
Use and Care Guide
Page 2
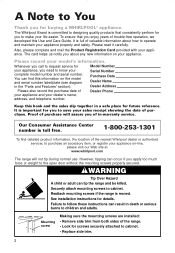
... installation instructions for you to save your appliance on the model and serial number label/plate (see diagram in -warranty service. Please record your appliance. Reattach mounting screws if the range is committed to designing quality products that you enjoy years of purchase. Please read it carefully. Proof of purchase will not tip during normal use. It is full of the nearest Whirlpool...
... installation instructions for you to save your appliance on the model and serial number label/plate (see diagram in -warranty service. Please record your appliance. Reattach mounting screws if the range is committed to designing quality products that you enjoy years of purchase. Please read it carefully. Proof of purchase will not tip during normal use. It is full of the nearest Whirlpool...

Use and Care Guide
Page 3
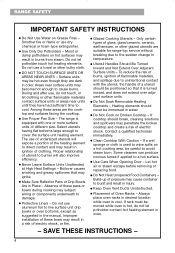
... kill or hurt you don't follow instructions. wWARNING You can be preceded by a qualified technician. • Never Use the Range for Warming or Heating the Room. • Do Not Leave Children Alone - TO CHECK IF THE DEVICES ARE INSTALLED PROPERLY, OPEN THE OVEN DOOR, REMOVE A SCREW AT THE BOTTOM OF EACH SIDE TRIM, REMOVE THE SIDE TRIMS, AND VERIFY THAT THE ANTITIP DEVICES...
... kill or hurt you don't follow instructions. wWARNING You can be preceded by a qualified technician. • Never Use the Range for Warming or Heating the Room. • Do Not Leave Children Alone - TO CHECK IF THE DEVICES ARE INSTALLED PROPERLY, OPEN THE OVEN DOOR, REMOVE A SCREW AT THE BOTTOM OF EACH SIDE TRIM, REMOVE THE SIDE TRIMS, AND VERIFY THAT THE ANTITIP DEVICES...
Use and Care Guide
Page 4
... contact surface units or areas near surface units may ignite. • Make Sure Reflector Pans or Drip Bowls Are in color. Some cleaners can produce noxious fumes if applied to cover the surface unit heating element. If rack must be immersed in oven. - Select utensils having flat bottoms large enough to a hot surface. • Use Care When Opening Door - Always place oven racks in temperature. • Utensil Handles Should Be Turned Inward...
... contact surface units or areas near surface units may ignite. • Make Sure Reflector Pans or Drip Bowls Are in color. Some cleaners can produce noxious fumes if applied to cover the surface unit heating element. If rack must be immersed in oven. - Select utensils having flat bottoms large enough to a hot surface. • Use Care When Opening Door - Always place oven racks in temperature. • Utensil Handles Should Be Turned Inward...
Use and Care Guide
Page 6
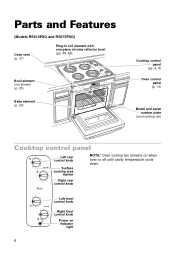
... down. TIME R LOCKED COOK STOP CLEAN TIME COOK TIME DELA ST AR Y T TIME STOP TIME TIMER SET TIMER OFF MIN HR CLOCK LIGHT START ENTER 5 SEC OFF CANCEL Cooktop control panel (pp. 6, 8) Oven control panel (p. 14) Model and serial number plate (on mounting rail) Cooktop control panel Left rear control knob Surface cooking area marker NOTE: Oven cooling fan remains on indicator light 6 Parts and Features (Models RS610PXG and RS675PXG) Oven vent (p. 37) Plug-in coil element with one-piece chrome reflector bowl (pp. 48, 49) Broil element (not shown) (p. 23) Bake element (p. 20...
... down. TIME R LOCKED COOK STOP CLEAN TIME COOK TIME DELA ST AR Y T TIME STOP TIME TIMER SET TIMER OFF MIN HR CLOCK LIGHT START ENTER 5 SEC OFF CANCEL Cooktop control panel (pp. 6, 8) Oven control panel (p. 14) Model and serial number plate (on mounting rail) Cooktop control panel Left rear control knob Surface cooking area marker NOTE: Oven cooling fan remains on indicator light 6 Parts and Features (Models RS610PXG and RS675PXG) Oven vent (p. 37) Plug-in coil element with one-piece chrome reflector bowl (pp. 48, 49) Broil element (not shown) (p. 23) Bake element (p. 20...
Use and Care Guide
Page 7
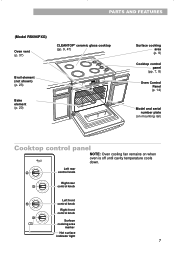
...surface indicator light 7 TIME R LOCKED COOK STOP CLEAN TIME BAKE CUS TOM BROIL AUT O CLEAN TEMP HEAT DELAY TIME D BAKE BROIL ON LOCKED COOK TIME DELA ST AR Y T TIME ST OP TIME TIMER SET TIMER OFF MIN HR CLOOCCKK LIGHT ST AR T ENTER 5 SEC OFF CANCEL Surface cooking area (p. 9) Cooktop control panel (pp. 7, 8) Oven Control Panel (p. 14) Model and serial number plate (on mounting rail) Cooktop control panel NOTE: Oven cooling fan remains on when oven is off until cavity temperature cools down. PARTS AND FEATURES (Model RS696PXG) Oven vent (p. 37) CLEANTOP® ceramic...
...surface indicator light 7 TIME R LOCKED COOK STOP CLEAN TIME BAKE CUS TOM BROIL AUT O CLEAN TEMP HEAT DELAY TIME D BAKE BROIL ON LOCKED COOK TIME DELA ST AR Y T TIME ST OP TIME TIMER SET TIMER OFF MIN HR CLOOCCKK LIGHT ST AR T ENTER 5 SEC OFF CANCEL Surface cooking area (p. 9) Cooktop control panel (pp. 7, 8) Oven Control Panel (p. 14) Model and serial number plate (on mounting rail) Cooktop control panel NOTE: Oven cooling fan remains on when oven is off until cavity temperature cools down. PARTS AND FEATURES (Model RS696PXG) Oven vent (p. 37) CLEANTOP® ceramic...
Use and Care Guide
Page 9
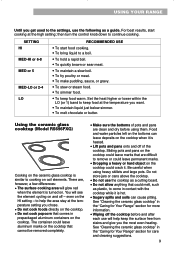
... off the cooktop before using heavy skillets and large pots. See "Cleaning the ceramic glass cooktop" in the "Caring for Your Range" section for care and cleaning suggestions. 9 then turn the control knob down to cooking on coil elements. There are clean and dry before and after each use will see the element cycling on and off - Sliding pots and pans on the cooktop could leave marks that comes in prepackaged aluminum...
... off the cooktop before using heavy skillets and large pots. See "Cleaning the ceramic glass cooktop" in the "Caring for Your Range" section for care and cleaning suggestions. 9 then turn the control knob down to cooking on coil elements. There are clean and dry before and after each use will see the element cycling on and off - Sliding pots and pans on the cooktop could leave marks that comes in prepackaged aluminum...

Use and Care Guide
Page 11
... enamel-on low settings. Place the edge of a ruler across the bottom of the cookware. Cookware tips • Select a pan that has boiled dry, on the bottom of metal or glass cookware which will scratch the ceramic glass surface. • Use flat bottom cookware for rough spots on a hot surface cooking area. The cookware could cause uneven heating and poor cooking results. •...
... enamel-on low settings. Place the edge of a ruler across the bottom of the cookware. Cookware tips • Select a pan that has boiled dry, on the bottom of metal or glass cookware which will scratch the ceramic glass surface. • Use flat bottom cookware for rough spots on a hot surface cooking area. The cookware could cause uneven heating and poor cooking results. •...

Use and Care Guide
Page 12
... bake time. Rack placement for even heat to reach all parts of the food will be centered in better baking. In opposite corners on the 2nd and 4th rack guides. Two sheets of cookies may be moved while the oven is directly over another. Place the rack so the top of the oven. Stagger pans so no pan is hot. • For best performance, cook on one rack. USING...
... bake time. Rack placement for even heat to reach all parts of the food will be centered in better baking. In opposite corners on the 2nd and 4th rack guides. Two sheets of cookies may be moved while the oven is directly over another. Place the rack so the top of the oven. Stagger pans so no pan is hot. • For best performance, cook on one rack. USING...
Use and Care Guide
Page 14
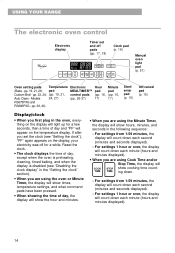
... when the oven is preheating, cleaning, timed baking, and when the display is disabled (see "Setting the clock"), "PF" again appears on the temperature display. pp. 19, 21, 26; Models 24, 27) (pp. 26-37) 17) 17) RS675PXG and RS696PXG - TIMER STOP LOCKED CLEAN COOK TIME TIMER TIMER SET OFF CLOCK LIGHT BAKE CUSTOM AUTO BROIL CLEAN TEMP COOK TIME DELAY START TIME STOP TIME HR MIN START ENTER 5 SEC OFF CANCEL Manual oven light pad (p. 51) Oven setting pads Temperature Electronic Hour Minute (Bake - For settings from 1-59 minutes, the display will...
... when the oven is preheating, cleaning, timed baking, and when the display is disabled (see "Setting the clock"), "PF" again appears on the temperature display. pp. 19, 21, 26; Models 24, 27) (pp. 26-37) 17) 17) RS675PXG and RS696PXG - TIMER STOP LOCKED CLEAN COOK TIME TIMER TIMER SET OFF CLOCK LIGHT BAKE CUSTOM AUTO BROIL CLEAN TEMP COOK TIME DELAY START TIME STOP TIME HR MIN START ENTER 5 SEC OFF CANCEL Manual oven light pad (p. 51) Oven setting pads Temperature Electronic Hour Minute (Bake - For settings from 1-59 minutes, the display will...
Use and Care Guide
Page 19
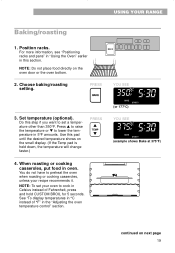
... CUSTOM BROIL for 5 seconds. USING YOUR RANGE Baking/roasting 1. Position racks. ELECTRONIC OVEN CONTROL BAKE CUSTOM BROIL BAKE C F HEAT DELAY BAKE ON TIMED BROIL LOCKED? You do not have to preheat the oven when roasting or cooking casseroles, unless your oven to cook in Celsius instead of °F" in this section. For more information, see "Positioning racks and pans" in "Using the Oven" earlier in the "Adjusting the oven temperature control" section. PRESS BAKE 3. continued on the oven door or the oven bottom. 2. When roasting or cooking...
... CUSTOM BROIL for 5 seconds. USING YOUR RANGE Baking/roasting 1. Position racks. ELECTRONIC OVEN CONTROL BAKE CUSTOM BROIL BAKE C F HEAT DELAY BAKE ON TIMED BROIL LOCKED? You do not have to preheat the oven when roasting or cooking casseroles, unless your oven to cook in Celsius instead of °F" in this section. For more information, see "Positioning racks and pans" in "Using the Oven" earlier in the "Adjusting the oven temperature control" section. PRESS BAKE 3. continued on the oven door or the oven bottom. 2. When roasting or cooking...
Use and Care Guide
Page 20
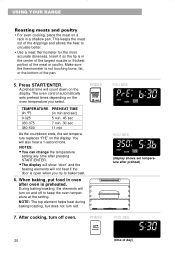
... (display shows set temperature replaces "PrE" on the display. USING YOUR RANGE Roasting meats and poultry • For even cooking, place the meat on a rack in oven after oven is preheated. Insert it so the tip is in min and sec) 5 min 45 sec 7 min 30 sec 11 min As the countdown ends, the set temperature after pressing START/ENTER. • The display will show "door" and the heating elements...
... (display shows set temperature replaces "PrE" on the display. USING YOUR RANGE Roasting meats and poultry • For even cooking, place the meat on a rack in oven after oven is preheated. Insert it so the tip is in min and sec) 5 min 45 sec 7 min 30 sec 11 min As the countdown ends, the set temperature after pressing START/ENTER. • The display will show "door" and the heating elements...
Use and Care Guide
Page 21
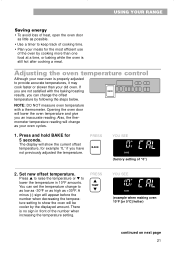
The display will change as your oven cycles. 1. You can change to as low as -30°F or as high as +30°F. Set new offset temperature. There is still hot after cooking a meal. ELECTRONIC OVEN CONTROL BAKE CUSTOM BROIL BAKE C F HEAT DELAY BAKE ON TIMED BROIL LOCKED? Press and hold BAKE for example "0," if you have not previously adjusted the temperature. PRESS BAKE YOU SEE F BAKE (factory setting of "0") 2. Adjusting the oven temperature control Although your new oven is properly adjusted to provide...
The display will change as your oven cycles. 1. You can change to as low as -30°F or as high as +30°F. Set new offset temperature. There is still hot after cooking a meal. ELECTRONIC OVEN CONTROL BAKE CUSTOM BROIL BAKE C F HEAT DELAY BAKE ON TIMED BROIL LOCKED? Press and hold BAKE for example "0," if you have not previously adjusted the temperature. PRESS BAKE YOU SEE F BAKE (factory setting of "0") 2. Adjusting the oven temperature control Although your new oven is properly adjusted to provide...

Use and Care Guide
Page 24
... cuts and unevenly shaped pieces of day) YOU SEE F HEAT ON BROIL (example shows Broil at 325°F) • If you use lower broiling temperatures. NOTE: If the Temp pad is done, turn off oven. When broiling is held down, the temperature will change faster. PRESS CUSTOM BROIL TEMP YOU SEE (time of meat, fish and poultry may cook better if you want food to broil slower from the start...
... cuts and unevenly shaped pieces of day) YOU SEE F HEAT ON BROIL (example shows Broil at 325°F) • If you use lower broiling temperatures. NOTE: If the Temp pad is done, turn off oven. When broiling is held down, the temperature will change faster. PRESS CUSTOM BROIL TEMP YOU SEE (time of meat, fish and poultry may cook better if you want food to broil slower from the start...

Use and Care Guide
Page 27
... temperature shows on next page 27 Do this pad until the correct time shows on the display. Start oven. Press s to raise the temperature or t to set a temperature other than 1 hour) or in 5°F amounts. PRESS COOK TIME YOU SEE F BAKE (example shows Bake at 375°F [or 191°C]) YOU SEE F BAKE COOK TIME 5. Set cook time. Press the "up" (v) or "down , the temperature will change faster.) PRESS TEMP 4. USING YOUR RANGE...
... temperature shows on next page 27 Do this pad until the correct time shows on the display. Start oven. Press s to raise the temperature or t to set a temperature other than 1 hour) or in 5°F amounts. PRESS COOK TIME YOU SEE F BAKE (example shows Bake at 375°F [or 191°C]) YOU SEE F BAKE COOK TIME 5. Set cook time. Press the "up" (v) or "down , the temperature will change faster.) PRESS TEMP 4. USING YOUR RANGE...
Use and Care Guide
Page 34
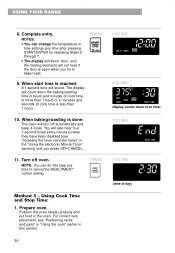
... will not heat if the door is less than 1 hour) or in the "Using the electronic Minute Timer" section]) until you try to cancel the MEALTIMER™ control setting. PRESS START ENTER 5 SEC 9. Using Cook Time and Stop Time: 1. Complete entry. NOTE: You can change the temperature or time settings any time to bake/roast. When start time is done: The oven will count down cook time) YOU SEE COOK TIME YOU SEE (time of day...
... will not heat if the door is less than 1 hour) or in the "Using the electronic Minute Timer" section]) until you try to cancel the MEALTIMER™ control setting. PRESS START ENTER 5 SEC 9. Using Cook Time and Stop Time: 1. Complete entry. NOTE: You can change the temperature or time settings any time to bake/roast. When start time is done: The oven will count down cook time) YOU SEE COOK TIME YOU SEE (time of day...
Use and Care Guide
Page 44
... or oven cleaners. • Wash, rinse and dry with soft cloth. • Non-abrasive plastic scrubbing pad • Gently clean around the model and serial plate; too much scrubbing could remove the numbers. Food spills containing acids, such as gasoline near this appliance. Refer to instructions on panel. do not spray directly on all spills and clean. Ceramic glass cooktop (Model RS696PXG) Coil Elements (Models RS610PXG...
... or oven cleaners. • Wash, rinse and dry with soft cloth. • Non-abrasive plastic scrubbing pad • Gently clean around the model and serial plate; too much scrubbing could remove the numbers. Food spills containing acids, such as gasoline near this appliance. Refer to instructions on panel. do not spray directly on all spills and clean. Ceramic glass cooktop (Model RS696PXG) Coil Elements (Models RS610PXG...

Use and Care Guide
Page 50
... surface. 50 Push in frame. Close the door. CARING FOR YOUR RANGE Removing the oven door For normal use of your oven, you do not need help. Do not lift and carry the door by the handle. Insert small end of similar diameter may need to remove. 4. However, if you have not installed it will shut. To replace: To remove: 1. Remove the door removal pins from each door hinge. 3. Open the door...
... surface. 50 Push in frame. Close the door. CARING FOR YOUR RANGE Removing the oven door For normal use of your oven, you do not need help. Do not lift and carry the door by the handle. Insert small end of similar diameter may need to remove. 4. However, if you have not installed it will shut. To replace: To remove: 1. Remove the door removal pins from each door hinge. 3. Open the door...
Use and Care Guide
Page 52
... following: Is the oven wired into a live circuit with the proper voltage? (See Installation Instructions.) w Have you still need help, see the clock time again, press and hold CLOCK for the start time. Wait for assistance or service. Replace the fuse or reset the circuit breaker. • You have not plugged in coil element(s) all the way. Push the control knob(s) in this manual describing the function you can find...
... following: Is the oven wired into a live circuit with the proper voltage? (See Installation Instructions.) w Have you still need help, see the clock time again, press and hold CLOCK for the start time. Wait for assistance or service. Replace the fuse or reset the circuit breaker. • You have not plugged in coil element(s) all the way. Push the control knob(s) in this manual describing the function you can find...
Use and Care Guide
Page 53
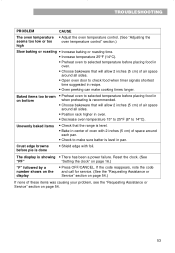
.... TROUBLESHOOTING PROBLEM CAUSE The oven temperature seems too low or too high • Adjust the oven temperature control. (See "Adjusting the oven temperature control" section.) Slow baking or roasting • Increase baking or roasting time. • Increase temperature 25°F (14°C). • Preheat oven to selected temperature before placing food in oven. • Choose bakeware that will allow 2 inches (5 cm) of air space around all sides. • Position rack higher in pan. Reset the clock...
.... TROUBLESHOOTING PROBLEM CAUSE The oven temperature seems too low or too high • Adjust the oven temperature control. (See "Adjusting the oven temperature control" section.) Slow baking or roasting • Increase baking or roasting time. • Increase temperature 25°F (14°C). • Preheat oven to selected temperature before placing food in oven. • Choose bakeware that will allow 2 inches (5 cm) of air space around all sides. • Position rack higher in pan. Reset the clock...
Use and Care Guide
Page 55
... Command pads 14, 15 Control knobs 8 Control lock 15 Disabling the clock display 16 Display 14 Hot surface indicator light 8 MEALTIMER 26 Minute timer 17 Power on indicator light 8 Starting 15 Surface cooking area markers 8 Tones 18 COOKWARE Canning 10 Characteristics of cookware materials....11 Tips 11 FEATURES 6, 7 LIGHTS 51 LOCK Control 15 Self-cleaning cycle 40, 41 MODEL AND SERIAL NUMBER 2 OVEN TEMPERATURE Adjusting 21 Setting 19, 24, 27, 29, 30, 33, 35 OVEN VENT 37 PANS 12 PARTS 6, 7 RACKS 12 REMOVING THE OVEN DOOR 50 ROASTING Aluminum foil...
... Command pads 14, 15 Control knobs 8 Control lock 15 Disabling the clock display 16 Display 14 Hot surface indicator light 8 MEALTIMER 26 Minute timer 17 Power on indicator light 8 Starting 15 Surface cooking area markers 8 Tones 18 COOKWARE Canning 10 Characteristics of cookware materials....11 Tips 11 FEATURES 6, 7 LIGHTS 51 LOCK Control 15 Self-cleaning cycle 40, 41 MODEL AND SERIAL NUMBER 2 OVEN TEMPERATURE Adjusting 21 Setting 19, 24, 27, 29, 30, 33, 35 OVEN VENT 37 PANS 12 PARTS 6, 7 RACKS 12 REMOVING THE OVEN DOOR 50 ROASTING Aluminum foil...


