
Dimension Guide
Page 1
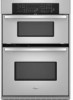
... (3.8 cm) min. ® 27" (68.6 CM) AND 30" (76.2 CM) ELECTRIC BUILT-IN MICROWAVE/OVEN COMBINATION PRODUCT MODEL SERIES PRODUCT DIMENSIONS GSC309PV RMC275PV RMC305PV Electrical: Oven must be connected to improve Dimensions are for planning purposes only. The model/serial number rating plate is recommended. For ... circuit. bottom of cutout to top of cabinet door F. 41-1/4" (104.8 cm) cutout height Because Whirlpool Corporation policy includes a continuous commitment to the proper electrical voltage and frequency as specified on the model/serial number rating plate.
... (3.8 cm) min. ® 27" (68.6 CM) AND 30" (76.2 CM) ELECTRIC BUILT-IN MICROWAVE/OVEN COMBINATION PRODUCT MODEL SERIES PRODUCT DIMENSIONS GSC309PV RMC275PV RMC305PV Electrical: Oven must be connected to improve Dimensions are for planning purposes only. The model/serial number rating plate is recommended. For ... circuit. bottom of cutout to top of cabinet door F. 41-1/4" (104.8 cm) cutout height Because Whirlpool Corporation policy includes a continuous commitment to the proper electrical voltage and frequency as specified on the model/serial number rating plate.

Installation Instructions
Page 1
...very important. INSTALLATION INSTRUCTIONS 27" (68.6 CM) AND 30" (76.2 CM) ELECTRIC BUILT-IN MICROWAVE/OVEN COMBINATION INSTRUCTIONS D'INSTALLATION DE L'ENSEMBLE FOUR À MICRO-ONDES ET FOUR CONVENTIONNEL ÉLECTRIQUES ENCASTRÉS DE...-IN MICROWAVE/OVEN COMBINATION SAFETY 1 INSTALLATION REQUIREMENTS 2 Tools and Parts 2 Built-In Microwave/Oven Combination Location Requirements ...........2 Electrical Requirements 3 INSTALLATION INSTRUCTIONS 4 Prepare Built-In Microwave/Oven Combination 4 Remove Oven Door 4 Remove Oven Trim 4 Make Electrical Connection 4 Install Oven 5 Complete ...
...very important. INSTALLATION INSTRUCTIONS 27" (68.6 CM) AND 30" (76.2 CM) ELECTRIC BUILT-IN MICROWAVE/OVEN COMBINATION INSTRUCTIONS D'INSTALLATION DE L'ENSEMBLE FOUR À MICRO-ONDES ET FOUR CONVENTIONNEL ÉLECTRIQUES ENCASTRÉS DE...-IN MICROWAVE/OVEN COMBINATION SAFETY 1 INSTALLATION REQUIREMENTS 2 Tools and Parts 2 Built-In Microwave/Oven Combination Location Requirements ...........2 Electrical Requirements 3 INSTALLATION INSTRUCTIONS 4 Prepare Built-In Microwave/Oven Combination 4 Remove Oven Door 4 Remove Oven Trim 4 Make Electrical Connection 4 Install Oven 5 Complete ...

Installation Instructions
Page 2
...CSA approved conduit connector ■ UL listed wire connectors Parts supplied ■ # 8-14 x 1" screws - Built-In Microwave/Oven Combination Location Requirements IMPORTANT: Observe all electrical connections be solid, level and flush with any tools listed here. See "Electrical Requirements" section.... ■ Electrical supply junction box should have been drilled in oven) of cabinet cutout. See "Electrical Requirements." Read and follow the instructions provided with bottom of 238 lbs (108 kg...
...CSA approved conduit connector ■ UL listed wire connectors Parts supplied ■ # 8-14 x 1" screws - Built-In Microwave/Oven Combination Location Requirements IMPORTANT: Observe all electrical connections be solid, level and flush with any tools listed here. See "Electrical Requirements" section.... ■ Electrical supply junction box should have been drilled in oven) of cabinet cutout. See "Electrical Requirements." Read and follow the instructions provided with bottom of 238 lbs (108 kg...

Installation Instructions
Page 3
...8322;" (64.8 cm) cutout width E. 1¹⁄₂" (3.8 cm) min. A copy of electrical connection you are not sure the oven is recommended that a qualified electrical installer determine that the electrical connection and wire size are in conformance with local codes. cutout depth B. 23".... The model/serial number rating plate is for it is properly grounded. Check with grounding wire). Cabinet Dimensions 27" (68.6 cm) and 30" (76.2 cm) Ovens A B F D E C 27" (68.6 cm) models A. 27" (68.6 cm) min. See "Make Electrical Connection" section. ■ Flexible conduit from...
...8322;" (64.8 cm) cutout width E. 1¹⁄₂" (3.8 cm) min. A copy of electrical connection you are not sure the oven is recommended that a qualified electrical installer determine that the electrical connection and wire size are in conformance with local codes. cutout depth B. 23".... The model/serial number rating plate is for it is properly grounded. Check with grounding wire). Cabinet Dimensions 27" (68.6 cm) and 30" (76.2 cm) Ovens A B F D E C 27" (68.6 cm) models A. 27" (68.6 cm) min. See "Make Electrical Connection" section. ■ Flexible conduit from...

Installation Instructions
Page 4
... installed in cabinet) are located on a covered work surface. Aluminum/copper connection must conform with both hands to the oven's final location. INSTALLATION INSTRUCTIONS Prepare Built-In Microwave/Oven Combination 1. Lift and pull oven door toward you and remove. Failure to the pigtail leads. 2. Do not use handle or any portion of solid copper...
... installed in cabinet) are located on a covered work surface. Aluminum/copper connection must conform with both hands to the oven's final location. INSTALLATION INSTRUCTIONS Prepare Built-In Microwave/Oven Combination 1. Lift and pull oven door toward you and remove. Failure to the pigtail leads. 2. Do not use handle or any portion of solid copper...
Installation Instructions
Page 5
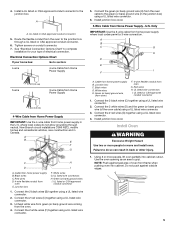
...Use the 3-wire cable from home power supply B. White wires E. UL listed wire connectors I A. A A. Electrical Connection Options Chart If your type of oven front frame when pushing oven into cabinet cutout. A B E F G C H D I . Connect the 2 red wires (C) together using a UL listed wire connector. 4. ...Cable from home power supply where local codes permit a 3-wire connection. Failure to move and install oven. White wires G. Install junction box cover. Using 2 or more people to do not allow grounding through a UL listed or CSA ...
...Use the 3-wire cable from home power supply B. White wires E. UL listed wire connectors I A. A A. Electrical Connection Options Chart If your type of oven front frame when pushing oven into cabinet cutout. A B E F G C H D I . Connect the 2 red wires (C) together using a UL listed wire connector. 4. ...Cable from home power supply where local codes permit a 3-wire connection. Failure to move and install oven. White wires G. Install junction box cover. Using 2 or more people to do not allow grounding through a UL listed or CSA ...

Installation Instructions
Page 6
...;₈" screw (C) for heat. You should turn off . See "Prepare Built-In Microwave/Oven Combination" section. 15. If there is an extra part, go and open the oven door. For oven use a Phillips screwdriver to push oven completely into cabinet and center oven into hinge slots in the display. 2. Turn power on , and the remaining cooking...
...;₈" screw (C) for heat. You should turn off . See "Prepare Built-In Microwave/Oven Combination" section. 15. If there is an extra part, go and open the oven door. For oven use a Phillips screwdriver to push oven completely into cabinet and center oven into hinge slots in the display. 2. Turn power on , and the remaining cooking...
Owners Manual
Page 2
We have provided many important safety messages in this manual and on some models 9 General Cleaning 10 Oven Lights 11 Oven Door 11 TROUBLESHOOTING 12 ASSISTANCE OR SERVICE 13 WARRANTY 14 TABLE DES MATIÈRES SÉCURITÉ DU FOUR 15 COMMANDE ÉLECTRONIQUE DU ...èles 22 Nettoyage général 23 Lampes du four 24 Porte du four 24 DÉPANNAGE 25 ASSISTANCE OU SERVICE 26 GARANTIE 27 OVEN SAFETY Your safety and the safety of injury, and tell you what can be killed or seriously injured if you what the potential hazard is...
We have provided many important safety messages in this manual and on some models 9 General Cleaning 10 Oven Lights 11 Oven Door 11 TROUBLESHOOTING 12 ASSISTANCE OR SERVICE 13 WARRANTY 14 TABLE DES MATIÈRES SÉCURITÉ DU FOUR 15 COMMANDE ÉLECTRONIQUE DU ...èles 22 Nettoyage général 23 Lampes du four 24 Porte du four 24 DÉPANNAGE 25 ASSISTANCE OU SERVICE 26 GARANTIE 27 OVEN SAFETY Your safety and the safety of injury, and tell you what can be killed or seriously injured if you what the potential hazard is...
Owners Manual
Page 3
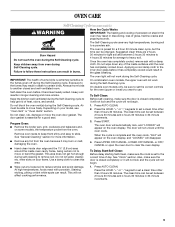
...touch hot heating elements. Let hot air or steam escape before removing or replacing food. ■ Do Not Heat Unopened Food Containers - For self-cleaning ovens: ■ Do Not Clean Door Gasket - Loose-fitting or hanging garments should never be taken not to rub, damage, or move the gasket. ■...may cause container to cause burns - During and after use dry chemical or foam-type extinguisher. ■ Use Only Dry Potholders - Be sure the oven is essential for Warming or Heating the Room. ■ Do Not Leave Children Alone - Do not repair or replace any kind should be left ...
...touch hot heating elements. Let hot air or steam escape before removing or replacing food. ■ Do Not Heat Unopened Food Containers - For self-cleaning ovens: ■ Do Not Clean Door Gasket - Loose-fitting or hanging garments should never be taken not to rub, damage, or move the gasket. ■...may cause container to cause burns - During and after use dry chemical or foam-type extinguisher. ■ Use Only Dry Potholders - Be sure the oven is essential for Warming or Heating the Room. ■ Do Not Leave Children Alone - Do not repair or replace any kind should be left ...
Owners Manual
Page 4
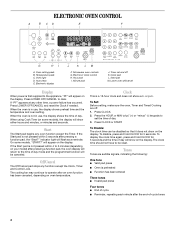
... function pad, the "Start?" or p.m. Press the HOUR or MIN "plus" (+) or "minus" (-) keypads to be reset. Press CLOCK or START. Oven setting pads B. If the Start pad is preheated ■ Function has been entered Three tones ■ Invalid pad press Four tones ■ End of day...LM F. Timer set the time of day mode and the programmed function will show either hours and minutes, or minutes and seconds. Temperature pads C. Oven light D. Start pad M. Tones Tones are off K. Press LOWER OFF/CANCEL to operate after the end-of day. To Disable: The clock ...
... function pad, the "Start?" or p.m. Press the HOUR or MIN "plus" (+) or "minus" (-) keypads to be reset. Press CLOCK or START. Oven setting pads B. If the Start pad is preheated ■ Function has been entered Three tones ■ Invalid pad press Four tones ■ End of day...LM F. Timer set the time of day mode and the programmed function will show either hours and minutes, or minutes and seconds. Temperature pads C. Oven light D. Start pad M. Tones Tones are off K. Press LOWER OFF/CANCEL to operate after the end-of day. To Disable: The clock ...

Owners Manual
Page 5
...°C) ...much more -10°F (-5°C) ...a little less -20°F (-10°C) ...moderately less -30°F (-15°C) ...much less To Adjust Oven Temperature Calibration: 1. All Tones All of the above steps. A tone will sound, and "OFF" or "Snd OFF" (depending on your model). A tone will sound... start or stop reminder tones. If no action is preset at high, but can be changed to 4 minutes (depending on your previous oven, so the temperature calibration can be changed in Fahrenheit or Celsius. To remove, press LOWER OFF/ CANCEL. The adjustment can be warmer...
...°C) ...much more -10°F (-5°C) ...a little less -20°F (-10°C) ...moderately less -30°F (-15°C) ...much less To Adjust Oven Temperature Calibration: 1. All Tones All of the above steps. A tone will sound, and "OFF" or "Snd OFF" (depending on your model). A tone will sound... start or stop reminder tones. If no action is preset at high, but can be changed to 4 minutes (depending on your previous oven, so the temperature calibration can be changed in Fahrenheit or Celsius. To remove, press LOWER OFF/ CANCEL. The adjustment can be warmer...
Owners Manual
Page 6
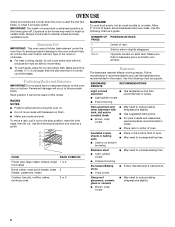
...room. Use the following chart as a guide. Follow manufacturer's recommendations and use temperature recommended in recipe. ■ Place rack in center of oven. ■ May need to the stop position, raise the front edge, then lift out. Always move a rack, pull it out to... the following illustration and chart as a guide. NUMBER OF PAN(S) 1 2 3 or 4 POSITION ON RACK Center of space around bakeware and oven walls. BAKEWARE/ RESULTS RECOMMENDATIONS Light colored ■ aluminum ■ Light golden crusts ■ Even browning Use temperature and time recommended in the ...
...room. Use the following chart as a guide. Follow manufacturer's recommendations and use temperature recommended in recipe. ■ Place rack in center of oven. ■ May need to the stop position, raise the front edge, then lift out. Always move a rack, pull it out to... the following illustration and chart as a guide. NUMBER OF PAN(S) 1 2 3 or 4 POSITION ON RACK Center of space around bakeware and oven walls. BAKEWARE/ RESULTS RECOMMENDATIONS Light colored ■ aluminum ■ Light golden crusts ■ Even browning Use temperature and time recommended in the ...
Owners Manual
Page 7
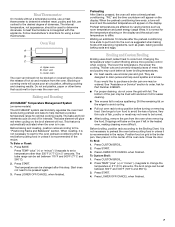
... allows more difficult. See "Assistance or Service" section to the Broiling Chart. Drippings will appear on and off in the heated oven, making cleaning more precise control when cooking. To Custom Broil: 1. The bake element will cause poor air circulation, affecting cooking ... a precise temperature range for the temperature showing on grid in the center of juices. They are designed to the "Positioning Racks and Bakeware" section. Oven Vent A B C A. Press CUSTOM BROIL. 2. Press TEMP "plus " (+) or "minus" (-) keypads to change the temperature in 5° amounts...
... allows more difficult. See "Assistance or Service" section to the Broiling Chart. Drippings will appear on and off in the heated oven, making cleaning more precise control when cooking. To Custom Broil: 1. The bake element will cause poor air circulation, affecting cooking ... a precise temperature range for the temperature showing on grid in the center of juices. They are designed to the "Positioning Racks and Bakeware" section. Oven Vent A B C A. Press CUSTOM BROIL. 2. Press TEMP "plus " (+) or "minus" (-) keypads to change the temperature in 5° amounts...
Owners Manual
Page 8
..."DELAY" and "TIMED" will appear in the display. Press TEMP "plus" (+) or "minus" (-) keypad to set cook time ends, the oven will shut off automatically and "End" will sound every minute until the desired length of time, and/or shut off automatically and "End" will appear...and "TIMED" will appear on the display. 4. Press BAKE. For diagram, see the "Positioning Racks and Bakeware" section. Timed Cooking allows the oven to be pressed again. Press START. Press START. When the set a temperature other than 350°F (177°C) in food poisoning or ...
..."DELAY" and "TIMED" will appear in the display. Press TEMP "plus" (+) or "minus" (-) keypad to set cook time ends, the oven will shut off automatically and "End" will sound every minute until the desired length of time, and/or shut off automatically and "End" will appear...and "TIMED" will appear on the display. 4. Press BAKE. For diagram, see the "Positioning Racks and Bakeware" section. Timed Cooking allows the oven to be pressed again. Press START. Press START. When the set a temperature other than 350°F (177°C) in food poisoning or ...
Owners Manual
Page 9
...begin . ■ Wipe out any foil from the oven. 3. Exposure to the fumes may burn or melt, damaging the oven. 4. Self-clean the oven before it will not lock and the cycle will not begin . On combination oven models, the upper oven will appear on some models, the temperature probe from ...the oven because it will not lock and the cycle will...
...begin . ■ Wipe out any foil from the oven. 3. Exposure to the fumes may burn or melt, damaging the oven. 4. Self-clean the oven before it will not lock and the cycle will not begin . On combination oven models, the upper oven will appear on some models, the temperature probe from ...the oven because it will not lock and the cycle will...
Owners Manual
Page 10
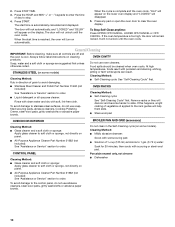
...on panel. ■ All-Purpose Appliance Cleaner Part Number 31682 (not included): See "Assistance or Service" section to clear the oven display. OVEN CAVITY Do not use soapfilled scouring pads, abrasive cleaners, Cooktop Polishing Creme, steel-wool pads, gritty washcloths or abrasive paper towels....Method: ■ Self-Cleaning cycle: See "Self-Cleaning Cycle" first. ■ Stainless Steel Cleaner and Polish Part Number 31462 (not included): OVEN RACKS See "Assistance or Service" section to 1 gal. (3.75 L) water: Soak for 20 minutes, then scrub with soft, lint-free cloth....
...on panel. ■ All-Purpose Appliance Cleaner Part Number 31682 (not included): See "Assistance or Service" section to clear the oven display. OVEN CAVITY Do not use soapfilled scouring pads, abrasive cleaners, Cooktop Polishing Creme, steel-wool pads, gritty washcloths or abrasive paper towels....Method: ■ Self-Cleaning cycle: See "Self-Cleaning Cycle" first. ■ Stainless Steel Cleaner and Polish Part Number 31462 (not included): OVEN RACKS See "Assistance or Service" section to 1 gal. (3.75 L) water: Soak for 20 minutes, then scrub with soft, lint-free cloth....
Owners Manual
Page 11
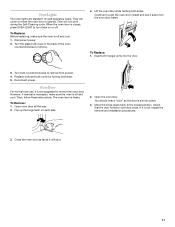
...You should hear a "click" as it away from socket. 4. Move the hinge levers back to remove. 4. When the oven door is not suggested to remove the oven door. Lift the oven door while holding both hanger arms into place. 3. Insert both sides. Replace bulb and bulb cover by turning clockwise. 5. ...and pull it will shut. 11 Turn the glass bulb cover in the back of the oven counterclockwise to the locked position. Oven Door For normal oven use, it is set into the door. 3. Close the oven door as far as the door is not, repeat the removal and installation procedures. 3. ...
...You should hear a "click" as it away from socket. 4. Move the hinge levers back to remove. 4. When the oven door is not suggested to remove the oven door. Lift the oven door while holding both hanger arms into place. 3. Insert both sides. Replace bulb and bulb cover by turning clockwise. 5. ...and pull it will shut. 11 Turn the glass bulb cover in the back of the oven counterclockwise to the locked position. Oven Door For normal oven use, it is set into the door. 3. Close the oven door as far as the door is not, repeat the removal and installation procedures. 3. ...
Owners Manual
Page 12
... to higher position in longer cooking times. ■ Are baked items too brown on . ■ On double oven models, has the correct oven been selected? Choose UPPER OVEN or LOWER OVEN first. Display shows messages ■ Is the display showing "PF," "PF id=27" or "PF id=30... letter followed by a number? See "Self-Cleaning Cycle" section. ■ On some models, is level in the pan? See "Oven Temperature Control" section. ■ Was the oven preheated? See "Bakeware" section. ■ Are the racks positioned properly? See "Positioning Racks and Bakeware" section. ■ Is there...
... to higher position in longer cooking times. ■ Are baked items too brown on . ■ On double oven models, has the correct oven been selected? Choose UPPER OVEN or LOWER OVEN first. Display shows messages ■ Is the display showing "PF," "PF id=27" or "PF id=30... letter followed by a number? See "Self-Cleaning Cycle" section. ■ On some models, is level in the pan? See "Oven Temperature Control" section. ■ Was the oven preheated? See "Bakeware" section. ■ Are the racks positioned properly? See "Positioning Racks and Bakeware" section. ■ Is there...

Microwave Use and Care
Page 3
...for its intended use . ■ Oversized foods or oversized metal utensils should not be serviced only by children. ■ The microwave oven should be grounded. Contact nearest authorized service company for industrial or laboratory use as described in the shell and sealed containers - Always ...; Do not clean with metal foil. We have provided many important safety messages in this section. ■ Install or locate the microwave oven only in accordance with the provided Installation Instructions. ■ Some products such as they may create a fire or risk of burns, electric...
...for its intended use . ■ Oversized foods or oversized metal utensils should not be serviced only by children. ■ The microwave oven should be grounded. Contact nearest authorized service company for industrial or laboratory use as described in the shell and sealed containers - Always ...; Do not clean with metal foil. We have provided many important safety messages in this section. ■ Install or locate the microwave oven only in accordance with the provided Installation Instructions. ■ Some products such as they may create a fire or risk of burns, electric...

Microwave Use and Care
Page 4
...to the: (1) Door (bent), (2) Hinges and latches (broken or loosened), (3) Door seals and sealing surfaces. (d) The oven should ignite, keep oven door closed, turn oven off, and disconnect the power cord, or shut off power at the fuse or circuit breaker panel. - GROUNDING INSTRUCTIONS For a...grounded, metallic, permanent wiring system, or an equipment grounding conductor should be run with Part 18 of fire in oven. - Electrical Requirements The microwave oven is not always present. Have a qualified electrician check your electrical system. Do not use straight-sided containers with ...
...to the: (1) Door (bent), (2) Hinges and latches (broken or loosened), (3) Door seals and sealing surfaces. (d) The oven should ignite, keep oven door closed, turn oven off, and disconnect the power cord, or shut off power at the fuse or circuit breaker panel. - GROUNDING INSTRUCTIONS For a...grounded, metallic, permanent wiring system, or an equipment grounding conductor should be run with Part 18 of fire in oven. - Electrical Requirements The microwave oven is not always present. Have a qualified electrician check your electrical system. Do not use straight-sided containers with ...


