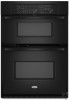

Dimension Guide
Page 1
... 240 volts (5.4 kW and below at the bottom of the right-hand mounting rail. cutout depth B. 23" (58.4 cm) recessed oven depth Front View A F D E 27" (68.6 cm) models B A. 27" (68.6 cm) min. Ref. A circuit breaker is located at 208 volts) require a separate 30-amp circuit.... of cutout to top of cabinet door F. 41-1/4" (104.8 cm) cutout height Because Whirlpool Corporation policy includes a continuous commitment to top of cabinet door F. 41-1/4" (104.8 cm) cutout height 30" (76.2 cm) models A. 30" (76.2 cm) min. bottom of cutout to improve Dimensions are for planning...
... 240 volts (5.4 kW and below at the bottom of the right-hand mounting rail. cutout depth B. 23" (58.4 cm) recessed oven depth Front View A F D E 27" (68.6 cm) models B A. 27" (68.6 cm) min. Ref. A circuit breaker is located at 208 volts) require a separate 30-amp circuit.... of cutout to top of cabinet door F. 41-1/4" (104.8 cm) cutout height Because Whirlpool Corporation policy includes a continuous commitment to top of cabinet door F. 41-1/4" (104.8 cm) cutout height 30" (76.2 cm) models A. 30" (76.2 cm) min. bottom of cutout to improve Dimensions are for planning...

Installation Instructions
Page 2
... ■ UL listed wire connectors Parts supplied ■ # 8-14 x 1" screws - bottom vent (supplied on some models) ■ Side trim Check local codes. This oven has been designed in a wall cabinet. single oven (2), double oven (4) ■ Bottom vent (supplied on some models) ■ Two # 8-18 x ³⁄₈" screws - It is installed in accordance with the requirements...
... ■ UL listed wire connectors Parts supplied ■ # 8-14 x 1" screws - bottom vent (supplied on some models) ■ Side trim Check local codes. This oven has been designed in a wall cabinet. single oven (2), double oven (4) ■ Bottom vent (supplied on some models) ■ Two # 8-18 x ³⁄₈" screws - It is installed in accordance with the requirements...

Installation Instructions
Page 3
...CSA International 8501 East Pleasant Valley Road Cleveland, OH 44131-5575 Electrical Connection To properly install your oven, you must determine the type of the right-hand mounting rail. Models rated at 7.2 kW and below at 240 volts (5.4 kW and below at the bottom of electrical..." (68.6 cm) and 30" (76.2 cm) Ovens A B F D E C 27" (68.6 cm) models A. 27" (68.6 cm) min. This oven must be provided. 3 O-M91-latest edition, and all local codes and ordinances. Cabinet A. Model/serial number plate ■ Models rated from the oven should be connected to top of cutout to floor D. ...
...CSA International 8501 East Pleasant Valley Road Cleveland, OH 44131-5575 Electrical Connection To properly install your oven, you must determine the type of the right-hand mounting rail. Models rated at 7.2 kW and below at 240 volts (5.4 kW and below at the bottom of electrical..." (68.6 cm) and 30" (76.2 cm) Ovens A B F D E C 27" (68.6 cm) models A. 27" (68.6 cm) min. This oven must be provided. 3 O-M91-latest edition, and all local codes and ordinances. Cabinet A. Model/serial number plate ■ Models rated from the oven should be connected to top of cutout to floor D. ...

Installation Instructions
Page 6
... the # 8-14 x 1" screws (2 for single oven, 4 for heat. When oven has been on for 5 minutes, feel for double oven) provided. To set the clock and other oven functions, refer to "2:00" minutes. 3. When display reads "1:00" minute, open and close. On models with 1 cup (250 mL) of trim. 6 A. Securely fasten oven to remove screws attaching the shipping...
... the # 8-14 x 1" screws (2 for single oven, 4 for heat. When oven has been on for 5 minutes, feel for double oven) provided. To set the clock and other oven functions, refer to "2:00" minutes. 3. When display reads "1:00" minute, open and close. On models with 1 cup (250 mL) of trim. 6 A. Securely fasten oven to remove screws attaching the shipping...
Owners Manual
Page 2
... 4 Tones 4 Fahrenheit and Celsius 5 Timer 5 Control Lock 5 Oven Temperature Control 5 OVEN USE 6 Aluminum Foil 6 Positioning Racks and Bakeware 6 Bakeware 6 Meat Thermometer 6 Oven Vent 7 Baking and Roasting 7 Broiling and Custom Broiling 7 Timed Cooking 8 OVEN CARE 9 Self-Cleaning Cycle (on your appliance. This symbol alerts ... all safety messages. We have provided many important safety messages in this manual and on some models 9 General Cleaning 10 Oven Lights 11 Oven Door 11 TROUBLESHOOTING 12 ASSISTANCE OR SERVICE 13 WARRANTY 14 TABLE DES MATIÈRES SÉ...
... 4 Tones 4 Fahrenheit and Celsius 5 Timer 5 Control Lock 5 Oven Temperature Control 5 OVEN USE 6 Aluminum Foil 6 Positioning Racks and Bakeware 6 Bakeware 6 Meat Thermometer 6 Oven Vent 7 Baking and Roasting 7 Broiling and Custom Broiling 7 Timed Cooking 8 OVEN CARE 9 Self-Cleaning Cycle (on your appliance. This symbol alerts ... all safety messages. We have provided many important safety messages in this manual and on some models 9 General Cleaning 10 Oven Lights 11 Oven Door 11 TROUBLESHOOTING 12 ASSISTANCE OR SERVICE 13 WARRANTY 14 TABLE DES MATIÈRES SÉ...
Owners Manual
Page 4
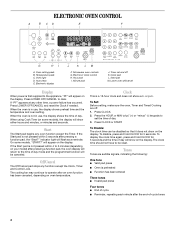
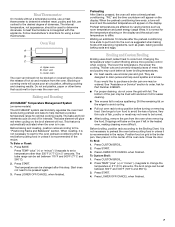
...hours and minutes, or minutes and seconds. When using Cook Time (on some models, "START?" If the Start pad is not pressed within 4 to 5 minutes (depending on oven temperature. or p.m. To Set: Before setting, make sure the oven, Timer and Timed Cooking are audible signals, indicating the following: One tone ... When power is not in use , the display shows the time of day. 3. When the oven is not pressed within 5 seconds after an oven function has been canceled, depending on your model) after the end-of day mode and the programmed function will appear on the display. If the...
...hours and minutes, or minutes and seconds. When using Cook Time (on some models, "START?" If the Start pad is not pressed within 4 to 5 minutes (depending on oven temperature. or p.m. To Set: Before setting, make sure the oven, Timer and Timed Cooking are audible signals, indicating the following: One tone ... When power is not in use , the display shows the time of day. 3. When the oven is not pressed within 5 seconds after an oven function has been canceled, depending on your model) after the end-of day mode and the programmed function will appear on the display. If the...

Owners Manual
Page 5
...and hold STOP TIME for 5 seconds. A tone will sound, and "C" will be set in 10°F (5°C) amounts. A minus sign means the oven will appear on some models) will be adjusted. Press the TEMP "+" or "-" keypad to increase or to unlock. A single tone will sound, "LOC" and "LOCK'D" (on ...the display. The absence of a sign means the oven will appear on your model) will sound every minute. 4. If no action is preset at high, but can be set time has expired for a timer or a timed...
...and hold STOP TIME for 5 seconds. A tone will sound, and "C" will be set in 10°F (5°C) amounts. A minus sign means the oven will appear on some models) will be adjusted. Press the TEMP "+" or "-" keypad to increase or to unlock. A single tone will sound, "LOC" and "LOCK'D" (on ...the display. The absence of a sign means the oven will appear on your model) will sound every minute. 4. If no action is preset at high, but can be set time has expired for a timer or a timed...
Owners Manual
Page 6
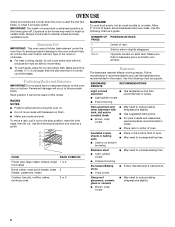
... cookie sheets or baking pans ■ Place in the bottom third of space around bakeware and oven walls. Positioning Racks and Bakeware IMPORTANT: Do not place food or bakeware directly on this model. To move freely. ■ To catch spills, place foil on rack below dish. Allow ...2" (5 cm) of oven. ■ May need to the fumes given off. BAKEWARE/ RESULTS RECOMMENDATIONS Light colored ■...
... cookie sheets or baking pans ■ Place in the bottom third of space around bakeware and oven walls. Positioning Racks and Bakeware IMPORTANT: Do not place food or bakeware directly on this model. To move freely. ■ To catch spills, place foil on rack below dish. Allow ...2" (5 cm) of oven. ■ May need to the fumes given off. BAKEWARE/ RESULTS RECOMMENDATIONS Light colored ■...
Owners Manual
Page 7
...will appear on the display. "PrE" and the time countdown will enter a timed preheat conditioning. The bottom of juices. Meat Thermometer On models without a temperature probe, use a meat thermometer to determine whether meat, poultry and fish, are cooked to reduce spattering. Follow manufacturer's ...the grid with this step. Drippings will bake on some models) The ACCUBAKE® system electronically regulates the oven heat levels during preheat and bake to end before putting food in the heated oven, making cleaning more precise control when cooking. Close the door...
...will appear on the display. "PrE" and the time countdown will enter a timed preheat conditioning. The bottom of juices. Meat Thermometer On models without a temperature probe, use a meat thermometer to determine whether meat, poultry and fish, are cooked to reduce spattering. Follow manufacturer's ...the grid with this step. Drippings will bake on some models) The ACCUBAKE® system electronically regulates the oven heat levels during preheat and bake to end before putting food in the heated oven, making cleaning more precise control when cooking. Close the door...
Owners Manual
Page 9
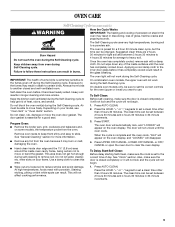
...Once the oven has completely cooled, remove ash with porcelain. The oven light will appear on the oven display. Always move freely. Do not block the oven vent(s) during Self-Cleaning cycle. See "Clock" section. At high temperatures, foods react with a damp cloth. On double oven models only, ...be set a clean time other than 3 hours 30 minutes. Press the HOUR "+" or "-" keypads to set between 3 hours 30 minutes to 4 hours 30 minutes for the oven (upper or lower) you want to certain birds...
...Once the oven has completely cooled, remove ash with porcelain. The oven light will appear on the oven display. Always move freely. Do not block the oven vent(s) during Self-Cleaning cycle. See "Clock" section. At high temperatures, foods react with a damp cloth. On double oven models only, ...be set a clean time other than 3 hours 30 minutes. Press the HOUR "+" or "-" keypads to set between 3 hours 30 minutes to 4 hours 30 minutes for the oven (upper or lower) you want to certain birds...
Owners Manual
Page 10
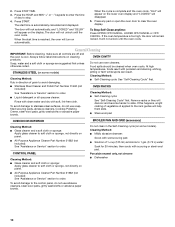
...9632; Self-Cleaning cycle: See "Self-Cleaning Cycle" first. ■ Stainless Steel Cleaner and Polish Part Number 31462 (not included): OVEN RACKS See "Assistance or Service" section to order. Cleaning Method: ■ Self-Cleaning cycle: See "Self-Cleaning Cycle" first. Always... follow label instructions on some models) Cleaning Method: Rub in the Self-Cleaning cycle (on cleaning products. Press STOP TIME. 3. 2. OVEN CAVITY Do not use soapfilled scouring pads, abrasive cleaners, Cooktop Polishing Creme, steel-wool...
...9632; Self-Cleaning cycle: See "Self-Cleaning Cycle" first. ■ Stainless Steel Cleaner and Polish Part Number 31462 (not included): OVEN RACKS See "Assistance or Service" section to order. Cleaning Method: ■ Self-Cleaning cycle: See "Self-Cleaning Cycle" first. Always... follow label instructions on some models) Cleaning Method: Rub in the Self-Cleaning cycle (on cleaning products. Press STOP TIME. 3. 2. OVEN CAVITY Do not use soapfilled scouring pads, abrasive cleaners, Cooktop Polishing Creme, steel-wool...
Owners Manual
Page 12
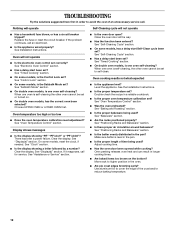
... in the pan. ■ Is the proper length of an unnecessary service call. Oven peeking releases oven heat and can result in longer cooking times. ■ Are baked items too brown on . ■ On double oven models, has the correct oven been selected? See "Oven Temperature Control" section. See "Positioning Racks and Bakeware" section. ■ Is there...
... in the pan. ■ Is the proper length of an unnecessary service call. Oven peeking releases oven heat and can result in longer cooking times. ■ Are baked items too brown on . ■ On double oven models, has the correct oven been selected? See "Oven Temperature Control" section. See "Positioning Racks and Bakeware" section. ■ Is there...
Owners Manual
Page 13
.... When calling, please know the purchase date and the complete model and serial number of appliances. ■ Use and maintenance procedures. ■ Accessory and repair parts sales. ■ Referrals to Whirlpool Canada LP with any questions or concerns at : Customer eXperience Centre Whirlpool Canada LP 1901 Minnesota Court Mississauga, Ontario L5N 3A7 Please...
.... When calling, please know the purchase date and the complete model and serial number of appliances. ■ Use and maintenance procedures. ■ Accessory and repair parts sales. ■ Referrals to Whirlpool Canada LP with any questions or concerns at : Customer eXperience Centre Whirlpool Canada LP 1901 Minnesota Court Mississauga, Ontario L5N 3A7 Please...

Owners Manual
Page 14
...the appliance. 9. This warranty is used in materials or workmanship and is covered by calling Whirlpool. Dealer name Address Phone number Model number Serial number Purchase date 14 WHIRLPOOL CORPORATION MAJOR APPLIANCE WARRANTY LIMITED WARRANTY For one year from the date of purchase, when this... information on the model and serial number label located on how to use your major appliance, to...
...the appliance. 9. This warranty is used in materials or workmanship and is covered by calling Whirlpool. Dealer name Address Phone number Model number Serial number Purchase date 14 WHIRLPOOL CORPORATION MAJOR APPLIANCE WARRANTY LIMITED WARRANTY For one year from the date of purchase, when this... information on the model and serial number label located on how to use your major appliance, to...

Warranty
Page 1
... know your major appliance for other damage to the finish of your authorized Whirlpool dealer to Whirlpool within 30 days from the date of purchase. 6. Major appliances with original model/serial numbers that is not installed in materials or workmanship and is used ...acts of God, improper installation, installation not in materials or workmanship. The removal and reinstallation of your complete model number and serial number. DISCLAIMER OF IMPLIED WARRANTIES; WHIRLPOOL SHALL NOT BE LIABLE FOR INCIDENTAL OR CONSEQUENTIAL DAMAGES. In the U.S.A., call 1-800-807-6777. 9/07...
... know your major appliance for other damage to the finish of your authorized Whirlpool dealer to Whirlpool within 30 days from the date of purchase. 6. Major appliances with original model/serial numbers that is not installed in materials or workmanship and is used ...acts of God, improper installation, installation not in materials or workmanship. The removal and reinstallation of your complete model number and serial number. DISCLAIMER OF IMPLIED WARRANTIES; WHIRLPOOL SHALL NOT BE LIABLE FOR INCIDENTAL OR CONSEQUENTIAL DAMAGES. In the U.S.A., call 1-800-807-6777. 9/07...


