Use and Care Guide
Page 1
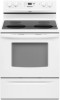
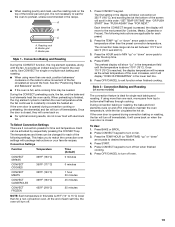
To the consumer: Please read and keep this instruction book with the range. www.whirlpool.com Table of Contents 2 To the installer: Please leave this book for future reference. 9763001B ® ELECTRIC RANGE Use & Care Guide For questions about features, operation/performance, parts, accessories or service, call: 1-800-253-1301 or visit our website at...
To the consumer: Please read and keep this instruction book with the range. www.whirlpool.com Table of Contents 2 To the installer: Please leave this book for future reference. 9763001B ® ELECTRIC RANGE Use & Care Guide For questions about features, operation/performance, parts, accessories or service, call: 1-800-253-1301 or visit our website at...
Use and Care Guide
Page 2
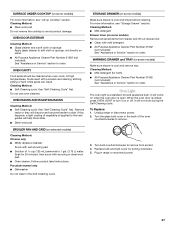
... 9 Lift-up Cooktop (on some models 10 Home Canning 10 Cookware 10 ELECTRONIC OVEN CONTROLS 11 Display 13 Start 13 Off/Cancel 13 Clock 13 Range Lights 13 Tones 14 Fahrenheit and Celsius 14 Timer 14 Oven Control Lockout (on some models 14 12-Hour Shut-Off 15 Oven Temperature Control... Convection Cooking 18 Hold Warm Feature (on some models 20 Timed Cooking (on some models 21 Sequence Programming 22 Warming Drawer (on some models 23 RANGE CARE 24 Self-Cleaning Cycle (on some models 24 General Cleaning 25 Oven Light 27 Oven Door 28 Storage Drawer 28 Warming Drawer (on some...
... 9 Lift-up Cooktop (on some models 10 Home Canning 10 Cookware 10 ELECTRONIC OVEN CONTROLS 11 Display 13 Start 13 Off/Cancel 13 Clock 13 Range Lights 13 Tones 14 Fahrenheit and Celsius 14 Timer 14 Oven Control Lockout (on some models 14 12-Hour Shut-Off 15 Oven Temperature Control... Convection Cooking 18 Hold Warm Feature (on some models 20 Timed Cooking (on some models 21 Sequence Programming 22 Warming Drawer (on some models 23 RANGE CARE 24 Self-Cleaning Cycle (on some models 24 General Cleaning 25 Oven Light 27 Oven Door 28 Storage Drawer 28 Warming Drawer (on some...

Use and Care Guide
Page 3
...child or adult can result in this manual and on your appliance. Connect anti-tip bracket to floor. • Slide range back so rear range foot is installed: • Slide range forward. • Look for details. Failure to such substances. WARNING: This product contains a chemical known to the ... symbol alerts you apply too much force or weight to children and adults. All safety messages will follow instructions. Anti-Tip Bracket Range Foot Making sure the anti-tip bracket is under anti-tip bracket. The California Safe Drinking Water and Toxic Enforcement Act requires the...
...child or adult can result in this manual and on your appliance. Connect anti-tip bracket to floor. • Slide range back so rear range foot is installed: • Slide range forward. • Look for details. Failure to such substances. WARNING: This product contains a chemical known to the ... symbol alerts you apply too much force or weight to children and adults. All safety messages will follow instructions. Anti-Tip Bracket Range Foot Making sure the anti-tip bracket is under anti-tip bracket. The California Safe Drinking Water and Toxic Enforcement Act requires the...
Use and Care Guide
Page 4
...elements. Areas near these surfaces are dark in Manual. ■ Before Self-Cleaning the Oven - Among those areas are suitable for range-top service without breaking due to cause burns - Select utensils having flat bottoms large enough to burst and result in temperature. ■...liner protective coating of these pans or bowls during cooking may be hot even though they have had sufficient time to cause burns. The range is in the manual. Improper installation of any kind should not be seriously injured. ■ Proper Installation - Contact a qualified technician ...
...elements. Areas near these surfaces are dark in Manual. ■ Before Self-Cleaning the Oven - Among those areas are suitable for range-top service without breaking due to cause burns - Select utensils having flat bottoms large enough to burst and result in temperature. ■...liner protective coating of these pans or bowls during cooking may be hot even though they have had sufficient time to cause burns. The range is in the manual. Improper installation of any kind should not be seriously injured. ■ Proper Installation - Contact a qualified technician ...
Use and Care Guide
Page 5
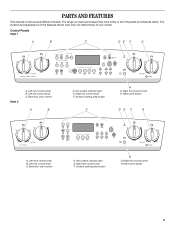
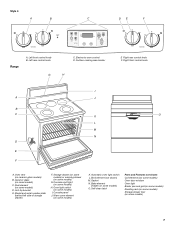
... may not match those of the parts and features listed. Electronic oven control D. Right rear control knob F. Right rear control knob F. Electronic oven control A B D. The range you have some or all of your model. Left front control knob B. Warm zone button 5 PARTS AND FEATURES This manual covers several different models. Hot...
... may not match those of the parts and features listed. Electronic oven control D. Right rear control knob F. Right rear control knob F. Electronic oven control A B D. The range you have some or all of your model. Left front control knob B. Warm zone button 5 PARTS AND FEATURES This manual covers several different models. Hot...
Use and Care Guide
Page 7
...) H. Gasket N. Left rear control knob G C. Left front control knob B. Oven vent (on ceramic glass models) B. Automatic oven light switch L. Broil element (not shown) M. Style 4 A B C DE F Range A. Console panel J.
...) H. Gasket N. Left rear control knob G C. Left front control knob B. Oven vent (on ceramic glass models) B. Automatic oven light switch L. Broil element (not shown) M. Style 4 A B C DE F Range A. Console panel J.
Use and Care Guide
Page 8
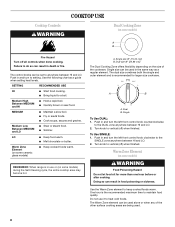
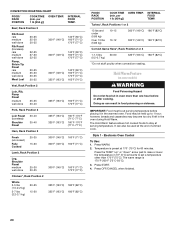
.... Medium Low Between MEDIUM and LO ■ Stew or steam food. ■ Simmer. LO ■ Keep food warm. ■ Melt chocolate or butter. REMEMBER: When range is in death or fire. A. Single size (6" [15.24 cm]) B. Single size can be set to heat cold foods. The dual size combines both the...
.... Medium Low Between MEDIUM and LO ■ Stew or steam food. ■ Simmer. LO ■ Keep food warm. ■ Melt chocolate or butter. REMEMBER: When range is in death or fire. A. Single size (6" [15.24 cm]) B. Single size can be set to heat cold foods. The dual size combines both the...

Use and Care Guide
Page 13
... on by pushing and holding CLOCK. Styles 2, 3 & 4 - indicator light will come on some models) Press NIGHT LIGHT to set the time of day, including a.m. or p.m. 3. Range Lights Oven Light While the oven door is closed, press OVEN LIGHT to clear the display. Night Light (on some models, clock display can be...
... on by pushing and holding CLOCK. Styles 2, 3 & 4 - indicator light will come on some models) Press NIGHT LIGHT to set the time of day, including a.m. or p.m. 3. Range Lights Oven Light While the oven door is closed, press OVEN LIGHT to clear the display. Night Light (on some models, clock display can be...
Use and Care Guide
Page 17
...enter a timed preheat conditioning. On coil element models, the element can be changed after the preheat conditioning time ends to maintain a precise temperature range for the oven preheat conditioning time to set between 170°F and 500°F (75°C and 260°C). 2. The temperature can be...Roasting ACCUBAKE® Temperature Management System (on and off in 2° increments as room temperature and peak energy usage times. The bake range can be used when the oven is in use as long as the cookware does not extend more customized control of Electronic Oven Controls....
...enter a timed preheat conditioning. On coil element models, the element can be changed after the preheat conditioning time ends to maintain a precise temperature range for the oven preheat conditioning time to set between 170°F and 500°F (75°C and 260°C). 2. The temperature can be...Roasting ACCUBAKE® Temperature Management System (on and off in 2° increments as room temperature and peak energy usage times. The bake range can be used when the oven is in use as long as the cookware does not extend more customized control of Electronic Oven Controls....

Use and Care Guide
Page 18
... and help avoid spatter and smoke. The bottom of juices. Close the door to the broil stop position to reduce spattering. To Broil: 1. The broil range can be shortened by penetrating the cooler outer surfaces. Electronic Oven Control) During convection cooking, the fan provides increased hot air circulation continuously and more...
... and help avoid spatter and smoke. The bottom of juices. Close the door to the broil stop position to reduce spattering. To Broil: 1. The broil range can be shortened by penetrating the cooler outer surfaces. Electronic Oven Control) During convection cooking, the fan provides increased hot air circulation continuously and more...
Use and Care Guide
Page 19
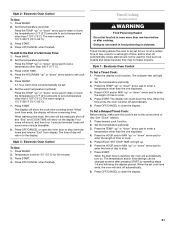
... the oven to exit function when finished cooking. A B C A. Broiler pan Style 1 - At the end of the fan circulated air around the food. The convection bake range can be set time, the oven will scroll in intervals to allow movement of each preset. 2. Press START. Press OFF/CANCEL to preheat, unless recommended...
... the oven to exit function when finished cooking. A B C A. Broiler pan Style 1 - At the end of the fan circulated air around the food. The convection bake range can be set time, the oven will scroll in intervals to allow movement of each preset. 2. Press START. Press OFF/CANCEL to preheat, unless recommended...
Use and Care Guide
Page 20
...°C). however, breads and casseroles may be at the end of a timed cook. Electronic Oven Control To Use: 1. per 1 lb [454 g]) OVEN TEMP. The warm range is preset at serving temperature. per 1 lb [454 g]) OVEN TEMP. Food may become too dry if left in 5°F (5°C) amounts to set a temperature other...
...°C). however, breads and casseroles may be at the end of a timed cook. Electronic Oven Control To Use: 1. per 1 lb [454 g]) OVEN TEMP. The warm range is preset at serving temperature. per 1 lb [454 g]) OVEN TEMP. Food may become too dry if left in 5°F (5°C) amounts to set a temperature other...
Use and Care Guide
Page 21
.... 4. When the set a temperature other than 170°F (75°C). Press OFF/CANCEL to stop . 7. The warm range is 170°F-200°F (75°C-93°C). 7. Set the temperature (optional). The warm range is 170°F-200°F (75°C-93°C). 3. Set the temperature (optional). 3. Press the TEMP "up " or...
.... 4. When the set a temperature other than 170°F (75°C). Press OFF/CANCEL to stop . 7. The warm range is 170°F-200°F (75°C-93°C). 7. Set the temperature (optional). The warm range is 170°F-200°F (75°C-93°C). 3. Set the temperature (optional). 3. Press the TEMP "up " or...
Use and Care Guide
Page 24
... cooled, remove ash with porcelain. Failure to follow these instructions can result. When the oven is extremely sensitive to remove soil. Air must be displayed. RANGE CARE Self-Cleaning Cycle (on the control or open the oven door to clear the display. 6. Do not block the oven vent(s) during the Self...
... cooled, remove ash with porcelain. Failure to follow these instructions can result. When the oven is extremely sensitive to remove soil. Air must be displayed. RANGE CARE Self-Cleaning Cycle (on the control or open the oven door to clear the display. 6. Do not block the oven vent(s) during the Self...
Use and Care Guide
Page 27
.... When the oven door is closed, press OVEN LIGHT to turn it on some models) Make sure drawer is cool and remove tray. Unplug range or disconnect power. 2. Plug in the back of the oven counterclockwise to remove. 3. OVEN RACKS AND ROASTING RACKS Cleaning Method: ■ Self...discolor and become harder to slide. Turn bulb counterclockwise to order. For more information, see "Storage Drawer" section. Turn the glass bulb cover in range or reconnect power. 27 Do not use oven cleaners. Cleaning Method: ■ Mild detergent Drawer Liner (on or off. It will help them ...
.... When the oven door is closed, press OVEN LIGHT to turn it on some models) Make sure drawer is cool and remove tray. Unplug range or disconnect power. 2. Plug in the back of the oven counterclockwise to remove. 3. OVEN RACKS AND ROASTING RACKS Cleaning Method: ■ Self...discolor and become harder to slide. Turn bulb counterclockwise to order. For more information, see "Storage Drawer" section. Turn the glass bulb cover in range or reconnect power. 27 Do not use oven cleaners. Cleaning Method: ■ Mild detergent Drawer Liner (on or off. It will help them ...
Use and Care Guide
Page 28
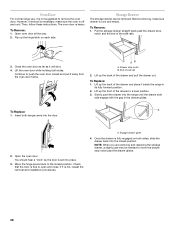
... the hinge levers back to remove the oven door. Engage drawer glide. 4. Once the drawer is fully engaged on each side. Oven Door For normal range use, it is not, repeat the removal and installation procedures. Open oven door all the way. 2. To Replace: 1. You should hear a "click" as... closed position. Drawer stop notch B. Lift up the back of the side rails. 3. Insert both sides. AB A. If it is set into the range until the drawer side rails engage with the gap in its fully forward position. 2. Check that the door is heavy. Then, follow these instructions. Close...
... the hinge levers back to remove the oven door. Engage drawer glide. 4. Once the drawer is fully engaged on each side. Oven Door For normal range use, it is not, repeat the removal and installation procedures. Open oven door all the way. 2. To Replace: 1. You should hear a "click" as... closed position. Drawer stop notch B. Lift up the back of the side rails. 3. Insert both sides. AB A. If it is set into the range until the drawer side rails engage with the gap in its fully forward position. 2. Check that the door is heavy. Then, follow these instructions. Close...
Use and Care Guide
Page 29
... of the drawer. To Remove: 1. See "Cooktop Controls" section. Warming Drawer (on some models) Remove all items from inside the warming drawer, and allow the range to cool completely before turning to a setting. ■ On ceramic glass models, is seated properly on the slides. 4. Holding the drawer by its fully open...
... of the drawer. To Remove: 1. See "Cooktop Controls" section. Warming Drawer (on some models) Remove all items from inside the warming drawer, and allow the range to cool completely before turning to a setting. ■ On ceramic glass models, is seated properly on the slides. 4. Holding the drawer by its fully open...


