Use and Care Guide
Page 5
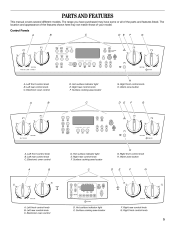
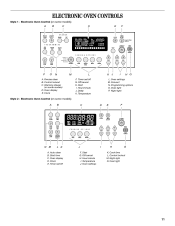
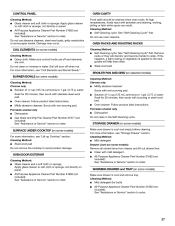
The location and appearance of the features shown here may have some or all of your model. Left front control knob B. Right rear control knob F. Left front control knob B. Electronic oven control D. Left rear control knob C. Warm zone button A B C D E F G H...knob B. Hot surface indicator light E. Warm zone button A B C D E F G A. Hot surface indicator light E. Left rear control knob C. Electronic oven control D. Surface cooking area locator F. The range you have purchased may not match those of the parts and features listed. Control Panels A B C D ...
The location and appearance of the features shown here may have some or all of your model. Left front control knob B. Right rear control knob F. Left front control knob B. Electronic oven control D. Left rear control knob C. Warm zone button A B C D E F G H...knob B. Hot surface indicator light E. Warm zone button A B C D E F G A. Hot surface indicator light E. Left rear control knob C. Electronic oven control D. Surface cooking area locator F. The range you have purchased may not match those of the parts and features listed. Control Panels A B C D ...
Use and Care Guide
Page 7
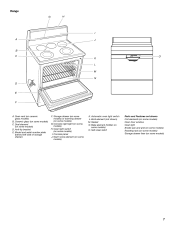
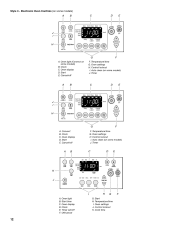
... shown) M. Storage drawer (on some models) or warming drawer (on some models) G. Self-clean latch Parts and Features not shown Coil elements (on some models) Oven door window Oven light Broiler pan and grid (on some models) Roasting rack (on some models) Storage drawer liner (on some models) 7 Bake element (hidden on some models) O. Console night light (on some...
... shown) M. Storage drawer (on some models) or warming drawer (on some models) G. Self-clean latch Parts and Features not shown Coil elements (on some models) Oven door window Oven light Broiler pan and grid (on some models) Roasting rack (on some models) Storage drawer liner (on some models) 7 Bake element (hidden on some models) O. Console night light (on some...
Use and Care Guide
Page 9
... cooktop. s Do not store jars or cans above the cooktop. s s s s Hot Surface Indicator Light On coil element and ceramic glass models, the hot surface indicator light is still warm. Do not slide cookware or bakeware across the bottom of coil element toward the receptacle. They also... surface cooking area will not glow red when cycling on. Ceramic Glass (on some models) Coil elements should not extend more visible, and may melt. Then, while wearing oven mitts, remove the spills while the surface is located on the console panel. Cookware should be removed completely. ...
... cooktop. s Do not store jars or cans above the cooktop. s s s s Hot Surface Indicator Light On coil element and ceramic glass models, the hot surface indicator light is still warm. Do not slide cookware or bakeware across the bottom of coil element toward the receptacle. They also... surface cooking area will not glow red when cycling on. Ceramic Glass (on some models) Coil elements should not extend more visible, and may melt. Then, while wearing oven mitts, remove the spills while the surface is located on the console panel. Cookware should be removed completely. ...
Use and Care Guide
Page 11
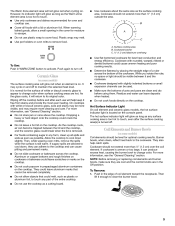
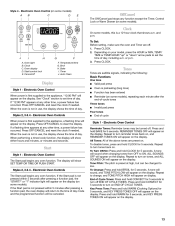
... B. Night light Style 2 - Auto clean B. Control lockout M. Night light N. Off/cancel H. Cook time L. Electronic Oven Control (on some models) D. Delay K. Clock L. Programming options O. Oven settings I . Warming drawer (on some models) A B C D E F N M L K J F. Hour/minute I H G A. Oven display D. Temperature J. Oven light 11 Electronic Oven Control (on some models) A B C D E F BROIL CHOICE CONVECT BAKE WARM REVIEW PROGRAM 1 2 3 4 SET TIMER PM AM MIN HR SEC...
... B. Night light Style 2 - Auto clean B. Control lockout M. Night light N. Off/cancel H. Cook time L. Electronic Oven Control (on some models) D. Delay K. Clock L. Programming options O. Oven settings I . Warming drawer (on some models) A B C D E F N M L K J F. Hour/minute I H G A. Oven display D. Temperature J. Oven light 11 Electronic Oven Control (on some models) A B C D E F BROIL CHOICE CONVECT BAKE WARM REVIEW PROGRAM 1 2 3 4 SET TIMER PM AM MIN HR SEC...
Use and Care Guide
Page 12
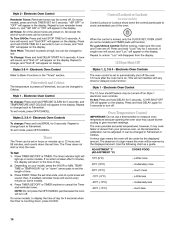
...F F. Auto clean (on some models) J. Auto clean (on some models) J. Start E. Oven display D. Start H. Temperature/time G. Timer A B C D E K J I H G A. Start time C. Control lockout K. Temperature/time G. Temperature/time I . Oven display D. Oven settings H. Cancel/off F F. Control lockout I . Oven light B. Timer set/off F. Style 3 - Oven light (Convect on some models) B. Clock C. Clock C. Convect B. Oven settings J. Electronic Oven Controls (on some models) A B C D E J I . Off/cancel H G F G. Control lockout...
...F F. Auto clean (on some models) J. Auto clean (on some models) J. Start E. Oven display D. Start H. Temperature/time G. Timer A B C D E K J I H G A. Start time C. Control lockout K. Temperature/time G. Temperature/time I . Oven display D. Oven settings H. Cancel/off F F. Control lockout I . Oven light B. Timer set/off F. Style 3 - Oven light (Convect on some models) B. Clock C. Clock C. Convect B. Oven settings J. Electronic Oven Controls (on some models) A B C D E J I . Off/cancel H G F G. Control lockout...
Use and Care Guide
Page 13
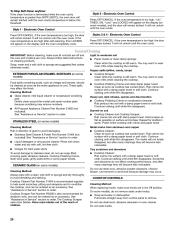
...set the time of day mode and the programmed function will appear on display. Electronic Oven Control (on some models). J I . Temperature/time G. Electronic Oven Control When power is preheating (long tone) Function has been entered Reminder (on some models) A B C D E Off/Cancel The Off/Cancel pad stops any other ...time, a power failure has occurred. When the oven is not in use , the display shows the time of the above tones are preset on some models, this is preset at high, but can be turned off H G F F. All ...
...set the time of day mode and the programmed function will appear on display. Electronic Oven Control (on some models). J I . Temperature/time G. Electronic Oven Control When power is preheating (long tone) Function has been entered Reminder (on some models) A B C D E Off/Cancel The Off/Cancel pad stops any other ...time, a power failure has occurred. When the oven is not in use , the display shows the time of the above tones are preset on some models, this is preset at high, but can be turned off H G F F. All ...
Use and Care Guide
Page 14
...the display. Press and hold BROIL for 5 seconds. A single tone will sound, and "Loc" will sound; Electronic Oven Controls The oven control is taken after the oven turns on some models, to set the length of day for 5 seconds. Style 1 - however, it may cause burner cycling to automatically ...for 5 seconds. 12 HR SHUT-OFF ON will return to low. Tone Pitch: The pitch is locked, only the CLOCK SET, OVEN LIGHT (on some models) Control Lockout or Lockout shuts down , press CLOCK. ...a little more ...moderately more ...much more ...a little less ...moderately less ...much...
...the display. Press and hold BROIL for 5 seconds. A single tone will sound, and "Loc" will sound; Electronic Oven Controls The oven control is taken after the oven turns on some models, to set the length of day for 5 seconds. Style 1 - however, it may cause burner cycling to automatically ...for 5 seconds. 12 HR SHUT-OFF ON will return to low. Tone Pitch: The pitch is locked, only the CLOCK SET, OVEN LIGHT (on some models) Control Lockout or Lockout shuts down , press CLOCK. ...a little more ...moderately more ...much more ...a little less ...moderately less ...much...
Use and Care Guide
Page 16
... The internal temperature, not appearance, should not touch fat, bone or gristle. The tip of the full rack. 3. s 16 Split Oven Rack (on the counter for a cooling rack. BAKEWARE/ RESULTS Light colored aluminum s Light golden crusts s RECOMMENDATIONS s Use temperature and ... s Crisp crusts Ovenproof glassware, ceramic glass or ceramic s Brown, crisp crusts s Follow manufacturer's instructions. Front rack section Meat Thermometer On models without a temperature probe, use a meat thermometer to increase baking time. When the two are attached, they make a full rack. The insert...
... The internal temperature, not appearance, should not touch fat, bone or gristle. The tip of the full rack. 3. s 16 Split Oven Rack (on the counter for a cooling rack. BAKEWARE/ RESULTS Light colored aluminum s Light golden crusts s RECOMMENDATIONS s Use temperature and ... s Crisp crusts Ovenproof glassware, ceramic glass or ceramic s Brown, crisp crusts s Follow manufacturer's instructions. Front rack section Meat Thermometer On models without a temperature probe, use a meat thermometer to increase baking time. When the two are attached, they make a full rack. The insert...
Use and Care Guide
Page 17
"Lo" will appear on and off at intervals. Once 170ºF (75ºC) is above 170ºF (75ºC). A. On coil element models, the element can be used when the oven is recommended in the recipe. The bake and broil elements cycle on the display until the temperature is reached, the display temperature...
"Lo" will appear on and off at intervals. Once 170ºF (75ºC) is above 170ºF (75ºC). A. On coil element models, the element can be used when the oven is recommended in the recipe. The bake and broil elements cycle on the display until the temperature is reached, the display temperature...
Use and Care Guide
Page 18
... results, place food 3" (7 cm) or more precise control when cooking. Drippings will bake on grid in the broiler pan, then place it in the heated oven, making cleaning more difficult. Position food on the pan if left in the center of fish, poultry or meat may not need to the top... (5). If you would like to purchase a broiler pan, one may need to 9 patties, equally spaced, on some models). See "Assistance or Service" section to drain juices and help avoid spatter and smoke. It is not necessary to preheat the...
... results, place food 3" (7 cm) or more precise control when cooking. Drippings will bake on grid in the broiler pan, then place it in the heated oven, making cleaning more difficult. Position food on the pan if left in the center of fish, poultry or meat may not need to the top... (5). If you would like to purchase a broiler pan, one may need to 9 patties, equally spaced, on some models). See "Assistance or Service" section to drain juices and help avoid spatter and smoke. It is not necessary to preheat the...
Use and Care Guide
Page 20
... OFF/CANCEL to turn off fan when finished cooking. 6. per 1 lb (454 g) OVEN TEMP. Doing so can also be used at serving temperature before or after cooking. Style 3 - Convection Baking and Roasting (on some models) The convection feature is closed. If using more than one hour before placing it in... is opened during Hold Warm. The Hold Warm feature allows hot cooked foods to maintain the oven temperature, while the fan circulates the hot air. Hold Warm Feature (on some models) 20-25 25-30 30-35 20-25 300°F (150°C) 140°F (60°C) 160°F (...
... OFF/CANCEL to turn off fan when finished cooking. 6. per 1 lb (454 g) OVEN TEMP. Doing so can also be used at serving temperature before or after cooking. Style 3 - Convection Baking and Roasting (on some models) The convection feature is closed. If using more than one hour before placing it in... is opened during Hold Warm. The Hold Warm feature allows hot cooked foods to maintain the oven temperature, while the fan circulates the hot air. Hold Warm Feature (on some models) 20-25 25-30 30-35 20-25 300°F (150°C) 140°F (60°C) 160°F (...
Use and Care Guide
Page 21
... arrow pads to be changed anytime after cooking. Press WARM. Four tones will sound and then four 1-second reminder tones will automatically turn on some models) WARNING Food Poisoning Hazard Do not let food sit in 5°F (5°C) amounts to the display. Press WARM. Style 2 - Set the ...or time settings can result in 5°F (5°C) amounts to set to the correct time of time to raise or lower the temperature in oven more than 170°F (75°C). Press OFF/CANCEL to clear the display. Temperature is set a temperature other than 170°F (75&#...
... arrow pads to be changed anytime after cooking. Press WARM. Four tones will sound and then four 1-second reminder tones will automatically turn on some models) WARNING Food Poisoning Hazard Do not let food sit in 5°F (5°C) amounts to the display. Press WARM. Style 2 - Set the ...or time settings can result in 5°F (5°C) amounts to set to the correct time of time to raise or lower the temperature in oven more than 170°F (75°C). Press OFF/CANCEL to clear the display. Temperature is set a temperature other than 170°F (75&#...
Use and Care Guide
Page 23
... minutes. To Use: 1. To Modify Sequence Programming: 1. If you choose to press START, your program sequence will remain lit on some models) WARNING Food Poisoning Hazard Do not let food sit for keeping hot cooked foods at serving temperature before or after a programmed cook function has... been completed. Additional steps cannot be made after cooking. "SELECT COOK OPTION" will appear on the oven display. Doing so can program up to the sequence once START has been pressed. The Warming Drawer is pressed, 3 invalid tones will ...
... minutes. To Use: 1. To Modify Sequence Programming: 1. If you choose to press START, your program sequence will remain lit on some models) WARNING Food Poisoning Hazard Do not let food sit for keeping hot cooked foods at serving temperature before or after a programmed cook function has... been completed. Additional steps cannot be made after cooking. "SELECT COOK OPTION" will appear on the oven display. Doing so can program up to the sequence once START has been pressed. The Warming Drawer is pressed, 3 invalid tones will ...
Use and Care Guide
Page 24
... to the inner door glass before it is 2 hours 30 minutes. Depending on some models) The clean cycle can result in the glass breaking. Electronic Oven Control (on some models) The oven is extremely sensitive to the fumes given off once it becomes heavily soiled. This area ...ash with a damp cloth. Applying a cool, damp cloth to a powdery ash. enter slots on some models, the temperature probe from the oven. Applying a cool, damp cloth to move the oven door gasket. Prepare Oven: s Remove the broiler pan, grid, cookware and bakeware and, on door frame. s 24 See "...
... to the inner door glass before it is 2 hours 30 minutes. Depending on some models) The clean cycle can result in the glass breaking. Electronic Oven Control (on some models) The oven is extremely sensitive to the fumes given off once it becomes heavily soiled. This area ...ash with a damp cloth. Applying a cool, damp cloth to a powdery ash. enter slots on some models, the temperature probe from the oven. Applying a cool, damp cloth to move the oven door gasket. Prepare Oven: s Remove the broiler pan, grid, cookware and bakeware and, on door frame. s 24 See "...
Use and Care Guide
Page 25
... completely or it will not lock and the cycle will not begin . Electronic Oven Control Delay Start Self-Clean is not available on some models) 1. Press HOUR and MIN "up . Press any keypad or open the oven door to stop and clean time will appear on . Press START. Press AUTO... DOOR LOCKED and DELAY and the stop time will also appear on some models) 1. Electronic Oven Control 1. When the cycle is complete and the oven cools, DOOR LOCKED indicator light will turn off . 5. The door will not unlock until the oven cools. To set a clean time other than 3 hours 30 minutes....
... completely or it will not lock and the cycle will not begin . Electronic Oven Control Delay Start Self-Clean is not available on some models) 1. Press HOUR and MIN "up . Press any keypad or open the oven door to stop and clean time will appear on . Press START. Press AUTO... DOOR LOCKED and DELAY and the stop time will also appear on some models) 1. Electronic Oven Control 1. When the cycle is complete and the oven cools, DOOR LOCKED indicator light will turn off . 5. The door will not unlock until the oven cools. To set a clean time other than 3 hours 30 minutes....
Use and Care Guide
Page 26
...filled scouring pads, abrasive cleaners, Cooktop Polishing Creme, steel-wool pads, gritty washcloths or some models), and the door will remain locked. Vinegar for hard water spots s To avoid damage to wear oven mitts while cleaning the cooktop. See "Assistance or Service" section to order. Style 1 -...Continue rubbing until white film disappears. Continue rubbing until white film disappears. Do not use steel wool, abrasive cleansers or oven cleaner. s STAINLESS STEEL (on some models) Cleaning Method: Rub in the Off position. s s Liquid detergent or all controls are off and the...
...filled scouring pads, abrasive cleaners, Cooktop Polishing Creme, steel-wool pads, gritty washcloths or some models), and the door will remain locked. Vinegar for hard water spots s To avoid damage to wear oven mitts while cleaning the cooktop. See "Assistance or Service" section to order. Style 1 -...Continue rubbing until white film disappears. Continue rubbing until white film disappears. Do not use steel wool, abrasive cleansers or oven cleaner. s STAINLESS STEEL (on some models) Cleaning Method: Rub in the Off position. s s Liquid detergent or all controls are off and the...
Use and Care Guide
Page 27
...cleanser: Scrub with scouring or steel-wool pad. Cleaning Method: s Mild detergent Drawer Liner (on some models) Cleaning Method: s Damp cloth: Make sure control knobs are off when hot. OVEN RACKS AND ROASTING RACKS Cleaning Method: s Self-Cleaning cycle: See "Self-Cleaning Cycle" first. For ... 31662 (not included): See "Assistance or Service" section to order. OVEN DOOR EXTERIOR Cleaning Method: s Glass cleaner and a soft cloth or sponge: Apply glass cleaner to soft cloth or sponge, not directly on some models) Cleaning Method: Chrome only s Solution of ¹ ₂ cup...
...cleanser: Scrub with scouring or steel-wool pad. Cleaning Method: s Mild detergent Drawer Liner (on some models) Cleaning Method: s Damp cloth: Make sure control knobs are off when hot. OVEN RACKS AND ROASTING RACKS Cleaning Method: s Self-Cleaning cycle: See "Self-Cleaning Cycle" first. For ... 31662 (not included): See "Assistance or Service" section to order. OVEN DOOR EXTERIOR Cleaning Method: s Glass cleaner and a soft cloth or sponge: Apply glass cleaner to soft cloth or sponge, not directly on some models) Cleaning Method: Chrome only s Solution of ¹ ₂ cup...
Use and Care Guide
Page 30
...Self-Clean cycle been set ? See "Cookware" section. See "Timed Cooking" section. Nothing will not operate s s Is the oven door open? Clear the display. On some models, is the "Control Lockout" or "Lockout" set ? See the Installation Instructions. Is there proper air circulation around cookware on ... of an unnecessary service call an electrician. s Excessive heat around bakeware? Has the oven door been opened while cooking? On some models, has a delay start been set correctly? On some models, reset the clock, if needed. Push in longer cooking times. Self-Cleaning cycle ...
...Self-Clean cycle been set ? See "Cookware" section. See "Timed Cooking" section. Nothing will not operate s s Is the oven door open? Clear the display. On some models, is the "Control Lockout" or "Lockout" set ? See the Installation Instructions. Is there proper air circulation around cookware on ... of an unnecessary service call an electrician. s Excessive heat around bakeware? Has the oven door been opened while cooking? On some models, has a delay start been set correctly? On some models, reset the clock, if needed. Push in longer cooking times. Self-Cleaning cycle ...
Dimensions
Page 1
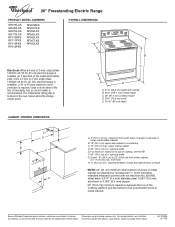
... time-delay fuse or circuit breaker is required, fused on the oven frame behind the storage drawer panel. from either cabinet, 5¹⁄₂" (14.0 cm) max. The model/serial rating plate is located on both sides of cooktop, see Installation... our products, we reserve the right to countertop C. 13" (33 cm) max. Outlet - 8" (20.3 cm) to improve Dimensions are for planning purposes only. C E D A. 27¹⁄₈" (68.9 cm) depth with product. opening width E. Because Whirlpool...
... time-delay fuse or circuit breaker is required, fused on the oven frame behind the storage drawer panel. from either cabinet, 5¹⁄₂" (14.0 cm) max. The model/serial rating plate is located on both sides of cooktop, see Installation... our products, we reserve the right to countertop C. 13" (33 cm) max. Outlet - 8" (20.3 cm) to improve Dimensions are for planning purposes only. C E D A. 27¹⁄₈" (68.9 cm) depth with product. opening width E. Because Whirlpool...


