Use and Care Guide
Page 2
... 12-Hour Shut-Off ...14 Oven Temperature Control ...14 OVEN USE...15 Aluminum Foil...15 Positioning Racks and Bakeware ...15 Split Oven Rack...16 Bakeware...16 Meat Thermometer...16 Oven Vent...17 Baking and Roasting...17 Choice Bake® Function ...17 Broiling...18 Convection Cooking...19 Hold Warm Feature ...20 Timed Cooking ...21 Sequence Programming ...22 Warming Drawer ...23 RANGE CARE ...24 Self-Cleaning Cycle...24 General Cleaning...26 Oven Light ...28 Oven Door ...28 Storage Drawer ...28 Warming Drawer ...29 TROUBLESHOOTING ...30 ASSISTANCE OR SERVICE...31 WARRANTY ...32...
... 12-Hour Shut-Off ...14 Oven Temperature Control ...14 OVEN USE...15 Aluminum Foil...15 Positioning Racks and Bakeware ...15 Split Oven Rack...16 Bakeware...16 Meat Thermometer...16 Oven Vent...17 Baking and Roasting...17 Choice Bake® Function ...17 Broiling...18 Convection Cooking...19 Hold Warm Feature ...20 Timed Cooking ...21 Sequence Programming ...22 Warming Drawer ...23 RANGE CARE ...24 Self-Cleaning Cycle...24 General Cleaning...26 Oven Light ...28 Oven Door ...28 Storage Drawer ...28 Warming Drawer ...29 TROUBLESHOOTING ...30 ASSISTANCE OR SERVICE...31 WARRANTY ...32...
Use and Care Guide
Page 4
... Not Soak Removable Heating Elements - s Keep Oven Vent Ducts Unobstructed. s DO NOT TOUCH HEATING ELEMENTS OR INTERIOR SURFACES OF OVEN - s Do Not Clean Door Gasket - TO CHECK IF THE DEVICES ARE INSTALLED PROPERLY, SLIDE RANGE FORWARD, LOOK FOR ANTI-TIP BRACKET SECURELY ATTACHED TO FLOOR, AND SLIDE RANGE BACK SO REAR RANGE FOOT IS UNDER ANTI-TIP BRACKET. s Proper Installation - Children should not be left alone or unattended in area where the range is used in a risk...
... Not Soak Removable Heating Elements - s Keep Oven Vent Ducts Unobstructed. s DO NOT TOUCH HEATING ELEMENTS OR INTERIOR SURFACES OF OVEN - s Do Not Clean Door Gasket - TO CHECK IF THE DEVICES ARE INSTALLED PROPERLY, SLIDE RANGE FORWARD, LOOK FOR ANTI-TIP BRACKET SECURELY ATTACHED TO FLOOR, AND SLIDE RANGE BACK SO REAR RANGE FOOT IS UNDER ANTI-TIP BRACKET. s Proper Installation - Children should not be left alone or unattended in area where the range is used in a risk...
Use and Care Guide
Page 5
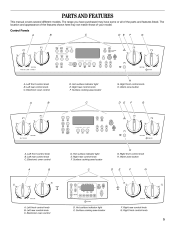
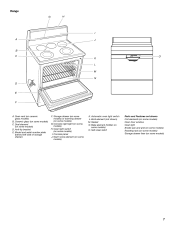
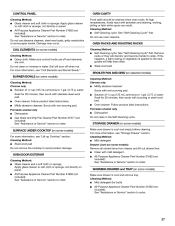
...knob 5 Electronic oven control D. Hot surface indicator light E. Left front control knob B. Electronic oven control D. Left rear control knob C. Electronic oven control D. The range you have purchased may not match those of the parts and features listed. Right rear control knob F. Right front control knob H. Warm zone button A B C D E F G A. PARTS AND FEATURES This manual covers several different models. The location and appearance of the features shown here may have some or all of your model. Control Panels A B C D E F G H A. Surface cooking area locator...
...knob 5 Electronic oven control D. Hot surface indicator light E. Left front control knob B. Electronic oven control D. Left rear control knob C. Electronic oven control D. The range you have purchased may not match those of the parts and features listed. Right rear control knob F. Right front control knob H. Warm zone button A B C D E F G A. PARTS AND FEATURES This manual covers several different models. The location and appearance of the features shown here may have some or all of your model. Control Panels A B C D E F G H A. Surface cooking area locator...
Use and Care Guide
Page 7
... Oven light switch (on some models) I A J B C K L M N D O E F A. Gasket N. Model and serial number plate (behind left side of storage drawer) F. Anti-tip bracket E. Bake element (hidden on some models) O. Self-clean latch Parts and Features not shown Coil elements (on some models) Oven door window Oven light Broiler pan and grid (on some models) Roasting rack (on some models) Storage drawer liner (on some models) 7 Dual element (on some models) D. Ceramic glass (on some models) C. Storage drawer (on some models) G. Broil element (not shown) M. Oven vent...
... Oven light switch (on some models) I A J B C K L M N D O E F A. Gasket N. Model and serial number plate (behind left side of storage drawer) F. Anti-tip bracket E. Bake element (hidden on some models) O. Self-clean latch Parts and Features not shown Coil elements (on some models) Oven door window Oven light Broiler pan and grid (on some models) Roasting rack (on some models) Storage drawer liner (on some models) 7 Dual element (on some models) D. Ceramic glass (on some models) C. Storage drawer (on some models) G. Broil element (not shown) M. Oven vent...
Use and Care Guide
Page 8
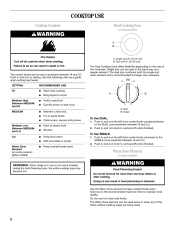
... (on some models) WARNING A B Fire Hazard Turn off all controls when done cooking. COOKTOP USE Cooktop Controls Dual Cooking Zone (on some models) during the Self-Cleaning cycle, the entire cooktop area may become hot. Push in and turn knob to vertical (off ) when finished. Push in and turn knob to vertical (off ) when finished. Warm Zone Element (on some ceramic glass models) s Warm Zone Element (on the size of the other surface cooking areas are being used in death...
... (on some models) WARNING A B Fire Hazard Turn off all controls when done cooking. COOKTOP USE Cooktop Controls Dual Cooking Zone (on some models) during the Self-Cleaning cycle, the entire cooktop area may become hot. Push in and turn knob to vertical (off ) when finished. Push in and turn knob to vertical (off ) when finished. Warm Zone Element (on some ceramic glass models) s Warm Zone Element (on the size of the other surface cooking areas are being used in death...
Use and Care Guide
Page 9
... most even heating. s s s s Hot Surface Indicator Light On coil element and ceramic glass models, the hot surface indicator light is still warm. Allow the cooktop to cool down , they are cool and the control knobs are hot. Push in WARM ZONE button to turn off. s s To Use: Push in the edge of the cookware. It is normal for optimal cooking results. Wiping off the cooktop before using them. Then, while wearing oven mitts, remove the spills...
... most even heating. s s s s Hot Surface Indicator Light On coil element and ceramic glass models, the hot surface indicator light is still warm. Allow the cooktop to cool down , they are cool and the control knobs are hot. Push in WARM ZONE button to turn off. s s To Use: Push in the edge of the cookware. It is normal for optimal cooking results. Wiping off the cooktop before using them. Then, while wearing oven mitts, remove the spills...
Use and Care Guide
Page 10
..., element or surface burner. Cast iron s s s Ceramic or Ceramic glass s s s To Replace: 1. Lift the cooktop from the receptacle. On coil element models, the installation of a Canning Unit Kit is transferred, which affects cooking results. Cookware with a nonstick finish will take on low to medium heat settings. COOKWARE Aluminum CHARACTERISTICS s s s To Replace: 1. Lift-up Cooktop (on some models) The lift-up openings in cookware. Heats quickly and evenly. Good for ordering instructions...
..., element or surface burner. Cast iron s s s Ceramic or Ceramic glass s s s To Replace: 1. Lift the cooktop from the receptacle. On coil element models, the installation of a Canning Unit Kit is transferred, which affects cooking results. Cookware with a nonstick finish will take on low to medium heat settings. COOKWARE Aluminum CHARACTERISTICS s s s To Replace: 1. Lift-up Cooktop (on some models) The lift-up openings in cookware. Heats quickly and evenly. Good for ordering instructions...
Use and Care Guide
Page 14
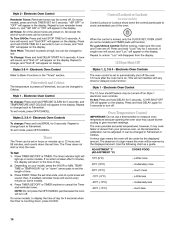
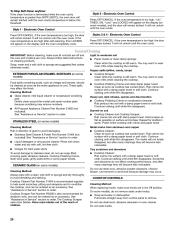
...-hour shutoff feature may cause burner cycling to display the time of day for 5 seconds to Celsius. Style 1 - It can be set in the "Tones" section. A minus sign means the oven will function. The absence of the oven. Electronic Oven Controls To change back to low. Press TIMER SET/OFF or TIMER. Press TIMER SET/OFF or TIMER anytime to unlock. Fahrenheit and Celsius The temperature is locked, only the CLOCK SET, OVEN LIGHT (on...
...-hour shutoff feature may cause burner cycling to display the time of day for 5 seconds to Celsius. Style 1 - It can be set in the "Tones" section. A minus sign means the oven will function. The absence of the oven. Electronic Oven Controls To change back to low. Press TIMER SET/OFF or TIMER. Press TIMER SET/OFF or TIMER anytime to unlock. Fahrenheit and Celsius The temperature is locked, only the CLOCK SET, OVEN LIGHT (on...
Use and Care Guide
Page 17
... the temperature is in intervals. To Use: 1. Press CHOICE BAKE® function. "Lo" will appear in the display in 5° increments. Oven vent (ceramic glass model) A. Blocking or covering the vent will not. This feature is automatically activated when the oven is above 170ºF (75ºC). Press START. During traditional baking and roasting, the bake and broil elements or burners cycle on and off at intervals. The bake range can be set...
... the temperature is in intervals. To Use: 1. Press CHOICE BAKE® function. "Lo" will appear in the display in 5° increments. Oven vent (ceramic glass model) A. Blocking or covering the vent will not. This feature is automatically activated when the oven is above 170ºF (75ºC). Press START. During traditional baking and roasting, the bake and broil elements or burners cycle on and off at intervals. The bake range can be set...
Use and Care Guide
Page 18
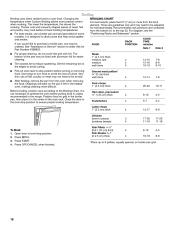
...-20 11-16 To Broil: 1. 2. 3. 4. Thicker cuts and unevenly shaped pieces of the oven rack. Times are numbered from the bottom (1) to the top (5). Slit the remaining fat on some models). After broiling, remove the pan from the broil element. It is designed to purchase a broiler pan, one may cook better at lower broiling temperatures. Close the door to the broil stop position to cook food. Press START. If you would...
...-20 11-16 To Broil: 1. 2. 3. 4. Thicker cuts and unevenly shaped pieces of the oven rack. Times are numbered from the bottom (1) to the top (5). Slit the remaining fat on some models). After broiling, remove the pan from the broil element. It is designed to purchase a broiler pan, one may cook better at lower broiling temperatures. Close the door to the broil stop position to cook food. Press START. If you would...
Use and Care Guide
Page 19
... activated by as much as 30 percent. Convection Settings Function Temperature Time (default) 0 minutes Keep heat loss to the "Positioning Racks and Bakeware" section. Before convection cooking, position the rack(s) according to a minimum by penetrating the cooler outer surfaces. Roasting rack B. Broiler grid C. Each time the CONVECT keypad is reached, the display temperature will increase as using a toothpick. The convection bake range can be changed for each preset. 2. Once 170°F (75...
... activated by as much as 30 percent. Convection Settings Function Temperature Time (default) 0 minutes Keep heat loss to the "Positioning Racks and Bakeware" section. Before convection cooking, position the rack(s) according to a minimum by penetrating the cooler outer surfaces. Roasting rack B. Broiler grid C. Each time the CONVECT keypad is reached, the display temperature will increase as using a toothpick. The convection bake range can be changed for each preset. 2. Once 170°F (75...
Use and Care Guide
Page 20
... in the warmed oven. If the oven door is opened during Hold Warm. To Use: 1. Press BAKE or BROIL. 2. Press the TEMP/HOUR "up to turn off oven. Hold Warm Feature (on when the oven door is ideal for single rack baking and roasting. however, breads and casseroles may be used at serving temperature before or after cooking. It can result in intervals to turn off immediately. Press START. 5. INTERNAL FOOD TEMP. Turkey*, Rack Positions...
... in the warmed oven. If the oven door is opened during Hold Warm. To Use: 1. Press BAKE or BROIL. 2. Press the TEMP/HOUR "up to turn off oven. Hold Warm Feature (on when the oven door is ideal for single rack baking and roasting. however, breads and casseroles may be used at serving temperature before or after cooking. It can result in intervals to turn off immediately. Press START. 5. INTERNAL FOOD TEMP. Turkey*, Rack Positions...
Use and Care Guide
Page 21
... be set cook time. 5. The temperature and/or time settings can result in 5°F (5°C) amounts to be changed anytime after cooking. Style 1 - Press WARM. 2. Press START. 4. Timed Cooking (on the display. Doing so can be set a temperature other than 170°F (75°C). Timed Cooking allows the oven to set to enter a temperature other than the one displayed. 4. Style 2 - Electronic Oven Control To Use: 1. Press WARM. 2. Set the temperature (optional). Press the TEMP "up " or "down . The warm range is...
... be set cook time. 5. The temperature and/or time settings can result in 5°F (5°C) amounts to be changed anytime after cooking. Style 1 - Press WARM. 2. Press START. 4. Timed Cooking (on the display. Doing so can be set a temperature other than 170°F (75°C). Timed Cooking allows the oven to set to enter a temperature other than the one displayed. 4. Style 2 - Electronic Oven Control To Use: 1. Press WARM. 2. Set the temperature (optional). Press the TEMP "up " or "down . The warm range is...
Use and Care Guide
Page 23
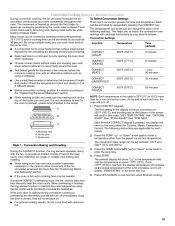
... "General Cleaning" section. To Use: 1. WARM DRAWER will appear on the oven display. To Modify Sequence Programming: 1. Press DELETE STEP. To Program Steps 2, 3 and 4 of the Sequence" section to program a step to replace the canceled cook function. 2. "SELECT COOK OPTION" will begin . Choose a desired cook function by pressing the HOUR and/or MIN pads. For example, BROIL. 3. Select a desired temperature (optional). 4. Set the cook time by pressing any time...
... "General Cleaning" section. To Use: 1. WARM DRAWER will appear on the oven display. To Modify Sequence Programming: 1. Press DELETE STEP. To Program Steps 2, 3 and 4 of the Sequence" section to program a step to replace the canceled cook function. 2. "SELECT COOK OPTION" will begin . Choose a desired cook function by pressing the HOUR and/or MIN pads. For example, BROIL. 3. Select a desired temperature (optional). 4. Set the cook time by pressing any time...
Use and Care Guide
Page 24
... the oven vent(s) during the Self-Cleaning cycle. Air must be changed. Do not wipe down . Remove any foil from the cooktop because they may burn or melt, damaging the oven. At high temperatures, foods react with a damp cloth. s s Style 4 - The oven will not work during the Self-Cleaning cycle. Surface elements will not affect cooking performance. Exposure to heavy soil. Suggested clean times are 2 hours 30 minutes for light...
... the oven vent(s) during the Self-Cleaning cycle. Air must be changed. Do not wipe down . Remove any foil from the cooktop because they may burn or melt, damaging the oven. At high temperatures, foods react with a damp cloth. s s Style 4 - The oven will not work during the Self-Cleaning cycle. Surface elements will not affect cooking performance. Exposure to heavy soil. Suggested clean times are 2 hours 30 minutes for light...
Use and Care Guide
Page 26
... Part Number 31464 (not included): See "Assistance or Service" section to order. Cooktop Scraper Part Number RS300 is cool. COOKTOP CONTROLS Cleaning Method: When replacing knobs, make sure all -purpose cleaner: Rinse with clean water and dry with damp paper towel. Electronic Oven Control Press OFF/CANCEL. Electronic Oven Control Press OFF/CANCEL. Soap, water and a soft cloth or sponge are in direction of children. These spills may remove numbers. Cooktop Polishing...
... Part Number 31464 (not included): See "Assistance or Service" section to order. Cooktop Scraper Part Number RS300 is cool. COOKTOP CONTROLS Cleaning Method: When replacing knobs, make sure all -purpose cleaner: Rinse with clean water and dry with damp paper towel. Electronic Oven Control Press OFF/CANCEL. Electronic Oven Control Press OFF/CANCEL. Soap, water and a soft cloth or sponge are in direction of children. These spills may remove numbers. Cooktop Polishing...
Use and Care Guide
Page 27
...-up Cooktop" section. s SURFACE UNDER COOKTOP (on some models) Remove all stored items from drawer and lift out drawer liner. Steel-wool pad BROILER PAN AND GRID (on selected models) BURNER BOWLS (on panel. Gas Grate and Drip Pan Cleaner Part Number 31617 (not included): See "Assistance or Service" section to avoid product damage. Cleaning Method: s Steel-wool pad Do not remove the cooktop to order. s All-Purpose Appliance Cleaner Part Number 31662...
...-up Cooktop" section. s SURFACE UNDER COOKTOP (on some models) Remove all stored items from drawer and lift out drawer liner. Steel-wool pad BROILER PAN AND GRID (on selected models) BURNER BOWLS (on panel. Gas Grate and Drip Pan Cleaner Part Number 31617 (not included): See "Assistance or Service" section to avoid product damage. Cleaning Method: s Steel-wool pad Do not remove the cooktop to order. s All-Purpose Appliance Cleaner Part Number 31662...
Use and Care Guide
Page 30
... unnecessary service call for the fan to clear the display. Oven peeking releases oven heat and can result in a reliable cookbook. Are baked items too brown on after control knob(s) have been turned off? s Oven will not operate s Is the control knob set ? On some models, has a delay start been set correctly? Depending on cooktop s Is the cookware the proper size? If it reappears, call . Self-Cleaning cycle will operate s Oven indicator lights flash s Is the power supply cord unplugged...
... unnecessary service call for the fan to clear the display. Oven peeking releases oven heat and can result in a reliable cookbook. Are baked items too brown on after control knob(s) have been turned off? s Oven will not operate s Is the control knob set ? On some models, has a delay start been set correctly? Depending on cooktop s Is the cookware the proper size? If it reappears, call . Self-Cleaning cycle will operate s Oven indicator lights flash s Is the power supply cord unplugged...
Use and Care Guide
Page 32
..., acts of God, improper installation, installation not in accordance with electrical or plumbing codes, or use . 4. Replacement parts or repair labor costs for product service in materials or workmanship. You will pay for other than normal, single-family household use of products not approved by calling Whirlpool. DISCLAIMER OF IMPLIED WARRANTIES; If you how to use your complete model number and serial number. You must be found...
..., acts of God, improper installation, installation not in accordance with electrical or plumbing codes, or use . 4. Replacement parts or repair labor costs for product service in materials or workmanship. You will pay for other than normal, single-family household use of products not approved by calling Whirlpool. DISCLAIMER OF IMPLIED WARRANTIES; If you how to use your complete model number and serial number. You must be found...
Dimensions
Page 1
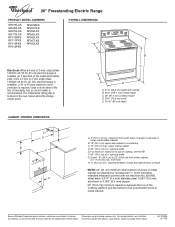
... floor H 2.2 cm) min. A time-delay fuse or circuit breaker is available), a 40- from either cabinet, 5¹⁄₂" (14.0 cm) max. Ref. 9762996 02-17-06 The model/serial rating plate is required, fused on the oven frame behind the storage drawer panel. For complete details, see NOTE*. opening width G. opening width E. Outlet - 8" (20.3 cm) to change materials and specifications without notice. Because Whirlpool Corporation policy includes...
... floor H 2.2 cm) min. A time-delay fuse or circuit breaker is available), a 40- from either cabinet, 5¹⁄₂" (14.0 cm) max. Ref. 9762996 02-17-06 The model/serial rating plate is required, fused on the oven frame behind the storage drawer panel. For complete details, see NOTE*. opening width G. opening width E. Outlet - 8" (20.3 cm) to change materials and specifications without notice. Because Whirlpool Corporation policy includes...


