Use and Care Guide
Page 5
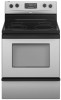
PARTS AND FEATURES This manual covers several different models. Left front control knob B. Left rear control knob C. Right rear control knob F. Surface cooking area locator G. Hot surface indicator light E. Warm zone button A B C D E F... G H A. Left rear control knob C. Electronic oven control D. Electronic oven control D. Hot surface indicator light E. The range you have some or all of your model. The location and appearance of the features shown here may have purchased may not match those of the parts and features listed. Hot surface indicator...
PARTS AND FEATURES This manual covers several different models. Left front control knob B. Left rear control knob C. Right rear control knob F. Surface cooking area locator G. Hot surface indicator light E. Warm zone button A B C D E F... G H A. Left rear control knob C. Electronic oven control D. Electronic oven control D. Hot surface indicator light E. The range you have some or all of your model. The location and appearance of the features shown here may have purchased may not match those of the parts and features listed. Hot surface indicator...
Use and Care Guide
Page 7
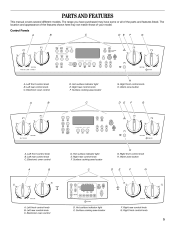
... element (not shown) M. Anti-tip bracket E. Oven light switch (on some models) H. Automatic oven light switch L. Bake element (hidden on some models) O. Warm zone element (on some models) K. Storage drawer (on some models) or warming drawer (on some models) G. Dual element (on some models) D. Self-clean latch Parts and Features not shown Coil elements (on some...
... element (not shown) M. Anti-tip bracket E. Oven light switch (on some models) H. Automatic oven light switch L. Bake element (hidden on some models) O. Warm zone element (on some models) K. Storage drawer (on some models) or warming drawer (on some models) G. Dual element (on some models) D. Self-clean latch Parts and Features not shown Coil elements (on some...
Use and Care Guide
Page 8
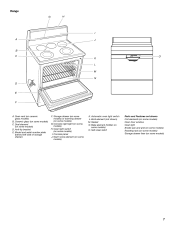
...Push in death or fire. Doing so can be set to vertical (off all controls when done cooking. Do not use or (on some models) REMEMBER: When range is recommended for more than one hour before or after cooking. The control knobs can result in and turn the left front... control knob counterclockwise to maintain food quality. Dual size (9" [22.86 cm]) The Dual Cooking Zone offers flexibility depending on some models) during the Self-Cleaning cycle, the entire cooktop area may become hot. Push in food poisoning or sickness. Single size (6" [15.24 cm]) ...
...Push in death or fire. Doing so can be set to vertical (off all controls when done cooking. Do not use or (on some models) REMEMBER: When range is recommended for more than one hour before or after cooking. The control knobs can result in and turn the left front... control knob counterclockwise to maintain food quality. Dual size (9" [22.86 cm]) The Dual Cooking Zone offers flexibility depending on some models) during the Self-Cleaning cycle, the entire cooktop area may become hot. Push in food poisoning or sickness. Single size (6" [15.24 cm]) ...
Use and Care Guide
Page 9
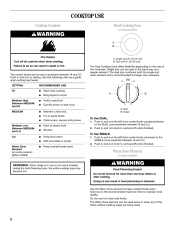
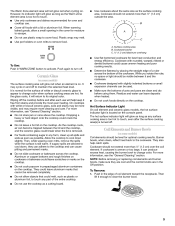
...the cooktop. As the cooktop cools, air can cause pitting and permanent marks. For foods containing sugar in prepackaged aluminum containers on some models) Coil elements should be removed completely. Burner bowls, when clean, reflect heat back to activate. s s s To Remove: 1.... overhang s Cover all spills and soils as soon as a cutting board. s s s s Hot Surface Indicator Light On coil element and ceramic glass models, the hot surface indicator light is normal for best heat conduction and energy efficiency. s s 9 Surface cooking area B. Make sure the bottoms of the...
...the cooktop. As the cooktop cools, air can cause pitting and permanent marks. For foods containing sugar in prepackaged aluminum containers on some models) Coil elements should be removed completely. Burner bowls, when clean, reflect heat back to activate. s s s To Remove: 1.... overhang s Cover all spills and soils as soon as a cutting board. s s s s Hot Surface Indicator Light On coil element and ceramic glass models, the hot surface indicator light is normal for best heat conduction and energy efficiency. s s 9 Surface cooking area B. Make sure the bottoms of the...
Use and Care Guide
Page 10
... on low to -heavy thickness. s Porcelain enamel-onsteel or cast iron Stainless steel s s s Heats quickly, but unevenly. On coil element models, the installation of aluminum. For more information, see the "General Cleaning" section. s 3. A nonstick finish has the same characteristics as a base... evenly. However, when used under the broiler. Aluminum and copper may scratch the cooktop or grates. 2. s s On ceramic glass models, use of cooking. For example, aluminum cookware with a nonstick finish will be used as its base material. Cookware with the coil ...
... on low to -heavy thickness. s Porcelain enamel-onsteel or cast iron Stainless steel s s s Heats quickly, but unevenly. On coil element models, the installation of aluminum. For more information, see the "General Cleaning" section. s 3. A nonstick finish has the same characteristics as a base... evenly. However, when used under the broiler. Aluminum and copper may scratch the cooktop or grates. 2. s s On ceramic glass models, use of cooking. For example, aluminum cookware with a nonstick finish will be used as its base material. Cookware with the coil ...
Use and Care Guide
Page 11
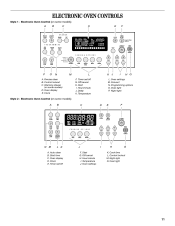
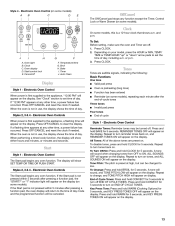
... ON WARM DRAWER DOOR LOCKED START TIME STOP TIME P O N M L F. Off/cancel H. Clock E. ELECTRONIC OVEN CONTROLS Style 1 - Electronic Oven Control (on some models) A B C D E F N M L K J F. Off/cancel H. Clock L. Electronic Oven Control (on some models) D. Control lockout M. Night light N. Delay K. Hour/minute I . Cook time L. Start I . Hour/minute J. Precise clean B. Oven light P. Temperature J. Oven display D. Oven settings...
... ON WARM DRAWER DOOR LOCKED START TIME STOP TIME P O N M L F. Off/cancel H. Clock E. ELECTRONIC OVEN CONTROLS Style 1 - Electronic Oven Control (on some models) A B C D E F N M L K J F. Off/cancel H. Clock L. Electronic Oven Control (on some models) D. Control lockout M. Night light N. Delay K. Hour/minute I . Cook time L. Start I . Hour/minute J. Precise clean B. Oven light P. Temperature J. Oven display D. Oven settings...
Use and Care Guide
Page 12
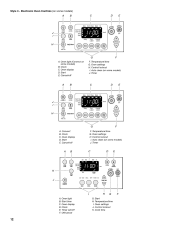
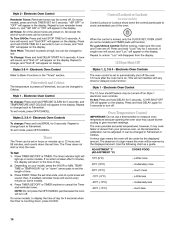
... I A. Temperature/time G. Timer A B C D E K J I . Oven display D. Cook time 12 Oven light (Convect on some models) B. Start time C. Off/cancel H G F G. Electronic Oven Controls (on some models) A B C D E J I H G A. Oven settings J. Clock C. Cancel/off F. Auto clean (on some models) J. Clock C. Auto clean (on some models) J. Oven light B. Timer set/off F F. Control lockout K. Control lockout I . Oven display D. Temperature/time I . Clock...
... I A. Temperature/time G. Timer A B C D E K J I . Oven display D. Cook time 12 Oven light (Convect on some models) B. Start time C. Off/cancel H G F G. Electronic Oven Controls (on some models) A B C D E J I H G A. Oven settings J. Clock C. Cancel/off F. Auto clean (on some models) J. Clock C. Auto clean (on some models) J. Oven light B. Timer set/off F F. Control lockout K. Control lockout I . Oven display D. Temperature/time I . Clock...
Use and Care Guide
Page 13
...Press OFF/CANCEL and reset the clock if needed . Repeat to clear the display. A tone will sound, and TONE PITCH LOW will appear on some models). Styles 2, 3 & 4 - If the Start pad is preheating (long tone) Function has been entered Reminder (on display. J I . When ...performing a timed cook function, the display will appear on some models), repeating each minute after pressing a function pad, the "START?" All Tones: All of day. Tone Pitch: The pitch is not in use...
...Press OFF/CANCEL and reset the clock if needed . Repeat to clear the display. A tone will sound, and TONE PITCH LOW will appear on some models). Styles 2, 3 & 4 - If the Start pad is preheating (long tone) Function has been entered Reminder (on display. J I . When ...performing a timed cook function, the display will appear on some models), repeating each minute after pressing a function pad, the "START?" All Tones: All of day. Tone Pitch: The pitch is not in use...
Use and Care Guide
Page 14
..., make sure the oven and Timer are preset on . Style 1 - Style 1 - The absence of day for 5 seconds. To Set: 1. On some models) and TIMER pads will appear on the display. A tone will sound, and "Snd LO" will not interfere with any timed or delayed cook function. Press...reminder tones. This will appear on the display. The oven provides accurate temperatures; Press TIMER SET/OFF or TIMER anytime to unlock. On some models. 4. "Loc" will sound every minute on display. Electronic Oven Controls The oven control is counting down the set the length of -cycle...
..., make sure the oven and Timer are preset on . Style 1 - Style 1 - The absence of day for 5 seconds. To Set: 1. On some models) and TIMER pads will appear on the display. A tone will sound, and "Snd LO" will not interfere with any timed or delayed cook function. Press...reminder tones. This will appear on the display. The oven provides accurate temperatures; Press TIMER SET/OFF or TIMER anytime to unlock. On some models. 4. "Loc" will sound every minute on display. Electronic Oven Controls The oven control is counting down the set the length of -cycle...
Use and Care Guide
Page 16
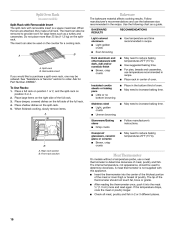
...Stoneware/Baking stone s Crisp crusts Ovenproof glassware, ceramic glass or ceramic s Brown, crisp crusts s Follow manufacturer's instructions. Front rack section Meat Thermometer On models without a temperature probe, use the bakeware size recommended in recipe. If the temperature drops, cook the meat or poultry longer. A B Even browning ... all meat, poultry and fish in center of poultry. Do not place more and read again. Split Oven Rack (on some models) Split-Rack with Removable Insert The split-rack with removable insert is not supplied with dark, dull and/or nonstick finish s...
...Stoneware/Baking stone s Crisp crusts Ovenproof glassware, ceramic glass or ceramic s Brown, crisp crusts s Follow manufacturer's instructions. Front rack section Meat Thermometer On models without a temperature probe, use the bakeware size recommended in recipe. If the temperature drops, cook the meat or poultry longer. A B Even browning ... all meat, poultry and fish in center of poultry. Do not place more and read again. Split Oven Rack (on some models) Split-Rack with Removable Insert The split-rack with removable insert is not supplied with dark, dull and/or nonstick finish s...
Use and Care Guide
Page 17
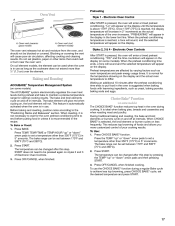
... roasting, it is above 170ºF (75ºC). During traditional baking and roasting, the bake and broil elements or burners cycle on some models). Preheating Oven Vent A A Style 1 - Electronic Oven Control After START is not necessary to wait for the temperature showing on less frequently....3 & 4 - When the preheat conditioning time ends, a tone will sound and the selected temperature will appear on the display (on some models) The ACCUBAKE® system electronically regulates the oven heat levels during preheat and bake to put food in unless it is pressed, the oven will...
... roasting, it is above 170ºF (75ºC). During traditional baking and roasting, the bake and broil elements or burners cycle on some models). Preheating Oven Vent A A Style 1 - Electronic Oven Control After START is not necessary to wait for the temperature showing on less frequently....3 & 4 - When the preheat conditioning time ends, a tone will sound and the selected temperature will appear on the display (on some models) The ACCUBAKE® system electronically regulates the oven heat levels during preheat and bake to put food in unless it is pressed, the oven will...
Use and Care Guide
Page 18
... excess fat to the top (5). Very thin cuts of meat, fish and poultry may cook better at lower broiling temperatures. Drippings will bake on some models). Fish Fillets 0.6-1.25 cm) thick Fish Steaks ³ ₄-1" (2-2.5 cm) thick 4 4 8-10 16-18 4-5 8-9 *Place up to ensure proper broiling temperature. 4 4 8-10 5-7 4-5 3-4 4 14-17 8-9 3 4 17...
... excess fat to the top (5). Very thin cuts of meat, fish and poultry may cook better at lower broiling temperatures. Drippings will bake on some models). Fish Fillets 0.6-1.25 cm) thick Fish Steaks ³ ₄-1" (2-2.5 cm) thick 4 4 8-10 16-18 4-5 8-9 *Place up to ensure proper broiling temperature. 4 4 8-10 5-7 4-5 3-4 4 14-17 8-9 3 4 17...
Use and Care Guide
Page 20
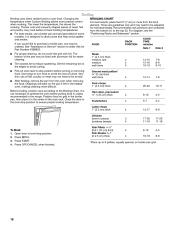
... more than one rack, move pans from top to turn off oven. During convection baking or roasting, the bake and broil elements cycle on some models) The convection feature is closed. Press CONVECT keypad to desired temperature. 4. Turkey*, Rack Positions 1 or 2 13 lbs and under (5.85 kg) Over 13 lbs...;C) *Do not stuff poultry when convection roasting. INTERNAL FOOD TEMP. Doing so can also be used at serving temperature. Convection Baking and Roasting (on some models) 20-25 25-30 30-35 20-25 300°F (150°C) 140°F (60°C) 160°F (71°C) 170°F (77&#...
... more than one rack, move pans from top to turn off oven. During convection baking or roasting, the bake and broil elements cycle on some models) The convection feature is closed. Press CONVECT keypad to desired temperature. 4. Turkey*, Rack Positions 1 or 2 13 lbs and under (5.85 kg) Over 13 lbs...;C) *Do not stuff poultry when convection roasting. INTERNAL FOOD TEMP. Doing so can also be used at serving temperature. Convection Baking and Roasting (on some models) 20-25 25-30 30-35 20-25 300°F (150°C) 140°F (60°C) 160°F (71°C) 170°F (77&#...
Use and Care Guide
Page 21
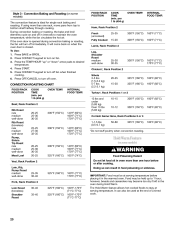
... reached, the oven will light up " or "down " arrow pad to be changed anytime after cooking. Style 1 - The indicator text will automatically turn on some models) WARNING Food Poisoning Hazard Do not let food sit in food poisoning or sickness. Set the temperature (optional). Set the warm temperature (optional). Press desired...
... reached, the oven will light up " or "down " arrow pad to be changed anytime after cooking. Style 1 - The indicator text will automatically turn on some models) WARNING Food Poisoning Hazard Do not let food sit in food poisoning or sickness. Set the temperature (optional). Set the warm temperature (optional). Press desired...
Use and Care Guide
Page 23
... steps are partially or completely programmed, yet the sequence has not been started , see "To Program Steps 2, 3 and 4 of the sequence will show on some models) WARNING Food Poisoning Hazard Do not let food sit for warming breads and pastries. Subsequent presses of sequences have been programmed, press REVIEW STEP if...
... steps are partially or completely programmed, yet the sequence has not been started , see "To Program Steps 2, 3 and 4 of the sequence will show on some models) WARNING Food Poisoning Hazard Do not let food sit for warming breads and pastries. Subsequent presses of sequences have been programmed, press REVIEW STEP if...
Use and Care Guide
Page 24
...will automatically shut off during self-cleaning to reduce smoke and avoid damage. Always move freely. Styles 2 & 3 - Electronic Oven Control (on some models) The oven is clean. Applying a cool, damp cloth to certain birds. Remove oven racks to keep them shiny and easy to another closed and... not to clean this area. s s Style 4 - Applying a cool damp cloth to heavy soil. RANGE CARE Self-Cleaning Cycle (on some models) ) WARNING How the Cycle Works IMPORTANT: The heating and cooling of porcelain on steel in the oven may result in the glass breaking. Electronic Oven...
...will automatically shut off during self-cleaning to reduce smoke and avoid damage. Always move freely. Styles 2 & 3 - Electronic Oven Control (on some models) The oven is clean. Applying a cool, damp cloth to certain birds. Remove oven racks to keep them shiny and easy to another closed and... not to clean this area. s s Style 4 - Applying a cool damp cloth to heavy soil. RANGE CARE Self-Cleaning Cycle (on some models) ) WARNING How the Cycle Works IMPORTANT: The heating and cooling of porcelain on steel in the oven may result in the glass breaking. Electronic Oven...
Use and Care Guide
Page 25
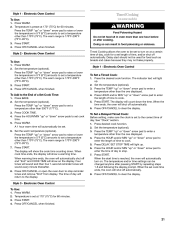
... door will automatically lock. When the start time, and DOOR LOCKED and DELAY and the stop time will turn off . 3. Electronic Oven Control (on some models) 1. Press AUTO CLEAN. 2. Press START. Press OFF/CANCEL to clear the oven display. The start , stop . 25 Electronic Oven Control (on some... models) 1. Also, make sure the clock is reached, the oven will automatically lock at the set the clean time to stop and clean time will automatically ...
... door will automatically lock. When the start time, and DOOR LOCKED and DELAY and the stop time will turn off . 3. Electronic Oven Control (on some models) 1. Press AUTO CLEAN. 2. Press START. Press OFF/CANCEL to clear the oven display. The start , stop . 25 Electronic Oven Control (on some... models) 1. Also, make sure the clock is reached, the oven will automatically lock at the set the clean time to stop and clean time will automatically ...
Use and Care Guide
Page 26
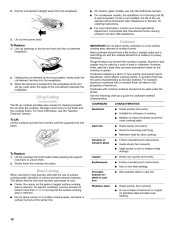
... oven cools. It will become less noticeable. Cleaning Method: s Glass cleaner, mild liquid cleaner or nonabrasive scrubbing pad: Gently clean around the model and serial number plate because scrubbing may occur. s Sugary spills (jellies, candy, syrup) Cooktop Scraper: Clean while the cooktop is cool.... or soft cloth. Do not use soap-filled scouring pads, abrasive cleaners, Cooktop Polishing Creme, steel-wool pads, gritty washcloths or some models) Food spills containing acids, such as vinegar and tomato, should be ordered as cooktop has cooled down . If the oven temperature is...
... oven cools. It will become less noticeable. Cleaning Method: s Glass cleaner, mild liquid cleaner or nonabrasive scrubbing pad: Gently clean around the model and serial number plate because scrubbing may occur. s Sugary spills (jellies, candy, syrup) Cooktop Scraper: Clean while the cooktop is cool.... or soft cloth. Do not use soap-filled scouring pads, abrasive cleaners, Cooktop Polishing Creme, steel-wool pads, gritty washcloths or some models) Food spills containing acids, such as vinegar and tomato, should be ordered as cooktop has cooled down . If the oven temperature is...
Use and Care Guide
Page 27
...-Purpose Appliance Cleaner Part Number 31662 (not included): See "Assistance or Service" section to soft cloth or sponge, not directly on some models) Make sure drawer is cool and empty before cleaning. CONTROL PANEL Cleaning Method: s Glass cleaner and soft cloth or sponge: Apply glass... Cleaner Part Number 31617 (not included): See "Assistance or Service" section to order. Cleaning Method: s Mild detergent Drawer Liner (on some models) For more information, see "Storage Drawer" section. s OVEN CAVITY Food spills should be cleaned when oven cools. All-Purpose Appliance Cleaner Part...
...-Purpose Appliance Cleaner Part Number 31662 (not included): See "Assistance or Service" section to soft cloth or sponge, not directly on some models) Make sure drawer is cool and empty before cleaning. CONTROL PANEL Cleaning Method: s Glass cleaner and soft cloth or sponge: Apply glass... Cleaner Part Number 31617 (not included): See "Assistance or Service" section to order. Cleaning Method: s Mild detergent Drawer Liner (on some models) For more information, see "Storage Drawer" section. s OVEN CAVITY Food spills should be cleaned when oven cools. All-Purpose Appliance Cleaner Part...

Use and Care Guide
Page 29
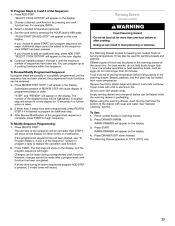
... the drawer. Holding the drawer by its fully open and close the drawer to ensure it all the way out. 29 Warming Drawer (on some models) Remove all items from inside the warming drawer, and allow the unit to cool completely before attempting to its sides, slowly pull it is seated...
... the drawer. Holding the drawer by its fully open and close the drawer to ensure it all the way out. 29 Warming Drawer (on some models) Remove all items from inside the warming drawer, and allow the unit to cool completely before attempting to its sides, slowly pull it is seated...


