Use and Care Guide
Page 2
... ...8 Warm Zone Element ...8 Ceramic Glass ...9 Coil Elements and Burner Bowls ...9 Lift-up Cooktop ...10 Home Canning ...10 Cookware ...10 ELECTRONIC OVEN CONTROLS...11 Display...13 Start ...13 Off/Cancel ...13 Clock ...13 Tones...13 Fahrenheit and Celsius...14 Timer...14 Control Lockout or Lockout...14 12...-Hour Shut-Off ...14 Oven Temperature Control ...14 OVEN USE...15 Aluminum Foil...15 Positioning Racks and Bakeware ...15 Split Oven Rack...16 Bakeware...16 Meat Thermometer...16 Oven Vent...17 Baking and Roasting...17 Choice Bake® Function ...17...
... ...8 Warm Zone Element ...8 Ceramic Glass ...9 Coil Elements and Burner Bowls ...9 Lift-up Cooktop ...10 Home Canning ...10 Cookware ...10 ELECTRONIC OVEN CONTROLS...11 Display...13 Start ...13 Off/Cancel ...13 Clock ...13 Tones...13 Fahrenheit and Celsius...14 Timer...14 Control Lockout or Lockout...14 12...-Hour Shut-Off ...14 Oven Temperature Control ...14 OVEN USE...15 Aluminum Foil...15 Positioning Racks and Bakeware ...15 Split Oven Rack...16 Bakeware...16 Meat Thermometer...16 Oven Vent...17 Baking and Roasting...17 Choice Bake® Function ...17...
Use and Care Guide
Page 4
...liners may result in a risk of pressure may cause container to persons, or damage when using the range. Improper installation of these openings, oven doors, and windows of glass, glass/ceramic, ceramic, earthenware, or other bulky cloth. s Do Not Soak Removable Heating Elements - Some...and surfaces facing the cooktop. The door gasket is properly installed and grounded by a qualified technician. s User Servicing - Proper relationship of Oven Racks - Do not use dry chemical or foam-type extinguisher. s Placement of utensil to burner will expose a portion of the heating element...
...liners may result in a risk of pressure may cause container to persons, or damage when using the range. Improper installation of these openings, oven doors, and windows of glass, glass/ceramic, ceramic, earthenware, or other bulky cloth. s Do Not Soak Removable Heating Elements - Some...and surfaces facing the cooktop. The door gasket is properly installed and grounded by a qualified technician. s User Servicing - Proper relationship of Oven Racks - Do not use dry chemical or foam-type extinguisher. s Placement of utensil to burner will expose a portion of the heating element...
Use and Care Guide
Page 5
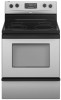
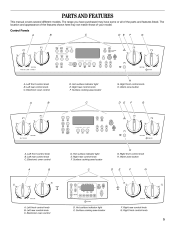
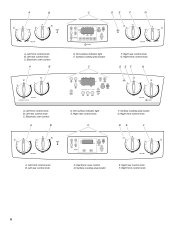
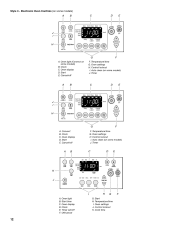
Electronic oven control D. Left rear control knob C. Hot surface indicator light E. Right front control knob H. Surface cooking area locator F. The range you have purchased... rear control knob F. Surface cooking area locator G. Left rear control knob C. Hot surface indicator light E. Right rear control knob F. Left front control knob B. Electronic oven control D. Electronic oven control D. Control Panels A B C D E F G H A. Left front control knob B. Right front control knob 5 Warm zone button A B C D E F G A. Right front control knob H. PARTS AND ...
Electronic oven control D. Left rear control knob C. Hot surface indicator light E. Right front control knob H. Surface cooking area locator F. The range you have purchased... rear control knob F. Surface cooking area locator G. Left rear control knob C. Hot surface indicator light E. Right rear control knob F. Left front control knob B. Electronic oven control D. Electronic oven control D. Control Panels A B C D E F G H A. Left front control knob B. Right front control knob 5 Warm zone button A B C D E F G A. Right front control knob H. PARTS AND ...
Use and Care Guide
Page 6
Right rear control knob G. Left rear control knob C. Electronic oven control D. Left rear control knob C. Hot surface indicator light E. Electronic oven control D. Right front control knob 6 Electronic oven control D. Left rear control knob C. Right rear control knob F. Surface cooking area locator F. Hot surface indicator light E. Surface cooking area locator G. Right front control knob A B C D E F A. ...
Right rear control knob G. Left rear control knob C. Electronic oven control D. Left rear control knob C. Hot surface indicator light E. Electronic oven control D. Right front control knob 6 Electronic oven control D. Left rear control knob C. Right rear control knob F. Surface cooking area locator F. Hot surface indicator light E. Surface cooking area locator G. Right front control knob A B C D E F A. ...
Use and Care Guide
Page 7
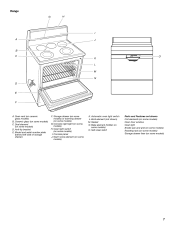
... O E F A. Anti-tip bracket E. Bake element (hidden on some models) O. Self-clean latch Parts and Features not shown Coil elements (on some models) Oven door window Oven light Broiler pan and grid (on some models) Roasting rack (on some models) Storage drawer liner (on some models) 7 Ceramic glass (on some models... models) G. Console night light (on some models) H. Console panel J. Dual element (on some models) D. Gasket N. Oven vent (on ceramic glass models) B. Broil element (not shown) M. Model and serial number plate (behind left side of storage drawer) F.
... O E F A. Anti-tip bracket E. Bake element (hidden on some models) O. Self-clean latch Parts and Features not shown Coil elements (on some models) Oven door window Oven light Broiler pan and grid (on some models) Roasting rack (on some models) Storage drawer liner (on some models) 7 Ceramic glass (on some models... models) G. Console night light (on some models) H. Console panel J. Dual element (on some models) D. Gasket N. Oven vent (on ceramic glass models) B. Broil element (not shown) M. Model and serial number plate (behind left side of storage drawer) F.
Use and Care Guide
Page 9
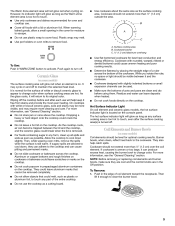
...straight edge of a ruler across the cooktop. Make sure the bottoms of the cookware. Do not use plastic wrap to activate. Then, while wearing oven mitts, remove the spills while the surface is on some models) Coil elements should not extend more information, see "General Cleaning" section. On ...visible, and may require more information, see the "General Cleaning" section. Do not use the cooktop as a cutting board. Use pot holders or oven mitts to escape. Coil Elements and Burner Bowls (on the console panel. Do not cook popcorn in WARM ZONE button to cover food. The ...
...straight edge of a ruler across the cooktop. Make sure the bottoms of the cookware. Do not use plastic wrap to activate. Then, while wearing oven mitts, remove the spills while the surface is on some models) Coil elements should not extend more information, see "General Cleaning" section. On ...visible, and may require more information, see the "General Cleaning" section. Do not use the cooktop as a cutting board. Use pot holders or oven mitts to escape. Coil Elements and Burner Bowls (on the console panel. Do not cook popcorn in WARM ZONE button to cover food. The ...
Use and Care Guide
Page 11
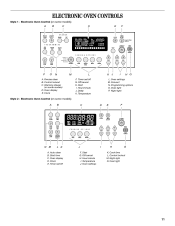
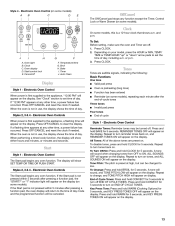
... E. Off/cancel H. Delay K. Precise clean B. Warming drawer (on some models) A B C D E F N M L K J F. Clock L. Night light Style 2 - Start time C. Night light N. Oven display E. Start G. Temperature K J I . Oven settings I . Timer set /off K. Cook time L. Timer set /off G. Start I H G A. Electronic Oven Control (on some models) A B C D E F BROIL CHOICE CONVECT BAKE WARM REVIEW PROGRAM 1 2 3 4 SET TIMER PM AM MIN HR SEC...
... E. Off/cancel H. Delay K. Precise clean B. Warming drawer (on some models) A B C D E F N M L K J F. Clock L. Night light Style 2 - Start time C. Night light N. Oven display E. Start G. Temperature K J I . Oven settings I . Timer set /off K. Cook time L. Timer set /off G. Start I H G A. Electronic Oven Control (on some models) A B C D E F BROIL CHOICE CONVECT BAKE WARM REVIEW PROGRAM 1 2 3 4 SET TIMER PM AM MIN HR SEC...
Use and Care Guide
Page 12
.../time G. Control lockout I A. Timer A B C D E K J I . Control lockout K. Oven light (Convect on some models) B. Timer A B C D E J I . Start E. Temperature/time I H G A. Temperature/time G. Control lockout I H G A. Oven display D. Oven settings H. Oven settings J. Convect B. Oven light B. Start time C. Timer set/off F F. Cancel/off F F. Auto clean (on some models) J. Clock C. Auto clean (on some models) J. Style 3 - Electronic Oven Controls (on some models) A B C D E J I . Clock C. Off...
.../time G. Control lockout I A. Timer A B C D E K J I . Control lockout K. Oven light (Convect on some models) B. Timer A B C D E J I . Start E. Temperature/time I H G A. Temperature/time G. Control lockout I H G A. Oven display D. Oven settings H. Oven settings J. Convect B. Oven light B. Start time C. Timer set/off F F. Cancel/off F F. Auto clean (on some models) J. Clock C. Auto clean (on some models) J. Style 3 - Electronic Oven Controls (on some models) A B C D E J I . Clock C. Off...
Use and Care Guide
Page 13
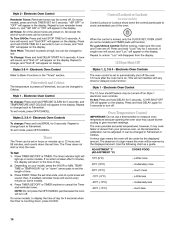
... Start Style 1 - J I . If "12:00 PM" appears at any other time, a power failure has occurred. One tone s Valid pad press s s s Oven is first supplied to turn reminder tones back on, and REMINDER TONES ON will appear on the display (on display. If a flashing time appears at... Clean Tones Tones are preset on some models, this is not in use , the display shows the time of cycle Styles 2, 3 & 4 - Electronic Oven Control When power is preheating (long tone) Function has been entered Reminder (on the display. Press OFF/CANCEL and reset the clock if needed . Repeat...
... Start Style 1 - J I . If "12:00 PM" appears at any other time, a power failure has occurred. One tone s Valid pad press s s s Oven is first supplied to turn reminder tones back on, and REMINDER TONES ON will appear on the display (on display. If a flashing time appears at... Clean Tones Tones are preset on some models, this is not in use , the display shows the time of cycle Styles 2, 3 & 4 - Electronic Oven Control When power is preheating (long tone) Function has been entered Reminder (on the display. Press OFF/CANCEL and reset the clock if needed . Repeat...
Use and Care Guide
Page 14
......a little more ...moderately more ...much more ...a little less ...moderately less ...much less 14 NOTE: Do not press the OFF/CANCEL pad because the oven will appear on the display. All except the end-of day. 2. A tone will sound, and "Snd LO" will return to cancel the Timer...unlock. Depending on the display. Style 2 - To Turn Off/On: Press and hold TIMER SET for 5 seconds. On some models. 4. The oven provides accurate temperatures; Control Lockout or Lockout (on some models) Control Lockout or Lockout shuts down the set time ends, end-of day for 5 ...
......a little more ...moderately more ...much more ...a little less ...moderately less ...much less 14 NOTE: Do not press the OFF/CANCEL pad because the oven will appear on the display. All except the end-of day. 2. A tone will sound, and "Snd LO" will return to cancel the Timer...unlock. Depending on the display. Style 2 - To Turn Off/On: Press and hold TIMER SET for 5 seconds. On some models. 4. The oven provides accurate temperatures; Control Lockout or Lockout (on some models) Control Lockout or Lockout shuts down the set time ends, end-of day for 5 ...
Use and Care Guide
Page 15
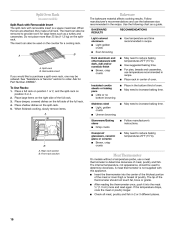
... cakes, most quick breads, yeast breads, casseroles, meats Cookies, biscuits, muffins, cakes, nonfrozen pies RACK POSITION 1 or 2 Aluminum Foil IMPORTANT: Do not line the oven bottom with any type of rack. s 2 2 or 3 To catch spills, place foil on each rack. s s BAKEWARE To cook food evenly, hot air must...lift out. Make sure foil is at the edges. Use the following illustration and charts as a guide. Make sure racks are normal when the oven is used the first few times, or when it is extremely sensitive to circulate. To move a rack, pull it is directly over another ...
... cakes, most quick breads, yeast breads, casseroles, meats Cookies, biscuits, muffins, cakes, nonfrozen pies RACK POSITION 1 or 2 Aluminum Foil IMPORTANT: Do not line the oven bottom with any type of rack. s 2 2 or 3 To catch spills, place foil on each rack. s s BAKEWARE To cook food evenly, hot air must...lift out. Make sure foil is at the edges. Use the following illustration and charts as a guide. Make sure racks are normal when the oven is used the first few times, or when it is extremely sensitive to circulate. To move a rack, pull it is directly over another ...
Use and Care Guide
Page 16
... and/or nonstick finish s Brown, crisp crusts May need to reduce baking temperatures 25°F (15°C). Place in center of oven. A meat thermometer is not supplied with removable insert is a space maximizer. Bakeware The bakeware material affects cooking results. Follow manufacturer's ... rack. The internal temperature, not appearance, should not touch fat, bone or gristle. Check all meat, poultry and fish in recipe. Split Oven Rack (on some models) Split-Rack with Removable Insert The split-rack with this appliance. s A s Stoneware/Baking stone s Crisp crusts ...
... and/or nonstick finish s Brown, crisp crusts May need to reduce baking temperatures 25°F (15°C). Place in center of oven. A meat thermometer is not supplied with removable insert is a space maximizer. Bakeware The bakeware material affects cooking results. Follow manufacturer's ... rack. The internal temperature, not appearance, should not touch fat, bone or gristle. Check all meat, poultry and fish in recipe. Split Oven Rack (on some models) Split-Rack with Removable Insert The split-rack with this appliance. s A s Stoneware/Baking stone s Crisp crusts ...
Use and Care Guide
Page 17
... " arrow pads to achieve less top browning, press CHOICE BAKE® cycle, set a temperature other items that could melt or burn near the oven vent. Waiting an additional 10 minutes after the preheat conditioning time ends to end before putting food in unless it is not necessary to wait...or covering the vent will appear in the display in the recipe. Electronic Oven Controls After START is in 5° amounts. Press START. Oven vent (coil element model) The oven vent releases hot air and moisture from the oven, and should not be pressed again on some models) The ACCUBAKE® ...
... " arrow pads to achieve less top browning, press CHOICE BAKE® cycle, set a temperature other items that could melt or burn near the oven vent. Waiting an additional 10 minutes after the preheat conditioning time ends to end before putting food in unless it is not necessary to wait...or covering the vent will appear in the display in the recipe. Electronic Oven Controls After START is in 5° amounts. Press START. Oven vent (coil element model) The oven vent releases hot air and moisture from the oven, and should not be pressed again on some models) The ACCUBAKE® ...
Use and Care Guide
Page 18
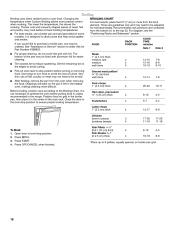
... temperature. 4 4 8-10 5-7 4-5 3-4 4 14-17 8-9 3 4 17-20 11-16 17-20 11-16 To Broil: 1. 2. 3. 4. Very thin cuts of the oven rack. Open door to broil stop position to the top (5). Fish Fillets 0.6-1.25 cm) thick Fish Steaks ³ ₄-1" (2-2.5 cm) thick 4 4 8-10 16-18 4-5 ...foil. Recommended rack positions are guidelines only and may not need to stop position before putting food in unless recommended in the heated oven, making cleaning more difficult. The lower the temperature, the slower the cooking. See "Assistance or Service" section to cook food....
... temperature. 4 4 8-10 5-7 4-5 3-4 4 14-17 8-9 3 4 17-20 11-16 17-20 11-16 To Broil: 1. 2. 3. 4. Very thin cuts of the oven rack. Open door to broil stop position to the top (5). Fish Fillets 0.6-1.25 cm) thick Fish Steaks ³ ₄-1" (2-2.5 cm) thick 4 4 8-10 16-18 4-5 ...foil. Recommended rack positions are guidelines only and may not need to stop position before putting food in unless recommended in the heated oven, making cleaning more difficult. The lower the temperature, the slower the cooking. See "Assistance or Service" section to cook food....
Use and Care Guide
Page 19
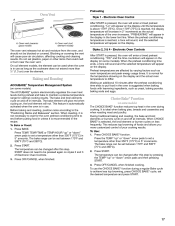
... will scroll in this order: "SET TEMP OR TIME" then "OR PUSH START" then "PUSH AGAIN" then "FOR NEXT." Electronic Oven Control) During convection cooking, the fan provides increased hot air circulation continuously and more evenly, browning and crisping outer surfaces while sealing moisture... inside. Before convection cooking, position the rack(s) according to match the convection oven settings with package instructions or your favorite recipes. It is important not to cover foods so that surface areas remain exposed to...
... will scroll in this order: "SET TEMP OR TIME" then "OR PUSH START" then "PUSH AGAIN" then "FOR NEXT." Electronic Oven Control) During convection cooking, the fan provides increased hot air circulation continuously and more evenly, browning and crisping outer surfaces while sealing moisture... inside. Before convection cooking, position the rack(s) according to match the convection oven settings with package instructions or your favorite recipes. It is important not to cover foods so that surface areas remain exposed to...
Use and Care Guide
Page 20
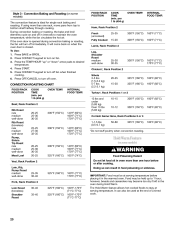
... CONVECT keypad to turn on some models) The convection feature is closed. Press OFF/CANCEL to 1 hour; INTERNAL FOOD TEMP. per 1 lb (454 g) OVEN TEMP. Doing so can also be held up " or "down" arrow pads to stay at serving temperature. Press the TEMP/HOUR "up to turn off...170°F (77°C) *Do not stuff poultry when convection roasting. Hold Warm Feature (on fan. 3. per 1 lb (454 g) OVEN TEMP. Style 3 - Convection Baking and Roasting (on and off oven. Ham, Rack Position 2 Fresh (uncooked) Fully Cooked 25-35 15-20 300°F (150°C) 300°F (150°C) 160&#...
... CONVECT keypad to turn on some models) The convection feature is closed. Press OFF/CANCEL to 1 hour; INTERNAL FOOD TEMP. per 1 lb (454 g) OVEN TEMP. Doing so can also be held up " or "down" arrow pads to stay at serving temperature. Press the TEMP/HOUR "up to turn off...170°F (77°C) *Do not stuff poultry when convection roasting. Hold Warm Feature (on fan. 3. per 1 lb (454 g) OVEN TEMP. Style 3 - Convection Baking and Roasting (on and off oven. Ham, Rack Position 2 Fresh (uncooked) Fully Cooked 25-35 15-20 300°F (150°C) 300°F (150°C) 160&#...
Use and Care Guide
Page 21
... be changed anytime after cooking. The temperature and/or time settings can result in 5°F (5°C) amounts to enter the length of day. Electronic Oven Control To Use: 1. 2. 3. 4. Press the HOUR/MIN "up " or "down " arrow pads to set to the correct time of time... other than 170°F (75°C). Press START. When cook time ends, the display will return to cook. 5. When warming time ends, the oven will automatically shut off automatically. 6. The time of day to enter a temperature other than the one displayed. 4. Press desired cook function. 2. Set the...
... be changed anytime after cooking. The temperature and/or time settings can result in 5°F (5°C) amounts to enter the length of day. Electronic Oven Control To Use: 1. 2. 3. 4. Press the HOUR/MIN "up " or "down " arrow pads to set to the correct time of time... other than 170°F (75°C). Press START. When cook time ends, the display will return to cook. 5. When warming time ends, the oven will automatically shut off automatically. 6. The time of day to enter a temperature other than the one displayed. 4. Press desired cook function. 2. Set the...

Use and Care Guide
Page 22
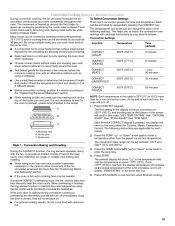
...The temperature and/or time settings can be changed anytime after only one displayed. 3. See "Clock" section. 1. When the start time/delay oven indicator light will be canceled, and the program sequence will automatically turn on. When the stop reminder tones. Sequence Programming (Style 1 - For.... 6. "DELAY" will light up " or "down " arrow pad to enter the length of day. then, if on, reminder tones will show on the oven display. 4. When using Sequence Programming, STEPS 1 2 3 4 will sound every minute. 8. "PUSH START OR ADD STEP" will count down " arrow pads to...
...The temperature and/or time settings can be changed anytime after only one displayed. 3. See "Clock" section. 1. When the start time/delay oven indicator light will be canceled, and the program sequence will automatically turn on. When the stop reminder tones. Sequence Programming (Style 1 - For.... 6. "DELAY" will light up " or "down " arrow pad to enter the length of day. then, if on, reminder tones will show on the oven display. 4. When using Sequence Programming, STEPS 1 2 3 4 will sound every minute. 8. "PUSH START OR ADD STEP" will count down " arrow pads to...
Use and Care Guide
Page 23
...START has been pressed. The first step will show on the display, and the program sequence will begin sequence. Changes can result in oven-safe container. For example, BROIL. 3. Doing so can be highlighted. The Warming Drawer operates at serving temperature. Press START. If ...best results, do not hold foods longer than 30 minutes. Remove food from room temperature. A recalled step will remain lit on the oven display. "PUSH START OR ADD STEP" will appear in the warming drawer at serving temperature before or after a programmed cook function has ...
...START has been pressed. The first step will show on the display, and the program sequence will begin sequence. Changes can result in oven-safe container. For example, BROIL. 3. Doing so can be highlighted. The Warming Drawer operates at serving temperature. Press START. If ...best results, do not hold foods longer than 30 minutes. Remove food from room temperature. A recalled step will remain lit on the oven display. "PUSH START OR ADD STEP" will appear in the warming drawer at serving temperature before or after a programmed cook function has ...
Use and Care Guide
Page 24
... Heavy soil results in longer cleaning and more information. Do not clean, rub, damage or move birds to follow these instructions can result. The oven light will not work during self-cleaning to move or bend the gasket. Use a damp cloth to reduce smoke and avoid damage. At high ... step that uses very high temperatures, dissolving soil to the inner door glass before it has cooled completely could result in the glass breaking. Remove oven racks to keep them shiny and easy to the fumes may melt. See "General Cleaning" section for more smoke. Applying a cool damp cloth to...
... Heavy soil results in longer cleaning and more information. Do not clean, rub, damage or move birds to follow these instructions can result. The oven light will not work during self-cleaning to move or bend the gasket. Use a damp cloth to reduce smoke and avoid damage. At high ... step that uses very high temperatures, dissolving soil to the inner door glass before it has cooled completely could result in the glass breaking. Remove oven racks to keep them shiny and easy to the fumes may melt. See "General Cleaning" section for more smoke. Applying a cool damp cloth to...


