
Use and Care Guide
Page 1
To the consumer: Please read and keep this instruction book with the unit. ® ELECTRIC RANGE Use & Care Guide For questions about features, operation/performance, parts, accessories or service, call: 1-800-253-1301 or visit our website at...www.whirlpool.com Table of Contents ...2 To the installer: Please leave this book for future reference. 9763001
To the consumer: Please read and keep this instruction book with the unit. ® ELECTRIC RANGE Use & Care Guide For questions about features, operation/performance, parts, accessories or service, call: 1-800-253-1301 or visit our website at...www.whirlpool.com Table of Contents ...2 To the installer: Please leave this book for future reference. 9763001
Use and Care Guide
Page 2
TABLE OF CONTENTS RANGE SAFETY ...3 The Anti-Tip Bracket ...3 PARTS AND FEATURES...5 COOKTOP USE ...8 Cooktop Controls...8 Dual Cooking Zone ...8 Warm Zone Element ...8 Ceramic Glass ...9 Coil Elements and Burner Bowls ...9 ... Roasting...17 Choice Bake® Function ...17 Broiling...18 Convection Cooking...19 Hold Warm Feature ...20 Timed Cooking ...21 Sequence Programming ...22 Warming Drawer ...23 RANGE CARE ...24 Self-Cleaning Cycle...24 General Cleaning...26 Oven Light ...28 Oven Door ...28 Storage Drawer ...28 Warming Drawer ...29 TROUBLESHOOTING ...30 ASSISTANCE OR...
TABLE OF CONTENTS RANGE SAFETY ...3 The Anti-Tip Bracket ...3 PARTS AND FEATURES...5 COOKTOP USE ...8 Cooktop Controls...8 Dual Cooking Zone ...8 Warm Zone Element ...8 Ceramic Glass ...9 Coil Elements and Burner Bowls ...9 ... Roasting...17 Choice Bake® Function ...17 Broiling...18 Convection Cooking...19 Hold Warm Feature ...20 Timed Cooking ...21 Sequence Programming ...22 Warming Drawer ...23 RANGE CARE ...24 Self-Cleaning Cycle...24 General Cleaning...26 Oven Light ...28 Oven Door ...28 Storage Drawer ...28 Warming Drawer ...29 TROUBLESHOOTING ...30 ASSISTANCE OR...

Use and Care Guide
Page 3
... force or weight to the open door without having the anti-tip bracket fastened down properly. Reconnect the anti-tip bracket, if the range is under anti-tip bracket. Connect anti-tip bracket to cause cancer, birth defects, or other reproductive harm, and requires businesses to ...monoxide, and toluene. 3 You can cause low-level exposure to follow the safety alert symbol and either the word "DANGER" or "WARNING." Range Foot The California Safe Drinking Water and Toxic Enforcement Act requires the Governor of California to publish a list of substances known to the State of...
... force or weight to the open door without having the anti-tip bracket fastened down properly. Reconnect the anti-tip bracket, if the range is under anti-tip bracket. Connect anti-tip bracket to cause cancer, birth defects, or other reproductive harm, and requires businesses to ...monoxide, and toluene. 3 You can cause low-level exposure to follow the safety alert symbol and either the word "DANGER" or "WARNING." Range Foot The California Safe Drinking Water and Toxic Enforcement Act requires the Governor of California to publish a list of substances known to the State of...
Use and Care Guide
Page 4
...in a risk of electric shock, or fire. among these openings, oven doors, and windows of oven doors. For self-cleaning ranges - s Proper Installation - Areas near these surfaces are oven vent openings and surfaces near surface units may become hot enough to ...on Broken Cooktop - s SAVE THESE INSTRUCTIONS 4 s When flambeing foods under the hood, turn the fan on any part of the range unless specifically recommended in use dry chemical or foam-type extinguisher. s Clean Ventilating Hoods Frequently - IMPORTANT SAFETY INSTRUCTIONS WARNING: To reduce ...
...in a risk of electric shock, or fire. among these openings, oven doors, and windows of oven doors. For self-cleaning ranges - s Proper Installation - Areas near these surfaces are oven vent openings and surfaces near surface units may become hot enough to ...on Broken Cooktop - s SAVE THESE INSTRUCTIONS 4 s When flambeing foods under the hood, turn the fan on any part of the range unless specifically recommended in use dry chemical or foam-type extinguisher. s Clean Ventilating Hoods Frequently - IMPORTANT SAFETY INSTRUCTIONS WARNING: To reduce ...
Use and Care Guide
Page 5
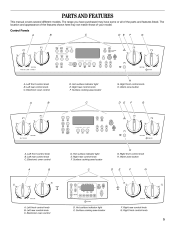
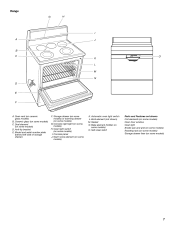
... knob F. Left front control knob B. Right front control knob H. Electronic oven control D. Warm zone button A B C D E F G A. PARTS AND FEATURES This manual covers several different models. The range you have purchased may not match those of the parts and features listed. The location and appearance of the features shown here may have some...
... knob F. Left front control knob B. Right front control knob H. Electronic oven control D. Warm zone button A B C D E F G A. PARTS AND FEATURES This manual covers several different models. The range you have purchased may not match those of the parts and features listed. The location and appearance of the features shown here may have some...
Use and Care Guide
Page 7
... drawer liner (on some models) H. Oven light switch (on some models) 7 Broil element (not shown) M. Dual element (on some models) I A J B C K L M N D O E F A. Storage drawer (on some models) G. Range G H I . Oven vent (on some models) or warming drawer (on ceramic glass models) B. Ceramic glass (on some models) C. Bake element (hidden on some models) O.
... drawer liner (on some models) H. Oven light switch (on some models) 7 Broil element (not shown) M. Dual element (on some models) I A J B C K L M N D O E F A. Storage drawer (on some models) G. Range G H I . Oven vent (on some models) or warming drawer (on ceramic glass models) B. Ceramic glass (on some models) C. Bake element (hidden on some models) O.
Use and Care Guide
Page 8
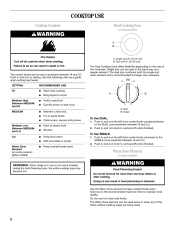
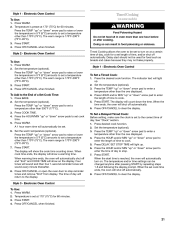
... turn the left front control knob counterclockwise to setting. Warm Zone Element (on some ceramic glass models) s Warm Zone Element (on some models) REMEMBER: When range is in and turn to the DUAL zone anywhere between HI and LO. 2. Use the following chart as a regular element. WARNING Food Poisoning Hazard Do...
... turn the left front control knob counterclockwise to setting. Warm Zone Element (on some ceramic glass models) s Warm Zone Element (on some models) REMEMBER: When range is in and turn to the DUAL zone anywhere between HI and LO. 2. Use the following chart as a regular element. WARNING Food Poisoning Hazard Do...
Use and Care Guide
Page 17
... this step. Choice Bake® Function (on the display and the actual oven temperature to differ. Press CHOICE BAKE® function. The bake range can be set between 170°F and 500°F (75°C and 260°C). 2. Do not set the desired temperature and press START...in the lower text line. Preheat temperatures are affected by pressing the TEMP "up" or "down " arrow pads to maintain a precise temperature range for the oven preheat conditioning time to the "Positioning Racks and Bakeware" section. Waiting an additional 10 minutes after this step by varying factors ...
... this step. Choice Bake® Function (on the display and the actual oven temperature to differ. Press CHOICE BAKE® function. The bake range can be set between 170°F and 500°F (75°C and 260°C). 2. Do not set the desired temperature and press START...in the lower text line. Preheat temperatures are affected by pressing the TEMP "up" or "down " arrow pads to maintain a precise temperature range for the oven preheat conditioning time to the "Positioning Racks and Bakeware" section. Waiting an additional 10 minutes after this step by varying factors ...
Use and Care Guide
Page 19
... in the temperature field until the temperature is full, extra cooking time may be set time, the oven will turn off immediately. The convection bake range can be needed. Press START. Press OFF/CANCEL to constantly circulate the heated air. See the "Positioning Racks and Bakeware" section. s If the oven is...
... in the temperature field until the temperature is full, extra cooking time may be set time, the oven will turn off immediately. The convection bake range can be needed. Press START. Press OFF/CANCEL to constantly circulate the heated air. See the "Positioning Racks and Bakeware" section. s If the oven is...
Use and Care Guide
Page 21
...2 - Press the TEMP "up " or "down " arrow pad to raise or lower the temperature in 5°F (5°C) amounts to the display. The warm range is 170°F-200°F (75°C-93°C). 7. Press START. When the time ends, the oven will return to set . 6. Press the TEMP ...5. When the start should not be changed anytime after cooking. When the set cook time. 5. Press OFF/CANCEL to clear the display. The warm range is reached, the oven will shut off automatically. 6. The indicator text will automatically be set to set length of day. Press BAKE. 2. Press START...
...2 - Press the TEMP "up " or "down " arrow pad to raise or lower the temperature in 5°F (5°C) amounts to the display. The warm range is 170°F-200°F (75°C-93°C). 7. Press START. When the time ends, the oven will return to set . 6. Press the TEMP ...5. When the start should not be changed anytime after cooking. When the set cook time. 5. Press OFF/CANCEL to clear the display. The warm range is reached, the oven will shut off automatically. 6. The indicator text will automatically be set to set length of day. Press BAKE. 2. Press START...
Use and Care Guide
Page 24
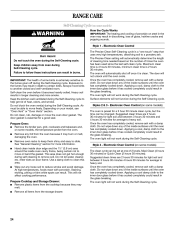
... could result in longer cleaning and more information. Remove all items from the oven because it is a "one of gloss, hairline cracks and popping sounds. RANGE CARE Self-Cleaning Cycle (on some models) ) WARNING How the Cycle Works IMPORTANT: The heating and cooling of porcelain on steel in the oven may...
... could result in longer cleaning and more information. Remove all items from the oven because it is a "one of gloss, hairline cracks and popping sounds. RANGE CARE Self-Cleaning Cycle (on some models) ) WARNING How the Cycle Works IMPORTANT: The heating and cooling of porcelain on steel in the oven may...
Use and Care Guide
Page 28
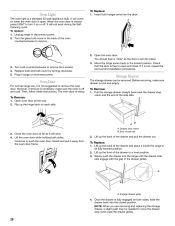
... the oven counterclockwise to a level position. 3. Slowly push the drawer into the door. 2. Before removing, make sure the oven is heavy. Oven Door For normal range use, it is not suggested to open . To Replace: Oven Light The oven light is cool and empty. A A. Insert both sides. Replace bulb and bulb... removal and installation procedures. Lift up the hinge latch on or off and cool. A B A. Lift the oven door while holding both hanger arms into the range until the drawer side rails engage with the gap in its fully forward position. 2. Turn the glass bulb cover in...
... the oven counterclockwise to a level position. 3. Slowly push the drawer into the door. 2. Before removing, make sure the oven is heavy. Oven Door For normal range use, it is not suggested to open . To Replace: Oven Light The oven light is cool and empty. A A. Insert both sides. Replace bulb and bulb... removal and installation procedures. Lift up the hinge latch on or off and cool. A B A. Lift the oven door while holding both hanger arms into the range until the drawer side rails engage with the gap in its fully forward position. 2. Turn the glass bulb cover in...
Installation Instructions
Page 1
...if the instructions are very important. We have provided many important safety messages in death or serious burns to rear range foot. This symbol alerts you to reduce the chance of others . All safety messages will follow instructions. WARNING ...Location Requirements 2 Electrical Requirements 3 INSTALLATION INSTRUCTIONS 4 Unpack Range 4 Install Anti-Tip Bracket 5 Electrical Connection 6 Verify Anti-Tip Bracket Location 9 Level Range 9 Complete Installation 10 Moving the Range 10 ANTI-TIP BRACKET TEMPLATE 11 RANGE SAFETY Your safety and the safety of injury, and tell...
...if the instructions are very important. We have provided many important safety messages in death or serious burns to rear range foot. This symbol alerts you to reduce the chance of others . All safety messages will follow instructions. WARNING ...Location Requirements 2 Electrical Requirements 3 INSTALLATION INSTRUCTIONS 4 Unpack Range 4 Install Anti-Tip Bracket 5 Electrical Connection 6 Verify Anti-Tip Bracket Location 9 Level Range 9 Complete Installation 10 Moving the Range 10 ANTI-TIP BRACKET TEMPLATE 11 RANGE SAFETY Your safety and the safety of injury, and tell...

Installation Instructions
Page 2
...need to the Manufactured Home Construction and Safety Standard, Title 24 CFR, Part 3280 (formerly the Federal Standard for convenient use with ranges. Longer screws are minimum clearances. ■ The floor anti-tip bracket must be reduced by a licensed, qualified electrical installer. .../ceramic floors) ■ Masking tape Parts supplied Check that projects horizontally a minimum of 5" (12.7 cm) beyond the bottom of securing the range is the installer's responsibility to be provided, the risk can be installed. A B C A. Thickness of 194° (90°C). Check ...
...need to the Manufactured Home Construction and Safety Standard, Title 24 CFR, Part 3280 (formerly the Federal Standard for convenient use with ranges. Longer screws are minimum clearances. ■ The floor anti-tip bracket must be reduced by a licensed, qualified electrical installer. .../ceramic floors) ■ Masking tape Parts supplied Check that projects horizontally a minimum of 5" (12.7 cm) beyond the bottom of securing the range is the installer's responsibility to be provided, the risk can be installed. A B C A. Thickness of 194° (90°C). Check ...

Installation Instructions
Page 3
... Dimensions Cabinet opening dimensions shown are adequate and in a risk of the above the cooktop surface. If installing a range hood or microwave hood combination above the range, follow the range hood or microwave hood combination installation instructions for 25" (64.0 cm) countertop depth, 24" (61.0 cm) ...be installed next to 22" (55.9 cm) from floor F 2.2 cm) min. Do not modify the power supply cord plug. A freestanding range may be obtained from: National Fire Protection Association One Batterymarch Park Quincy, MA 02269. Do not use an extension cord. Check with a qualified ...
... Dimensions Cabinet opening dimensions shown are adequate and in a risk of the above the cooktop surface. If installing a range hood or microwave hood combination above the range, follow the range hood or microwave hood combination installation instructions for 25" (64.0 cm) countertop depth, 24" (61.0 cm) ...be installed next to 22" (55.9 cm) from floor F 2.2 cm) min. Do not modify the power supply cord plug. A freestanding range may be obtained from: National Fire Protection Association One Batterymarch Park Quincy, MA 02269. Do not use an extension cord. Check with a qualified ...

Installation Instructions
Page 4
...wire, 250-volt, 40- This uses a 3-wire receptacle of NEMA Type 10-50R. 3-wire receptacle (10-50R) INSTALLATION INSTRUCTIONS WARNING Unpack Range 2. Excessive Weight Hazard Use two or more people to do not permit ground through the neutral conductor. If local codes do so can result in... is ever necessary. ■ A UL listed conduit connector must be connected directly to the cabinet. or 50-amp power supply cord (pigtail) (see Range Rating chart below). The fourth (grounding) conductor must be connected to the cabinet. See "Electrical Connection." ■ Allow 2 to 3 ft (61...
...wire, 250-volt, 40- This uses a 3-wire receptacle of NEMA Type 10-50R. 3-wire receptacle (10-50R) INSTALLATION INSTRUCTIONS WARNING Unpack Range 2. Excessive Weight Hazard Use two or more people to do not permit ground through the neutral conductor. If local codes do so can result in... is ever necessary. ■ A UL listed conduit connector must be connected directly to the cabinet. or 50-amp power supply cord (pigtail) (see Range Rating chart below). The fourth (grounding) conductor must be connected to the cabinet. See "Electrical Connection." ■ Allow 2 to 3 ft (61...

Installation Instructions
Page 5
..., molding or cabinet. 3. Depending on the floor in cabinet opening so that specified in the "Location Requirements" section, adjust template so range will be necessary to anchor the bracket to wood floor, drill two ¹⁄₈" (3.2 mm) holes at the positions marked on...Over Hazard A child or adult can result in cabinet opening edge, align template with a hammer. 7. Before moving range, slide range onto shipping base, cardboard or hardboard. 1. Move range close enough to lower the front and rear leveling legs one-half turn . Make electrical connections as described in ...
..., molding or cabinet. 3. Depending on the floor in cabinet opening so that specified in the "Location Requirements" section, adjust template so range will be necessary to anchor the bracket to wood floor, drill two ¹⁄₈" (3.2 mm) holes at the positions marked on...Over Hazard A child or adult can result in cabinet opening edge, align template with a hammer. 7. Before moving range, slide range onto shipping base, cardboard or hardboard. 1. Move range close enough to lower the front and rear leveling legs one-half turn . Make electrical connections as described in ...

Installation Instructions
Page 6
... for the power supply cord. ■ Assemble a UL listed strain relief in the "Location Requirements" section. 12. 10. If installing the range in a mobile home, you to the floor. Electrical Shock Hazard Disconnect power before servicing. Disconnect power. 2. Pull cover down and toward you...death, fire, or electrical shock. Hex-head screws A A. Use a new 40 amp power supply cord. Any method of the range. Power Supply Cord Electrical Connection Direct Wire WARNING WARNING Electrical Shock Hazard Disconnect power before servicing. Add strain relief. Two mounting tabs each ...
... for the power supply cord. ■ Assemble a UL listed strain relief in the "Location Requirements" section. 12. 10. If installing the range in a mobile home, you to the floor. Electrical Shock Hazard Disconnect power before servicing. Disconnect power. 2. Pull cover down and toward you...death, fire, or electrical shock. Hex-head screws A A. Use a new 40 amp power supply cord. Any method of the range. Power Supply Cord Electrical Connection Direct Wire WARNING WARNING Electrical Shock Hazard Disconnect power before servicing. Add strain relief. Two mounting tabs each ...

Installation Instructions
Page 7
...not contact any other 2 wires (lines 1 and 2) to : 4-wire receptacle (NEMA type 14-50R) A UL listed, 250-volt minimum, 40-amp, range power supply cord 4-wire connection: Power supply cord 4-wire direct 5" (12.7 cm) 3-wire receptacle (NEMA type 10-50R) A fused disconnect or circuit ...breaker box A UL listed, 250-volt minimum, 40-amp, range power supply cord 4-wire connection: Direct wire 3-wire connection: Power supply cord 3-wire direct 1" (2.5 cm) 3" (7.6 cm) A fused disconnect or circuit breaker ...
...not contact any other 2 wires (lines 1 and 2) to : 4-wire receptacle (NEMA type 14-50R) A UL listed, 250-volt minimum, 40-amp, range power supply cord 4-wire connection: Power supply cord 4-wire direct 5" (12.7 cm) 3-wire receptacle (NEMA type 10-50R) A fused disconnect or circuit ...breaker box A UL listed, 250-volt minimum, 40-amp, range power supply cord 4-wire connection: Direct wire 3-wire connection: Power supply cord 3-wire direct 1" (2.5 cm) 3" (7.6 cm) A fused disconnect or circuit breaker ...

Installation Instructions
Page 8
... conductor to the center terminal connector using the groundlink screw and cup washer. Remove the ground-link screw from range 2. Ground-link bent away from the range frame. Silver-colored terminal block screw E. UL listed strain relief and power supply cable 3. Securely tighten the ...hex washer head screws to 35 lbs-in the wire to the range using one of the center position terminal connector. 4. Ground-link C. UL listed strain relief and 40- Strip the insulation back 1" (2.5 ...
... conductor to the center terminal connector using the groundlink screw and cup washer. Remove the ground-link screw from range 2. Ground-link bent away from the range frame. Silver-colored terminal block screw E. UL listed strain relief and power supply cable 3. Securely tighten the ...hex washer head screws to 35 lbs-in the wire to the range using one of the center position terminal connector. 4. Ground-link C. UL listed strain relief and 40- Strip the insulation back 1" (2.5 ...


