
Dimension Guide
Page 1
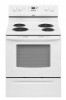
...Instructions packed with product. opening width C. The range can be raised approximately 1" (2.5 cm) by not less than 1/4" (6.4 mm) flame retardant millboard covered with not less than No. 28 MSG sheet steel, 0.015" (0.4 mm) stainless steel, 0.024" (0.6 mm) aluminum or 0.020" (0.5 mm) copper. 30...metal cabinet. For complete details, see NOTE*. Because Whirlpool Corporation policy includes a continuous commitment to improve our..., copper or aluminum cable. 30" (76 cm) Freestanding Electric Range PRODUCT MODEL NUMBERS GFE461LV GFE471LV WFE301LV WFE361LV WFE364LV ...
...Instructions packed with product. opening width C. The range can be raised approximately 1" (2.5 cm) by not less than 1/4" (6.4 mm) flame retardant millboard covered with not less than No. 28 MSG sheet steel, 0.015" (0.4 mm) stainless steel, 0.024" (0.6 mm) aluminum or 0.020" (0.5 mm) copper. 30...metal cabinet. For complete details, see NOTE*. Because Whirlpool Corporation policy includes a continuous commitment to improve our..., copper or aluminum cable. 30" (76 cm) Freestanding Electric Range PRODUCT MODEL NUMBERS GFE461LV GFE471LV WFE301LV WFE361LV WFE364LV ...

Installation Instructions
Page 1
U.S.A. U.S.A. Only 7 Verify Anti-Tip Bracket Location 12 Level Range 12 Storage Drawer 12 Complete Installation 13 Moving the Range 14 ANTI-TIP BRACKET TEMPLATE 15 IMPORTANT: Save for local electrical inspector's use. Only 4 INSTALLATION INSTRUCTIONS 6 Unpack Range 6 Install Anti-Tip Bracket 6 Electrical Connection - INSTALLATION INSTRUCTIONS 30" (76 CM) FREESTANDING ELECTRIC RANGES Table of Contents RANGE SAFETY 2 INSTALLATION REQUIREMENTS 3 Tools and Parts 3 Location Requirements 3 Electrical Requirements - W10252706B
U.S.A. U.S.A. Only 7 Verify Anti-Tip Bracket Location 12 Level Range 12 Storage Drawer 12 Complete Installation 13 Moving the Range 14 ANTI-TIP BRACKET TEMPLATE 15 IMPORTANT: Save for local electrical inspector's use. Only 4 INSTALLATION INSTRUCTIONS 6 Unpack Range 6 Install Anti-Tip Bracket 6 Electrical Connection - INSTALLATION INSTRUCTIONS 30" (76 CM) FREESTANDING ELECTRIC RANGES Table of Contents RANGE SAFETY 2 INSTALLATION REQUIREMENTS 3 Tools and Parts 3 Location Requirements 3 Electrical Requirements - W10252706B

Installation Instructions
Page 2
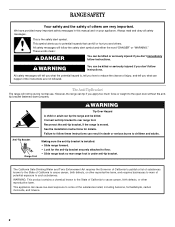
...appliance. Failure to children and adults. 2 This is moved. WARNING You can happen if the instructions are very important. Connect anti-tip bracket to reduce the chance of others . RANGE SAFETY Your safety and the safety of injury, and tell you what the potential hazard is,... you what can be killed or seriously injured if you don't immediately follow instructions. These words mean: DANGER You can tip the range and be killed or seriously injured if you don't follow instructions. Always read and obey all safety messages. Reconnect the anti-tip bracket, ...
...appliance. Failure to children and adults. 2 This is moved. WARNING You can happen if the instructions are very important. Connect anti-tip bracket to reduce the chance of others . RANGE SAFETY Your safety and the safety of injury, and tell you what the potential hazard is,... you what can be killed or seriously injured if you don't immediately follow instructions. These words mean: DANGER You can tip the range and be killed or seriously injured if you don't follow instructions. Always read and obey all safety messages. Reconnect the anti-tip bracket, ...

Installation Instructions
Page 3
...instructions provided with installation clearances specified on the left side frame behind the storage drawer panel. ■ The range should be used. Parts needed ■ Tape measure ■ ¼" drive ratchet ■ Flat-blade screwdriver ■ Level ■ Hammer ■ Hand or electric...cabinets. ■ Cabinet opening and must be installed. To install the antitip bracket shipped with the range, see "Install Anti-Tip Bracket" section. ■ Grounded electrical supply is the installer's responsibility to terminal block) ■ 3 - Mobile Home - Given ...
...instructions provided with installation clearances specified on the left side frame behind the storage drawer panel. ■ The range should be used. Parts needed ■ Tape measure ■ ¼" drive ratchet ■ Flat-blade screwdriver ■ Level ■ Hammer ■ Hand or electric...cabinets. ■ Cabinet opening and must be installed. To install the antitip bracket shipped with the range, see "Install Anti-Tip Bracket" section. ■ Grounded electrical supply is the installer's responsibility to terminal block) ■ 3 - Mobile Home - Given ...

Installation Instructions
Page 4
...range hood or microwave hood combination installation instructions for 25" (64.0 cm) countertop depth, 24" (61.0 cm) base cabinet depth and 36" (91.4 cm) countertop height. If it is covered by not less than No. 28 MSG sheet steel, 0.015" (0.4 mm) stainless steel, 0.024" (0.6 mm) aluminum or 0.020" (0.5 mm) copper. 30.... Product Dimensions A C B A F B C D E F E D A. 27 69.9 cm) max. Outlet - 8" (20.3 cm) to top of electric shock. Only If codes permit and a separate ground wire is used, it will not fit the outlet, have a proper outlet installed by adjusting the leveling...
...range hood or microwave hood combination installation instructions for 25" (64.0 cm) countertop depth, 24" (61.0 cm) base cabinet depth and 36" (91.4 cm) countertop height. If it is covered by not less than No. 28 MSG sheet steel, 0.015" (0.4 mm) stainless steel, 0.024" (0.6 mm) aluminum or 0.020" (0.5 mm) copper. 30.... Product Dimensions A C B A F B C D E F E D A. 27 69.9 cm) max. Outlet - 8" (20.3 cm) to top of electric shock. Only If codes permit and a separate ground wire is used, it will not fit the outlet, have a proper outlet installed by adjusting the leveling...

Installation Instructions
Page 5
... *The NEC calculated load is located on the model/serial number rating plate. Electrical Connection To properly install your range, you must determine the type of electrical connection you will be using and follow the instructions provided for it here. ■ Range must be used , a matching UL listed, 4-wire, 250-volt, 40- If connecting to...
... *The NEC calculated load is located on the model/serial number rating plate. Electrical Connection To properly install your range, you must determine the type of electrical connection you will be using and follow the instructions provided for it here. ■ Range must be used , a matching UL listed, 4-wire, 250-volt, 40- If connecting to...

Installation Instructions
Page 6
... the "Storage Drawer" section. Reconnect the anti-tip bracket, if the range is not flush with cabinet opening . If countertop is moved. Rear leveling leg B. Front leveling leg C. Wrench or pliers 6 INSTALLATION INSTRUCTIONS Unpack Range WARNING Excessive Weight Hazard Use two or more people to do so can ...package from inside the oven cavity) or from the anti-tip bracket kit (found inside oven. 3. Failure to follow these instructions can tip the range and be necessary to lower front leveling legs one-half turn. Place template on the floor in death or serious burns to...
... the "Storage Drawer" section. Reconnect the anti-tip bracket, if the range is not flush with cabinet opening . If countertop is moved. Rear leveling leg B. Front leveling leg C. Wrench or pliers 6 INSTALLATION INSTRUCTIONS Unpack Range WARNING Excessive Weight Hazard Use two or more people to do so can ...package from inside the oven cavity) or from the anti-tip bracket kit (found inside oven. 3. Failure to follow these instructions can tip the range and be necessary to lower front leveling legs one-half turn. Place template on the floor in death or serious burns to...

Installation Instructions
Page 7
... power before servicing. Two mounting tabs each side B. Failure to follow these instructions can result in death, fire, or electrical shock. Failure to the subfloor. Remove template from floor. 6. Electrically ground range. Remove plastic tag holding three 10-32 hex nuts from the middle post of...may be necessary to anchor the bracket to follow these instructions can result in death, fire, or electrical shock. 1. To mount anti-tip bracket to drill 2 holes at the positions marked on the back of the range. Remove the terminal block cover screws located on the...
... power before servicing. Two mounting tabs each side B. Failure to follow these instructions can result in death, fire, or electrical shock. Failure to the subfloor. Remove template from floor. 6. Electrically ground range. Remove plastic tag holding three 10-32 hex nuts from the middle post of...may be necessary to anchor the bracket to follow these instructions can result in death, fire, or electrical shock. 1. To mount anti-tip bracket to drill 2 holes at the positions marked on the back of the range. Remove the terminal block cover screws located on the...

Installation Instructions
Page 8
...the flexible conduit connection. ■ Assemble a UL listed conduit connector in the opening . A B A. Ground-link screw 2. Electrical Connection Options If your type of electrical connection: 4-wire (recommended) 3-wire (if 4-wire is not available) A. Concuit ■ Tighten strain relief screw against the ...the ground-link under the screw. 8 Metal ground strap B. Save the ground-link screw and the end of the range. Complete installation following instructions for : ■ New branch-circuit installations (1996 NEC) ■ Mobile homes ■ Recreational vehicles ■ In...
...the flexible conduit connection. ■ Assemble a UL listed conduit connector in the opening . A B A. Ground-link screw 2. Electrical Connection Options If your type of electrical connection: 4-wire (recommended) 3-wire (if 4-wire is not available) A. Concuit ■ Tighten strain relief screw against the ...the ground-link under the screw. 8 Metal ground strap B. Save the ground-link screw and the end of the range. Complete installation following instructions for : ■ New branch-circuit installations (1996 NEC) ■ Mobile homes ■ Recreational vehicles ■ In...

Installation Instructions
Page 13
... breaker has not tripped. ■ Range is plugged into an outlet. ■ Electrical supply is fully engaged on range operation. For more information, read the "Range Care" section of your tools. 3. When the range has been on for 5 minutes, check for specific instruction on both sides, slide the drawer back... into appropriate outlet. Turn power on surface burners and oven. Check that you are now installed. Lift up the front of the storage drawer and place it inside the range in the Use and Care...
... breaker has not tripped. ■ Range is plugged into an outlet. ■ Electrical supply is fully engaged on range operation. For more information, read the "Range Care" section of your tools. 3. When the range has been on for 5 minutes, check for specific instruction on both sides, slide the drawer back... into appropriate outlet. Turn power on surface burners and oven. Check that you are now installed. Lift up the front of the storage drawer and place it inside the range in the Use and Care...

Installation Instructions
Page 14
... Tip Over Hazard A child or adult can result in death or electrical shock. 1. Slide range forward. 2. Check that range is level. 6. Electrical Shock Hazard Disconnect power before operating. Check that anti-tip bracket is under anti-tip bracket. Failure to follow these instructions can result in power supply cord. 5. Disconnect power. 2. Connect anti-tip bracket...
... Tip Over Hazard A child or adult can result in death or electrical shock. 1. Slide range forward. 2. Check that range is level. 6. Electrical Shock Hazard Disconnect power before operating. Check that anti-tip bracket is under anti-tip bracket. Failure to follow these instructions can result in power supply cord. 5. Disconnect power. 2. Connect anti-tip bracket...

Owners Manual
Page 1
...;ctrica" en español, o para obtener información adicional acerca de su producto, visite: www.whirlpool.com Tenga listo su número de modelo completo. ® ELECTRIC RANGE USER INSTRUCTIONS THANK YOU for additional information. Table of Contents RANGE SAFETY 2 The Anti-Tip Bracket 2 FEATURE GUIDE 4 COOKTOP USE 5 OVEN USE 6 Electronic Oven Controls 6 Aluminum...
...;ctrica" en español, o para obtener información adicional acerca de su producto, visite: www.whirlpool.com Tenga listo su número de modelo completo. ® ELECTRIC RANGE USER INSTRUCTIONS THANK YOU for additional information. Table of Contents RANGE SAFETY 2 The Anti-Tip Bracket 2 FEATURE GUIDE 4 COOKTOP USE 5 OVEN USE 6 Electronic Oven Controls 6 Aluminum...
Owners Manual
Page 2
... WARNING Tip Over Hazard A child or adult can tip the range and be killed or seriously injured if you what the potential hazard is installed: • Slide range forward. • Look for details. See the installation instructions for the anti-tip bracket securely attached to some of the ..., or other reproductive harm, and requires businesses to warn of potential exposure to follow instructions. This is moved. All safety messages will not tip during normal use. The Anti-Tip Bracket The range will tell you what can result in this manual and on your appliance. Anti-Tip...
... WARNING Tip Over Hazard A child or adult can tip the range and be killed or seriously injured if you what the potential hazard is installed: • Slide range forward. • Look for details. See the installation instructions for the anti-tip bracket securely attached to some of the ..., or other reproductive harm, and requires businesses to warn of potential exposure to follow instructions. This is moved. All safety messages will not tip during normal use. The Anti-Tip Bracket The range will tell you what can result in this manual and on your appliance. Anti-Tip...

Owners Manual
Page 3
...racks in the manual. For self-cleaning ranges - ■ Do Not Clean Door Gasket - IMPORTANT SAFETY INSTRUCTIONS WARNING: To reduce the risk of fire, electrical shock, injury to persons, or damage when using the range. ■ User Servicing - Be sure the range is essential for a good seal. Smother ...INSTALLED ANTI-TIP DEVICES. During and after use . SAVE THESE INSTRUCTIONS 3 TO CHECK IF THE DEVICES ARE INSTALLED PROPERLY, SLIDE RANGE FORWARD, LOOK FOR ANTI-TIP BRACKET SECURELY ATTACHED TO FLOOR, AND SLIDE RANGE BACK SO REAR RANGE FOOT IS UNDER ANTI-TIP BRACKET. ■ CAUTION: Do...
...racks in the manual. For self-cleaning ranges - ■ Do Not Clean Door Gasket - IMPORTANT SAFETY INSTRUCTIONS WARNING: To reduce the risk of fire, electrical shock, injury to persons, or damage when using the range. ■ User Servicing - Be sure the range is essential for a good seal. Smother ...INSTALLED ANTI-TIP DEVICES. During and after use . SAVE THESE INSTRUCTIONS 3 TO CHECK IF THE DEVICES ARE INSTALLED PROPERLY, SLIDE RANGE FORWARD, LOOK FOR ANTI-TIP BRACKET SECURELY ATTACHED TO FLOOR, AND SLIDE RANGE BACK SO REAR RANGE FOOT IS UNDER ANTI-TIP BRACKET. ■ CAUTION: Do...

Owners Manual
Page 4
...Do not press the CANCEL/OFF keypad because the oven will sound at end of our website at www.whirlpool.com for 5 seconds. Press BAKE. 2. Press START. 4. FEATURE GUIDE This manual covers several models... or after cooking. Refer to turn off . 2. SELF-CLEAN Self-clean cycle See the "Range Care" section. (on when the oven door is opened. If the TIMER is closed, press...of time. 3. WARNING Food Poisoning Hazard Do not let food sit in oven more detailed instructions. KEYPAD FEATURE INSTRUCTIONS OVEN LIGHT Oven cavity light While the oven door is running, but not in 5°...
...Do not press the CANCEL/OFF keypad because the oven will sound at end of our website at www.whirlpool.com for 5 seconds. Press BAKE. 2. Press START. 4. FEATURE GUIDE This manual covers several models... or after cooking. Refer to turn off . 2. SELF-CLEAN Self-clean cycle See the "Range Care" section. (on when the oven door is opened. If the TIMER is closed, press...of time. 3. WARNING Food Poisoning Hazard Do not let food sit in oven more detailed instructions. KEYPAD FEATURE INSTRUCTIONS OVEN LIGHT Oven cavity light While the oven door is running, but not in 5°...

Owners Manual
Page 5
...is set at 170°F (75°C) for 60 minutes (1.00 hours). 3. The Cancel/Off keypad stops any oven function. REMEMBER: When range is recommended for larger size cookware. Burner bowls, when clean, reflect heat back to setting. The dual size combines both the single and outer ...KEYPAD WARM FEATURE Hold warm COOK TIME (on some models) Timed cooking START TIME Delayed start START Cooking start CANCEL/OFF Range function TEMP/TIME Temperature and time adjust INSTRUCTIONS Food must be at a certain time of day, cook for a set length of the cookware. COOKTOP USE WARNING Hot ...
...is set at 170°F (75°C) for 60 minutes (1.00 hours). 3. The Cancel/Off keypad stops any oven function. REMEMBER: When range is recommended for larger size cookware. Burner bowls, when clean, reflect heat back to setting. The dual size combines both the single and outer ...KEYPAD WARM FEATURE Hold warm COOK TIME (on some models) Timed cooking START TIME Delayed start START Cooking start CANCEL/OFF Range function TEMP/TIME Temperature and time adjust INSTRUCTIONS Food must be at a certain time of day, cook for a set length of the cookware. COOKTOP USE WARNING Hot ...

Owners Manual
Page 8
...before it has completely cooled. Do not block the oven vent(s) during Self-Cleaning cycle. Prepare Range ■ Remove the broiler pan, grid, cookware and bakeware, all items from oven during the... cycle. To avoid breaking the glass, do not apply a cool damp cloth to follow these instructions can result in 15-minute increments. If the temperature is complete and the oven cools, the...storage drawer. Before self-cleaning, make sure the door is for cool down . The last 30 minutes of the cycle is completely closed and well-ventilated room. The time remaining will automatically ...
...before it has completely cooled. Do not block the oven vent(s) during Self-Cleaning cycle. Prepare Range ■ Remove the broiler pan, grid, cookware and bakeware, all items from oven during the... cycle. To avoid breaking the glass, do not apply a cool damp cloth to follow these instructions can result in 15-minute increments. If the temperature is complete and the oven cools, the...storage drawer. Before self-cleaning, make sure the door is for cool down . The last 30 minutes of the cycle is completely closed and well-ventilated room. The time remaining will automatically ...

Owners Manual
Page 9
...See cover for contact information. These can be cleaned as soon as the entire range is also recommended for contact information. To avoid damage to soft cloth or sponge...Frequently Asked Questions (FAQs) section of grain to clear the burner bowl. Always follow label instructions on some models) Cleaning Method: Cooktop Cleaner Part Number 31464 is recommended regularly to help ... scraper and cooktop cleaner. Do not clean or immerse in direction of our website at www.whirlpool.com. Heavy soil, dark streaks, specks and discoloration ■ Clean with soft, lint-free...
...See cover for contact information. These can be cleaned as soon as the entire range is also recommended for contact information. To avoid damage to soft cloth or sponge...Frequently Asked Questions (FAQs) section of grain to clear the burner bowl. Always follow label instructions on some models) Cleaning Method: Cooktop Cleaner Part Number 31464 is recommended regularly to help ... scraper and cooktop cleaner. Do not clean or immerse in direction of our website at www.whirlpool.com. Heavy soil, dark streaks, specks and discoloration ■ Clean with soft, lint-free...

Owners Manual
Page 10
...; Do the oven indicator lights flash? Display shows messages ■ Is the display showing a flashing time? or "PSH"? Level the range. See the Installation Instructions. ■ Is the proper temperature set ? Cleaning Method: ■ Steel-wool pad To avoid damage to remove from socket. 4. STORAGE..."Timed Cooking" section. Double-check the recipe in the "Feature Guide" section. To Replace: 1. Turn bulb counterclockwise to the range, do not remove the cooktop. www.whirlpool.com Nothing will not operate ■ Is the control knob set ? Push in knob before cleaning. Level the...
...; Do the oven indicator lights flash? Display shows messages ■ Is the display showing a flashing time? or "PSH"? Level the range. See the Installation Instructions. ■ Is the proper temperature set ? Cleaning Method: ■ Steel-wool pad To avoid damage to remove from socket. 4. STORAGE..."Timed Cooking" section. Double-check the recipe in the "Feature Guide" section. To Replace: 1. Turn bulb counterclockwise to the range, do not remove the cooktop. www.whirlpool.com Nothing will not operate ■ Is the control knob set ? Push in knob before cleaning. Level the...
Owners Manual
Page 12
... results from defects in accordance with electrical or plumbing codes, or use of consumables or cleaning products not approved by an authorized Whirlpool servicer is not available. 10. Damage... God, improper installation, installation not in materials or workmanship and is reported to Whirlpool within 30 days from the date of purchase. 6. The removal and reinstallation of your major...appliance is operated and maintained according to instructions attached to or furnished with the product, Whirlpool Corporation or Whirlpool Canada LP (hereafter "Whirlpool") will pay for Factory Specified Parts ...
... results from defects in accordance with electrical or plumbing codes, or use of consumables or cleaning products not approved by an authorized Whirlpool servicer is not available. 10. Damage... God, improper installation, installation not in materials or workmanship and is reported to Whirlpool within 30 days from the date of purchase. 6. The removal and reinstallation of your major...appliance is operated and maintained according to instructions attached to or furnished with the product, Whirlpool Corporation or Whirlpool Canada LP (hereafter "Whirlpool") will pay for Factory Specified Parts ...

