
Installation Instructions
Page 2
...9632; Hand or electric drill (for wall cabinet installations) ■ 1" (25 mm) drill bit (for cutout dimensions and approved oven cooktop combinations (separate sheet). 2 See "Electrical Requirements" section. ■ Electrical supply junction box should have been drilled in accordance with... x ³⁄₈" screws - Location Requirements IMPORTANT: Observe all governing codes and ordinances. ■ Cabinet opening . ■ Oven support surface must be recessed and located in a wall cabinet. NOTE: For undercounter installation, it is recommended that can be killed or...
...9632; Hand or electric drill (for wall cabinet installations) ■ 1" (25 mm) drill bit (for cutout dimensions and approved oven cooktop combinations (separate sheet). 2 See "Electrical Requirements" section. ■ Electrical supply junction box should have been drilled in accordance with... x ³⁄₈" screws - Location Requirements IMPORTANT: Observe all governing codes and ordinances. ■ Cabinet opening . ■ Oven support surface must be recessed and located in a wall cabinet. NOTE: For undercounter installation, it is recommended that can be killed or...

Installation Instructions
Page 3
... recessed depth E. 27¹⁄₂" (69.9 cm) recessed height 30" (76.2 cm) models A. 28 71.9 cm) max. recessed width B. 29" (73.7 cm) max. Double Ovens A E D C 27" (68.6 cm) models A. 27" (68.6 cm) min. cutout height B E D C 27" (68.6 cm) models A. 25 64.3 cm) max. ...recessed width B. 51" (129.5 cm) max. Single Ovens A Single Ovens Installed in Cabinet A B B E D C 27" (68.6 cm) models A. 25 64.3 cm) max. cabinet width B. 1¹⁄₂" (3.8 cm) min. bottom of cabinet ...
... recessed depth E. 27¹⁄₂" (69.9 cm) recessed height 30" (76.2 cm) models A. 28 71.9 cm) max. recessed width B. 29" (73.7 cm) max. Double Ovens A E D C 27" (68.6 cm) models A. 27" (68.6 cm) min. cutout height B E D C 27" (68.6 cm) models A. 25 64.3 cm) max. ...recessed width B. 51" (129.5 cm) max. Single Ovens A Single Ovens Installed in Cabinet A B B E D C 27" (68.6 cm) models A. 25 64.3 cm) max. cabinet width B. 1¹⁄₂" (3.8 cm) min. bottom of cabinet ...

Installation Instructions
Page 4
...179;⁄₄" (37.5 cm) bottom of cutout to top of cabinet door F. 49³⁄₄" (126.4 cm) min. Double Ovens Installed in conformance with local codes. Check with a qualified electrical installer if you will be using and follow the instructions provided for it is ... and C22.2 No. cutout height A. 23¹⁄₄" (59.1 cm) min. cutout height 30" (76.2 cm) models A. 30" (76.2 cm) min. This oven must be connected to floor D. 25¹⁄₂" (64.8 cm) cutout width E. 1¹⁄₂" (3.8 cm) min. cabinet width B. 1" (2.5 cm) top of...
...179;⁄₄" (37.5 cm) bottom of cutout to top of cabinet door F. 49³⁄₄" (126.4 cm) min. Double Ovens Installed in conformance with local codes. Check with a qualified electrical installer if you will be using and follow the instructions provided for it is ... and C22.2 No. cutout height A. 23¹⁄₄" (59.1 cm) min. cutout height 30" (76.2 cm) models A. 30" (76.2 cm) min. This oven must be connected to floor D. 25¹⁄₂" (64.8 cm) cutout width E. 1¹⁄₂" (3.8 cm) min. cabinet width B. 1" (2.5 cm) top of...

Installation Instructions
Page 5
...Electrical Connection WARNING A B A. Aluminum/copper connection must be connected directly to the junction box. ■ Do not cut the conduit. Move oven and cardboard close . Remove Oven Trim 1. ■ Models rated from 7.3 to 9.6 kW at 240 volts (5.5 to 7.2 kW at 208 volts) require a separate 30-...a neutral (white) power supply wire and a cabinet-connected green (or bare) ground wire twisted together. 1. Connect a section of the oven. Failure to the pigtail leads. 2. Remove the cable tie from the side of solid copper wire to do so can result in locked ...
...Electrical Connection WARNING A B A. Aluminum/copper connection must be connected directly to the junction box. ■ Do not cut the conduit. Move oven and cardboard close . Remove Oven Trim 1. ■ Models rated from 7.3 to 9.6 kW at 240 volts (5.5 to 7.2 kW at 208 volts) require a separate 30-...a neutral (white) power supply wire and a cabinet-connected green (or bare) ground wire twisted together. 1. Connect a section of the oven. Failure to the pigtail leads. 2. Remove the cable tie from the side of solid copper wire to do so can result in locked ...

Installation Instructions
Page 6
...wire connector. 2. Untwist white wire from green (or bare) ground wire coming from Home Power Supply - Install junction box cover. 3-Wire Cable from the oven. 4. Connect the 2 black wires (C) together using a UL listed wire connector. 3. Connect the 2 white wires (F) together using a UL listed wire ...Wire Cable from Home Power Supply IMPORTANT: Use the 4-wire cable from home power supply B. Electrical Connection Options Chart If your type of the oven cable) using a UL listed wire connector. 5. Connect the 2 white wires (D) and the green (or bare) ground wire (of electrical...
...wire connector. 2. Untwist white wire from green (or bare) ground wire coming from Home Power Supply - Install junction box cover. 3-Wire Cable from the oven. 4. Connect the 2 black wires (C) together using a UL listed wire connector. 3. Connect the 2 white wires (F) together using a UL listed wire ...Wire Cable from Home Power Supply IMPORTANT: Use the 4-wire cable from home power supply B. Electrical Connection Options Chart If your type of the oven cable) using a UL listed wire connector. 5. Connect the 2 white wires (D) and the green (or bare) ground wire (of electrical...

Installation Instructions
Page 7
... remove screws attaching the shipping feet. 4. On models with shipping feet, use a Phillips screwdriver to grip. Securely fasten oven to cabinet using the # 8-14 x 1" screws (2 for single oven, 4 for each trim piece upward onto oven side rails. 7 Vent tab C. # 8-18 x ³⁄₈" screw D. Slide top end of each side of front frame...
... remove screws attaching the shipping feet. 4. On models with shipping feet, use a Phillips screwdriver to grip. Securely fasten oven to cabinet using the # 8-14 x 1" screws (2 for single oven, 4 for each trim piece upward onto oven side rails. 7 Vent tab C. # 8-18 x ³⁄₈" screw D. Slide top end of each side of front frame...

Installation Instructions
Page 8
...11. If there is intact and tight; Dispose of/recycle all of hinges into place. 13. Turn power on . Press START. Make sure the oven door is closed and the "ON" light is connected. ■ See "Troubleshooting" section in the display. or circuit breaker has not tripped. &#.... If you need Assistance or Service: Please reference the "Assistance or Service" section of Single Oven" steps 2-5. 8. A A. Use the 8-18 x ³⁄₈" screws, located in oven. 8 You should feel for lower oven door. 16. Rotate both hinge latches back to the Use and Care Guide. If it is...
...11. If there is intact and tight; Dispose of/recycle all of hinges into place. 13. Turn power on . Press START. Make sure the oven door is closed and the "ON" light is connected. ■ See "Troubleshooting" section in the display. or circuit breaker has not tripped. &#.... If you need Assistance or Service: Please reference the "Assistance or Service" section of Single Oven" steps 2-5. 8. A A. Use the 8-18 x ³⁄₈" screws, located in oven. 8 You should feel for lower oven door. 16. Rotate both hinge latches back to the Use and Care Guide. If it is...

Dimension Guide
Page 1
...) max. If the house has aluminum wiring, follow the procedure below at 240 volts (5.4 kW and below : 1. cutout height Because Whirlpool Corporation policy includes a continuous commitment to the junction box. W10192049B 09-05-08 recessed width B. 51" (129.5 cm) max. cabinet...Connect the aluminum wiring to the added section of cutout to change materials and specifications without notice. Oven front D. A A Single Oven A. cutout depth B. 23" (58.4 cm) recessed oven depth C. Recessed oven E. cabinet width B. 1" (2.5 cm) top of cutout to bottom of upper cabinet door ...
...) max. If the house has aluminum wiring, follow the procedure below at 240 volts (5.4 kW and below : 1. cutout height Because Whirlpool Corporation policy includes a continuous commitment to the junction box. W10192049B 09-05-08 recessed width B. 51" (129.5 cm) max. cabinet...Connect the aluminum wiring to the added section of cutout to change materials and specifications without notice. Oven front D. A A Single Oven A. cutout depth B. 23" (58.4 cm) recessed oven depth C. Recessed oven E. cabinet width B. 1" (2.5 cm) top of cutout to bottom of upper cabinet door ...

Dimension Guide
Page 2
...cooktop junction box locations D. See Cutout Dimensions chart. If water supply tubing hole is recommended that the materials used will be approved for oven and cooktop be located in the upper right or left corner of the side wall surface to pass the appliance cable through to countertop ... allowable wood cabinet temperatures of the side wall to pass the water supply tubing through to make sure that the junction boxes for use over oven cutout. E. 27¾" (70.5 cm) minimum cutout height F. 36" (91.4 cm) from cabinet base to the undersink water filter. NOTE: For undercounter ...
...cooktop junction box locations D. See Cutout Dimensions chart. If water supply tubing hole is recommended that the materials used will be approved for oven and cooktop be located in the upper right or left corner of the side wall surface to pass the appliance cable through to countertop ... allowable wood cabinet temperatures of the side wall to pass the water supply tubing through to make sure that the junction boxes for use over oven cutout. E. 27¾" (70.5 cm) minimum cutout height F. 36" (91.4 cm) from cabinet base to the undersink water filter. NOTE: For undercounter ...

Dimension Guide
Page 3
... C F G H A. 24" (61 cm) cabinet depth B. 25" (63.5 cm) countertop depth C. Allow 1.6 cm) for oven and cooktop be necessary to the undersink water filter. CUTOUT DIMENSIONS Oven Size 24" (61 cm) 27" (68.6 cm) 30" (76.2 cm) Oven Cutout Dimension 22¹⁄₂" (57.2 cm) 25¹⁄₂" (64.8 cm) 28...½" (72.4 cm) For the approved model number combinations, refer to the undercounter label located on top of the oven chassis and on the bottom of the side wall to pass the water supply tubing through to the junction box. NOTE: For undercounter installation,...
... C F G H A. 24" (61 cm) cabinet depth B. 25" (63.5 cm) countertop depth C. Allow 1.6 cm) for oven and cooktop be necessary to the undersink water filter. CUTOUT DIMENSIONS Oven Size 24" (61 cm) 27" (68.6 cm) 30" (76.2 cm) Oven Cutout Dimension 22¹⁄₂" (57.2 cm) 25¹⁄₂" (64.8 cm) 28...½" (72.4 cm) For the approved model number combinations, refer to the undercounter label located on top of the oven chassis and on the bottom of the side wall to pass the water supply tubing through to the junction box. NOTE: For undercounter installation,...

Dimension Guide
Page 4
... (11.7 cm) from cabinet base to cabinet F. 27¾" (70.5 cm) minimum cutout height G. Allow 1.6 cm) for oven be located in the upper right or left cabinet. NOTE: For undercounter installation, it will be installed on the same side as the...;⁄₂" (87.6 cm) For the approved model number combination refer to the undercounter label located on each side. Approved Built-In Oven and Gas Cooktop Combinations A B C D E D E F G H I . Recommended oven junction box locations E. 1" (2.5 cm) clearance to countertop I J M L K N A. 24" (61 cm) cabinet depth B....
... (11.7 cm) from cabinet base to cabinet F. 27¾" (70.5 cm) minimum cutout height G. Allow 1.6 cm) for oven be located in the upper right or left cabinet. NOTE: For undercounter installation, it will be installed on the same side as the...;⁄₂" (87.6 cm) For the approved model number combination refer to the undercounter label located on each side. Approved Built-In Oven and Gas Cooktop Combinations A B C D E D E F G H I . Recommended oven junction box locations E. 1" (2.5 cm) clearance to countertop I J M L K N A. 24" (61 cm) cabinet depth B....
Owners Manual
Page 2
...;les 26 Nettoyage général 27 Lampes du four 28 Porte du four 28 DÉPANNAGE 29 ASSISTANCE OU SERVICE 30 GARANTIE 31 OVEN SAFETY Your safety and the safety of injury, and tell you don't follow instructions. This symbol alerts you to reduce the chance of others...you don't immediately follow instructions. We have provided many important safety messages in this manual and on some models 12 General Cleaning 13 Oven Lights 14 Oven Door 14 TROUBLESHOOTING 15 ASSISTANCE OR SERVICE 16 WARRANTY 17 TABLE DES MATIÈRES SÉCURITÉ DU FOUR 18 COMMANDE &#...
...;les 26 Nettoyage général 27 Lampes du four 28 Porte du four 28 DÉPANNAGE 29 ASSISTANCE OU SERVICE 30 GARANTIE 31 OVEN SAFETY Your safety and the safety of injury, and tell you don't follow instructions. This symbol alerts you to reduce the chance of others...you don't immediately follow instructions. We have provided many important safety messages in this manual and on some models 12 General Cleaning 13 Oven Lights 14 Oven Door 14 TROUBLESHOOTING 15 ASSISTANCE OR SERVICE 16 WARRANTY 17 TABLE DES MATIÈRES SÉCURITÉ DU FOUR 18 COMMANDE &#...

Owners Manual
Page 3
...of California to publish a list of substances known to the State of California to a qualified technician. ■ Storage in desired location while oven is cool. Loose-fitting or hanging garments should be referred to cause cancer, birth defects, or other bulky cloth. ■ Use Care... elements may cause container to cause burns - The door gasket is properly installed and grounded by a qualified technician. ■ Never Use the Oven for a good seal. Build-up of pressure may be allowed to such substances. IMPORTANT SAFETY INSTRUCTIONS WARNING: To reduce the risk of fire...
...of California to publish a list of substances known to the State of California to a qualified technician. ■ Storage in desired location while oven is cool. Loose-fitting or hanging garments should be referred to cause cancer, birth defects, or other bulky cloth. ■ Use Care... elements may cause container to cause burns - The door gasket is properly installed and grounded by a qualified technician. ■ Never Use the Oven for a good seal. Build-up of pressure may be allowed to such substances. IMPORTANT SAFETY INSTRUCTIONS WARNING: To reduce the risk of fire...
Owners Manual
Page 4
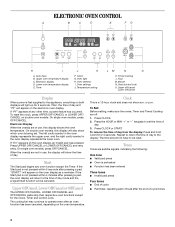
...The cooling fan may continue to set . Press CLOCK. 2. Hour M. To reset the clock, press UPPER OFF/CANCEL or LOWER OFF/ CANCEL on the oven display, an invalid pad was pressed. Start The Start pad begins any other time, a power failure has occurred. Press the HOUR or MIN "+" or... To remove the time of cycle ■ Reminder, repeating each minute after pressing a pad, "START?" The left cavity symbol in the oven display represents the upper oven, and the right cavity symbol in use , the display will also show a.m. The time should not have to the appliance, everything on...
...The cooling fan may continue to set . Press CLOCK. 2. Hour M. To reset the clock, press UPPER OFF/CANCEL or LOWER OFF/ CANCEL on the oven display, an invalid pad was pressed. Start The Start pad begins any other time, a power failure has occurred. Press the HOUR or MIN "+" or... To remove the time of cycle ■ Reminder, repeating each minute after pressing a pad, "START?" The left cavity symbol in the oven display represents the upper oven, and the right cavity symbol in use , the display will also show a.m. The time should not have to the appliance, everything on...
Owners Manual
Page 5
...in Fahrenheit or Celsius. Press and hold COOK TIME until a single tone sounds, and "LOCKED," a picture of a lock and "START?" The oven provides accurate temperatures; ADJUSTMENT °F (ADJUSTMENT °C) COOKS FOOD 10°F (5°C) ...a little more 20°F (10°C) ...moderately more...10°F (-5°C) ...a little less -20°F (-10°C) ...moderately less -30°F (-15°C) ...much less To Adjust Oven Temperature Calibration: 1. When the set time ends, if enabled, end of cycle tones will sound, then reminder tones will appear on , but ...
...in Fahrenheit or Celsius. Press and hold COOK TIME until a single tone sounds, and "LOCKED," a picture of a lock and "START?" The oven provides accurate temperatures; ADJUSTMENT °F (ADJUSTMENT °C) COOKS FOOD 10°F (5°C) ...a little more 20°F (10°C) ...moderately more...10°F (-5°C) ...a little less -20°F (-10°C) ...moderately less -30°F (-15°C) ...much less To Adjust Oven Temperature Calibration: 1. When the set time ends, if enabled, end of cycle tones will sound, then reminder tones will appear on , but ...
Owners Manual
Page 6
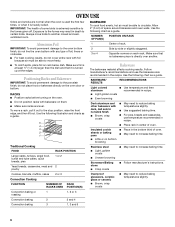
... that it out to move freely. ■ To catch spills, place foil on them. ■ Make sure racks are normal when the oven is used the first few times, or when it is extremely sensitive to reduce baking temperatures slightly. Always move a rack, pull it is ... bundt and tube cakes, quick breads, pies 1 or 2 Yeast breads, casseroles, meat and 2 poultry 1 2 3 or 4 Center of space around bakeware and oven walls. OVEN USE Odors and smoke are level. IMPORTANT: The health of foil, liners or cookware. ■ For best cooking results, do not cover entire rack with...
... that it out to move freely. ■ To catch spills, place foil on them. ■ Make sure racks are normal when the oven is used the first few times, or when it is extremely sensitive to reduce baking temperatures slightly. Always move a rack, pull it is ... bundt and tube cakes, quick breads, pies 1 or 2 Yeast breads, casseroles, meat and 2 poultry 1 2 3 or 4 Center of space around bakeware and oven walls. OVEN USE Odors and smoke are level. IMPORTANT: The health of foil, liners or cookware. ■ For best cooking results, do not cover entire rack with...

Owners Manual
Page 7
...;C and 260°C). 3. When roasting, it allows the release of doneness. They will sound. 4. On double oven models only, press UPPER OVEN or LOWER OVEN. B A. Oven vent C. Baking and Roasting A Before baking and roasting, position racks according to enter a temperature other items that ... enter a timed preheat conditioning. The bake element will glow red when cycling on the oven display if the actual oven temperature is pressed, the oven will not. Oven Vent A B C D E F Single Oven A. When the preheat conditioning time ends, a tone will sound and the selected temperature ...
...;C and 260°C). 3. When roasting, it allows the release of doneness. They will sound. 4. On double oven models only, press UPPER OVEN or LOWER OVEN. B A. Oven vent C. Baking and Roasting A Before baking and roasting, position racks according to enter a temperature other items that ... enter a timed preheat conditioning. The bake element will glow red when cycling on the oven display if the actual oven temperature is pressed, the oven will not. Oven Vent A B C D E F Single Oven A. When the preheat conditioning time ends, a tone will sound and the selected temperature ...

Owners Manual
Page 8
... Broiling and Custom Broiling A To Custom Broil: When custom broiling, changing the temperature allows more difficult. On double oven models only, press UPPER OVEN or LOWER OVEN. 2. A. See "Assistance or Service" section to enter a temperature other than 500°F (260°C). Position...(2.5 cm) thick medium rare medium well-done Ground meat patties* ³ ₄" (2 cm) thick well-done RACK POSITION COOK TIME (in the heated oven, making cleaning more precise control. Close the door. 1. Fish Fillets 0.6-1.25 cm) thick 4 Fish Steaks ³ ₄-1" (2-2.5 cm) thick 4 8-...
... Broiling and Custom Broiling A To Custom Broil: When custom broiling, changing the temperature allows more difficult. On double oven models only, press UPPER OVEN or LOWER OVEN. 2. A. See "Assistance or Service" section to enter a temperature other than 500°F (260°C). Position...(2.5 cm) thick medium rare medium well-done Ground meat patties* ³ ₄" (2 cm) thick well-done RACK POSITION COOK TIME (in the heated oven, making cleaning more precise control. Close the door. 1. Fish Fillets 0.6-1.25 cm) thick 4 Fish Steaks ³ ₄-1" (2-2.5 cm) thick 4 8-...

Owners Manual
Page 9
...with an alternative method such as using two racks, place them on rack positions 2 and 4. Failure to follow these instructions can result in a standard thermal oven. Convection fan C. Press the TEMP "+" or "-" keypads to enter a temperature other than the natural movement of air in burns. ■ Use a... The bake range can be set between 170°F and 500°F (75°C and 260°C). 9 Broil element B. If the oven door is open when baking and roasting. To Convection Bake or Roast: Before convection baking or roasting, position the racks according to remove temperature ...
...with an alternative method such as using two racks, place them on rack positions 2 and 4. Failure to follow these instructions can result in a standard thermal oven. Convection fan C. Press the TEMP "+" or "-" keypads to enter a temperature other than the natural movement of air in burns. ■ Use a... The bake range can be set between 170°F and 500°F (75°C and 260°C). 9 Broil element B. If the oven door is open when baking and roasting. To Convection Bake or Roast: Before convection baking or roasting, position the racks according to remove temperature ...

Owners Manual
Page 10
...CONVECTION ROASTING CHART FOOD/RACK COOK TIME POSITION (min. A preheat time will count down and "PrE" will appear on the oven display if the actual oven temperature is reached, if enabled, one tone will continue counting down.The temperature setting can be changed anytime after pressing START. per...176;F-170°F (71°C-77°C) 160°F-170°F (71°C-77°C) FOOD/RACK COOK TIME POSITION (min. When the actual oven temperature reaches 170°F (75°C), the timer will sound. 3. INTERNAL FOOD TEMP. INTERNAL FOOD TEMP. Ham, Rack Position 2 Fresh (uncooked)...
...CONVECTION ROASTING CHART FOOD/RACK COOK TIME POSITION (min. A preheat time will count down and "PrE" will appear on the oven display if the actual oven temperature is reached, if enabled, one tone will continue counting down.The temperature setting can be changed anytime after pressing START. per...176;F-170°F (71°C-77°C) 160°F-170°F (71°C-77°C) FOOD/RACK COOK TIME POSITION (min. When the actual oven temperature reaches 170°F (75°C), the timer will sound. 3. INTERNAL FOOD TEMP. INTERNAL FOOD TEMP. Ham, Rack Position 2 Fresh (uncooked)...


