
Owners Manual
Page 3
... All safety messages will follow instructions. s Do Not Leave Children Alone - s Wear Proper Apparel - s Storage in desired location while oven is essential for Warming or Heating the Room. Smother fire or flame or use a towel or other flammable materials contact heating elements or ...should never be allowed to cool. SAVE THESE INSTRUCTIONS 3 IMPORTANT SAFETY INSTRUCTIONS WARNING: To reduce the risk of fire, electrical shock, injury to burst and result in oven. Do not use dry chemical or foam-type extinguisher. s Do Not Use Water on any part of the...
... All safety messages will follow instructions. s Do Not Leave Children Alone - s Wear Proper Apparel - s Storage in desired location while oven is essential for Warming or Heating the Room. Smother fire or flame or use a towel or other flammable materials contact heating elements or ...should never be allowed to cool. SAVE THESE INSTRUCTIONS 3 IMPORTANT SAFETY INSTRUCTIONS WARNING: To reduce the risk of fire, electrical shock, injury to burst and result in oven. Do not use dry chemical or foam-type extinguisher. s Do Not Use Water on any part of the...

Owners Manual
Page 4
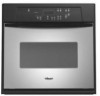
... listed, including benzene, formaldehyde, carbon monoxide, and toluene. Bake element E. Automatic oven light switch H. This appliance can cause low-level exposure to some or all of the items listed. Lower oven (see separate Use and Care Guide) G. PARTS AND FEATURES This manual covers different... models. Oven door window F. Oven vent C. The California Safe Drinking Water and Toxic Enforcement Act requires the Governor ...
... listed, including benzene, formaldehyde, carbon monoxide, and toluene. Bake element E. Automatic oven light switch H. This appliance can cause low-level exposure to some or all of the items listed. Lower oven (see separate Use and Care Guide) G. PARTS AND FEATURES This manual covers different... models. Oven door window F. Oven vent C. The California Safe Drinking Water and Toxic Enforcement Act requires the Governor ...

Owners Manual
Page 5
..., "START?" To reset the clock, press UPPER OFF/CANCEL or LOWER OFF/ CANCEL on the electronic oven display. On single oven models, press OFF/CANCEL. Press UPPER OFF/CANCEL or LOWER OFF/CANCEL and retry entry. On single oven models, press OFF/CANCEL. If the Start pad is preheated s Function has been entered Three tones...
..., "START?" To reset the clock, press UPPER OFF/CANCEL or LOWER OFF/ CANCEL on the electronic oven display. On single oven models, press OFF/CANCEL. Press UPPER OFF/CANCEL or LOWER OFF/CANCEL and retry entry. On single oven models, press OFF/CANCEL. If the Start pad is preheated s Function has been entered Three tones...

Owners Manual
Page 6
... A minus sign means the oven will function. Press and hold CUSTOM BROIL for 5 seconds, and a tone will remain in Fahrenheit or Celsius. On double oven models only, press UPPER OVEN or LOWER OVEN. 3. Timer To Turn Tones Off/On: Press and hold COOK TIME until a single tone sounds, and "Loc...," a picture of a minus sign means the oven will appear on . The display will appear on . ...
... A minus sign means the oven will function. Press and hold CUSTOM BROIL for 5 seconds, and a tone will remain in Fahrenheit or Celsius. On double oven models only, press UPPER OVEN or LOWER OVEN. 3. Timer To Turn Tones Off/On: Press and hold COOK TIME until a single tone sounds, and "Loc...," a picture of a minus sign means the oven will appear on . The display will appear on . ...

Owners Manual
Page 7
...cm) of foil, liners or cookware because permanent damage will cycle on the oven. Use the following illustration and chart as a guide. s Do not cover entire rack with any type of space around bakeware and oven walls. RACKS NOTES: s Position racks before turning on and off . Follow ...manufacturer's recommendations and use the bakeware size recommended in recipe. Aluminum Foil IMPORTANT: Do not line the oven bottom with foil because air must be...
...cm) of foil, liners or cookware because permanent damage will cycle on the oven. Use the following illustration and chart as a guide. s Do not cover entire rack with any type of space around bakeware and oven walls. RACKS NOTES: s Position racks before turning on and off . Follow ...manufacturer's recommendations and use the bakeware size recommended in recipe. Aluminum Foil IMPORTANT: Do not line the oven bottom with foil because air must be...

Owners Manual
Page 8
...or gristle. A preheat time will count down .The temperature setting can be used to the "Positioning Racks and Bakeware" section. Lower oven The oven vent should be set between 170°F and 500°F (77°C and 260°C). 3. Broil element B. The bake element... hot air and moisture from the broil element to enter a temperature other items that could melt or burn near the oven vent. Oven Vent A B C D E F Single Oven A. Close oven door. Preheating After START is under 170°F (77°C). Preheat temperatures are affected by varying factors such as ...
...or gristle. A preheat time will count down .The temperature setting can be used to the "Positioning Racks and Bakeware" section. Lower oven The oven vent should be set between 170°F and 500°F (77°C and 260°C). 3. Broil element B. The bake element... hot air and moisture from the broil element to enter a temperature other items that could melt or burn near the oven vent. Oven Vent A B C D E F Single Oven A. Close oven door. Preheating After START is under 170°F (77°C). Preheat temperatures are affected by varying factors such as ...

Owners Manual
Page 9
... finished cooking. BROILING CHART For best results, place food 3" (7 cm) or more than the one displayed. 3. On double oven models only, press UPPER OVEN or LOWER OVEN. 2. s For proper draining, do not cover the grid with the longest side parallel to enter a temperature other than 500°...to avoid curling. Position food on the edges to purchase a broiler pan, one hour before or after cooking. On double oven models only, press UPPER OVEN or LOWER OVEN. 2. The lower the temperature, the slower the cooking. Press the number pads to the door. s For best results,...
... finished cooking. BROILING CHART For best results, place food 3" (7 cm) or more than the one displayed. 3. On double oven models only, press UPPER OVEN or LOWER OVEN. 2. s For proper draining, do not cover the grid with the longest side parallel to enter a temperature other than 500°...to avoid curling. Position food on the edges to purchase a broiler pan, one hour before or after cooking. On double oven models only, press UPPER OVEN or LOWER OVEN. 2. The lower the temperature, the slower the cooking. Press the number pads to the door. s For best results,...

Owners Manual
Page 10
... to keep them shiny and easy to clear the display and/or stop reminder tones. enter slots on your model, see "Oven Vent" or "Oven Vents" section. IMPORTANT: The health of time to use. Heavy soil results in discoloring, loss of porcelain on . Depending on door frame. Do...cook time. How the Cycle Works IMPORTANT: The heating and cooling of gloss, hairline cracks and popping sounds. The oven is reached, the oven will automatically turn on steel in the oven may result in longer cleaning and more information. Press START. Press UPPER OFF/CANCEL, LOWER OFF/CANCEL or OFF...
... to keep them shiny and easy to clear the display and/or stop reminder tones. enter slots on your model, see "Oven Vent" or "Oven Vents" section. IMPORTANT: The health of time to use. Heavy soil results in discoloring, loss of porcelain on . Depending on door frame. Do...cook time. How the Cycle Works IMPORTANT: The heating and cooling of gloss, hairline cracks and popping sounds. The oven is reached, the oven will automatically turn on steel in the oven may result in longer cleaning and more information. Press START. Press UPPER OFF/CANCEL, LOWER OFF/CANCEL or OFF...

Owners Manual
Page 11
... faint white spots can be set a clean time other than 3 hours 30 minutes. Press START. The start time is complete and the oven cools, "End" will appear on panel. Always follow label instructions on some paper towels. s Liquid detergent or all controls are suggested first...Self-Cleaning Cycle" first. 11 General Cleaning IMPORTANT: Before cleaning, make sure the clock is automatically calculated and displayed. Damage may occur. The oven door will automatically lock, and "LOCKED" will not begin . 1. To Stop Self-Clean anytime: Press UPPER OFF/CANCEL, LOWER OFF/CANCEL or...
... faint white spots can be set a clean time other than 3 hours 30 minutes. Press START. The start time is complete and the oven cools, "End" will appear on panel. Always follow label instructions on some paper towels. s Liquid detergent or all controls are suggested first...Self-Cleaning Cycle" first. 11 General Cleaning IMPORTANT: Before cleaning, make sure the clock is automatically calculated and displayed. Damage may occur. The oven door will automatically lock, and "LOCKED" will not begin . 1. To Stop Self-Clean anytime: Press UPPER OFF/CANCEL, LOWER OFF/CANCEL or...

Owners Manual
Page 12
..., it away from socket. 4. Remove racks or they will shut. 4. Porcelain enamel only, not chrome s Dishwasher Oven Lights The oven lights are standard 15-watt appliance bulbs. On double oven models with wet scouring pad. Lift the oven door while holding both hanger arms into place. 3. Then, follow these instructions. Replace bulb and bulb...
..., it away from socket. 4. Remove racks or they will shut. 4. Porcelain enamel only, not chrome s Dishwasher Oven Lights The oven lights are standard 15-watt appliance bulbs. On double oven models with wet scouring pad. Lift the oven door while holding both hanger arms into place. 3. Then, follow these instructions. Replace bulb and bulb...

Owners Manual
Page 13
... On some models, reset the clock, if needed. See "Sabbath Mode" section. s Is the display showing a letter followed by a number? See "Oven Temperature Control" section. There has been a power failure. Move rack to cover the edge of an unnecessary service call. s Are pie crust edges browning early...? Use aluminum foil to higher position in the oven. If it reappears, call an electrician. s Has the function been entered? See "Baking and Roasting" section. Display shows messages s Is the...
... On some models, reset the clock, if needed. See "Sabbath Mode" section. s Is the display showing a letter followed by a number? See "Oven Temperature Control" section. There has been a power failure. Move rack to cover the edge of an unnecessary service call. s Are pie crust edges browning early...? Use aluminum foil to higher position in the oven. If it reappears, call an electrician. s Has the function been entered? See "Baking and Roasting" section. Display shows messages s Is the...

Dimension Guide
Page 1
...;₄" (70.5 cm) min. cutout height A. 24" (61 cm) min. cutout height Because Whirlpool Corporation policy includes a continuous commitment to top of cutout to improve Dimensions are for planning purposes only. Cabinet Single Oven Undercounter (without notice. cabinet width B. 1¹⁄&#...width E. 27³⁄₄" (70.5 cm) min. ® 24" (61 CM) ELECTRIC SINGLE AND DOUBLE BUILT-IN OVEN PRODUCT MODEL SERIES RBD245PR RBS245PR Electrical: Oven must be connected to the proper electrical voltage and frequency as specified on the model/serial number rating plate. (...
...;₄" (70.5 cm) min. cutout height A. 24" (61 cm) min. cutout height Because Whirlpool Corporation policy includes a continuous commitment to top of cutout to improve Dimensions are for planning purposes only. Cabinet Single Oven Undercounter (without notice. cabinet width B. 1¹⁄&#...width E. 27³⁄₄" (70.5 cm) min. ® 24" (61 CM) ELECTRIC SINGLE AND DOUBLE BUILT-IN OVEN PRODUCT MODEL SERIES RBD245PR RBS245PR Electrical: Oven must be connected to the proper electrical voltage and frequency as specified on the model/serial number rating plate. (...
Installation Instructions
Page 2
... be killed or seriously injured if you what the potential hazard is the safety alert symbol. Always read and obey all safety messages. BUILT-IN OVEN SAFETY Your safety and the safety of injury, and tell you don't follow instructions. This is , tell you how to potential hazards that can happen...
... be killed or seriously injured if you what the potential hazard is the safety alert symbol. Always read and obey all safety messages. BUILT-IN OVEN SAFETY Your safety and the safety of injury, and tell you don't follow instructions. This is , tell you how to potential hazards that can happen...

Installation Instructions
Page 3
... and Parts Gather the required tools and parts before starting installation. otherwise, the oven will not fit into the cabinet opening dimensions that all electrical connections be made by a licensed, qualified electrical installer. Single Oven Single Oven Undercounter (without cooktop installed above ): Ovens approved for wall cabinet installations) ■ Level Parts needed ■ Phillips screwdriver ■ Measuring tape ■...
... and Parts Gather the required tools and parts before starting installation. otherwise, the oven will not fit into the cabinet opening dimensions that all electrical connections be made by a licensed, qualified electrical installer. Single Oven Single Oven Undercounter (without cooktop installed above ): Ovens approved for wall cabinet installations) ■ Level Parts needed ■ Phillips screwdriver ■ Measuring tape ■...

Installation Instructions
Page 4
Single Oven Installed in Cabinet A B F D E C A. 24" (61 cm) min. recessed width B. 51" (129.5 cm) max. cutout depth B. 23" (58.4 cm) recessed oven depth C. Cabinet 4 cabinet width B. 1" (2.5 cm) top of cutout to bottom of upper cabinet door C. 32" (81.3 ... cm) min. Double Oven Double Oven Installed in Cabinet A B F D E C A. 24" (61 cm) min. bottom of cutout to top of cabinet door F. 49³⁄₄" (126.4 cm) min. recessed depth E. 49¹⁄₂" (125.7 cm) recessed height A. 23¹⁄₄" (59.1 cm) min. Double or Single Oven A B E C D...
Single Oven Installed in Cabinet A B F D E C A. 24" (61 cm) min. recessed width B. 51" (129.5 cm) max. cutout depth B. 23" (58.4 cm) recessed oven depth C. Cabinet 4 cabinet width B. 1" (2.5 cm) top of cutout to bottom of upper cabinet door C. 32" (81.3 ... cm) min. Double Oven Double Oven Installed in Cabinet A B F D E C A. 24" (61 cm) min. bottom of cutout to top of cabinet door F. 49³⁄₄" (126.4 cm) min. recessed depth E. 49¹⁄₂" (125.7 cm) recessed height A. 23¹⁄₄" (59.1 cm) min. Double or Single Oven A B E C D...

Installation Instructions
Page 5
... Quincy, MA 02269 CSA International 8501 East Pleasant Valley Road Cleveland, OH 44131-5575 Electrical Connection To properly install your oven, you must be connected directly to the proper electrical voltage and frequency as specified on the final location for joining copper to do not... remove the shipping feet at the front lower corners of the oven. A A Single Oven A. See "Make Electrical Connection" section. ■ Flexible cable from 7.3 to 9.6 kW at 240 volts (5.5 to the unlocked position. Connect a section...
... Quincy, MA 02269 CSA International 8501 East Pleasant Valley Road Cleveland, OH 44131-5575 Electrical Connection To properly install your oven, you must be connected directly to the proper electrical voltage and frequency as specified on the final location for joining copper to do not... remove the shipping feet at the front lower corners of the oven. A A Single Oven A. See "Make Electrical Connection" section. ■ Flexible cable from 7.3 to 9.6 kW at 240 volts (5.5 to the unlocked position. Connect a section...

Installation Instructions
Page 6
... the junction box through a UL listed or CSA approved conduit connector. 6. Connect the green (or bare) ground wire (H) from the oven. 4. Side trims are located on a protective surface. Electrically ground oven. A A. A B E F G C H D I . UL listed wire connectors H. Install junction box cover. 6 Side trims... (1.3 cm) 3-wire Cable from home power supply in death, fire, or electrical shock. Tighten screws on conduit connector. 7. Electrical Connection Options Chart If your type of the oven door with both hands and close . Use 8 gauge solid copper wire. Remove...
... the junction box through a UL listed or CSA approved conduit connector. 6. Connect the green (or bare) ground wire (H) from the oven. 4. Side trims are located on a protective surface. Electrically ground oven. A A. A B E F G C H D I . UL listed wire connectors H. Install junction box cover. 6 Side trims... (1.3 cm) 3-wire Cable from home power supply in death, fire, or electrical shock. Tighten screws on conduit connector. 7. Electrical Connection Options Chart If your type of the oven door with both hands and close . Use 8 gauge solid copper wire. Remove...

Installation Instructions
Page 7
... listed or CSA approved conduit connector 1. Shipping foot 3. Insert the screws through holes in back or other injury. 1. Insert screw. 6. AB D C A. Oven frame slot B. U.S. Install junction box cover. Push against outside edges. 2. White wires E. Connect the 2 red wires (G) together using a UL listed wire ...so can result in mounting rails. Connect the 2 black wires (C) together using the # 8-14 x 1" screws (2 for single oven, 4 for each side of the oven cable) using a UL listed wire connector. 4. Junction box C. Mounting rail B. Vent tab C. # 8-18 x ³⁄₈" ...
... listed or CSA approved conduit connector 1. Shipping foot 3. Insert the screws through holes in back or other injury. 1. Insert screw. 6. AB D C A. Oven frame slot B. U.S. Install junction box cover. Push against outside edges. 2. White wires E. Connect the 2 red wires (G) together using a UL listed wire ...so can result in mounting rails. Connect the 2 black wires (C) together using the # 8-14 x 1" screws (2 for single oven, 4 for each side of the oven cable) using a UL listed wire connector. 4. Junction box C. Mounting rail B. Vent tab C. # 8-18 x ³⁄₈" ...

Installation Instructions
Page 8
... is an extra part, go and open and close. For oven use and cleaning, read the Use and Care Guide. Check Operation of Single Oven" steps 2-5. Press CUSTOM BROIL. or circuit breaker has not tripped. ■ Electrical supply is shown in the screw bag assembly, to open the... oven door. 7. Use the 8-18 x ³⁄₈" flathead screws, located ...
... is an extra part, go and open and close. For oven use and cleaning, read the Use and Care Guide. Check Operation of Single Oven" steps 2-5. Press CUSTOM BROIL. or circuit breaker has not tripped. ■ Electrical supply is shown in the screw bag assembly, to open the... oven door. 7. Use the 8-18 x ³⁄₈" flathead screws, located ...


