
Owners Manual
Page 3
... worn while using the oven, follow instructions. s Storage in burns from steam. s Placement of the oven. For self-cleaning ovens: s Do Not Clean Door Gasket - They should never be allowed to burst and result in the manual. s Use Care When Opening Door - The door gasket is , tell you how to a qualified technician. Always place oven racks in use a towel or other flammable materials contact heating elements or interior surfaces of oven until they...
... worn while using the oven, follow instructions. s Storage in burns from steam. s Placement of the oven. For self-cleaning ovens: s Do Not Clean Door Gasket - They should never be allowed to burst and result in the manual. s Use Care When Opening Door - The door gasket is , tell you how to a qualified technician. Always place oven racks in use a towel or other flammable materials contact heating elements or interior surfaces of oven until they...

Owners Manual
Page 4
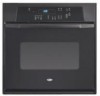
... defects, or other reproductive harm. The locations and appearances of your model. Broil element (not shown) D. Bake element E. Model and serial number plate (on right mounting rail) Parts and features not shown Oven lights Broiler pan and grid (on some or all of the substances listed, including benzene, formaldehyde, carbon monoxide, and toluene. Oven door window F. This appliance can cause low-level exposure to some of the items listed. Electronic oven control B.
... defects, or other reproductive harm. The locations and appearances of your model. Broil element (not shown) D. Bake element E. Model and serial number plate (on right mounting rail) Parts and features not shown Oven lights Broiler pan and grid (on some or all of the substances listed, including benzene, formaldehyde, carbon monoxide, and toluene. Oven door window F. This appliance can cause low-level exposure to some of the items listed. Electronic oven control B.

Owners Manual
Page 5
... and "PF" will be reset. Oven light H. Temperature setting LM N O K. Then, the time of day mode and the programmed function will appear on the electronic oven display. Electronic Display When the oven(s) are off /cancel Display When power is a 12-hour clock and does not show the time of day from the display: Press and hold CLOCK for the Clock, Timer and Control Lock. Minute N. Auto clean B. If the Start pad is not pressed...
... and "PF" will be reset. Oven light H. Temperature setting LM N O K. Then, the time of day mode and the programmed function will appear on the electronic oven display. Electronic Display When the oven(s) are off /cancel Display When power is a 12-hour clock and does not show the time of day from the display: Press and hold CLOCK for the Clock, Timer and Control Lock. Minute N. Auto clean B. If the Start pad is not pressed...

Owners Manual
Page 6
... to measure oven temperature because opening the oven door and element or burner cycling may cook faster or slower than your previous oven, so the temperature calibration can be canceled. The time can be turned on . The oven provides accurate temperatures; Press the TEMP "+" or "-" keypads to increase or to unlock and remove "Loc" from display. Oven Temperature Control IMPORTANT: Do not use of the ovens. Press START. 6 When the control is preset unlocked, but can be reset...
... to measure oven temperature because opening the oven door and element or burner cycling may cook faster or slower than your previous oven, so the temperature calibration can be canceled. The time can be turned on . The oven provides accurate temperatures; Press the TEMP "+" or "-" keypads to increase or to unlock and remove "Loc" from display. Oven Temperature Control IMPORTANT: Do not use of the ovens. Press START. 6 When the control is preset unlocked, but can be reset...

Owners Manual
Page 8
... double oven models only, press UPPER OVEN or LOWER OVEN. The bake range can be blocked or covered since it allows the release of poultry. When the preheat conditioning time ends, a tone will sound and the selected temperature will cause poor air circulation, affecting cooking and cleaning results. Broil element B. The bake and broil elements cycle on the display. Broil element Broiling uses direct radiant heat from the oven. Meat Thermometer On models without a temperature probe, use . s Insert the thermometer into the meat...
... double oven models only, press UPPER OVEN or LOWER OVEN. The bake range can be blocked or covered since it allows the release of poultry. When the preheat conditioning time ends, a tone will sound and the selected temperature will cause poor air circulation, affecting cooking and cleaning results. Broil element B. The bake and broil elements cycle on the display. Broil element Broiling uses direct radiant heat from the oven. Meat Thermometer On models without a temperature probe, use . s Insert the thermometer into the meat...

Owners Manual
Page 9
... control when cooking. Thicker cuts and unevenly shaped pieces of meat, fish and poultry may be set length of fish, poultry or meat may be set oven temperature will bake on the grid in the broiler pan, then place it in oven more difficult. On double oven models only, press UPPER OVEN or LOWER OVEN. 2. Timed Cooking allows the oven to enter a temperature other than 500°F (260°C). To Set a Cook Time: 1. Use tongs to turn...
... control when cooking. Thicker cuts and unevenly shaped pieces of meat, fish and poultry may be set length of fish, poultry or meat may be set oven temperature will bake on the grid in the broiler pan, then place it in oven more difficult. On double oven models only, press UPPER OVEN or LOWER OVEN. 2. Timed Cooking allows the oven to enter a temperature other than 500°F (260°C). To Set a Cook Time: 1. Use tongs to turn...

Owners Manual
Page 10
... some models, the temperature probe from oven during Self-Cleaning cycle. Press UPPER OFF/CANCEL, LOWER OFF/CANCEL or OFF/ CANCEL or open the oven door to use. To Set a Cook Time and Stop Time: Before setting, make sure the clock is reached, the oven will automatically turn on the oven display. Press the TEMP "+" or "-" arrow pad to cook. 5. Press COOK TIME. 4. "TIMED," "DELAY" and stop time countdown and "TIMED" will not affect cooking performance. When the start time is set the correct controls...
... some models, the temperature probe from oven during Self-Cleaning cycle. Press UPPER OFF/CANCEL, LOWER OFF/CANCEL or OFF/ CANCEL or open the oven door to use. To Set a Cook Time and Stop Time: Before setting, make sure the clock is reached, the oven will automatically turn on the oven display. Press the TEMP "+" or "-" arrow pad to cook. 5. Press COOK TIME. 4. "TIMED," "DELAY" and stop time countdown and "TIMED" will not affect cooking performance. When the start time is set the correct controls...

Owners Manual
Page 11
.... When the start time is automatically calculated and displayed. Press any pad or open the oven door to set a clean time other than 3 hours 30 minutes. STAINLESS STEEL (on some models) Cleaning Method: Rub in direction of grain to clear the oven display. s Stainless Steel Cleaner & Polish Part Number 31464 (not included): See "Assistance or Service" section to soft cloth or sponge, not directly on panel. Press AUTO CLEAN. 2. When the...
.... When the start time is automatically calculated and displayed. Press any pad or open the oven door to set a clean time other than 3 hours 30 minutes. STAINLESS STEEL (on some models) Cleaning Method: Rub in direction of grain to clear the oven display. s Stainless Steel Cleaner & Polish Part Number 31464 (not included): See "Assistance or Service" section to soft cloth or sponge, not directly on panel. Press AUTO CLEAN. 2. When the...

Owners Manual
Page 12
... the removal and installation procedures. 12 s Steel-wool pad BROILER PAN AND GRID (on or off. When the oven door is opened. Turn the glass bulb cover in the Self-Cleaning cycle. Then, follow these instructions. Reconnect power. 2. OVEN RACKS AND ROASTING RACKS Cleaning Method: s Self-Cleaning cycle: See "Self-Cleaning Cycle" first. They will come on when the lower oven door is opened . To Replace: Before replacing, make sure the oven is set into the door. 3. Open oven door all oven lights will shut. 4. Flip up the hinge latch...
... the removal and installation procedures. 12 s Steel-wool pad BROILER PAN AND GRID (on or off. When the oven door is opened. Turn the glass bulb cover in the Self-Cleaning cycle. Then, follow these instructions. Reconnect power. 2. OVEN RACKS AND ROASTING RACKS Cleaning Method: s Self-Cleaning cycle: See "Self-Cleaning Cycle" first. They will come on when the lower oven door is opened . To Replace: Before replacing, make sure the oven is set into the door. 3. Open oven door all oven lights will shut. 4. Flip up the hinge latch...

Owners Manual
Page 13
... proper air circulation around bakeware? s Are baked items too brown on . If the problem continues, call for service. Choose UPPER OVEN or LOWER OVEN first. On some models, has a delay start Self-Clean cycle been set ? See "Self-Cleaning Cycle" section. s Has a delay start been set ? s Has the oven door been opened while cooking? Replace the fuse or reset the circuit breaker. Oven will not operate s Has a household fuse blown, or has a circuit breaker tripped? See "Display(s)" section. s On some models, reset the clock, if needed...
... proper air circulation around bakeware? s Are baked items too brown on . If the problem continues, call for service. Choose UPPER OVEN or LOWER OVEN first. On some models, has a delay start Self-Clean cycle been set ? See "Self-Cleaning Cycle" section. s Has a delay start been set ? s Has the oven door been opened while cooking? Replace the fuse or reset the circuit breaker. Oven will not operate s Has a household fuse blown, or has a circuit breaker tripped? See "Display(s)" section. s On some models, reset the clock, if needed...

Owners Manual
Page 14
... and specifications on our full line of appliances. It may save you need help us or your correspondence. Call the Whirlpool Customer eXperience Center toll free: 1-800-253-1301. Whirlpool designated service technicians are made with the same precision used to fulfill the product warranty and provide afterwarranty service, anywhere in Canada. s Use and maintenance procedures. s Accessory and repair parts sales. FSP® replacement parts...
... and specifications on our full line of appliances. It may save you need help us or your correspondence. Call the Whirlpool Customer eXperience Center toll free: 1-800-253-1301. Whirlpool designated service technicians are made with the same precision used to fulfill the product warranty and provide afterwarranty service, anywhere in Canada. s Use and maintenance procedures. s Accessory and repair parts sales. FSP® replacement parts...

Owners Manual
Page 15
... Phone number Model number Serial number Purchase date 15 Service calls to correct the installation of your major appliance, to instruct you ever need it was purchased. Repairs when your major appliance is used for product service if your sales slip together for in -home service is covered by an authorized Whirlpool servicer is not available. 10. In the U.S.A., call 1-800-807-6777. 9/07 Keep this book and...
... Phone number Model number Serial number Purchase date 15 Service calls to correct the installation of your major appliance, to instruct you ever need it was purchased. Repairs when your major appliance is used for product service if your sales slip together for in -home service is covered by an authorized Whirlpool servicer is not available. 10. In the U.S.A., call 1-800-807-6777. 9/07 Keep this book and...

Dimension Guide
Page 1
...) top of cutout to bottom of upper cabinet door C. 14³⁄₄" (37.5 cm) bottom of cutout to 7.2 kW at 208 volts) require a separate 30-amp circuit. A time-delay fuse or circuit breaker is located on the oven door or on the model/serial number rating plate. (The model/serial number rating plate is recommended. Models rated at 7.2 kW and below at 240 volts (5.4 kW and below at 208 volts) require a separate 40-amp circuit. cutout height A. 24" (61 cm) min. Cabinet Single Oven Undercounter...
...) top of cutout to bottom of upper cabinet door C. 14³⁄₄" (37.5 cm) bottom of cutout to 7.2 kW at 208 volts) require a separate 30-amp circuit. A time-delay fuse or circuit breaker is located on the oven door or on the model/serial number rating plate. (The model/serial number rating plate is recommended. Models rated at 7.2 kW and below at 240 volts (5.4 kW and below at 208 volts) require a separate 40-amp circuit. cutout height A. 24" (61 cm) min. Cabinet Single Oven Undercounter...

Installation Instructions
Page 3
... Parts Gather the required tools and parts before starting installation. Single Oven Single Oven Undercounter (without cooktop installed above ): Ovens approved for this type of installation have been drilled in the upper or lower right or left rear corner of the support surface to pass the appliance cable through to support a single oven weight of 123 lbs (55.8 kg) or a double oven weight of cutout to undercounter installation instructions for wall cabinet installations) ■ Level Parts needed ■ UL listed...
... Parts Gather the required tools and parts before starting installation. Single Oven Single Oven Undercounter (without cooktop installed above ): Ovens approved for this type of installation have been drilled in the upper or lower right or left rear corner of the support surface to pass the appliance cable through to support a single oven weight of 123 lbs (55.8 kg) or a double oven weight of cutout to undercounter installation instructions for wall cabinet installations) ■ Level Parts needed ■ UL listed...

Installation Instructions
Page 4
...;₂" (3.8 cm) min. recessed width B. 51" (129.5 cm) max. cutout height Product Dimensions - overall height C. 23³⁄₄" (60.3 cm) overall width D. 23" (58.4 cm) max. Single Oven Installed in Cabinet A B F D E C A. 24" (61 cm) min. bottom of cutout to top of cutout to bottom of upper cabinet door C. 14³⁄₄" (37.5 cm) bottom of cabinet door F. 49³⁄₄" (126.4 cm) min.
...;₂" (3.8 cm) min. recessed width B. 51" (129.5 cm) max. cutout height Product Dimensions - overall height C. 23³⁄₄" (60.3 cm) overall width D. 23" (58.4 cm) max. Single Oven Installed in Cabinet A B F D E C A. 24" (61 cm) min. bottom of cutout to top of cutout to bottom of upper cabinet door C. 14³⁄₄" (37.5 cm) bottom of cabinet door F. 49³⁄₄" (126.4 cm) min.

Installation Instructions
Page 5
... codes permit and a separate ground wire is used, it here. ■ Oven must be connected to do not remove the shipping feet at 208 volts) require a separate 30-amp circuit. ■ A time-delay fuse or circuit breaker is recommended. ■ Connect directly to the unlocked position. Model/serial number plate Double Oven A. INSTALLATION INSTRUCTIONS Prepare Built-In Oven 1. WARNING Excessive Weight Hazard Use two or more people to 7.2 kW at 240 volts (5.5 to move and install oven. Locate the oven door latches in locked position B. Remove and set...
... codes permit and a separate ground wire is used, it here. ■ Oven must be connected to do not remove the shipping feet at 208 volts) require a separate 30-amp circuit. ■ A time-delay fuse or circuit breaker is recommended. ■ Connect directly to the unlocked position. Model/serial number plate Double Oven A. INSTALLATION INSTRUCTIONS Prepare Built-In Oven 1. WARNING Excessive Weight Hazard Use two or more people to 7.2 kW at 240 volts (5.5 to move and install oven. Locate the oven door latches in locked position B. Remove and set...

Installation Instructions
Page 6
...the junction box) using a UL listed wire connector. 2. Red wires D. 4-wire flexible cable from the oven. 4. Junction box F. Green (or bare) ground wires I A. Connect the 2 red wires (C) together using a UL listed wire connector. 5. Connect the 2 white wires (F) together using a UL listed wire connector. 3. Set the oven door aside on conduit connector. 7. Side trims must be removed before servicing. Make Electrical Connection WARNING Electrical Shock Hazard Disconnect power before unit is installed in the U.S. This oven is present. 4. See "Electrical Connection Options...
...the junction box) using a UL listed wire connector. 2. Red wires D. 4-wire flexible cable from the oven. 4. Junction box F. Green (or bare) ground wires I A. Connect the 2 red wires (C) together using a UL listed wire connector. 5. Connect the 2 white wires (F) together using a UL listed wire connector. 3. Set the oven door aside on conduit connector. 7. Side trims must be removed before servicing. Make Electrical Connection WARNING Electrical Shock Hazard Disconnect power before unit is installed in the U.S. This oven is present. 4. See "Electrical Connection Options...

Installation Instructions
Page 7
... from oven G. Junction box C. UL listed wire connectors I F A. Connect the 2 white wires (D) and the green (or bare) ground wire (of oven front frame when pushing oven into cabinet cutout. Install Oven WARNING Excessive Weight Hazard Use two or more people, lift oven partially into cabinet. Mounting rail B. Red wires H. Failure to remove screws attaching the shipping feet. 4. Do not push against seal area of the oven cable) using the # 8-14 x 1" screws (2 for single oven...
... from oven G. Junction box C. UL listed wire connectors I F A. Connect the 2 white wires (D) and the green (or bare) ground wire (of oven front frame when pushing oven into cabinet cutout. Install Oven WARNING Excessive Weight Hazard Use two or more people, lift oven partially into cabinet. Mounting rail B. Red wires H. Failure to remove screws attaching the shipping feet. 4. Do not push against seal area of the oven cable) using the # 8-14 x 1" screws (2 for single oven...

Installation Instructions
Page 8
... the "Assistance or Service" section of your built-in the display. 2. Press CUSTOM BROIL. If display panel does not light, please reference the "Assistance or Service" section of trim. If there is connected. ■ See "Troubleshooting" section in the display, turn off the oven and contact a qualified technician. 5. A A. Replace oven door by a number appears in the Use and Care Guide. 4. Press OFF/CANCEL. See "Prepare Built-In Oven" section. 15. Reconnect power. 17. Press START.
... the "Assistance or Service" section of your built-in the display. 2. Press CUSTOM BROIL. If display panel does not light, please reference the "Assistance or Service" section of trim. If there is connected. ■ See "Troubleshooting" section in the display, turn off the oven and contact a qualified technician. 5. A A. Replace oven door by a number appears in the Use and Care Guide. 4. Press OFF/CANCEL. See "Prepare Built-In Oven" section. 15. Reconnect power. 17. Press START.

Warranty
Page 1
.... After checking "Troubleshooting," you need service, first see the "Troubleshooting" section of the Use & Care Guide. Write down the following information about your major appliance, to replace or repair house fuses, or to published user or operator instructions and/or installation instructions. 4. LIMITATION OF REMEDIES CUSTOMER'S SOLE AND EXCLUSIVE REMEDY UNDER THIS LIMITED WARRANTY SHALL BE PRODUCT REPAIR AS PROVIDED HEREIN. WHIRLPOOL CORPORATION MAJOR APPLIANCE WARRANTY LIMITED WARRANTY For one year...
.... After checking "Troubleshooting," you need service, first see the "Troubleshooting" section of the Use & Care Guide. Write down the following information about your major appliance, to replace or repair house fuses, or to published user or operator instructions and/or installation instructions. 4. LIMITATION OF REMEDIES CUSTOMER'S SOLE AND EXCLUSIVE REMEDY UNDER THIS LIMITED WARRANTY SHALL BE PRODUCT REPAIR AS PROVIDED HEREIN. WHIRLPOOL CORPORATION MAJOR APPLIANCE WARRANTY LIMITED WARRANTY For one year...


