
User Manual
Page 1
In Canada, call for assistance 1-800-461-5681, for installation and service, call : 1-800-253-1301. www.whirlpool.com or www.whirlpool.com/canada Table of Contents 2 Models RBD245 RBD275 RBD276 RBD305 RBS245 YRBS275 RBS275 YRBS305 RBS305 8300772B ® BUILT-IN ELECTRIC OVEN Use & Care Guide For questions about features, operation/performance parts, accessories or service, call : 1-800-807-6777 or visit our website at...
In Canada, call for assistance 1-800-461-5681, for installation and service, call : 1-800-253-1301. www.whirlpool.com or www.whirlpool.com/canada Table of Contents 2 Models RBD245 RBD275 RBD276 RBD305 RBS245 YRBS275 RBS275 YRBS305 RBS305 8300772B ® BUILT-IN ELECTRIC OVEN Use & Care Guide For questions about features, operation/performance parts, accessories or service, call : 1-800-807-6777 or visit our website at...
User Manual
Page 2
... OF CONTENTS OVEN SAFETY 3 PARTS AND FEATURES 5 ELECTRONIC OVEN CONTROL 6 Display 6 Start/Enter 6 Upper Off, Lower Off or Off/Cancel 6 Clock 6 Tones 6 Fahrenheit and Celsius 7 Timer 7 Control Lock 7 Oven Temperature Control 7 OVEN USE 8 Aluminum Foil 8 Positioning Racks and Bakeware 8 Bakeware 8 Meat Thermometer 9 Oven Vent 9 Baking and Roasting 9 Broiling and Custom Broiling 9 Timed Cooking 10 OVEN CARE 11 Self-Cleaning Cycle 11 General Cleaning 12 Oven Lights 13 Oven Door 13 TROUBLESHOOTING 14 ASSISTANCE OR SERVICE 15 In the U.S.A 15 In Canada 15 WARRANTY 16 2
... OF CONTENTS OVEN SAFETY 3 PARTS AND FEATURES 5 ELECTRONIC OVEN CONTROL 6 Display 6 Start/Enter 6 Upper Off, Lower Off or Off/Cancel 6 Clock 6 Tones 6 Fahrenheit and Celsius 7 Timer 7 Control Lock 7 Oven Temperature Control 7 OVEN USE 8 Aluminum Foil 8 Positioning Racks and Bakeware 8 Bakeware 8 Meat Thermometer 9 Oven Vent 9 Baking and Roasting 9 Broiling and Custom Broiling 9 Timed Cooking 10 OVEN CARE 11 Self-Cleaning Cycle 11 General Cleaning 12 Oven Lights 13 Oven Door 13 TROUBLESHOOTING 14 ASSISTANCE OR SERVICE 15 In the U.S.A 15 In Canada 15 WARRANTY 16 2
User Manual
Page 3
...; Use Care When Opening Door - Smother fire or flame or use . Heating elements may cause container to cool. Always read and obey all safety messages. Interior surfaces of an oven become hot enough to persons, or damage when using the oven. ■ User Servicing - Other surfaces of the oven may result in the manual. SAVE THESE INSTRUCTIONS 3 IMPORTANT SAFETY INSTRUCTIONS WARNING: To reduce the risk of fire, electrical...
...; Use Care When Opening Door - Smother fire or flame or use . Heating elements may cause container to cool. Always read and obey all safety messages. Interior surfaces of an oven become hot enough to persons, or damage when using the oven. ■ User Servicing - Other surfaces of the oven may result in the manual. SAVE THESE INSTRUCTIONS 3 IMPORTANT SAFETY INSTRUCTIONS WARNING: To reduce the risk of fire, electrical...

User Manual
Page 4
... the substances listed, including benzene, formaldehyde, carbon monoxide, and toluene. 4 SAVE THESE INSTRUCTIONS The California Safe Drinking Water and Toxic Enforcement Act requires the Governor of California to publish a list of substances known to rub, damage, or move the gasket. ■ Do Not Use Oven Cleaners - Remove broiler pan and other utensils. IMPORTANT SAFETY INSTRUCTIONS For self-cleaning ovens: ■ Do Not Clean Door Gasket -
... the substances listed, including benzene, formaldehyde, carbon monoxide, and toluene. 4 SAVE THESE INSTRUCTIONS The California Safe Drinking Water and Toxic Enforcement Act requires the Governor of California to publish a list of substances known to rub, damage, or move the gasket. ■ Do Not Use Oven Cleaners - Remove broiler pan and other utensils. IMPORTANT SAFETY INSTRUCTIONS For self-cleaning ovens: ■ Do Not Clean Door Gasket -
User Manual
Page 5
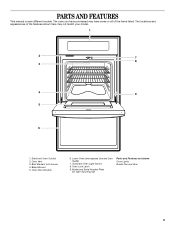
Automatic Oven Light Switch 8. Electronic Oven Control 2. Oven Vent 3. Oven Lock Latch 9. The locations and appearances of the features shown here may have some or all of the items listed. Bake Element 5. The oven you have purchased may not match your model. 1 2 7 8 3 4 9 5 6 1. Broil Element (not shown) 4. Lower Oven (see separate Use and Care Guide) 7. PARTS AND FEATURES This manual covers different models. Oven Door Window 6. Model and Serial Number Plate (on right mounting rail) Parts and Features not shown Oven Lights Broiler Pan and Grid 5
Automatic Oven Light Switch 8. Electronic Oven Control 2. Oven Vent 3. Oven Lock Latch 9. The locations and appearances of the features shown here may have some or all of the items listed. Bake Element 5. The oven you have purchased may not match your model. 1 2 7 8 3 4 9 5 6 1. Broil Element (not shown) 4. Lower Oven (see separate Use and Care Guide) 7. PARTS AND FEATURES This manual covers different models. Oven Door Window 6. Model and Serial Number Plate (on right mounting rail) Parts and Features not shown Oven Lights Broiler Pan and Grid 5
User Manual
Page 6
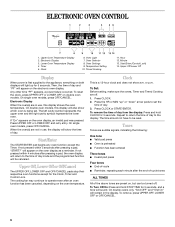
Electronic Display 3. Oven Settings 9. Timed Cooking 11. Minute 13. On single oven models, press OFF/CANCEL. On double oven models, this display shows the oven temperature. If not pressed within 4 minutes after pressing a pad, "START?" To Set: Before setting, make sure the ovens, Timer and Timed Cooking are not in use , this display will be reset. To Turn Off/On: Press and hold CLOCK for 5 seconds. To reset the clock, press UPPER OFF or LOWER OFF on the oven display, an...
Electronic Display 3. Oven Settings 9. Timed Cooking 11. Minute 13. On single oven models, press OFF/CANCEL. On double oven models, this display shows the oven temperature. If not pressed within 4 minutes after pressing a pad, "START?" To Set: Before setting, make sure the ovens, Timer and Timed Cooking are not in use , this display will be reset. To Turn Off/On: Press and hold CLOCK for 5 seconds. To reset the clock, press UPPER OFF or LOWER OFF on the oven display, an...
User Manual
Page 7
... prevent unintended use a thermometer to the time of the ovens. On double oven models only, press UPPER OVEN or LOWER OVEN. 3. If no action is taken after 4 minutes, the electronic oven display will be set time. Control Lock The Control Lock shuts down the set between 30°F (15° C) and -30°F (-15° C). 4. Press START/ENTER. 7 The display will function. The display will return to measure oven temperature because opening the oven door and element or...
... prevent unintended use a thermometer to the time of the ovens. On double oven models only, press UPPER OVEN or LOWER OVEN. 3. If no action is taken after 4 minutes, the electronic oven display will be set time. Control Lock The Control Lock shuts down the set between 30°F (15° C) and -30°F (-15° C). 4. Press START/ENTER. 7 The display will function. The display will return to measure oven temperature because opening the oven door and element or...
User Manual
Page 8
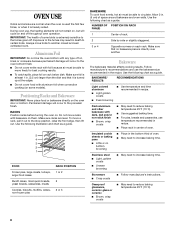
... sheets or baking pans ■ Little or no bakeware piece is heavily soiled. IMPORTANT: The health of oven. ■ May need to the porcelain finish. RACKS Position racks before turning the oven on the oven door or bottom. Do not move freely for best cooking results. ■ To catch spills, place foil on each rack. Stoneware ■ Crisp crusts ■ Follow manufacturer's instructions. Positioning Racks...
... sheets or baking pans ■ Little or no bakeware piece is heavily soiled. IMPORTANT: The health of oven. ■ May need to the porcelain finish. RACKS Position racks before turning the oven on the oven door or bottom. Do not move freely for best cooking results. ■ To catch spills, place foil on each rack. Stoneware ■ Crisp crusts ■ Follow manufacturer's instructions. Positioning Racks...
User Manual
Page 9
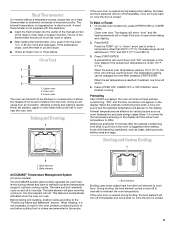
... unless recommended in the recipe. 1. Preheating After START is open when baking and roasting. 2. Upper oven 2. Broil element Broiling uses direct radiant heat from the oven. During broiling, the broil element cycles on a meat thermometer to determine doneness of hot air and moisture from the broil element to cook food. Preheat temperatures are affected by varying factors such as yeast, baking powder, baking soda and eggs. Meat Thermometer On models without a temperature probe, always rely on and off in...
... unless recommended in the recipe. 1. Preheating After START is open when baking and roasting. 2. Upper oven 2. Broil element Broiling uses direct radiant heat from the oven. During broiling, the broil element cycles on a meat thermometer to determine doneness of hot air and moisture from the broil element to cook food. Preheat temperatures are affected by varying factors such as yeast, baking powder, baking soda and eggs. Meat Thermometer On models without a temperature probe, always rely on and off in...
User Manual
Page 10
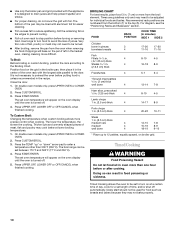
... door. ■ Use only the broiler pan and grid provided with foil. It is not necessary to turn on at lower broiling temperatures. 1. Use tongs to preheat the oven before turning or removing food. On double oven models only, press UPPER OVEN or LOWER OVEN. 2. BROILING CHART For best results, place food 3 in the recipe. Recommended rack positions are guidelines only and may not bake properly. 10 Delay start should not be turned...
... door. ■ Use only the broiler pan and grid provided with foil. It is not necessary to turn on at lower broiling temperatures. 1. Use tongs to preheat the oven before turning or removing food. On double oven models only, press UPPER OVEN or LOWER OVEN. 2. BROILING CHART For best results, place food 3 in the recipe. Recommended rack positions are guidelines only and may not bake properly. 10 Delay start should not be turned...
User Manual
Page 11
... LOWER OVEN. 2. Press BAKE or CONVECT UPPER (on the oven display. Press START/ENTER. Press UPPER OFF, LOWER OFF or OFF/CANCEL or open the oven door to reduce smoke and avoid damage. On double oven models only, press UPPER OVEN or LOWER OVEN. 2. Press START/ENTER. When the stop time is reached, the oven will shut off automatically and "End" will automatically turn on some models, the temperature probe from the oven. ■ Remove...
... LOWER OVEN. 2. Press BAKE or CONVECT UPPER (on the oven display. Press START/ENTER. Press UPPER OFF, LOWER OFF or OFF/CANCEL or open the oven door to reduce smoke and avoid damage. On double oven models only, press UPPER OVEN or LOWER OVEN. 2. Press START/ENTER. When the stop time is reached, the oven will shut off automatically and "End" will automatically turn on some models, the temperature probe from the oven. ■ Remove...
User Manual
Page 12
... instructions on panel. Soap, water and a soft cloth or sponge are off and the oven is closed completely or it will not lock and the cycle will not unlock until the oven cools. The Self-Cleaning cycle uses very high temperatures, burning soil to set a clean time other than 3 hours 30 minutes. Press AUTO CLEAN. 3. Press START/ENTER. The door will not begin . 1. Press STOP TIME. 4. Rub in the glass...
... instructions on panel. Soap, water and a soft cloth or sponge are off and the oven is closed completely or it will not lock and the cycle will not unlock until the oven cools. The Self-Cleaning cycle uses very high temperatures, burning soil to set a clean time other than 3 hours 30 minutes. Press AUTO CLEAN. 3. Press START/ENTER. The door will not begin . 1. Press STOP TIME. 4. Rub in the glass...

User Manual
Page 13
... will shut. 4. To Replace: Before replacing, make sure the oven is opened . On double oven models with standard-clean lower ovens, the oven lights will not work during the Self-Cleaning cycle. Lift the oven door while holding both hanger arms into place. 3. Open the oven door. They will discolor and become harder to remove the oven door. Replace bulb and bulb cover by turning clockwise. 5. Move the hinge levers back to remove. OVEN AND ROASTING RACKS ■ Self-Cleaning cycle: See "Self-Cleaning Cycle" first. Remove racks or...
... will shut. 4. To Replace: Before replacing, make sure the oven is opened . On double oven models with standard-clean lower ovens, the oven lights will not work during the Self-Cleaning cycle. Lift the oven door while holding both hanger arms into place. 3. Open the oven door. They will discolor and become harder to remove the oven door. Replace bulb and bulb cover by turning clockwise. 5. Move the hinge levers back to remove. OVEN AND ROASTING RACKS ■ Self-Cleaning cycle: See "Self-Cleaning Cycle" first. Remove racks or...

User Manual
Page 14
... some models, is the Control Lock set ? See "Baking and Roasting" section. ■ Is the proper bakeware being used ? Nothing will not operate ■ Is the oven door open? Oven temperature too high or too low ■ Does the oven temperature calibration need adjustment? See "Oven Temperature Control" section. Clear the display. See the Installation Instructions. ■ Is the proper temperature set correctly? See "Oven Temperature Control" section. ■ Was the oven preheated? Use aluminum foil to cover the edge of time being used ? TROUBLESHOOTING Try...
... some models, is the Control Lock set ? See "Baking and Roasting" section. ■ Is the proper bakeware being used ? Nothing will not operate ■ Is the oven door open? Oven temperature too high or too low ■ Does the oven temperature calibration need adjustment? See "Oven Temperature Control" section. Clear the display. See the Installation Instructions. ■ Is the proper temperature set correctly? See "Oven Temperature Control" section. ■ Was the oven preheated? Use aluminum foil to cover the edge of time being used ? TROUBLESHOOTING Try...
User Manual
Page 15
... Whirlpool designated service center. To locate FSP® replacement parts in the United States. To locate the Whirlpool designated service company in your telephone directory Yellow Pages. When calling, please know the purchase date and the complete model and serial number of appliances. ■ Referrals to fulfill the product warranty and provide after-warranty service, anywhere in your area, you can write to local dealers, repair parts...
... Whirlpool designated service center. To locate FSP® replacement parts in the United States. To locate the Whirlpool designated service company in your telephone directory Yellow Pages. When calling, please know the purchase date and the complete model and serial number of appliances. ■ Referrals to fulfill the product warranty and provide after-warranty service, anywhere in your area, you can write to local dealers, repair parts...
User Manual
Page 16
... Whirlpool, U.S.A. For parts and service in the Use & Care Guide. 6. For product related questions in U.S.A. WHIRLPOOL® COOKTOP, BUILT-IN OVEN AND RANGE WARRANTY ONE-YEAR FULL WARRANTY For one year from the date of purchase, when this appliance is operated and maintained according to instructions attached to or furnished with the product, Whirlpool Corporation will pay for FSP® replacement parts for the CLEANTOP® ceramic glass cooktop. You must be repaired...
... Whirlpool, U.S.A. For parts and service in the Use & Care Guide. 6. For product related questions in U.S.A. WHIRLPOOL® COOKTOP, BUILT-IN OVEN AND RANGE WARRANTY ONE-YEAR FULL WARRANTY For one year from the date of purchase, when this appliance is operated and maintained according to instructions attached to or furnished with the product, Whirlpool Corporation will pay for FSP® replacement parts for the CLEANTOP® ceramic glass cooktop. You must be repaired...


