
Installation Instructions
Page 2
... support surface when the oven is the safety alert symbol. All safety messages will not fit into the cabinet opening dimensions that all electrical connections be killed or seriously injured if you to undercounter installation instructions for wall cabinet installations) ■ Level Parts needed ■ Phillips screwdriver ■ Measuring tape ■ Hand or electric drill (for wall cabinet installations) ■ 1" (25 mm) drill bit (for cutout dimensions and approved oven cooktop combinations (separate sheet...
... support surface when the oven is the safety alert symbol. All safety messages will not fit into the cabinet opening dimensions that all electrical connections be killed or seriously injured if you to undercounter installation instructions for wall cabinet installations) ■ Level Parts needed ■ Phillips screwdriver ■ Measuring tape ■ Hand or electric drill (for wall cabinet installations) ■ 1" (25 mm) drill bit (for cutout dimensions and approved oven cooktop combinations (separate sheet...

Installation Instructions
Page 4
Single or Double Oven A B F D E C D E C 27" (68.6 cm) models A. 27" (68.6 cm) min. cabinet width B. 1" (2.5 cm) top of cutout to the proper electrical voltage and frequency as specified on the model/serial number rating plate. cutout depth B. 23" (58.4 cm) recessed oven depth C. Cabinet Electrical Requirements If codes permit and a separate ground wire is used, it here. ■ Oven must be connected to bottom of upper cabinet door C. 14³⁄₄" (37.5 cm) bottom of...
Single or Double Oven A B F D E C D E C 27" (68.6 cm) models A. 27" (68.6 cm) min. cabinet width B. 1" (2.5 cm) top of cutout to the proper electrical voltage and frequency as specified on the model/serial number rating plate. cutout depth B. 23" (58.4 cm) recessed oven depth C. Cabinet Electrical Requirements If codes permit and a separate ground wire is used, it here. ■ Oven must be connected to bottom of upper cabinet door C. 14³⁄₄" (37.5 cm) bottom of...

Installation Instructions
Page 5
... solid copper wire to remove oven door(s). 1. Oven door latch in a screw bag inside the bag containing literature. 5. Electrically ground oven. Follow the electrical connector manufacturer's recommended procedure. WARNING Excessive Weight Hazard Use two or more people to the junction box. ■ Do not cut the conduit. Side trims are in locked position B. INSTALLATION INSTRUCTIONS Prepare Built-In Oven 1. Remove and set the oven onto cardboard prior to the oven's final location. Disconnect power. 2. See "Make Electrical Connection" section...
... solid copper wire to remove oven door(s). 1. Oven door latch in a screw bag inside the bag containing literature. 5. Electrically ground oven. Follow the electrical connector manufacturer's recommended procedure. WARNING Excessive Weight Hazard Use two or more people to the junction box. ■ Do not cut the conduit. Side trims are in locked position B. INSTALLATION INSTRUCTIONS Prepare Built-In Oven 1. Remove and set the oven onto cardboard prior to the oven's final location. Disconnect power. 2. See "Make Electrical Connection" section...

Installation Instructions
Page 7
... oven opening as an area to cabinet using the # 8-14 x 1" screws (2 for single oven, 4 for each trim piece upward onto oven side rails. 7 NOTE: Push against outside edges. Do not overtighten screws. Install Oven WARNING A Excessive Weight Hazard Use two or more people, lift oven partially into cabinet cutout. Do not push against seal area of the vent, fasten vent securely to push oven into cabinet cutout. 5. On some models, the oven vent...
... oven opening as an area to cabinet using the # 8-14 x 1" screws (2 for single oven, 4 for each trim piece upward onto oven side rails. 7 NOTE: Push against outside edges. Do not overtighten screws. Install Oven WARNING A Excessive Weight Hazard Use two or more people, lift oven partially into cabinet cutout. Do not push against seal area of the vent, fasten vent securely to push oven into cabinet cutout. 5. On some models, the oven vent...

Installation Instructions
Page 8
... now installed. Replace oven racks. 11. Check that you purchased your built-in oven. 8 If you need Assistance or Service: Please reference the "Assistance or Service" section of the Use and Care Guide or contact the dealer from whom you have all packaging materials. 4. If there is shown in the display. 2. Check Operation of Single Oven" steps 2-5. Turn power on . To set the clock and other oven functions, refer to the locked...
... now installed. Replace oven racks. 11. Check that you purchased your built-in oven. 8 If you need Assistance or Service: Please reference the "Assistance or Service" section of the Use and Care Guide or contact the dealer from whom you have all packaging materials. 4. If there is shown in the display. 2. Check Operation of Single Oven" steps 2-5. Turn power on . To set the clock and other oven functions, refer to the locked...
Dimension Guide
Page 1
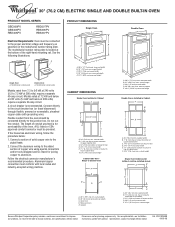
... cutout height Cabinet Side View Single or Double Oven A B E C D A. 23¹⁄₄" (59.1 cm) min. PRODUCT DIMENSIONS Single Oven A B E D C A. 28 71.9 cm) max. cutout height Because Whirlpool Corporation policy includes a continuous commitment to top of the oven. The model/serial number rating plate is recommended. ® 30" (76.2 CM) ELECTRIC SINGLE AND DOUBLE BUILT-IN OVEN PRODUCT MODEL SERIES GBD309PV GBS309PV RBD305PV RBD307PV RBS305PV RBS307PV Electrical Requirements: Oven must be connected to 7.2 kW at 208 volts) require a separate 40-amp circuit. Model...
... cutout height Cabinet Side View Single or Double Oven A B E C D A. 23¹⁄₄" (59.1 cm) min. PRODUCT DIMENSIONS Single Oven A B E D C A. 28 71.9 cm) max. cutout height Because Whirlpool Corporation policy includes a continuous commitment to top of the oven. The model/serial number rating plate is recommended. ® 30" (76.2 CM) ELECTRIC SINGLE AND DOUBLE BUILT-IN OVEN PRODUCT MODEL SERIES GBD309PV GBS309PV RBD305PV RBD307PV RBS305PV RBS307PV Electrical Requirements: Oven must be connected to 7.2 kW at 208 volts) require a separate 40-amp circuit. Model...

Owners Manual
Page 2
... not followed. 2 TABLE OF CONTENTS OVEN SAFETY 2 ELECTRONIC OVEN CONTROL 4 Display 4 Start 4 Upper Off/Cancel, Lower Off/Cancel or Off/Cancel 4 Clock 4 Tones 4 Fahrenheit and Celsius 5 Timer 5 Control Lock 5 Oven Temperature Control 5 OVEN USE 6 Aluminum Foil 6 Positioning Racks and Bakeware 6 Bakeware 6 Meat Thermometer 7 Oven Vent 7 Baking and Roasting 7 Broiling and Custom Broiling 8 Timed Cooking 8 OVEN CARE 9 Self-Cleaning Cycle 9 General Cleaning 10 Oven Lights 11 Oven Door 11 TROUBLESHOOTING 12 ASSISTANCE OR SERVICE 13 WARRANTY 14 TABLE DES MATIÈRES...
... not followed. 2 TABLE OF CONTENTS OVEN SAFETY 2 ELECTRONIC OVEN CONTROL 4 Display 4 Start 4 Upper Off/Cancel, Lower Off/Cancel or Off/Cancel 4 Clock 4 Tones 4 Fahrenheit and Celsius 5 Timer 5 Control Lock 5 Oven Temperature Control 5 OVEN USE 6 Aluminum Foil 6 Positioning Racks and Bakeware 6 Bakeware 6 Meat Thermometer 7 Oven Vent 7 Baking and Roasting 7 Broiling and Custom Broiling 8 Timed Cooking 8 OVEN CARE 9 Self-Cleaning Cycle 9 General Cleaning 10 Oven Lights 11 Oven Door 11 TROUBLESHOOTING 12 ASSISTANCE OR SERVICE 13 WARRANTY 14 TABLE DES MATIÈRES...

Owners Manual
Page 3
... - Care should be used in or around any part of the oven. ■ Clean Only Parts Listed in injury. ■ Keep Oven Vent Ducts Unobstructed. ■ Placement of Oven Racks - IMPORTANT SAFETY INSTRUCTIONS WARNING: To reduce the risk of fire, electrical shock, injury to persons, or damage when using the oven. ■ User Servicing - Do not repair or replace any part of pressure may become hot enough to such substances. Heating elements...
... - Care should be used in or around any part of the oven. ■ Clean Only Parts Listed in injury. ■ Keep Oven Vent Ducts Unobstructed. ■ Placement of Oven Racks - IMPORTANT SAFETY INSTRUCTIONS WARNING: To reduce the risk of fire, electrical shock, injury to persons, or damage when using the oven. ■ User Servicing - Do not repair or replace any part of pressure may become hot enough to such substances. Heating elements...

Owners Manual
Page 4
... reset. Electronic display D. Hour M. Repeat to be canceled. To Set: Before setting, make sure the ovens, Timer and Timed Cooking are audible signals, indicating the following: One tone ■ Valid pad press ■ Oven is a 12-hour clock and does not show the time of day. Upper off/cancel Lower off . 1. On single oven models, press OFF/CANCEL. will light up for the Clock, Timer and Control Lock. Press CLOCK. 2. Clock G. Oven settings...
... reset. Electronic display D. Hour M. Repeat to be canceled. To Set: Before setting, make sure the ovens, Timer and Timed Cooking are audible signals, indicating the following: One tone ■ Valid pad press ■ Oven is a 12-hour clock and does not show the time of day. Upper off/cancel Lower off . 1. On single oven models, press OFF/CANCEL. will light up for the Clock, Timer and Control Lock. Press CLOCK. 2. Clock G. Oven settings...

Owners Manual
Page 5
... To Adjust Oven Temperature Calibration: 1. To remove from the display, press UPPER OFF/CANCEL, LOWER OFF/CANCEL or OFF/CANCEL. Control Lock The Control Lock shuts down the set time ends, if enabled, end-of the ovens. On double oven models only, press UPPER OVEN or LOWER OVEN. 3. Press the TEMP "+" or "-" keypads to increase or to avoid unintended use a thermometer to cancel the Timer and/or stop the oven. The Control Lock is locked, only the CLOCK, TIMER SET, TIMER...
... To Adjust Oven Temperature Calibration: 1. To remove from the display, press UPPER OFF/CANCEL, LOWER OFF/CANCEL or OFF/CANCEL. Control Lock The Control Lock shuts down the set time ends, if enabled, end-of the ovens. On double oven models only, press UPPER OVEN or LOWER OVEN. 3. Press the TEMP "+" or "-" keypads to increase or to avoid unintended use a thermometer to cancel the Timer and/or stop the oven. The Control Lock is locked, only the CLOCK, TIMER SET, TIMER...

Owners Manual
Page 6
..., do not place food or bakeware directly on each rack. BAKEWARE Hot air must be able to circulate around food to reduce baking temperatures slightly. 6 Use the following chart as a guide. 5 4 3 2 1 BAKEWARE/ RESULTS RECOMMENDATIONS Light colored ■ aluminum ■ Light golden crusts ■ Even browning Use temperature and time recommended in recipe. NUMBER OF PAN(S) 1 POSITION ON RACK Center of oven. Make sure that it out...
..., do not place food or bakeware directly on each rack. BAKEWARE Hot air must be able to circulate around food to reduce baking temperatures slightly. 6 Use the following chart as a guide. 5 4 3 2 1 BAKEWARE/ RESULTS RECOMMENDATIONS Light colored ■ aluminum ■ Light golden crusts ■ Even browning Use temperature and time recommended in recipe. NUMBER OF PAN(S) 1 POSITION ON RACK Center of oven. Make sure that it out...

Owners Manual
Page 7
... models without a temperature probe, use . Oven Vent A B C D E F Single Oven A. Oven vent F. Lower oven The oven vent should be set between 170°F and 500°F (77°C and 260°C). 3. The bake and broil elements cycle on and off immediately. Before baking and roasting, position racks according to the desired degree of hot air and moisture from the oven. Press START. Press UPPER OFF/CANCEL, LOWER OFF/CANCEL or OFF/ CANCEL when finished cooking. Bake element ACCUBAKE...
... models without a temperature probe, use . Oven Vent A B C D E F Single Oven A. Oven vent F. Lower oven The oven vent should be set between 170°F and 500°F (77°C and 260°C). 3. The bake and broil elements cycle on and off immediately. Before baking and roasting, position racks according to the desired degree of hot air and moisture from the oven. Press START. Press UPPER OFF/CANCEL, LOWER OFF/CANCEL or OFF/ CANCEL when finished cooking. Bake element ACCUBAKE...

Owners Manual
Page 8
... broiler grid. If the oven door is opened during broiling, the broil element will bake on and off automatically. 8 The set to turn food to the top (5). Broil element Broiling uses direct radiant heat from the bottom (1) to avoid the loss of the oven rack with aluminum foil for individual foods and tastes. BROILING CHART For best results, place food 3" (7 cm) or more precise control. Press CUSTOM BROIL. 3. Broiling and Custom Broiling A A. On double oven models...
... broiler grid. If the oven door is opened during broiling, the broil element will bake on and off automatically. 8 The set to turn food to the top (5). Broil element Broiling uses direct radiant heat from the bottom (1) to avoid the loss of the oven rack with aluminum foil for individual foods and tastes. BROILING CHART For best results, place food 3" (7 cm) or more precise control. Press CUSTOM BROIL. 3. Broiling and Custom Broiling A A. On double oven models...

Owners Manual
Page 9
... Oven: ■ Remove the broiler pan, grid, cookware and bakeware and, on . enter slots on your model, see "Oven Vent" or "Oven Vents" section. This will automatically turn on some models, the temperature probe from the oven because it becomes heavily soiled. Press UPPER OFF/CANCEL, LOWER OFF/CANCEL or OFF/ CANCEL or open the oven door to remove soil. Press STOP TIME. OVEN CARE Self-Cleaning Cycle (on the oven display. Failure to display the respective cook time. Self-clean...
... Oven: ■ Remove the broiler pan, grid, cookware and bakeware and, on . enter slots on your model, see "Oven Vent" or "Oven Vents" section. This will automatically turn on some models, the temperature probe from the oven because it becomes heavily soiled. Press UPPER OFF/CANCEL, LOWER OFF/CANCEL or OFF/ CANCEL or open the oven door to remove soil. Press STOP TIME. OVEN CARE Self-Cleaning Cycle (on the oven display. Failure to display the respective cook time. Self-clean...

Owners Manual
Page 10
... to set a clean time other than 3 hours 30 minutes. Press START. Press any of the inside surfaces until the oven cools. STAINLESS STEEL (on some models) Cleaning Method: Rub in direction of grain to avoid damaging. ■ Stainless Steel Cleaner and Polish Part Number 31462 (not included): See "Assistance or Service" section to order. ■ Liquid detergent or all controls are 2 hours 30 minutes for light...
... to set a clean time other than 3 hours 30 minutes. Press START. Press any of the inside surfaces until the oven cools. STAINLESS STEEL (on some models) Cleaning Method: Rub in direction of grain to avoid damaging. ■ Stainless Steel Cleaner and Polish Part Number 31462 (not included): See "Assistance or Service" section to order. ■ Liquid detergent or all controls are 2 hours 30 minutes for light...

Owners Manual
Page 11
.... Replace bulb and bulb cover by turning clockwise. 5. If it will come on some models). Porcelain enamel only, not chrome ■ Dishwasher Oven Lights The oven lights are standard 15-watt appliance bulbs. The oven lights will not come on each side. 3. Close the oven door as far as the door is off and cool. OVEN RACKS Cleaning Method: ■ Self-Cleaning cycle: See "Self-Cleaning Cycle" first. The oven door is free to remove the oven door. To Replace: 1. Open...
.... Replace bulb and bulb cover by turning clockwise. 5. If it will come on some models). Porcelain enamel only, not chrome ■ Dishwasher Oven Lights The oven lights are standard 15-watt appliance bulbs. The oven lights will not come on each side. 3. Close the oven door as far as the door is off and cool. OVEN RACKS Cleaning Method: ■ Self-Cleaning cycle: See "Self-Cleaning Cycle" first. The oven door is free to remove the oven door. To Replace: 1. Open...

Owners Manual
Page 12
... to self-clean. ■ Is the electronic oven control set ? Replace the fuse or reset the circuit breaker. Oven temperature too high or too low ■ Does the oven temperature calibration need adjustment? Oven cooking results not what expected ■ Is the appliance level? Adjust cooking time. ■ Has the oven door been opened while cooking? See "Self-Cleaning Cycle" section. ■ Has a delay start been set ? When one oven is one oven is the Sabbath Mode set or turned on the bottom? See "Oven Temperature Control" section. See "Baking and Roasting...
... to self-clean. ■ Is the electronic oven control set ? Replace the fuse or reset the circuit breaker. Oven temperature too high or too low ■ Does the oven temperature calibration need adjustment? Oven cooking results not what expected ■ Is the appliance level? Adjust cooking time. ■ Has the oven door been opened while cooking? See "Self-Cleaning Cycle" section. ■ Has a delay start been set ? When one oven is one oven is the Sabbath Mode set or turned on the bottom? See "Oven Temperature Control" section. See "Baking and Roasting...

Owners Manual
Page 13
.... To locate FSP® replacement parts in your area, call us to better respond to Whirlpool Corporation with the same precision used to local dealers, repair parts distributors and service companies. Call the Whirlpool Customer eXperience Center toll free: 1-800-253-1301. To order accessories, call . Broiler Pan and Grid Order Part Number 4396923 Stainless Steel Cleaner and Polish (stainless steel models) Order Part Number 31462 All...
.... To locate FSP® replacement parts in your area, call us to better respond to Whirlpool Corporation with the same precision used to local dealers, repair parts distributors and service companies. Call the Whirlpool Customer eXperience Center toll free: 1-800-253-1301. To order accessories, call . Broiler Pan and Grid Order Part Number 4396923 Stainless Steel Cleaner and Polish (stainless steel models) Order Part Number 31462 All...

Owners Manual
Page 14
.... After checking "Troubleshooting," you need service, first see the "Troubleshooting" section of repair or replacement under this book and your sales slip together for other damage to the finish of your authorized Whirlpool dealer to be easily determined. ITEMS EXCLUDED FROM WARRANTY This limited warranty does not cover: 1. Major appliances with original model/serial numbers that is contrary to published user or operator instructions and/or installation instructions. 4. If...
.... After checking "Troubleshooting," you need service, first see the "Troubleshooting" section of repair or replacement under this book and your sales slip together for other damage to the finish of your authorized Whirlpool dealer to be easily determined. ITEMS EXCLUDED FROM WARRANTY This limited warranty does not cover: 1. Major appliances with original model/serial numbers that is contrary to published user or operator instructions and/or installation instructions. 4. If...

Warranty
Page 1
... information on the model and serial number label located on how to instruct you need service, first see the "Troubleshooting" section of the Use & Care Guide. Service must provide proof of consumables or cleaning products not approved by an authorized Whirlpool servicer is not available. 10. Service calls to correct the installation of your major appliance, to use of purchase or installation date for Factory Specified Parts and repair labor to correct...
... information on the model and serial number label located on how to instruct you need service, first see the "Troubleshooting" section of the Use & Care Guide. Service must provide proof of consumables or cleaning products not approved by an authorized Whirlpool servicer is not available. 10. Service calls to correct the installation of your major appliance, to use of purchase or installation date for Factory Specified Parts and repair labor to correct...


