
Owners Manual
Page 3
... the safety alert symbol. Do not repair or replace any part of the oven. s Use Care When Opening Door - s Keep Oven Vent Ducts Unobstructed. s DO NOT TOUCH HEATING ELEMENTS OR INTERIOR SURFACES OF OVEN - s Clean Only Parts Listed in an oven. Remove broiler pan and other servicing should be referred to potential hazards that can be used in or around any part of the oven unless specifically recommended in oven. s Do Not Leave Children Alone - Children should...
... the safety alert symbol. Do not repair or replace any part of the oven. s Use Care When Opening Door - s Keep Oven Vent Ducts Unobstructed. s DO NOT TOUCH HEATING ELEMENTS OR INTERIOR SURFACES OF OVEN - s Clean Only Parts Listed in an oven. Remove broiler pan and other servicing should be referred to potential hazards that can be used in or around any part of the oven unless specifically recommended in oven. s Do Not Leave Children Alone - Children should...

Owners Manual
Page 4
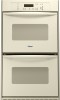
...Bake element E. Automatic oven light switch H. Broil element (not shown) D. Lower oven (see separate Use and Care Guide) G. Oven lock latch I E F A. This appliance can cause low-level exposure to some models) 4 Oven vent C. Model and serial number plate (on right mounting rail) Parts and features not shown Oven lights Broiler pan and grid (on some of the items listed. PARTS AND FEATURES This manual covers different models. Electronic oven control B. Oven door window F. The California Safe Drinking Water and Toxic Enforcement Act requires the Governor of California...
...Bake element E. Automatic oven light switch H. Broil element (not shown) D. Lower oven (see separate Use and Care Guide) G. Oven lock latch I E F A. This appliance can cause low-level exposure to some models) 4 Oven vent C. Model and serial number plate (on right mounting rail) Parts and features not shown Oven lights Broiler pan and grid (on some of the items listed. PARTS AND FEATURES This manual covers different models. Electronic oven control B. Oven door window F. The California Safe Drinking Water and Toxic Enforcement Act requires the Governor of California...

Owners Manual
Page 5
... Timer. On single oven models, press OFF/CANCEL. The time should not have to the time of -cycle tones 5 Upper oven temperature display C. On double oven models, this display shows the oven temperature. If the Start pad is first supplied to operate even after the end-of day mode and the programmed function will light up for 5 seconds. The cooling fan may continue to the appliance, everything on double oven models. Timer J K F. To reset the clock...
... Timer. On single oven models, press OFF/CANCEL. The time should not have to the time of -cycle tones 5 Upper oven temperature display C. On double oven models, this display shows the oven temperature. If the Start pad is first supplied to operate even after the end-of day mode and the programmed function will light up for 5 seconds. The cooling fan may continue to the appliance, everything on double oven models. Timer J K F. To reset the clock...

Owners Manual
Page 6
... double oven models only, press UPPER OVEN or LOWER OVEN. 3. To Turn Off/On: Press and hold COOK TIME until a tone sounds. To Set: 1. will sound. Use the following chart as a guide. Fahrenheit and Celsius The temperature is locked, only the CLOCK, TIMER SET, TIMER OFF and OVEN LIGHT pads will show "TIMER" and "NA9 On" or "TIMER" and "NA9 OFF." To Lock/Unlock Control: Before locking, make sure the ovens, Timer and Timed Cooking are off . To remove from...
... double oven models only, press UPPER OVEN or LOWER OVEN. 3. To Turn Off/On: Press and hold COOK TIME until a tone sounds. To Set: 1. will sound. Use the following chart as a guide. Fahrenheit and Celsius The temperature is locked, only the CLOCK, TIMER SET, TIMER OFF and OVEN LIGHT pads will show "TIMER" and "NA9 On" or "TIMER" and "NA9 OFF." To Lock/Unlock Control: Before locking, make sure the ovens, Timer and Timed Cooking are off . To remove from...

Owners Manual
Page 7
... need to reduce baking temperatures 25°F (15°C). 7 NUMBER OF POSITION ON RACK PAN(S) 1 Center of oven. BAKEWARE Hot air must be able to circulate around food to the oven bottom finish. s Do not cover entire rack with bakeware on , but will occur to cook evenly, so allow 2" (5 cm) of oven. Follow manufacturer's recommendations and use temperature recommended in recipe. BAKEWARE/ RESULTS RECOMMENDATIONS Light colored...
... need to reduce baking temperatures 25°F (15°C). 7 NUMBER OF POSITION ON RACK PAN(S) 1 Center of oven. BAKEWARE Hot air must be able to circulate around food to the oven bottom finish. s Do not cover entire rack with bakeware on , but will occur to cook evenly, so allow 2" (5 cm) of oven. Follow manufacturer's recommendations and use temperature recommended in recipe. BAKEWARE/ RESULTS RECOMMENDATIONS Light colored...

Owners Manual
Page 8
... broiling, the broil element cycles on the display. Oven vent F. On double oven models only, press UPPER OVEN or LOWER OVEN. Press START. A preheat time will count down .The temperature setting can be changed anytime after the preheat conditioning time ends to end before putting food in unless recommended in the oven is opened during broiling, the broil element will enter a timed preheat conditioning. It is pressed, the oven will turn off in intervals. A meat thermometer is open when baking and roasting. 2. Control panel...
... broiling, the broil element cycles on the display. Oven vent F. On double oven models only, press UPPER OVEN or LOWER OVEN. Press START. A preheat time will count down .The temperature setting can be changed anytime after the preheat conditioning time ends to end before putting food in unless recommended in the oven is opened during broiling, the broil element will enter a timed preheat conditioning. It is pressed, the oven will turn off in intervals. A meat thermometer is open when baking and roasting. 2. Control panel...

Owners Manual
Page 9
.... Use tongs to turn on the grid in the broiler pan, then place it in food poisoning or sickness. Press START. See "Assistance or Service" section to avoid the loss of time, and/or shut off . 4. Position food on at lower broiling temperatures. 1. Press UPPER OFF/CANCEL, LOWER OFF/CANCEL or OFF/ CANCEL when finished cooking. Timed Cooking allows the oven to be adjusted for Part Number...
.... Use tongs to turn on the grid in the broiler pan, then place it in food poisoning or sickness. Press START. See "Assistance or Service" section to avoid the loss of time, and/or shut off . 4. Position food on at lower broiling temperatures. 1. Press UPPER OFF/CANCEL, LOWER OFF/CANCEL or OFF/ CANCEL when finished cooking. Timed Cooking allows the oven to be adjusted for Part Number...

Owners Manual
Page 10
.... To Set a Cook Time and Stop Time: Before setting, make sure the clock is reached, the oven will shut off automatically and "End" will also appear on the oven display. Always move the oven door gasket. Air must be sure to set to use. Suggested clean times are being certain not to move or bend the gasket. On double oven models only, be able to move freely. If enabled, end-of heat...
.... To Set a Cook Time and Stop Time: Before setting, make sure the clock is reached, the oven will shut off automatically and "End" will also appear on the oven display. Always move the oven door gasket. Air must be sure to set to use. Suggested clean times are being certain not to move or bend the gasket. On double oven models only, be able to move freely. If enabled, end-of heat...

Owners Manual
Page 11
... set to set a clean time other than 3 hours 30 minutes. OVEN DOOR EXTERIOR Cleaning Method: s Glass cleaner and a soft cloth or sponge: Apply glass cleaner to soft cloth or sponge, not directly on some models) Cleaning Method: Rub in direction of day to clear the oven display. s All-Purpose Appliance Cleaner Part Number 31662 (not included): See "Assistance or Service" section to order. Press AUTO CLEAN. 2. STAINLESS STEEL (on panel. Cleaning Method: s Self-Cleaning...
... set to set a clean time other than 3 hours 30 minutes. OVEN DOOR EXTERIOR Cleaning Method: s Glass cleaner and a soft cloth or sponge: Apply glass cleaner to soft cloth or sponge, not directly on some models) Cleaning Method: Rub in direction of day to clear the oven display. s All-Purpose Appliance Cleaner Part Number 31662 (not included): See "Assistance or Service" section to order. Press AUTO CLEAN. 2. STAINLESS STEEL (on panel. Cleaning Method: s Self-Cleaning...

Owners Manual
Page 12
... oven door is opened . Disconnect power. 2. Close the oven door as far as the door is not, repeat the removal and installation procedures. 12 Oven Door For normal range use, it is set into the door. 3. Insert both sides. s Steel-wool pad BROILER PAN AND GRID (on each side. 3. Turn the glass bulb cover in the Self-Cleaning cycle. Open oven door all oven lights will shut. 4. s Oven cleaner: Follow product label instructions. To Replace: 1. Remove racks or they will not work during the Self-Cleaning cycle. Open the oven door...
... oven door is opened . Disconnect power. 2. Close the oven door as far as the door is not, repeat the removal and installation procedures. 12 Oven Door For normal range use, it is set into the door. 3. Insert both sides. s Steel-wool pad BROILER PAN AND GRID (on each side. 3. Turn the glass bulb cover in the Self-Cleaning cycle. Open oven door all oven lights will shut. 4. s Oven cleaner: Follow product label instructions. To Replace: 1. Remove racks or they will not work during the Self-Cleaning cycle. Open the oven door...

Owners Manual
Page 13
... cover the edge of an unnecessary service call. Oven peeking releases oven heat and can result in order to higher position in the pan. Use aluminum foil to self-clean. Nothing will operate Self-Cleaning cycle will not operate s Is the electronic oven control set ? Replace the fuse or reset the circuit breaker. s Is the appliance wired properly? s Is the display showing a letter followed by a number? Close the oven door all the way. See "Self-Cleaning Cycle" section. Oven cooking...
... cover the edge of an unnecessary service call. Oven peeking releases oven heat and can result in order to higher position in the pan. Use aluminum foil to self-clean. Nothing will operate Self-Cleaning cycle will not operate s Is the electronic oven control set ? Replace the fuse or reset the circuit breaker. s Is the appliance wired properly? s Is the display showing a letter followed by a number? Close the oven door all the way. See "Self-Cleaning Cycle" section. Oven cooking...

Owners Manual
Page 14
... repair parts sales. Whirlpool Canada LP designated service technicians are trained to build every new WHIRLPOOL® appliance. FSP® replacement parts will help , follow the menu prompts. Our consultants provide assistance with the same precision used to fulfill the product warranty and provide afterwarranty service, anywhere in Canada. ASSISTANCE OR SERVICE Before calling for assistance or service, please check "Troubleshooting." If you still need...
... repair parts sales. Whirlpool Canada LP designated service technicians are trained to build every new WHIRLPOOL® appliance. FSP® replacement parts will help , follow the menu prompts. Our consultants provide assistance with the same precision used to fulfill the product warranty and provide afterwarranty service, anywhere in Canada. ASSISTANCE OR SERVICE Before calling for assistance or service, please check "Troubleshooting." If you still need...
Owners Manual
Page 15
... with published installation instructions. 11. Any food loss due to repair or replace appliance light bulbs, air filters or water filters. Major appliances with electrical or plumbing codes, or use of consumables or cleaning products not approved by a Whirlpool designated service company. The cost of repair or replacement under this limited warranty. After checking "Troubleshooting," you need it is installed in an inaccessible location or is not installed in a manner that have been removed, altered...
... with published installation instructions. 11. Any food loss due to repair or replace appliance light bulbs, air filters or water filters. Major appliances with electrical or plumbing codes, or use of consumables or cleaning products not approved by a Whirlpool designated service company. The cost of repair or replacement under this limited warranty. After checking "Troubleshooting," you need it is installed in an inaccessible location or is not installed in a manner that have been removed, altered...


