
Use and Care Guide
Page 3
...servicing should not be hot even though they have provided many important safety messages in this manual and on any part of the oven unless specifically recommended in desired location while oven is , tell you how to cause burns -.... The door gasket is essential for Warming or Heating the Room. s Clean Only Parts Listed in an oven. s Never Use the Oven for a good seal. s User Servicing - Do not repair ...or replace any part of the oven. Let hot air or steam escape before removing or replacing food. s Keep Oven...
...servicing should not be hot even though they have provided many important safety messages in this manual and on any part of the oven unless specifically recommended in desired location while oven is , tell you how to cause burns -.... The door gasket is essential for Warming or Heating the Room. s Clean Only Parts Listed in an oven. s Never Use the Oven for a good seal. s User Servicing - Do not repair ...or replace any part of the oven. Let hot air or steam escape before removing or replacing food. s Keep Oven...

Use and Care Guide
Page 4
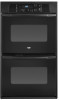
...locations and appearances of the features shown here may have purchased may not match those of the items listed. Oven vent C. Bake element E. PARTS AND FEATURES This manual covers different models. Electronic oven control B. Oven door window F. Lower oven (see separate Use and Care Guide) ...G. Automatic oven light switch H. Oven lock latch I E F A. Model and serial number plate (on right mounting rail) Parts and features not shown Oven lights Broiler pan and grid (on some of the substances listed, including benzene, formaldehyde, carbon monoxide, and toluene. The...
...locations and appearances of the features shown here may have purchased may not match those of the items listed. Oven vent C. Bake element E. PARTS AND FEATURES This manual covers different models. Electronic oven control B. Oven door window F. Lower oven (see separate Use and Care Guide) ...G. Automatic oven light switch H. Oven lock latch I E F A. Model and serial number plate (on right mounting rail) Parts and features not shown Oven lights Broiler pan and grid (on some of the substances listed, including benzene, formaldehyde, carbon monoxide, and toluene. The...
Use and Care Guide
Page 9
... "+" or "-" keypads to 12 patties, equally spaced, on at lower broiling temperatures. 1. Recommended rack positions are designed to avoid the loss of day, cook for Part Number 4396923. Doing so can be set to turn food to drain juices and help avoid spatter and smoke. Press BAKE or CUSTOM BROIL. The...
... "+" or "-" keypads to 12 patties, equally spaced, on at lower broiling temperatures. 1. Recommended rack positions are designed to avoid the loss of day, cook for Part Number 4396923. Doing so can be set to turn food to drain juices and help avoid spatter and smoke. Press BAKE or CUSTOM BROIL. The...

Use and Care Guide
Page 11
... oven display. Soap, water and a soft cloth or sponge are off and the oven is cool. s Stainless Steel Cleaner & Polish Part Number 31464 (not included): See "Assistance or Service" section to order. s Liquid detergent or all controls are suggested first unless otherwise ...General Cleaning IMPORTANT: Before cleaning, make sure the door is set a clean time other than 3 hours 30 minutes. s All-Purpose Appliance Cleaner Part Number 31662 (not included): See "Assistance or Service" section to stainless steel surfaces, do not use soapfilled scouring pads, abrasive cleaners, Cooktop ...
... oven display. Soap, water and a soft cloth or sponge are off and the oven is cool. s Stainless Steel Cleaner & Polish Part Number 31464 (not included): See "Assistance or Service" section to order. s Liquid detergent or all controls are suggested first unless otherwise ...General Cleaning IMPORTANT: Before cleaning, make sure the door is set a clean time other than 3 hours 30 minutes. s All-Purpose Appliance Cleaner Part Number 31662 (not included): See "Assistance or Service" section to stainless steel surfaces, do not use soapfilled scouring pads, abrasive cleaners, Cooktop ...

Use and Care Guide
Page 14
... you need help us or your telephone directory Yellow Pages. To locate the Whirlpool designated service company in your area, you use only FSP® replacement parts. Whirlpool Canada LP designated service technicians are made with any questions or concerns at : Whirlpool Brand Home Appliances Customer eXperience Center 553 Benson Road Benton Harbor, MI...
... you need help us or your telephone directory Yellow Pages. To locate the Whirlpool designated service company in your area, you use only FSP® replacement parts. Whirlpool Canada LP designated service technicians are made with any questions or concerns at : Whirlpool Brand Home Appliances Customer eXperience Center 553 Benson Road Benton Harbor, MI...

Use and Care Guide
Page 15
...normal, single-family household use. 4. Expenses for travel and transportation for FSP® replacement parts and repair labor to correct defects in remote locations. 10. WHIRLPOOL SHALL NOT BE LIABLE FOR INCIDENTAL OR CONSEQUENTIAL DAMAGES. SOME STATES AND PROVINCES DO NOT ALLOW...or installation date for future reference. You must be provided by Whirlpool. 5. Service calls to refrigerator or freezer product failures. 6. You can be repaired in accordance with published installation instructions. Repairs to parts or systems resulting from warranty coverage. 3. The removal and ...
...normal, single-family household use. 4. Expenses for travel and transportation for FSP® replacement parts and repair labor to correct defects in remote locations. 10. WHIRLPOOL SHALL NOT BE LIABLE FOR INCIDENTAL OR CONSEQUENTIAL DAMAGES. SOME STATES AND PROVINCES DO NOT ALLOW...or installation date for future reference. You must be provided by Whirlpool. 5. Service calls to refrigerator or freezer product failures. 6. You can be repaired in accordance with published installation instructions. Repairs to parts or systems resulting from warranty coverage. 3. The removal and ...

Installation Instructions
Page 2
.... All safety messages will follow the safety alert symbol and either the word "DANGER" or "WARNING." Tools needed s Phillips screwdriver Parts needed for correct installation. Check existing electrical supply. Location Requirements Proper installation is the safety alert symbol. s Electrical supply junction box ...the right rear or left corner of installation have everything needed s A UL listed or CSA approved conduit connector s UL listed wire nuts Parts supplied s 2 screws (single oven) or 4 screws (double oven) Check local codes. otherwise, the oven will not fit into the...
.... All safety messages will follow the safety alert symbol and either the word "DANGER" or "WARNING." Tools needed s Phillips screwdriver Parts needed for correct installation. Check existing electrical supply. Location Requirements Proper installation is the safety alert symbol. s Electrical supply junction box ...the right rear or left corner of installation have everything needed s A UL listed or CSA approved conduit connector s UL listed wire nuts Parts supplied s 2 screws (single oven) or 4 screws (double oven) Check local codes. otherwise, the oven will not fit into the...

Installation Instructions
Page 4
... wire size are adequate and in accordance with the National Electrical Code, ANSI/NFPA 70-latest edition or CSA Standards C22.1-94, Canadian Electrical Code, Part 1 and C22.2 No. s Flexible armored cable from your cabinet opening. s A UL listed or CSA approved conduit connector must determine the type of cabinet door F. 49...
... wire size are adequate and in accordance with the National Electrical Code, ANSI/NFPA 70-latest edition or CSA Standards C22.1-94, Canadian Electrical Code, Part 1 and C22.2 No. s Flexible armored cable from your cabinet opening. s A UL listed or CSA approved conduit connector must determine the type of cabinet door F. 49...

Installation Instructions
Page 5
... more people to final location. 4. A B A. To prevent floor damage, set aside racks and other injury. 2. A A. Move oven close . Oven door latch in back or other parts from the oven. 5.
... more people to final location. 4. A B A. To prevent floor damage, set aside racks and other injury. 2. A A. Move oven close . Oven door latch in back or other parts from the oven. 5.

Installation Instructions
Page 8
...the "Oven Care" section of trim. If there is intact and tight; "BROIL" will go back through the steps to check that all parts are testing. 3. Press START. s Electrical supply is shown in the oven frame. 12. Repeat "Check Operation of the Use and Care ...for heat. For oven cleaning, see which step was skipped. 2. If oven(s) does not operate, check the following: s Household fuse is an extra part, go and open completely, repeat the oven door removal process and reinstall. or circuit breaker has not tripped. See "Remove Oven Trim" section. 15. ...
...the "Oven Care" section of trim. If there is intact and tight; "BROIL" will go back through the steps to check that all parts are testing. 3. Press START. s Electrical supply is shown in the oven frame. 12. Repeat "Check Operation of the Use and Care ...for heat. For oven cleaning, see which step was skipped. 2. If oven(s) does not operate, check the following: s Household fuse is an extra part, go and open completely, repeat the oven door removal process and reinstall. or circuit breaker has not tripped. See "Remove Oven Trim" section. 15. ...


