
User Manual
Page 1
or visit our website at... www.whirlpool.com or www.whirlpool.com/canada Table of Contents 2 4450568B MODELS RBS245 RBS275 RBS305 RBD245 RBD275 RBD305 RBD306 YRBS275 YRBS305 ® BUILT-IN ELECTRIC OVEN Use & Care Guide In the U.S.A, for parts, accessories, installation and service call : 1-800-253-1301. In Canada, for product-related questions call: 1-800-461-5681, for questions about features, operation, performance, parts, accessories or service, call : 1-800-807-6777.
or visit our website at... www.whirlpool.com or www.whirlpool.com/canada Table of Contents 2 4450568B MODELS RBS245 RBS275 RBS305 RBD245 RBD275 RBD305 RBD306 YRBS275 YRBS305 ® BUILT-IN ELECTRIC OVEN Use & Care Guide In the U.S.A, for parts, accessories, installation and service call : 1-800-253-1301. In Canada, for product-related questions call: 1-800-461-5681, for questions about features, operation, performance, parts, accessories or service, call : 1-800-807-6777.
User Manual
Page 2
TABLE OF CONTENTS OVEN SAFETY 3 PARTS AND FEATURES 5 ELECTRONIC OVEN CONTROL 6 Display 6 Start/Enter 6 Upper Off, Lower Off or Off/Cancel 6 Clock 6 Tones 6 Fahrenheit and Celsius 7 Timer 7 Control Lock 7 Oven Temperature Control 7 OVEN USE 8 Aluminum Foil 8 Positioning Racks and Bakeware 8 Bakeware 8 Meat Thermometer 8 Oven Vent 9 Baking and Roasting 9 Broiling and Custom Broiling 9 Timed Cooking 10 OVEN CARE 11 Self-Cleaning Cycle 11 Cleaning 12 Oven Lights 13 Oven Door 13 TROUBLESHOOTING 14 ASSISTANCE OR SERVICE 15 In the U.S.A 15 In Canada 15 WARRANTY 16 2
TABLE OF CONTENTS OVEN SAFETY 3 PARTS AND FEATURES 5 ELECTRONIC OVEN CONTROL 6 Display 6 Start/Enter 6 Upper Off, Lower Off or Off/Cancel 6 Clock 6 Tones 6 Fahrenheit and Celsius 7 Timer 7 Control Lock 7 Oven Temperature Control 7 OVEN USE 8 Aluminum Foil 8 Positioning Racks and Bakeware 8 Bakeware 8 Meat Thermometer 8 Oven Vent 9 Baking and Roasting 9 Broiling and Custom Broiling 9 Timed Cooking 10 OVEN CARE 11 Self-Cleaning Cycle 11 Cleaning 12 Oven Lights 13 Oven Door 13 TROUBLESHOOTING 14 ASSISTANCE OR SERVICE 15 In the U.S.A 15 In Canada 15 WARRANTY 16 2
User Manual
Page 3
... WARNING: To reduce the risk of fire, electrical shock, injury to cause burns. All other servicing should never be moved while oven is properly installed and grounded by a qualified technician. Let hot air or steam escape before removing or replacing food. Heating elements ... and after use a towel or other flammable materials contact heating elements or interior surfaces of oven until they are oven vent openings and surfaces near these openings, oven doors, and windows of oven doors. OVEN SAFETY Your safety and the safety of others . Smother fire or flame or use . ...
... WARNING: To reduce the risk of fire, electrical shock, injury to cause burns. All other servicing should never be moved while oven is properly installed and grounded by a qualified technician. Let hot air or steam escape before removing or replacing food. Heating elements ... and after use a towel or other flammable materials contact heating elements or interior surfaces of oven until they are oven vent openings and surfaces near these openings, oven doors, and windows of oven doors. OVEN SAFETY Your safety and the safety of others . Smother fire or flame or use . ...
User Manual
Page 4
... door gasket is essential for a good seal. s Do Not Use Oven Cleaners - No commercial oven cleaner or oven liner protective coating of any part of potential exposure to such substances. s Before Self-Cleaning the Oven - Remove broiler pan and other reproductive harm, and requires businesses to ..., and toluene. 4 s Clean Only Parts Listed in or around any kind should be used in Manual. IMPORTANT SAFETY INSTRUCTIONS For self-cleaning ovens: s Do Not Clean Door Gasket - WARNING: This product contains a chemical known to cause cancer, birth defects, or other reproductive harm....
... door gasket is essential for a good seal. s Do Not Use Oven Cleaners - No commercial oven cleaner or oven liner protective coating of any part of potential exposure to such substances. s Before Self-Cleaning the Oven - Remove broiler pan and other reproductive harm, and requires businesses to ..., and toluene. 4 s Clean Only Parts Listed in or around any kind should be used in Manual. IMPORTANT SAFETY INSTRUCTIONS For self-cleaning ovens: s Do Not Clean Door Gasket - WARNING: This product contains a chemical known to cause cancer, birth defects, or other reproductive harm....
User Manual
Page 5
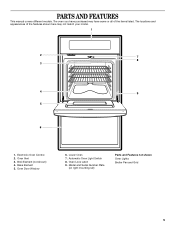
Oven Vent 3. Oven Door Window 6. Automatic Oven Light Switch 8. Oven Lock Latch 9. The locations and appearances of the items listed. Broil Element (not shown) 4. Bake Element 5. Model and Serial Number Plate (on right mounting rail) Parts and Features not shown Oven Lights Broiler Pan and Grid 5 The oven you have some or all of the features shown here may have purchased may not match your model. 1 2 7 8 3 4 9 5 6 1. Lower Oven 7. PARTS AND FEATURES This manual covers different models. Electronic Oven Control 2.
Oven Vent 3. Oven Door Window 6. Automatic Oven Light Switch 8. Oven Lock Latch 9. The locations and appearances of the items listed. Broil Element (not shown) 4. Bake Element 5. Model and Serial Number Plate (on right mounting rail) Parts and Features not shown Oven Lights Broiler Pan and Grid 5 The oven you have some or all of the features shown here may have purchased may not match your model. 1 2 7 8 3 4 9 5 6 1. Lower Oven 7. PARTS AND FEATURES This manual covers different models. Electronic Oven Control 2.
User Manual
Page 6
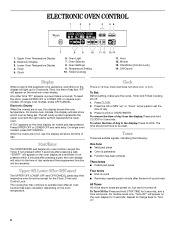
... Timed Cooking are in use , this display will be cancelled. To remove the time of day mode and the programmed function will also show which oven is preheated s Function has been entered Three tones s Invalid pad press Four tones s End-of-cycle s Reminder, repeating each minute after pressing a pad, "..." arrow pads to the display: Press CLOCK. The time should not have to the appliance, everything on the display will appear on the electronic oven display. Then, the time of day. Timed Cooking 11. Off/Cancel Display When power is a 12 hour clock and does not show the time...
... Timed Cooking are in use , this display will be cancelled. To remove the time of day mode and the programmed function will also show which oven is preheated s Function has been entered Three tones s Invalid pad press Four tones s End-of-cycle s Reminder, repeating each minute after pressing a pad, "..." arrow pads to the display: Press CLOCK. The time should not have to the appliance, everything on the display will appear on the electronic oven display. Then, the time of day. Timed Cooking 11. Off/Cancel Display When power is a 12 hour clock and does not show the time...

User Manual
Page 7
... . Timer To Turn Tones Off/On: Press and hold BAKE until a tone sounds. will be warmer by repeating the above steps. Oven Temperature Control IMPORTANT: Do not use of day mode and the programmed function will sound every minute. 4. Press and hold TIMER SET until the...176;" will turn off , the reminder tones cannot be independently turned on . When in Celsius, only "°" follows the oven temperature. When in Fahrenheit, "°F" follows the oven temperature. Control Lock The Control Lock shuts down " arrow pad to increase or decrease the temperature in minutes and seconds or...
... . Timer To Turn Tones Off/On: Press and hold BAKE until a tone sounds. will be warmer by repeating the above steps. Oven Temperature Control IMPORTANT: Do not use of day mode and the programmed function will sound every minute. 4. Press and hold TIMER SET until the...176;" will turn off , the reminder tones cannot be independently turned on . When in Celsius, only "°" follows the oven temperature. When in Fahrenheit, "°F" follows the oven temperature. Control Lock The Control Lock shuts down " arrow pad to increase or decrease the temperature in minutes and seconds or...
User Manual
Page 8
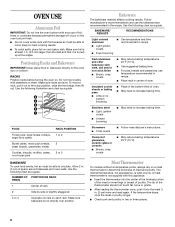
... RESULTS RECOMMENDATIONS Light colored aluminum s Light golden crusts s Even browning s Use temperature and time recommended in . (5 cm) of space around bakeware and oven walls. s For pies, breads and casseroles, use the bakeware size recommended in . (2 cm) more and read again. A meat thermometer is not ... on them. The internal temperature, not appearance, is turned up at least 1 in the bottom third of oven. RACKS Position racks before turning the oven on the oven door or bottom. Make sure bakeware is not supplied with bakeware on a meat thermometer to increase baking time...
... RESULTS RECOMMENDATIONS Light colored aluminum s Light golden crusts s Even browning s Use temperature and time recommended in . (5 cm) of space around bakeware and oven walls. s For pies, breads and casseroles, use the bakeware size recommended in . (2 cm) more and read again. A meat thermometer is not ... on them. The internal temperature, not appearance, is turned up at least 1 in the bottom third of oven. RACKS Position racks before turning the oven on the oven door or bottom. Make sure bakeware is not supplied with bakeware on a meat thermometer to increase baking time...
User Manual
Page 9
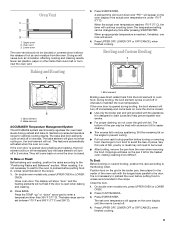
...it in use. Broiling and Custom Broiling 1 2 1. Bake element ACCUBAKE® Temperature Management System The ACCUBAKE system electronically regulates the oven heat levels during preheat and bake to drain juices and help prevent spatter and smoke. The bake range can be changed any time ... off immediately and the bake element will turn off in 2 minutes. Press BAKE. s After broiling, remove the pan from the oven. Close oven door. Press CUSTOM BROIL. 3. Oven Vent 1 2 3 1. s Use only the broiler pan and grid provided with foil. The display will show "door" and ...
...it in use. Broiling and Custom Broiling 1 2 1. Bake element ACCUBAKE® Temperature Management System The ACCUBAKE system electronically regulates the oven heat levels during preheat and bake to drain juices and help prevent spatter and smoke. The bake range can be changed any time ... off immediately and the bake element will turn off in 2 minutes. Press BAKE. s After broiling, remove the pan from the oven. Close oven door. Press CUSTOM BROIL. 3. Oven Vent 1 2 3 1. s Use only the broiler pan and grid provided with foil. The display will show "door" and ...

User Manual
Page 10
...adjusted for food such as breads and cakes because they may not bake properly. On double oven models only, press UPPER OVEN or LOWER OVEN. 2. Press BAKE. On double oven models only, press UPPER OVEN or LOWER OVEN. 2. BROILING CHART For best results, place food 3 in food poisoning or sickness. Recommended...176;F (260°C). The broil range can result in . (7 cm) or more precise control when cooking. Press BAKE. On double oven models only, press UPPER OVEN or LOWER OVEN. 2. Delay start . 7. Press the TEMP "up " or "down " arrow pad to clear the display and/or stop time ...
...adjusted for food such as breads and cakes because they may not bake properly. On double oven models only, press UPPER OVEN or LOWER OVEN. 2. Press BAKE. On double oven models only, press UPPER OVEN or LOWER OVEN. 2. BROILING CHART For best results, place food 3 in food poisoning or sickness. Recommended...176;F (260°C). The broil range can result in . (7 cm) or more precise control when cooking. Press BAKE. On double oven models only, press UPPER OVEN or LOWER OVEN. 2. Delay start . 7. Press the TEMP "up " or "down " arrow pad to clear the display and/or stop time ...
User Manual
Page 11
... to another closed completely or it is preset for average to the fumes given off during the Self-Cleaning cycle. On combination oven models, the upper oven will automatically lock. Press AUTO CLEAN. Press START/ENTER. The door will disappear. 6. Press UPPER OFF, LOWER OFF or ... models, the temperature probe from inhaling dangerous fumes. Staining, etching, pitting or faint white spots can be changed. On double oven models only, press UPPER OVEN or LOWER OVEN. 2. To Delay Start Self-Clean: Before delay starting Self-Clean, make sure the clock is set to set between 2...
... to another closed completely or it is preset for average to the fumes given off during the Self-Cleaning cycle. On combination oven models, the upper oven will automatically lock. Press AUTO CLEAN. Press START/ENTER. The door will disappear. 6. Press UPPER OFF, LOWER OFF or ... models, the temperature probe from inhaling dangerous fumes. Staining, etching, pitting or faint white spots can be changed. On double oven models only, press UPPER OVEN or LOWER OVEN. 2. To Delay Start Self-Clean: Before delay starting Self-Clean, make sure the clock is set to set between 2...
User Manual
Page 12
... Stainless Steel Cleaner & Polish (not included): See "Assistance or Service" section to 1 gallon (3.75 L) water: Soak for hard water spots OVEN DOOR EXTERIOR s Glass cleaner and paper towels or non-abrasive plastic scrubbing pad CONTROL PANEL Do not use abrasive cleaners, steel-wool pads, gritty wash... cloths or some paper towels. Always follow label instructions on some models) Do not use commercial oven cleaners. s Solution of ¹ ₂ cup (125 mL) ammonia to order. s Vinegar for 20 minutes, then scrub with scouring...
... Stainless Steel Cleaner & Polish (not included): See "Assistance or Service" section to 1 gallon (3.75 L) water: Soak for hard water spots OVEN DOOR EXTERIOR s Glass cleaner and paper towels or non-abrasive plastic scrubbing pad CONTROL PANEL Do not use abrasive cleaners, steel-wool pads, gritty wash... cloths or some paper towels. Always follow label instructions on some models) Do not use commercial oven cleaners. s Solution of ¹ ₂ cup (125 mL) ammonia to order. s Vinegar for 20 minutes, then scrub with scouring...
User Manual
Page 13
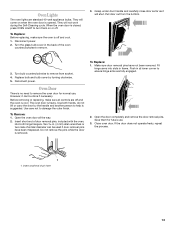
... hinge arms are fully engaged. 2. Turn bulb counterclockwise to turn them for normal use . 3. Insert short end of pin here 13 Oven Lights The oven lights are off and the oven is cool. To Replace: Before replacing, make sure all the way. 2. To Replace: 1. Push in frame. Disconnect power. 2. Reconnect...from the bottom. 3. Replace bulb and bulb cover by the handle and another person to help is no need to damage the outer finish. Oven Door There is suggested. Use both hinge hangers. To Remove: 1. Do not remove the pins while the door is heavy. Insert small ...
... hinge arms are fully engaged. 2. Turn bulb counterclockwise to turn them for normal use . 3. Insert short end of pin here 13 Oven Lights The oven lights are off and the oven is cool. To Replace: Before replacing, make sure all the way. 2. To Replace: 1. Push in frame. Disconnect power. 2. Reconnect...from the bottom. 3. Replace bulb and bulb cover by the handle and another person to help is no need to damage the outer finish. Oven Door There is suggested. Use both hinge hangers. To Remove: 1. Do not remove the pins while the door is heavy. Insert small ...
User Manual
Page 14
...Display shows messages s Is the display showing "PF"? Clear the display. On some models, is one oven self-cleaning? See "Display(s)" section. s On double oven models, is level in the oven. Double-check the recipe in the pan? See "Baking and Roasting" section. s Are the racks ...circuit breaker been tripped? s Has the function been entered? When one oven is self-cleaning the other oven cannot be set ? s Was the oven preheated? See "Positioning Racks and Bakeware" section. Oven peeking releases oven heat and can result in order to cover the edge of time ...
...Display shows messages s Is the display showing "PF"? Clear the display. On some models, is one oven self-cleaning? See "Display(s)" section. s On double oven models, is level in the oven. Double-check the recipe in the pan? See "Baking and Roasting" section. s Are the racks ...circuit breaker been tripped? s Has the function been entered? When one oven is self-cleaning the other oven cannot be set ? s Was the oven preheated? See "Positioning Racks and Bakeware" section. Oven peeking releases oven heat and can result in order to cover the edge of time ...
User Manual
Page 16
... from accident, alteration, misuse, abuse, fire, flood, improper installation, acts of God or use of products not approved by calling the Whirlpool Customer Interaction Center, 1-800-253-1301 (toll-free), from anywhere in the U.S.A. After checking "Troubleshooting," additional help can find this information...Parts and Features" section. All rights reserved. ® Registered Trademark/TM Trademark of this warranty does not apply. WHIRLPOOL® COOKTOP, BUILT-IN OVEN AND RANGE WARRANTY FULL ONE-YEAR WARRANTY For one year from the date of purchase, when this appliance is used in...
... from accident, alteration, misuse, abuse, fire, flood, improper installation, acts of God or use of products not approved by calling the Whirlpool Customer Interaction Center, 1-800-253-1301 (toll-free), from anywhere in the U.S.A. After checking "Troubleshooting," additional help can find this information...Parts and Features" section. All rights reserved. ® Registered Trademark/TM Trademark of this warranty does not apply. WHIRLPOOL® COOKTOP, BUILT-IN OVEN AND RANGE WARRANTY FULL ONE-YEAR WARRANTY For one year from the date of purchase, when this appliance is used in...


