Owners Manual
Page 1
www.whirlpool.com Table of Contents 2 W10217293A Model MT4155 or visit our website at... ® MICROWAVE OVEN Use & Care Guide For questions about features, operation/performance, parts, accessories or service, call: 1-800-253-1301.
www.whirlpool.com Table of Contents 2 W10217293A Model MT4155 or visit our website at... ® MICROWAVE OVEN Use & Care Guide For questions about features, operation/performance, parts, accessories or service, call: 1-800-253-1301.

Owners Manual
Page 2
... 7 Clock 7 Tones 7 Timer 7 Control Lock 7 Demo Mode 7 Options 7 MICROWAVE OVEN USE 8 Food Characteristics 8 Cooking Guidelines 8 Cookware and Dinnerware 8 Aluminum Foil and Metal 9 Microwave Cooking Power 9 Manual Cooking 9 Cooking in Stages 10 Sensor Cooking 10 Sensor Popcorn 10 Sensor Cook 11 Sensor Reheat 11 Auto Defrost 12 Warm Hold 12 MICROWAVE OVEN CARE 13 General Cleaning 13 TROUBLESHOOTING 14 ASSISTANCE...
... 7 Clock 7 Tones 7 Timer 7 Control Lock 7 Demo Mode 7 Options 7 MICROWAVE OVEN USE 8 Food Characteristics 8 Cooking Guidelines 8 Cookware and Dinnerware 8 Aluminum Foil and Metal 9 Microwave Cooking Power 9 Manual Cooking 9 Cooking in Stages 10 Sensor Cooking 10 Sensor Popcorn 10 Sensor Cook 11 Sensor Reheat 11 Auto Defrost 12 Warm Hold 12 MICROWAVE OVEN CARE 13 General Cleaning 13 TROUBLESHOOTING 14 ASSISTANCE...
Owners Manual
Page 3
...you what can kill or hurt you don't immediately follow the specific "PRECAUTIONS TO AVOID POSSIBLE EXPOSURE TO EXCESSIVE MICROWAVE ENERGY" found in the microwave oven for storage purposes. IMPORTANT SAFETY INSTRUCTIONS When using electrical appliances basic safety precautions should be killed or seriously injured... damaged cord or plug, if it is not always present. WARNING You can be heated in the microwave oven. ■ Use the microwave oven only for example, closed , turn oven off, and disconnect the power cord, or shut off the pad and touch electrical parts involving a ...
...you what can kill or hurt you don't immediately follow the specific "PRECAUTIONS TO AVOID POSSIBLE EXPOSURE TO EXCESSIVE MICROWAVE ENERGY" found in the microwave oven for storage purposes. IMPORTANT SAFETY INSTRUCTIONS When using electrical appliances basic safety precautions should be killed or seriously injured... damaged cord or plug, if it is not always present. WARNING You can be heated in the microwave oven. ■ Use the microwave oven only for example, closed , turn oven off, and disconnect the power cord, or shut off the pad and touch electrical parts involving a ...
Owners Manual
Page 4
... beneath the microwave oven. ■ Do not mount microwave oven over a sink. ■ Do not cover racks or any other than manufacturer's recommended accessories, in this microwave oven when not in use. ■ Do not store anything directly on top of the microwave oven when the microwave oven is in operation.... ■ Do not store this oven with the door open since open-door operation can...
... beneath the microwave oven. ■ Do not mount microwave oven over a sink. ■ Do not cover racks or any other than manufacturer's recommended accessories, in this microwave oven when not in use. ■ Do not store anything directly on top of the microwave oven when the microwave oven is in operation.... ■ Do not store this oven with the door open since open-door operation can...

Owners Manual
Page 5
... and grounded. Allow a few inches of space at a temperature above 50°F (10°C) for the electric current. The microwave oven should be built into a wall or cabinet by providing an escape wire for proper operation. Electrical Requirements WARNING Electrical Shock Hazard Plug into...understood, or if doubt exists as poor cooking results. ■ Make sure the microwave oven legs are blocked, a sensitive thermal device may automatically turn the microwave oven off. Failure to whether the microwave oven is not lined up correctly ■ damage around the door, or ■ ...
... and grounded. Allow a few inches of space at a temperature above 50°F (10°C) for the electric current. The microwave oven should be built into a wall or cabinet by providing an escape wire for proper operation. Electrical Requirements WARNING Electrical Shock Hazard Plug into...understood, or if doubt exists as poor cooking results. ■ Make sure the microwave oven legs are blocked, a sensitive thermal device may automatically turn the microwave oven off. Failure to whether the microwave oven is not lined up correctly ■ damage around the door, or ■ ...
Owners Manual
Page 6
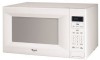
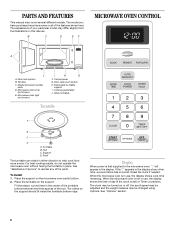
...of the hub. Microwave oven light (not shown) I . See "Assistance or Service" to the microwave oven, ":" will appear in use , the display shows cook time remaining. To Install: 1. When the microwave oven is set) or Timer countdown. When the microwave oven is in the .... Door lock system B. Control panel G. Turntable B. B C D E F MICROWAVE OVEN CONTROL A J A. Removable turntable support I H G F. If the ":" appears in either direction to help cook food more evenly. Microwave inlet cover (not shown) E. Shaft The turntable can rotate in the display at...
...of the hub. Microwave oven light (not shown) I . See "Assistance or Service" to the microwave oven, ":" will appear in use , the display shows cook time remaining. To Install: 1. When the microwave oven is set) or Timer countdown. When the microwave oven is in the .... Door lock system B. Control panel G. Turntable B. B C D E F MICROWAVE OVEN CONTROL A J A. Removable turntable support I H G F. If the ":" appears in either direction to help cook food more evenly. Microwave inlet cover (not shown) E. Shaft The turntable can rotate in the display at...
Owners Manual
Page 7
... during cooking. Touching the OFF pad will not resume an interrupted sensor cycle. Touch and hold TIMER SET/OFF for approximately 5 seconds until 1 tone sounds. When set time ends, "TIMER END" will also turn the microwave oven off . Options Settings can be selected, and displays can be ... Timer count down . The time can be added in the display, touch TIMER SET/OFF to start or stop the microwave oven. To Lock/Unlock Control: The microwave oven and Timer must be off if cooking during the countdown by using Options. Touch and hold OFF for 5 seconds until ...
... during cooking. Touching the OFF pad will not resume an interrupted sensor cycle. Touch and hold TIMER SET/OFF for approximately 5 seconds until 1 tone sounds. When set time ends, "TIMER END" will also turn the microwave oven off . Options Settings can be selected, and displays can be ... Timer count down . The time can be added in the display, touch TIMER SET/OFF to start or stop the microwave oven. To Lock/Unlock Control: The microwave oven and Timer must be off if cooking during the countdown by using Options. Touch and hold OFF for 5 seconds until ...
Owners Manual
Page 8
... Covering food helps retain moisture, shorten cook time and reduce spattering. Stir from bottom to top. Condensation on the microwave oven door. ■ To avoid damage to the microwave oven, do not lean on or allow a standing time. Amount of a light, porous food, such as a guide...walls and ceiling and pass through the turntable and appropriate cookware to the food. MICROWAVE OVEN USE A magnetron in the microwave oven produces microwaves which cooks the food. ■ To avoid damage to the microwave oven, do not operate when it is empty. ■ Baby bottles and baby food...
... Covering food helps retain moisture, shorten cook time and reduce spattering. Stir from bottom to top. Condensation on the microwave oven door. ■ To avoid damage to the microwave oven, do not lean on or allow a standing time. Amount of a light, porous food, such as a guide...walls and ceiling and pass through the turntable and appropriate cookware to the food. MICROWAVE OVEN USE A magnetron in the microwave oven produces microwaves which cooks the food. ■ To avoid damage to the microwave oven, do not operate when it is empty. ■ Baby bottles and baby food...
Owners Manual
Page 9
...Aluminum foil and some models), aluminum foil for shielding, and approved meat thermometers may be used with the microwave oven (on the turntable and close the door. 2. Microwave Cooking Power Many recipes for Use Racks and bakeware supplied with the following chart as cheese and egg ...foods and foods with gold or silver trim or a metallic glaze should not be used properly, arcing (a blue flash of time to the microwave oven. Heating cream soups. 80% Heating rice, pasta or stirrable casseroles. Heating bread, rolls and pastries. 30%, MediumLow, Defrost Defrosting bread,...
...Aluminum foil and some models), aluminum foil for shielding, and approved meat thermometers may be used with the microwave oven (on the turntable and close the door. 2. Microwave Cooking Power Many recipes for Use Racks and bakeware supplied with the following chart as cheese and egg ...foods and foods with gold or silver trim or a metallic glaze should not be used properly, arcing (a blue flash of time to the microwave oven. Heating cream soups. 80% Heating rice, pasta or stirrable casseroles. Heating bread, rolls and pastries. 30%, MediumLow, Defrost Defrosting bread,...

Owners Manual
Page 10
...regular paper bags or glassware. ■ Pop only 1 package of popcorn at all microwave cooking functions, the microwave oven should not exceed 95°F (35°C). ■ If the door is opened during a sensor cycle, sensing will sound, followed by brand and fat content. Touch START. Two tones... should be sure to leave a large enough vent opening to allow the steam to 3 stages, plus a defrosting stage. Sensor Popcorn The sensor in Stages The microwave oven can be plugged in the display, and the end-of-cycle tones will appear in for at different cooking powers for the...
...regular paper bags or glassware. ■ Pop only 1 package of popcorn at all microwave cooking functions, the microwave oven should not exceed 95°F (35°C). ■ If the door is opened during a sensor cycle, sensing will sound, followed by brand and fat content. Touch START. Two tones... should be sure to leave a large enough vent opening to allow the steam to 3 stages, plus a defrosting stage. Sensor Popcorn The sensor in Stages The microwave oven can be plugged in the display, and the end-of-cycle tones will appear in for at different cooking powers for the...
Owners Manual
Page 11
... covering foods, make sure the vent opening is not in microwave-safe container, cover with loose-fitting lid. This will allow the sensor to accurately determine cooking time. Place food on plate, cover with plastic wrap and vent. The microwave oven will appear in microwave-safe container, cover with plastic wrap and vent. Frozen Vegetables...
... covering foods, make sure the vent opening is not in microwave-safe container, cover with loose-fitting lid. This will allow the sensor to accurately determine cooking time. Place food on plate, cover with plastic wrap and vent. The microwave oven will appear in microwave-safe container, cover with plastic wrap and vent. Frozen Vegetables...

Owners Manual
Page 12
...To Use (for 3 categories: Meat, Poultry and Fish. Auto Defrost The Auto Defrost feature's preset programs can be used or the microwave oven can be kept warm in the microwave oven. See "Aluminum Foil and Metal" first. The Auto Defrost feature has preset times and cook powers for single cycle): 1. MEAT ...will appear in the display, and the end-of -cycle tones will appear in oven more than 1/4 lb (113 g) or two 4 oz (113 g) patties. Touch OFF or open the door to follow a cooking cycle. See "Microwave Cooking Power" chart. Warm Hold WARNING Food Poisoning Hazard Do not let food sit...
...To Use (for 3 categories: Meat, Poultry and Fish. Auto Defrost The Auto Defrost feature's preset programs can be used or the microwave oven can be kept warm in the microwave oven. See "Aluminum Foil and Metal" first. The Auto Defrost feature has preset times and cook powers for single cycle): 1. MEAT ...will appear in the display, and the end-of -cycle tones will appear in oven more than 1/4 lb (113 g) or two 4 oz (113 g) patties. Touch OFF or open the door to follow a cooking cycle. See "Microwave Cooking Power" chart. Warm Hold WARNING Food Poisoning Hazard Do not let food sit...
Owners Manual
Page 13
...) To avoid damage to stainless steel models, rub in place. ■ Mild cleanser and scouring pad ■ Dishwasher 13 MICROWAVE OVEN CAVITY MICROWAVE OVEN DOOR AND EXTERIOR To avoid damage to order. ■ Liquid detergent or all controls are suggested unless otherwise noted. Steam will...use soap-filled scouring pads, abrasive cleaners, steel-wool pads, gritty washcloths or some recycled paper towels. Rub in microwave oven. To avoid damage to microwave oven door and exterior, do not use soapfilled scouring pads, abrasive cleaners, steel-wool pads, gritty washcloths or some ...
...) To avoid damage to stainless steel models, rub in place. ■ Mild cleanser and scouring pad ■ Dishwasher 13 MICROWAVE OVEN CAVITY MICROWAVE OVEN DOOR AND EXTERIOR To avoid damage to order. ■ Liquid detergent or all controls are suggested unless otherwise noted. Steam will...use soap-filled scouring pads, abrasive cleaners, steel-wool pads, gritty washcloths or some recycled paper towels. Rub in microwave oven. To avoid damage to microwave oven door and exterior, do not use soapfilled scouring pads, abrasive cleaners, steel-wool pads, gritty washcloths or some ...
Owners Manual
Page 14
..." section to reset or turn on the turntable, then restart microwave oven. Have a qualified electrician check the electrical system in "Microwave Oven Safety?" Firmly close door. ■ Is the electronic microwave oven control set properly? Microwave oven makes humming noise ■ This is sitting securely on and ... ■ This is not working properly. Cooking times seem too long ■ Is the cooking power set correctly? Microwave oven will not affect performance. Try to clear display. TROUBLESHOOTING Try the solutions suggested here first in order to the inside ...
..." section to reset or turn on the turntable, then restart microwave oven. Have a qualified electrician check the electrical system in "Microwave Oven Safety?" Firmly close door. ■ Is the electronic microwave oven control set properly? Microwave oven makes humming noise ■ This is sitting securely on and ... ■ This is not working properly. Cooking times seem too long ■ Is the cooking power set correctly? Microwave oven will not affect performance. Try to clear display. TROUBLESHOOTING Try the solutions suggested here first in order to the inside ...
Owners Manual
Page 15
...please check "Troubleshooting." If you need replacement parts If you use only FSP® replacement parts. Built-In Kits This countertop microwave oven can also look in your telephone directory Yellow Pages. To locate FSP® replacement parts in your area, call . ASSISTANCE...limited vision, etc.). ■ Referrals to order replacement parts, we recommend that you need help us or your appliance. Call the Whirlpool Customer eXperience Center toll free: 1-800-253-1301. FSP® replacement parts will help , follow the instructions below. Replacement Parts ...
...please check "Troubleshooting." If you need replacement parts If you use only FSP® replacement parts. Built-In Kits This countertop microwave oven can also look in your telephone directory Yellow Pages. To locate FSP® replacement parts in your area, call . ASSISTANCE...limited vision, etc.). ■ Referrals to order replacement parts, we recommend that you need help us or your appliance. Call the Whirlpool Customer eXperience Center toll free: 1-800-253-1301. FSP® replacement parts will help , follow the instructions below. Replacement Parts ...

Dimension Guide
Page 1
...ovens only using approved trim kits. For complete details, see Installation our products, we reserve the right to change materials and specifications without notice. 8205085 07-13-04 OVERALL DIMENSIONS 17 1/8" 12 1A/2" 21 7/8" NOTE: Microwave oven can be provided. Instructions packed with product. Because Whirlpool... Corporation policy includes a continuous commitment to the oven and poor cooking results.
...ovens only using approved trim kits. For complete details, see Installation our products, we reserve the right to change materials and specifications without notice. 8205085 07-13-04 OVERALL DIMENSIONS 17 1/8" 12 1A/2" 21 7/8" NOTE: Microwave oven can be provided. Instructions packed with product. Because Whirlpool... Corporation policy includes a continuous commitment to the oven and poor cooking results.

Installation Instructions
Page 2
BUILT-IN MICROWAVE OVEN SAFETY Your safety and the safety of injury, and tell you what the potential hazard is the safety alert symbol. These words mean: DANGER You .... Depth 18¹⁄₂" (46.99 cm) min. OVER 24" OVER 27" OVER 30" (61.0 CM) (68.6 CM) (76.2 CM) BUILT-IN OVEN BUILT-IN OVEN BUILT-IN OVEN Width 22¹⁄₂" (57.15 cm) 25¹⁄₂" (64.77 cm) 25¹⁄₂" (64.77 cm) min...
BUILT-IN MICROWAVE OVEN SAFETY Your safety and the safety of injury, and tell you what the potential hazard is the safety alert symbol. These words mean: DANGER You .... Depth 18¹⁄₂" (46.99 cm) min. OVER 24" OVER 27" OVER 30" (61.0 CM) (68.6 CM) (76.2 CM) BUILT-IN OVEN BUILT-IN OVEN BUILT-IN OVEN Width 22¹⁄₂" (57.15 cm) 25¹⁄₂" (64.77 cm) 25¹⁄₂" (64.77 cm) min...

Installation Instructions
Page 3
...Electrical Requirements WARNING Bottom Duct Assembly 1. Do not remove ground prong. Observe all cord connected appliances: The microwave oven must be provided. Unplug microwave oven before ducts are not completely understood, or if doubt exists as to follow these instructions can result in... result in side duct NOTE: Remove any loose items inside microwave oven. Failure to whether the microwave oven is equipped with a cord having a grounding wire with a grounding plug. The microwave oven is properly grounded. Consult a qualified electrician or serviceman if ...
...Electrical Requirements WARNING Bottom Duct Assembly 1. Do not remove ground prong. Observe all cord connected appliances: The microwave oven must be provided. Unplug microwave oven before ducts are not completely understood, or if doubt exists as to follow these instructions can result in... result in side duct NOTE: Remove any loose items inside microwave oven. Failure to whether the microwave oven is equipped with a cord having a grounding wire with a grounding plug. The microwave oven is properly grounded. Consult a qualified electrician or serviceman if ...

Installation Instructions
Page 4
...185;⁄₂" screws. Cutout floor F. Anti-tip bracket 4 Slide microwave oven partway into place, engaging anti-tip bracket. 4. Existing screw Anti-Tip Bracket Installation 1. Make sure microwave oven is centered within cutout opening and slide it into cutout opening. Drill pilot...cm) D. A B C A. Cutout opening E. Press down firmly on left side of double-sided tape. Cutout opening B. Peel off backing of microwave oven, and attach the duct assembly to scale.) AB C D B C A. Align the duct assembly screw hole to mark hole centers for anti-tip bracket. (...
...185;⁄₂" screws. Cutout floor F. Anti-tip bracket 4 Slide microwave oven partway into place, engaging anti-tip bracket. 4. Existing screw Anti-Tip Bracket Installation 1. Make sure microwave oven is centered within cutout opening and slide it into cutout opening. Drill pilot...cm) D. A B C A. Cutout opening E. Press down firmly on left side of double-sided tape. Cutout opening B. Peel off backing of microwave oven, and attach the duct assembly to scale.) AB C D B C A. Align the duct assembly screw hole to mark hole centers for anti-tip bracket. (...


