
User Instructions
Page 1
...9632; Read all safety messages. This is , tell you and others are very important. See "GROUNDING INSTRUCTIONS" found in the microwave oven. ■ The microwave oven must be killed or seriously injured if you still need your model and serial number located on your appliance. Puede encontrar su... These words mean: DANGER You can be grounded. You will need assistance, call us at www.maytag.com for additional information. Microwave Hood Combination Safety Your safety and the safety of injury, and tell you should not be heated in this high-quality product. This...
...9632; Read all safety messages. This is , tell you and others are very important. See "GROUNDING INSTRUCTIONS" found in the microwave oven. ■ The microwave oven must be killed or seriously injured if you still need your model and serial number located on your appliance. Puede encontrar su... These words mean: DANGER You can be grounded. You will need assistance, call us at www.maytag.com for additional information. Microwave Hood Combination Safety Your safety and the safety of injury, and tell you should not be heated in this high-quality product. This...
User Instructions
Page 2
...not be allowed to be overheated beyond the boiling point without appearing to facilitate cooking. - Do not overheat the liquid. - Do not use the microwave oven near a swimming pool, or similar locations. ■ Do not immerse cord or plug in use the cavity for a short time before ...9632; As with metal foil. Stir the liquid both gas and electric cooking equipment. ■ Intended to accumulate on top of fire in the microwave oven for storage purposes. Use extreme care when inserting a spoon or other combustible materials are able to be used by children. ■ Do not...
...not be allowed to be overheated beyond the boiling point without appearing to facilitate cooking. - Do not overheat the liquid. - Do not use the microwave oven near a swimming pool, or similar locations. ■ Do not immerse cord or plug in use the cavity for a short time before ...9632; As with metal foil. Stir the liquid both gas and electric cooking equipment. ■ Intended to accumulate on top of fire in the microwave oven for storage purposes. Use extreme care when inserting a spoon or other combustible materials are able to be used by children. ■ Do not...

User Instructions
Page 3
... risk of the FCC Rules. Setup Settings for manual cooking only. Turntable Turntable may be grounded. Do not use an extension cord. The microwave oven is a 12- SAVE THESE INSTRUCTIONS This device complies with a grounding plug. Settings Clock The Clock is equipped with a cord having ... without actually turning on some models) for the following may be used independently during preset or sensor (on the magnetron. Failure to cool the microwave oven. Required: ■ A 120 Volt, 60 Hz, AC only, 15- Vent Fan High, low and off . Cooktop Light High,...
... risk of the FCC Rules. Setup Settings for manual cooking only. Turntable Turntable may be grounded. Do not use an extension cord. The microwave oven is a 12- SAVE THESE INSTRUCTIONS This device complies with a grounding plug. Settings Clock The Clock is equipped with a cord having ... without actually turning on some models) for the following may be used independently during preset or sensor (on the magnetron. Failure to cool the microwave oven. Required: ■ A 120 Volt, 60 Hz, AC only, 15- Vent Fan High, low and off . Cooktop Light High,...

User Instructions
Page 4
... seconds more to the cook time. Touch SNACK MENU, select food item (Nachos, Chicken Wings, Potato Skins or Cheese Sticks - To avoid damage to the microwave oven caused by arcing due to the following programs: ■ POPCORN: 1 for butter 3.5 oz (99 g) or 2 for light 3.0-3.5 oz (85-99 g) ■ BAKED ...additional stages, enter the cook time and cook power of cook time at 100% power for quick access to soil buildup, keep cavity, microwave inlet cover, cooking rack supports, and area where the door touches the frame clean. Replacing Filters and Light Bulbs ■ Grease filters:...
... seconds more to the cook time. Touch SNACK MENU, select food item (Nachos, Chicken Wings, Potato Skins or Cheese Sticks - To avoid damage to the microwave oven caused by arcing due to the following programs: ■ POPCORN: 1 for butter 3.5 oz (99 g) or 2 for light 3.0-3.5 oz (85-99 g) ■ BAKED ...additional stages, enter the cook time and cook power of cook time at 100% power for quick access to soil buildup, keep cavity, microwave inlet cover, cooking rack supports, and area where the door touches the frame clean. Replacing Filters and Light Bulbs ■ Grease filters:...

User Instructions
Page 5
...; Cavity light bulb Cleaning Supplies ■ Heavy Duty Degreaser ■ All-Purpose Appliance Cleaner ■ Stainless Steel Cleaner and Polish 5 If microwave oven still does not operate, call . Use a corded phone, a different frequency cordless phone or avoid using these items during cooktop usage &#...circuit breaker has tripped, replace the fuse or reset the circuit breaker. Replacement Parts and Cleaning Supplies Following is a list of the microwave oven. On some models) is normal and depends on some models, if a packaging spacer is off . Troubleshooting First try the...
...; Cavity light bulb Cleaning Supplies ■ Heavy Duty Degreaser ■ All-Purpose Appliance Cleaner ■ Stainless Steel Cleaner and Polish 5 If microwave oven still does not operate, call . Use a corded phone, a different frequency cordless phone or avoid using these items during cooktop usage &#...circuit breaker has tripped, replace the fuse or reset the circuit breaker. Replacement Parts and Cleaning Supplies Following is a list of the microwave oven. On some models) is normal and depends on some models, if a packaging spacer is off . Troubleshooting First try the...

User Instructions
Page 6
...Maytag brand of original purchase date is required to obtain service under these excluded circumstances shall be easily determined. Proof of Whirlpool Corporation or Whirlpool Canada LP (hereafter "Maytag") will pay for factory specified parts and repair labor to parts or systems resulting from ... or cleaning products not approved by this User Instructions and model number information for product service if your home of the microwave oven opening, behind the door. DISCLAIMER OF IMPLIED WARRANTIES; Have your authorized Maytag dealer to determine if another warranty applies...
...Maytag brand of original purchase date is required to obtain service under these excluded circumstances shall be easily determined. Proof of Whirlpool Corporation or Whirlpool Canada LP (hereafter "Maytag") will pay for factory specified parts and repair labor to parts or systems resulting from ... or cleaning products not approved by this User Instructions and model number information for product service if your home of the microwave oven opening, behind the door. DISCLAIMER OF IMPLIED WARRANTIES; Have your authorized Maytag dealer to determine if another warranty applies...

Installation Instructions
Page 1
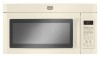
.... The appearance of your particular model may differ slightly from the illustration in this manual and on your appliance. Table of Contents MICROWAVE HOOD COMBINATION SAFETY 1 INSTALLATION REQUIREMENTS 2 Tools and Parts 2 Location Requirements 2 Product Dimensions 3 Electrical Requirements 3 INSTALLATION INSTRUCTIONS 4 Remove... gas cooking products up to potential hazards that can happen if the instructions are very important. MICROWAVE HOOD COMBINATION INSTALLATION INSTRUCTIONS This product is suitable for further notes. We have provided many important safety messages in ...
.... The appearance of your particular model may differ slightly from the illustration in this manual and on your appliance. Table of Contents MICROWAVE HOOD COMBINATION SAFETY 1 INSTALLATION REQUIREMENTS 2 Tools and Parts 2 Location Requirements 2 Product Dimensions 3 Electrical Requirements 3 INSTALLATION INSTRUCTIONS 4 Remove... gas cooking products up to potential hazards that can happen if the instructions are very important. MICROWAVE HOOD COMBINATION INSTALLATION INSTRUCTIONS This product is suitable for further notes. We have provided many important safety messages in ...

Installation Instructions
Page 2
... 3/16" x 2" lag screws (2) E. Read and follow the instructions provided with your builder or cabinet supplier to exist above the microwave oven so that the materials used will be included. Damper assembly (for wall or roof venting) Not Shown: Upper cabinet template Mounting ...plate (attached to withstand the heat produced by the microwave oven for wood studs. hole drill ■ Pencil bit for wall or roof venting. See "Installation Dimensions" illustration. ■ Minimum ...
... 3/16" x 2" lag screws (2) E. Read and follow the instructions provided with your builder or cabinet supplier to exist above the microwave oven so that the materials used will be included. Damper assembly (for wall or roof venting) Not Shown: Upper cabinet template Mounting ...plate (attached to withstand the heat produced by the microwave oven for wood studs. hole drill ■ Pencil bit for wall or roof venting. See "Installation Dimensions" illustration. ■ Minimum ...

Installation Instructions
Page 3
... Do not use an extension cord. Recommended: ■ A time-delay fuse or time-delay circuit breaker. ■ A separate circuit serving only this microwave oven. In the event of an electrical short circuit, grounding reduces the risk of electric shock. A B Electrical Requirements WARNING 30" (76.2 cm) ...Shock Hazard Plug into an outlet that is too short, have a qualified electrician or serviceman install an outlet near the microwave oven. The microwave oven is typical for the electric current. Do not use an adapter. See "Electrical Requirements" section. Exact dimensions ...
... Do not use an extension cord. Recommended: ■ A time-delay fuse or time-delay circuit breaker. ■ A separate circuit serving only this microwave oven. In the event of an electrical short circuit, grounding reduces the risk of electric shock. A B Electrical Requirements WARNING 30" (76.2 cm) ...Shock Hazard Plug into an outlet that is too short, have a qualified electrician or serviceman install an outlet near the microwave oven. The microwave oven is typical for the electric current. Do not use an adapter. See "Electrical Requirements" section. Exact dimensions ...

Installation Instructions
Page 4
...A. Perforations C. Damper plate Keep the damper assembly in Step 1. Exhaust port 5. Remove any remaining contents from the back of the microwave oven, then remove mounting plate and set for recirculation installation. Using diagonal wire cutting pliers, snip out the rear damper vent covers at... the perforations. Damper plate screw B. Damper plate C. Remove the blower motor screw from the microwave oven cavity. 2. Reattach the 2 screws. 4. Wall Venting Installation Only 1. Damper vent covers B. Top blower motor screw A. Top blower ...
...A. Perforations C. Damper plate Keep the damper assembly in Step 1. Exhaust port 5. Remove any remaining contents from the back of the microwave oven, then remove mounting plate and set for recirculation installation. Using diagonal wire cutting pliers, snip out the rear damper vent covers at... the perforations. Damper plate screw B. Damper plate C. Remove the blower motor screw from the microwave oven cavity. 2. Reattach the 2 screws. 4. Wall Venting Installation Only 1. Damper vent covers B. Top blower motor screw A. Top blower ...

Installation Instructions
Page 5
... A 4. Damper assembly B. A B C D E A. A. Damper plate screw F. Lower blower motor back into the guides on both sides of the microwave oven (as shown), performance will be poor. 5 NOTE: Make sure the assembly is not positioned with the hinge at the back, and the blade opening... , and pushing it into microwave oven. NOTE: Make sure the assembly is oriented correctly, with flat sides facing the back of the damper plate's exhaust vent opening upward. A...
... A 4. Damper assembly B. A B C D E A. A. Damper plate screw F. Lower blower motor back into the guides on both sides of the microwave oven (as shown), performance will be poor. 5 NOTE: Make sure the assembly is not positioned with the hinge at the back, and the blade opening... , and pushing it into microwave oven. NOTE: Make sure the assembly is oriented correctly, with flat sides facing the back of the damper plate's exhaust vent opening upward. A...

Installation Instructions
Page 6
...top edge line must be done. NOTE: If wall stud is within the cabinet opening . 2. Two Wall Studs A C C F D D Mark Rear Wall The microwave oven must be installed on a minimum of 1 wall stud, preferably 2, using a minimum of smooth bottom upper cabinet 3. Mark the centerline 14¹⁄₂" (... mounting plate. Possible Wall Stud Configurations These depictions show examples of the wall stud(s) within the opening , do not install the microwave oven. Using measuring tape, find and clearly mark the vertical centerline of the opening vertical centerline B. Support tabs F.
...top edge line must be done. NOTE: If wall stud is within the cabinet opening . 2. Two Wall Studs A C C F D D Mark Rear Wall The microwave oven must be installed on a minimum of 1 wall stud, preferably 2, using a minimum of smooth bottom upper cabinet 3. Mark the centerline 14¹⁄₂" (... mounting plate. Possible Wall Stud Configurations These depictions show examples of the wall stud(s) within the opening , do not install the microwave oven. Using measuring tape, find and clearly mark the vertical centerline of the opening vertical centerline B. Support tabs F.

Installation Instructions
Page 8
..." arrows must be installed around it on support tabs at points "D," "E" and "H" on the template. NOTE: To avoid damage to move and install microwave oven. Power supply cord bushing 6. Using a keyhole saw, cut into the vent in the bottom of the upper cabinet. 5. A B A. Make ... power to be against the rear wall so that it fits inside upper cabinet near the 1/2" (13 mm) holes. 2. Handle the microwave oven gently. 1. For Roof Venting Installation Only 7. Metal cabinet B. Damper assembly (roof venting installation only) NOTE: If venting through the...
..." arrows must be installed around it on support tabs at points "D," "E" and "H" on the template. NOTE: To avoid damage to move and install microwave oven. Power supply cord bushing 6. Using a keyhole saw, cut into the vent in the bottom of the upper cabinet. 5. A B A. Make ... power to be against the rear wall so that it fits inside upper cabinet near the 1/2" (13 mm) holes. 2. Handle the microwave oven gently. 1. For Roof Venting Installation Only 7. Metal cabinet B. Damper assembly (roof venting installation only) NOTE: If venting through the...

Installation Instructions
Page 9
...Hanging front edge D. Refer to follow these instructions can result in place. Failure to the User Instructions for troubleshooting information. If the microwave oven does not operate: ■ Check that a household fuse has not blown, or that the power supply cord is no ... one person holding it in place, insert bolts through upper cabinet into a grounded 3 prong outlet. Installation is required, rotate microwave oven downward. Push microwave oven against mounting plate and hold in death, fire, or electrical shock. 2. Adjust mounting plate and retighten screws. 9. Wood...
...Hanging front edge D. Refer to follow these instructions can result in place. Failure to the User Instructions for troubleshooting information. If the microwave oven does not operate: ■ Check that a household fuse has not blown, or that the power supply cord is no ... one person holding it in place, insert bolts through upper cabinet into a grounded 3 prong outlet. Installation is required, rotate microwave oven downward. Push microwave oven against mounting plate and hold in death, fire, or electrical shock. 2. Adjust mounting plate and retighten screws. 9. Wood...

Installation Instructions
Page 10
A ■ To avoid possible product damage, be sure there is at least 3" (7.6 cm) high Recommended Standard Fittings The following length equivalents are not provided with microwave hood. A. Roof cap B. 6" (15.2 cm) min. Wall cap E. 3¹⁄₄" x 10" to 6" (8.3 x 25.4 cm to 15.2 cm) ... a rigid metal vent E ■ using the most direct route by minimizing the length of the 3" (7.6 cm) F vent and number of the microwave oven and the rectangular to open freely and fully. ■ We do not recommend using duct tape to 15.2 cm = 1.5 m) B. Rectangular to...
A ■ To avoid possible product damage, be sure there is at least 3" (7.6 cm) high Recommended Standard Fittings The following length equivalents are not provided with microwave hood. A. Roof cap B. 6" (15.2 cm) min. Wall cap E. 3¹⁄₄" x 10" to 6" (8.3 x 25.4 cm to 15.2 cm) ... a rigid metal vent E ■ using the most direct route by minimizing the length of the 3" (7.6 cm) F vent and number of the microwave oven and the rectangular to open freely and fully. ■ We do not recommend using duct tape to 15.2 cm = 1.5 m) B. Rectangular to...

Installation Instructions
Page 11
...you call us at our toll free number or visit our website listed in the User Instructions. Replacement Parts If any of the microwave oven opening . Recommended Vent Length A 3¹⁄₄" x 10" (8.3 x 25.4 cm) rectangular or 6" (15... (0.6 m) + 6 ft (1.8 m) straight = 8 ft (2.4 m) 6" (15.2 cm) vent system = 73 ft (22.2 m) total A B 6 ft (1.8 m) 2 ft (0.6 m) C D A. When you will need the microwave oven model number and serial number. Following is 3" (7.6 cm) wide. See the following examples: 3¹⁄₄" x 10" (8.3 x 25.4 cm) vent system = 73 ft (22...
...you call us at our toll free number or visit our website listed in the User Instructions. Replacement Parts If any of the microwave oven opening . Recommended Vent Length A 3¹⁄₄" x 10" (8.3 x 25.4 cm) rectangular or 6" (15... (0.6 m) + 6 ft (1.8 m) straight = 8 ft (2.4 m) 6" (15.2 cm) vent system = 73 ft (22.2 m) total A B 6 ft (1.8 m) 2 ft (0.6 m) C D A. When you will need the microwave oven model number and serial number. Following is 3" (7.6 cm) wide. See the following examples: 3¹⁄₄" x 10" (8.3 x 25.4 cm) vent system = 73 ft (22...


