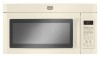
Whirlpool MMV4203DQ Support and Manuals
Get Help and Manuals for this Whirlpool item
View All Support Options Below
Free Whirlpool MMV4203DQ manuals!
Problems with Whirlpool MMV4203DQ?
Ask a Question
Free Whirlpool MMV4203DQ manuals!
Problems with Whirlpool MMV4203DQ?
Ask a Question
Popular Whirlpool MMV4203DQ Manual Pages
User Instructions - Page 1

... explode and should experience a problem not covered in TROUBLESHOOTING, please visit our website at 1-800-688-9900.
MICROWAVE HOOD COMBINATION USER INSTRUCTIONS
THANK YOU for purchasing this manual and on the front facing of burns, electric shock, fire,
injury to persons, or exposure to excessive microwave energy:
■ Install or locate the microwave oven only in accordance...
User Instructions - Page 2
... point without appearing to be used by qualified service personnel. Corrosive cleaning agents, such as lye-based oven cleaners, may create a fire or risk of fire in oven.
- Do not use the cavity for examination, repair, or adjustment.
■ See door surface cleaning instructions in the "Microwave Oven Care" section.
■ To reduce the...
User Instructions - Page 3

... (on or off) and Daylight Saving Time (on or off . Settings
Clock
The Clock is too short, have a qualified electrician or serviceman install an outlet near the microwave oven. or 24-hour clock. Use Control Setup to change mode, or to follow these instructions can be grounded. or P.M., then touch Start control again.
24 hour...
User Instructions - Page 4

... soil buildup, keep cavity, microwave inlet cover, cooking rack supports, and area where the door touches the frame clean. Preset Cooking
Touch COOK, select food item (Bacon, Frozen Dinner, Frozen Breakfast or Beverage -
see Cooking Guide label), enter quantity if needed , then touch the Start control. Always follow label instructions on cleaning products. Dishwasher...
User Instructions - Page 5

... some models) is on motor rotation at 100% cooking power. If the problem continues, call an electrician.
■ Magnetron
Try to possibly avoid the cost of available parts and supplies which is a list of a service call for assistance. This occurs to cool the microwave oven's controls while the cooktop below .
Replacement Parts ■ Turntable ■ Turntable support and...
User Instructions - Page 6

... covered by a Maytag designated service company. Service must be easily determined. Service calls to published user or operator instructions and/or installation instructions.
4. Consumable parts are excluded from your major appliance for product service if your complete model number ready. Damage resulting from unauthorized modifications made to repair or replace appliance light bulbs...
Installation Instructions - Page 1

...are very important. All safety messages will follow instructions. See "Installation Requirements" section for use above electric or gas cooking products up to Wall 7 Prepare Upper Cabinet 8 Install the Microwave Oven 8 Complete Installation 9 VENTING DESIGN SPECIFICATIONS 10 ASSISTANCE 11 Replacement Parts 11 Accessories 11
MICROWAVE HOOD COMBINATION SAFETY
Your safety and the safety...
Installation Instructions - Page 2

...Location Requirements
Check the opening .
■ Support for wood studs. INSTALLATION REQUIREMENTS
Tools and Parts
Tools Needed
Gather the required tools and parts before starting installation. For Roof Venting Installation Only:
■ If you are for weight of microwave oven)
Aluminum grease filters
Charcoal filters (Depending on model, aluminum grease filter and charcoal filter may...
Installation Instructions - Page 3

Grounded 3 prong outlet
*30" (76.2 cm) is typical for the electric current.
GROUNDING INSTRUCTIONS
■ For all governing codes and ordinances. The microwave oven is properly installed and grounded.
A
B
Electrical Requirements
WARNING
30" (76.2 cm)
min.
30" (76.2 cm) typical*
12" (30.5 cm) min.
66" (167.6 cm) min.
Exact dimensions may vary ...
Installation Instructions - Page 4

INSTALLATION INSTRUCTIONS
Remove Mounting Plate
NOTE: To avoid possible damage to the venting system. Remove any remaining contents from the back of the microwave oven, then remove mounting plate and set for recirculation installation. Remove the blower motor screw from the microwave oven cavity.
2. Blower motor screw
3. Mounting plate B. For wall or roof venting, changes must be...
Installation Instructions - Page 6

... a level, horizontal line through the drywall. Cabinet opening , do not install the microwave oven. Holes for toggle bolts C. Figure 1 -
A
A. This represents...installation can be installed on a minimum of 1 wall stud, preferably 2, using a minimum of the upper cabinet (or flush line, if upper cabinet has a hanging front edge - Hanging front edge of the mounting plate.
4. Support...
Installation Instructions - Page 7

... mark a hole at the hole(s)
marked in steps 9 and11.
13.
Wall Venting Installation Only
Centerline
Upper cabinet bottom
4" (10.2 cm)
³⁄₈" (1 cm...Check alignment of "Mark Rear Wall." With the support tabs facing forward (see illustrations in "Locate Wall...the wall at both sides of "Locate Wall Stud(s)." Set the mounting plate aside. Mark the centerline 3/8" (1 cm...
Installation Instructions - Page 8

...Install the Microwave Oven
WARNING
Excessive Weight Hazard Use two or more people, lift microwave...Venting Installation Only
7. With front of microwave oven...the heavy side.
Rotate microwave oven up toward upper cabinet. ... microwave oven, do so can result in the wall cutout.
8
Handle the microwave ...support tabs at one corner of the microwave oven. The "rear wall" arrows must be installed...
Installation Instructions - Page 9

... steps 3-6. 10. A
For Roof Venting Installation Only
11.
Install filters. Do not use an adapter. If the problem continues, call an electrician. ■ Check...microwave oven off of mounting plate, and set aside on the turntable, and programming a cook time of the microwave oven. To avoid warping, wood filler blocks (installer to the User Instructions for future use.
9 Replace...
Installation Instructions - Page 11

...Instructions. You will need your model number located on the model and serial number plate, which is round, a rectangular to round transition piece must be installed to keep the damper from your dealer to round transition piece must not exceed the equivalent of 140 ft (42.7 m) for either type of available replacement parts...
See your authorized dealer or service center. In addition, a...
Whirlpool MMV4203DQ Reviews
We have not received any reviews for Whirlpool yet.