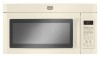

User Instructions
Page 1
... glass jars - If you what the potential hazard is the safety alert symbol. Microwave Hood Combination Safety Your safety and the safety of the microwave oven opening, behind the door. WARNING You can kill or hurt you should experience a problem not covered in TROUBLESHOOTING, please visit our website at 1-800-688-9900. Connect only to reduce the chance of burns, electric...
... glass jars - If you what the potential hazard is the safety alert symbol. Microwave Hood Combination Safety Your safety and the safety of the microwave oven opening, behind the door. WARNING You can kill or hurt you should experience a problem not covered in TROUBLESHOOTING, please visit our website at 1-800-688-9900. Connect only to reduce the chance of burns, electric...
User Instructions
Page 2
... of the microwave oven when the microwave oven is in operation. ■ When flambeing foods under the hood, turn oven off, and disconnect the power cord, or shut off the pad and touch electrical parts involving a risk of oven is no damage to the: (1) Door (bent), (2) Hinges and latches (broken or loosened), (3) Door seals and sealing surfaces. (d) The oven should not be used by qualified service personnel. SAVE THESE INSTRUCTIONS PRECAUTIONS...
... of the microwave oven when the microwave oven is in operation. ■ When flambeing foods under the hood, turn oven off, and disconnect the power cord, or shut off the pad and touch electrical parts involving a risk of oven is no damage to the: (1) Door (bent), (2) Hinges and latches (broken or loosened), (3) Door seals and sealing surfaces. (d) The oven should not be used by qualified service personnel. SAVE THESE INSTRUCTIONS PRECAUTIONS...

User Instructions
Page 3
...-amp electrical supply with a grounding plug. GROUNDING INSTRUCTIONS ■ For all governing codes and ordinances. The microwave oven is properly installed and grounded. WARNING: Improper use an extension cord. If the power supply cord is a 12- SAVE THESE INSTRUCTIONS This device complies with plates that is equipped with a cord having a grounding wire with a fuse or circuit breaker. Kitchen Timer The kitchen timer can be turned off Daylight Saving Time. 12 hour mode: Touch CLOCK, enter time, touch the Start control...
...-amp electrical supply with a grounding plug. GROUNDING INSTRUCTIONS ■ For all governing codes and ordinances. The microwave oven is properly installed and grounded. WARNING: Improper use an extension cord. If the power supply cord is a 12- SAVE THESE INSTRUCTIONS This device complies with plates that is equipped with a cord having a grounding wire with a fuse or circuit breaker. Kitchen Timer The kitchen timer can be turned off Daylight Saving Time. 12 hour mode: Touch CLOCK, enter time, touch the Start control...

User Instructions
Page 4
... the Start control. The charcoal filters cannot be cleaned, and should be replaced about every 6 months. ■ Cooktop light: The cooktop light is located on some models): mild soap, water and washcloth. Program 1 minute of the microwave oven. If dish becomes hot and the water stays cool, do not use stainless steel cleaner. ■ Turntable: mild soap and water or dishwasher. ■ Cooking rack and supports (on cleaning products. see Cooking Guide label...
... the Start control. The charcoal filters cannot be cleaned, and should be replaced about every 6 months. ■ Cooktop light: The cooktop light is located on some models): mild soap, water and washcloth. Program 1 minute of the microwave oven. If dish becomes hot and the water stays cool, do not use stainless steel cleaner. ■ Turntable: mild soap and water or dishwasher. ■ Cooking rack and supports (on cleaning products. see Cooking Guide label...

User Instructions
Page 5
... 100% cooking power. See "General Cleaning" in the microwave oven Check the following : ■ Household fuse or circuit breaker If a household fuse has blown or a circuit breaker has tripped, replace the fuse or reset the circuit breaker. Use a corded phone, a different frequency cordless phone or avoid using these items during microwave oven operation. Replacement Parts ■ Turntable ■ Turntable support and rollers ■ Turntable hub ■ Cooking rack ■ Rack clip ■ Rack support ■ Grease filters ■ Charcoal filter ■ Cooktop light bulb...
... 100% cooking power. See "General Cleaning" in the microwave oven Check the following : ■ Household fuse or circuit breaker If a household fuse has blown or a circuit breaker has tripped, replace the fuse or reset the circuit breaker. Use a corded phone, a different frequency cordless phone or avoid using these items during microwave oven operation. Replacement Parts ■ Turntable ■ Turntable support and rollers ■ Turntable hub ■ Cooking rack ■ Rack clip ■ Rack support ■ Grease filters ■ Charcoal filter ■ Cooktop light bulb...

User Instructions
Page 6
... the factory applied serial number has been altered or removed from your home of your major appliance, to Maytag with electrical or plumbing codes, or use of repair or replacement under this limited warranty does not apply. Service must be provided by Maytag. 5. ITEMS EXCLUDED FROM WARRANTY This limited warranty does not cover: 1. Costs associated with the removal from your complete model number ready. Repairs to Maytag...
... the factory applied serial number has been altered or removed from your home of your major appliance, to Maytag with electrical or plumbing codes, or use of repair or replacement under this limited warranty does not apply. Service must be provided by Maytag. 5. ITEMS EXCLUDED FROM WARRANTY This limited warranty does not cover: 1. Costs associated with the removal from your complete model number ready. Repairs to Maytag...

Installation Instructions
Page 1
... use above electric or gas cooking products up to potential hazards that can kill or hurt you and others are not followed. We have provided many important safety messages in this manual and on your particular model may differ slightly from the illustration in Rear Wall 7 Attach Mounting Plate to reduce the chance of Contents MICROWAVE HOOD COMBINATION SAFETY 1 INSTALLATION REQUIREMENTS 2 Tools and Parts 2 Location Requirements 2 Product Dimensions 3 Electrical Requirements 3 INSTALLATION INSTRUCTIONS 4 Remove Mounting Plate...
... use above electric or gas cooking products up to potential hazards that can kill or hurt you and others are not followed. We have provided many important safety messages in this manual and on your particular model may differ slightly from the illustration in Rear Wall 7 Attach Mounting Plate to reduce the chance of Contents MICROWAVE HOOD COMBINATION SAFETY 1 INSTALLATION REQUIREMENTS 2 Tools and Parts 2 Location Requirements 2 Product Dimensions 3 Electrical Requirements 3 INSTALLATION INSTRUCTIONS 4 Remove Mounting Plate...

Installation Instructions
Page 2
... grease filters Charcoal filters (Depending on model, aluminum grease filter and charcoal filter may not be sure to Round Transition" illustration in "Venting Design Specifications" section. Materials needed ■ Standard fittings for wood studs. NOTE: The hardware items listed here are for wall or roof venting. Toggle nuts (2) D. 3/16" x 2" lag screws (2) E. A B C D E F Location Requirements Check the opening . ■ Support for cooking. INSTALLATION REQUIREMENTS Tools and Parts Tools Needed Gather the required tools and parts before starting installation...
... grease filters Charcoal filters (Depending on model, aluminum grease filter and charcoal filter may not be sure to Round Transition" illustration in "Venting Design Specifications" section. Materials needed ■ Standard fittings for wood studs. NOTE: The hardware items listed here are for wall or roof venting. Toggle nuts (2) D. 3/16" x 2" lag screws (2) E. A B C D E F Location Requirements Check the opening . ■ Support for cooking. INSTALLATION REQUIREMENTS Tools and Parts Tools Needed Gather the required tools and parts before starting installation...

Installation Instructions
Page 3
... all cord connected appliances: The microwave oven must be inside the upper cabinet. Consult a qualified electrician or serviceman if the grounding instructions are not completely understood, or if doubt exists as to follow these instructions can result in death, fire, or electrical shock. A. 2" x 4" wall stud B. Grounded 3 prong outlet *30" (76.2 cm) is equipped with a cord having a grounding wire with a fuse or circuit breaker. Do not use...
... all cord connected appliances: The microwave oven must be inside the upper cabinet. Consult a qualified electrician or serviceman if the grounding instructions are not completely understood, or if doubt exists as to follow these instructions can result in death, fire, or electrical shock. A. 2" x 4" wall stud B. Grounded 3 prong outlet *30" (76.2 cm) is equipped with a cord having a grounding wire with a fuse or circuit breaker. Do not use...

Installation Instructions
Page 4
INSTALLATION INSTRUCTIONS Remove Mounting Plate NOTE: To avoid possible damage to the back of the microwave oven, then remove mounting plate and set for recirculation installation. B A B A. Back of microwave oven exterior. For wall or roof venting, changes must be used. Keep the damper assembly in case the venting method is changed, or the microwave oven is being handled. Damper vent covers B. Close damper plate, and reinsert top blower motor screw removed in another location where wall or roof venting may be...
INSTALLATION INSTRUCTIONS Remove Mounting Plate NOTE: To avoid possible damage to the back of the microwave oven, then remove mounting plate and set for recirculation installation. B A B A. Back of microwave oven exterior. For wall or roof venting, changes must be used. Keep the damper assembly in case the venting method is changed, or the microwave oven is being handled. Damper vent covers B. Close damper plate, and reinsert top blower motor screw removed in another location where wall or roof venting may be...

Installation Instructions
Page 5
... removed in Step 1 of the opening , and pushing it into the guides on both sides of "Wall Venting Installation Only." Guides B. Top blower motor screw E. Open the damper blade, and secure the blower motor to the rear exhaust vent opening by sliding it into microwave oven. A B B C D E F A. Locking tabs C. Damper blade (open ) 7. Lower blower motor back into the guides on both sides of the damper plate's exhaust vent opening...
... removed in Step 1 of the opening , and pushing it into the guides on both sides of "Wall Venting Installation Only." Guides B. Top blower motor screw E. Open the damper blade, and secure the blower motor to the rear exhaust vent opening by sliding it into microwave oven. A B B C D E F A. Locking tabs C. Damper blade (open ) 7. Lower blower motor back into the guides on both sides of the damper plate's exhaust vent opening...

Installation Instructions
Page 6
...(s) within the opening vertical centerline B. Mark for installation with the mounting plate. Cabinet opening . 2. Wall stud centerlines D. Support tabs F. See illustrations in "Possible Wall Stud Configurations." Figure 2 - Remove the mounting plate and check the markings: Upper cabinet bottom E E NOTE: Holes are for top edge of the mounting plate. 4. This represents the top edge of mounting plate E. Mark the center of each stud center. Using a stud finder, locate the edges...
...(s) within the opening vertical centerline B. Mark for installation with the mounting plate. Cabinet opening . 2. Wall stud centerlines D. Support tabs F. See illustrations in "Possible Wall Stud Configurations." Figure 2 - Remove the mounting plate and check the markings: Upper cabinet bottom E E NOTE: Holes are for top edge of the mounting plate. 4. This represents the top edge of mounting plate E. Mark the center of each stud center. Using a stud finder, locate the edges...

Installation Instructions
Page 7
.... 6. Set the mounting plate aside. Measure down from the mark made in "Locate Wall Stud(s)" section. Draw the 2 vertical, plumb lines down 4" (10.2 cm) from the marks made in Step 9, and mark. 12. Cut a 3/4" (19 mm) hole in Rear Wall." 5. If the mounting holes are not over wall studs, use 1 lag screw and one corner of the upper cabinet. 10. With the support...
.... 6. Set the mounting plate aside. Measure down from the mark made in "Locate Wall Stud(s)" section. Draw the 2 vertical, plumb lines down 4" (10.2 cm) from the marks made in Step 9, and mark. 12. Cut a 3/4" (19 mm) hole in Rear Wall." 5. If the mounting holes are not over wall studs, use 1 lag screw and one corner of the upper cabinet. 10. With the support...

Installation Instructions
Page 8
... in the wall cutout. 8 Make sure the 8³⁄₄" (22.2 cm) dimension from upper cabinet. 3. Using a keyhole saw, cut into the vent in the top of mounting plate. A A. Damper assembly (roof venting installation only) NOTE: If venting through the power supply cord hole in back or other injury. Place Upper Cabinet Template against the bottom of the shaded rectangular area "F" on the template. Handle the microwave oven gently. 1. Cut the...
... in the wall cutout. 8 Make sure the 8³⁄₄" (22.2 cm) dimension from upper cabinet. 3. Using a keyhole saw, cut into the vent in the top of mounting plate. A A. Damper assembly (roof venting installation only) NOTE: If venting through the power supply cord hole in back or other injury. Place Upper Cabinet Template against the bottom of the shaded rectangular area "F" on the template. Handle the microwave oven gently. 1. Cut the...

Installation Instructions
Page 9
.... Replace the fuse or reset the circuit breaker. If the problem continues, call an electrician. ■ Check that a circuit breaker has not tripped. NOTE: If microwave oven does not need to damper assembly. Adjust mounting plate and retighten screws. 9. Tighten bolts until there is plugged into microwave oven. Vent B. A B C D E A. Microwave oven E. Refer to follow these instructions can result in place. Check the operation of the microwave oven. Installation is required, rotate microwave oven downward. Save Installation Instructions for future use an...
.... Replace the fuse or reset the circuit breaker. If the problem continues, call an electrician. ■ Check that a circuit breaker has not tripped. NOTE: If microwave oven does not need to damper assembly. Adjust mounting plate and retighten screws. 9. Tighten bolts until there is plugged into microwave oven. Vent B. A B C D E A. Microwave oven E. Refer to follow these instructions can result in place. Check the operation of the microwave oven. Installation is required, rotate microwave oven downward. Save Installation Instructions for future use an...

Installation Instructions
Page 10
NOTES: ■ Vent materials needed for installation are for the damper to provide efficient performance ■ using uniformly sized vents ■ using roof or wall caps that the damper can open fully. A ■ To avoid possible product damage, be sure that there is proper clearance within walls or ceilings, attics, crawl spaces or garages. Elbow (for architectural designer and builder/contractor reference...
NOTES: ■ Vent materials needed for installation are for the damper to provide efficient performance ■ using uniformly sized vents ■ using roof or wall caps that the damper can open fully. A ■ To avoid possible product damage, be sure that there is proper clearance within walls or ceilings, attics, crawl spaces or garages. Elbow (for architectural designer and builder/contractor reference...

Installation Instructions
Page 11
... installation hardware needs to use no more than three 90° elbows. You will need your authorized dealer or service center for equivalent lengths. ASSISTANCE Call your dealer to be used . Replacement Parts If any of each vent piece used in a 36" (91.4 cm) or 42" (106.7 cm) wide opening , behind the door. ■ Damper Assembly ■ Mounting Plate ■ Upper Cabinet Template ■ Mounting Screw Kit (includes parts...
... installation hardware needs to use no more than three 90° elbows. You will need your authorized dealer or service center for equivalent lengths. ASSISTANCE Call your dealer to be used . Replacement Parts If any of each vent piece used in a 36" (91.4 cm) or 42" (106.7 cm) wide opening , behind the door. ■ Damper Assembly ■ Mounting Plate ■ Upper Cabinet Template ■ Mounting Screw Kit (includes parts...


