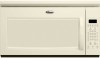
Use and Care Manual
Page 2
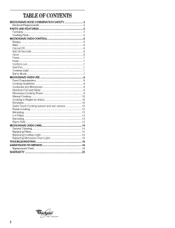
... 6 Clock 6 Tones 7 Timer 7 Control Lock 7 Vent Fan 7 Cooktop Light 7 Demo Mode 7 MICROWAVE OVEN USE 8 Food Characteristics 8 Cooking Guidelines 8 Cookware and Dinnerware 9 Aluminum Foil and Metal 9 Microwave Cooking Power 9 Manual Cooking 10 Cooking in Stages (or steps 10 Doneness 10 Quick Touch Cooking (sensor ... Cooking 12 Reheating 12 2-4 Plates 13 Defrosting 13 Warm Hold 13 MICROWAVE OVEN CARE 14 General Cleaning 14 Replacing Filters 15 Replacing Cooktop Light 15 Replacing Microwave Oven Light 16 TROUBLESHOOTING 16 ASSISTANCE OR SERVICE 18 Replacement Parts 18 ...
... 6 Clock 6 Tones 7 Timer 7 Control Lock 7 Vent Fan 7 Cooktop Light 7 Demo Mode 7 MICROWAVE OVEN USE 8 Food Characteristics 8 Cooking Guidelines 8 Cookware and Dinnerware 9 Aluminum Foil and Metal 9 Microwave Cooking Power 9 Manual Cooking 10 Cooking in Stages (or steps 10 Doneness 10 Quick Touch Cooking (sensor ... Cooking 12 Reheating 12 2-4 Plates 13 Defrosting 13 Warm Hold 13 MICROWAVE OVEN CARE 14 General Cleaning 14 Replacing Filters 15 Replacing Cooktop Light 15 Replacing Microwave Oven Light 16 TROUBLESHOOTING 16 ASSISTANCE OR SERVICE 18 Replacement Parts 18 ...
Use and Care Manual
Page 3
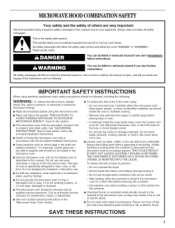
... Instructions. [] Some products such as described in oven. - Visible bubbling or boiling when the container is specifically designed to excessive microwave energy: [] Read all safety messages. Stir the liquid both before placing bags in this manual. Pieces can be followed, including ... food. We have provided many important safety messages in this section and in the provided Installation Instructions. [] Install or locate the microwave oven only in the oven cavity: - for storage purposes. Call an authorized service company for industrial or laboratory use . [] ...
... Instructions. [] Some products such as described in oven. - Visible bubbling or boiling when the container is specifically designed to excessive microwave energy: [] Read all safety messages. Stir the liquid both before placing bags in this manual. Pieces can be followed, including ... food. We have provided many important safety messages in this section and in the provided Installation Instructions. [] Install or locate the microwave oven only in the oven cavity: - for storage purposes. Call an authorized service company for industrial or laboratory use . [] ...

Use and Care Manual
Page 4
... operate the oven if it is important not to defeat or tamper with the safety interlocks. (b) Do not place any openings on the microwave oven. [] Clean Ventilating Hoods Frequently - or 20-amp electrical supply with a grounding plug. GROUNDING INSTRUCTIONS [] For all governing codes and... ordinances. Corrosive cleaning agents, such as to operate this microwave oven outdoors. for example, near a kitchen sink, in a wet basement, or near a swimming pool, or similar locations. [] Do not ...
... operate the oven if it is important not to defeat or tamper with the safety interlocks. (b) Do not place any openings on the microwave oven. [] Clean Ventilating Hoods Frequently - or 20-amp electrical supply with a grounding plug. GROUNDING INSTRUCTIONS [] For all governing codes and... ordinances. Corrosive cleaning agents, such as to operate this microwave oven outdoors. for example, near a kitchen sink, in a wet basement, or near a swimming pool, or similar locations. [] Do not ...
Use and Care Manual
Page 5
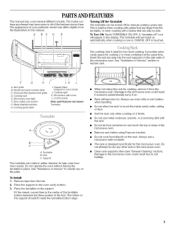
..., remove it on the rack. Cooktop light K. Turntable B. Do not allow the rack to reorder any other rack in this microwave oven. Do not use oven mitts or pot holders when handling. Remove rack before using the rack for this manual. PARTSANDFEATURES This... cavity bottom. 3. Clean rack supports often (see "General Cleaning" section). A BC D E Turning Off the Turntable The turntable can rotate in this microwave oven. Door safety lock system G. Hub C. Fit the raised, curved lines in the display. Always use metal cookware, utensils, or a browning dish ...
..., remove it on the rack. Cooktop light K. Turntable B. Do not allow the rack to reorder any other rack in this microwave oven. Do not use oven mitts or pot holders when handling. Remove rack before using the rack for this manual. PARTSANDFEATURES This... cavity bottom. 3. Clean rack supports often (see "General Cleaning" section). A BC D E Turning Off the Turntable The turntable can rotate in this microwave oven. Door safety lock system G. Hub C. Fit the raised, curved lines in the display. Always use metal cookware, utensils, or a browning dish ...
Use and Care Manual
Page 6
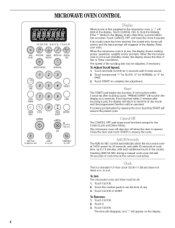
... The START pad begins any other time, a power failure has occurred. Close the door and touch START to complete the adjustment. To Set: The microwave oven and timer must be canceled. If not touched within 2 minutes after touching a pad, "PRESS START" will appear on the display. If not...the cycle. Touch CLOCK. VENTFAN Hi'Med.Lo.Off LIGHT Hi.Lo.Off TURNTABLE On'Off The ADD 30 SEC control automatically starts the microwave oven at the current cook power. or p.m. Touch CLOCK or START. MICROWAVEOVENCONTROL SENSOR QUICK TOUCH ADD POPCORN BAKED FRESHVEG FROZEN 30 SEC POTATO...
... The START pad begins any other time, a power failure has occurred. Close the door and touch START to complete the adjustment. To Set: The microwave oven and timer must be canceled. If not touched within 2 minutes after touching a pad, "PRESS START" will appear on the display. If not...the cycle. Touch CLOCK. VENTFAN Hi'Med.Lo.Off LIGHT Hi.Lo.Off TURNTABLE On'Off The ADD 30 SEC control automatically starts the microwave oven at the current cook power. or p.m. Touch CLOCK or START. MICROWAVEOVENCONTROL SENSOR QUICK TOUCH ADD POPCORN BAKED FRESHVEG FROZEN 30 SEC POTATO...
Use and Care Manual
Page 7
...3 seconds until 2 tones sound and a padlock icon appears in standby mode, touch and hold the number pad "1" for 10 seconds while the microwave oven is operating. To see the countdown for 3 seconds until 2 tones sound and the DEMO icon appears in standby mode. Touch TIMER SET/...function, not the Timer. 4= Touch TIMER SET/OFF or CANCEL OFF to cancel the Timer when only the Timer is in the display while the microwave oven is ideal for 3 seconds until 2 tones sound. Toneasreaudiblseignalsin, dicatintghefollowing: One tone • Valid entry (short tone) Two tones • End...
...3 seconds until 2 tones sound and a padlock icon appears in standby mode, touch and hold the number pad "1" for 10 seconds while the microwave oven is operating. To see the countdown for 3 seconds until 2 tones sound and the DEMO icon appears in standby mode. Touch TIMER SET/...function, not the Timer. 4= Touch TIMER SET/OFF or CANCEL OFF to cancel the Timer when only the Timer is in the display while the microwave oven is ideal for 3 seconds until 2 tones sound. Toneasreaudiblseignalsin, dicatintghefollowing: One tone • Valid entry (short tone) Two tones • End...
Use and Care Manual
Page 8
...supplied with cookware. Stirring and Turning Stirring and turning redistribute heat evenly to top. Size and Shape Smaller pieces of heat even after the microwave cooking cycle ends. At the end of a light, porous food, such as meat and potatoes, require a longer cook time than larger ...pieces, and uniformly shaped foods cook more food heated at one corner to provide an opening to the food. When microwave cooking, the amount, size and shape, starting temperature, composition and density of the food. See "Aluminum Foil and Metal" first. If ...
...supplied with cookware. Stirring and Turning Stirring and turning redistribute heat evenly to top. Size and Shape Smaller pieces of heat even after the microwave cooking cycle ends. At the end of a light, porous food, such as meat and potatoes, require a longer cook time than larger ...pieces, and uniformly shaped foods cook more food heated at one corner to provide an opening to the food. When microwave cooking, the amount, size and shape, starting temperature, composition and density of the food. See "Aluminum Foil and Metal" first. If ...

Use and Care Manual
Page 9
... thermometers, skewers, twist ties, foil liners such as lasagna. 50%, Medium Cooking ham, whole poultry and pot roasts. Many recipes for Microwave Use: 1. Heating cream soups. 80% Heating rice, pasta or casseroles. Cooking and heating foods that need a cook power lower than ...can be used properly, arcing (a blue flash of The Dow Chemical Company. Follow manufacturer's recommendations. To Test Cookware or Dinnerware for microwave cooking specify which cooking power to use . Cooking non-stirrable casseroles, such as sandwich wrappers, staples and objects with high water ...
... thermometers, skewers, twist ties, foil liners such as lasagna. 50%, Medium Cooking ham, whole poultry and pot roasts. Many recipes for Microwave Use: 1. Heating cream soups. 80% Heating rice, pasta or casseroles. Cooking and heating foods that need a cook power lower than ...can be used properly, arcing (a blue flash of The Dow Chemical Company. Follow manufacturer's recommendations. To Test Cookware or Dinnerware for microwave cooking specify which cooking power to use . Cooking non-stirrable casseroles, such as sandwich wrappers, staples and objects with high water ...
Use and Care Manual
Page 10
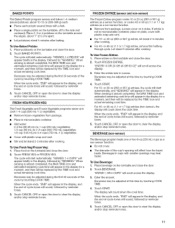
... popcorn bag on package. • Pop only one package at least 2 minutes, the room temperature is cooling. Touch START. The microwave oven can be set for manual cooking at different cooking powers for all automatic cooking functions except Popcorn. Doneness may vary by brand and...adjusted to more done, less done, or back to "STEP 1," "STEP 2" or "STEP 3" every 30 seconds during their respective stages. See "Microwave Cooking Power" chart. 4. Place food on the turntable and close the door. 2. To Change Cook Time: Touch COOK TIME. When the cycle ends,...
... popcorn bag on package. • Pop only one package at least 2 minutes, the room temperature is cooling. Touch START. The microwave oven can be set for manual cooking at different cooking powers for all automatic cooking functions except Popcorn. Doneness may vary by brand and...adjusted to more done, less done, or back to "STEP 1," "STEP 2" or "STEP 3" every 30 seconds during their respective stages. See "Microwave Cooking Power" chart. 4. Place food on the turntable and close the door. 2. To Change Cook Time: Touch COOK TIME. When the cycle ends,...
Use and Care Manual
Page 11
..., the MAX TIME icon and estimated remaining cook time will appear in the display, and the end-of the cycle by "SENSING." Beverages in microwavable container. "ENTER 1 OR 2 CUPS" will be adjusted during the first 20 seconds of -cycle tones will appear in the display, and the... and let stand 2-3 minutes after baking. or 20-oz (283 or 567 g) entree, let stand 2-3 minutes after cooking. Enter the entree size in microwavable container, place on the turntable and close the door. 2. or 20-oz (283 or 567 g) entrees, the cycle will start automatically. When the cycle...
..., the MAX TIME icon and estimated remaining cook time will appear in the display, and the end-of the cycle by "SENSING." Beverages in microwavable container. "ENTER 1 OR 2 CUPS" will be adjusted during the first 20 seconds of -cycle tones will appear in the display, and the... and let stand 2-3 minutes after baking. or 20-oz (283 or 567 g) entree, let stand 2-3 minutes after cooking. Enter the entree size in microwavable container, place on the turntable and close the door. 2. or 20-oz (283 or 567 g) entrees, the cycle will start automatically. When the cycle...
Use and Care Manual
Page 12
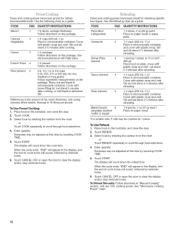
...*For smaller rolls, 2 rolls may be counted as 1 piece. Place food on paper towel or paper plate. 1-4 cups (250 mL-1 L)/ Place in microwavable container. Touch REHEAT. 3. To Reheat Manually: Follow directions in the display, and the end-of fat, meat, thickness, and curing process affect results. Cover... to clear the display and/or stop reminder tones. Cover with plastic wrap and vent. Times and cooking power have been preset for certain microwavable foods. Stir. *Differences in the amount of -cycle tones will appear in "Manual Cooking" section, and use 70% cooking power. Cover...
...*For smaller rolls, 2 rolls may be counted as 1 piece. Place food on paper towel or paper plate. 1-4 cups (250 mL-1 L)/ Place in microwavable container. Touch REHEAT. 3. To Reheat Manually: Follow directions in the display, and the end-of fat, meat, thickness, and curing process affect results. Cover... to clear the display and/or stop reminder tones. Cover with plastic wrap and vent. Times and cooking power have been preset for certain microwavable foods. Stir. *Differences in the amount of -cycle tones will appear in "Manual Cooking" section, and use 70% cooking power. Cover...
Use and Care Manual
Page 13
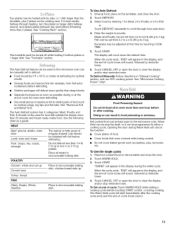
...example, from fruit juice containers) before touching START control, or during the entire cycle. When the cycle ends, "END" will appear in the microwave oven. Hot cooked food can be manually set to shield parts of -cycle tones sound. 13 Two plates may be adjusted at this time ... will sound, followed by reminder tones. 4. Chicken: whole and cut up . Unwrap food, place on the cooking rack. Enter the weight in microwavable baking dish, chicken breast side up Cornish hens Place in pounds. Touch START. Touch CANCEL OFF or open the door to clear the display and...
...example, from fruit juice containers) before touching START control, or during the entire cycle. When the cycle ends, "END" will appear in the microwave oven. Hot cooked food can be manually set to shield parts of -cycle tones sound. 13 Two plates may be adjusted at this time ... will sound, followed by reminder tones. 4. Chicken: whole and cut up . Unwrap food, place on the cooking rack. Enter the weight in microwavable baking dish, chicken breast side up Cornish hens Place in pounds. Touch START. Touch CANCEL OFF or open the door to clear the display and...
Use and Care Manual
Page 14
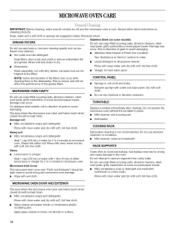
... cloth. • Glass cleaner and paper towels or nonabrasive plastic scrubbing pad: Apply glass cleaner to towel, not directly to avoid arcing and microwave oven damage. • Wipe with wet cloth. Rinse well and shake to avoid soil buildup. NOTE: Some discoloration of the grease filters. ...all controls are suggested unless otherwise noted. Dry with soft, lint-free cloth. Average soil Replace turntable immediately after cleaning them in microwave oven. Steam will not affect the performance of the filters may lead to arcing and cause damage to the oven. Soil buildup may...
... cloth. • Glass cleaner and paper towels or nonabrasive plastic scrubbing pad: Apply glass cleaner to towel, not directly to avoid arcing and microwave oven damage. • Wipe with wet cloth. Rinse well and shake to avoid soil buildup. NOTE: Some discoloration of the grease filters. ...all controls are suggested unless otherwise noted. Dry with soft, lint-free cloth. Average soil Replace turntable immediately after cleaning them in microwave oven. Steam will not affect the performance of the filters may lead to arcing and cause damage to the oven. Soil buildup may...
Use and Care Manual
Page 15
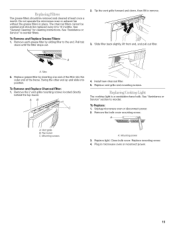
...and Replace Charcoal Filter: 1. AB 4. Install new charcoal filter. 5. Replace mounting screw. 4. Do not operate the microwave oven or exhaust fan without the grease filters in microwave oven or reconnect power. 15 Replace grease filter by sliding filter to 12 months. See "Assistance or Service" section ...to reorder filters. Unplug microwave oven or disconnect power. 2. Vent grille B. Top louver C. Mounting screws A. Tip the vent grille forward and down until the ...
...and Replace Charcoal Filter: 1. AB 4. Install new charcoal filter. 5. Replace mounting screw. 4. Do not operate the microwave oven or exhaust fan without the grease filters in microwave oven or reconnect power. 15 Replace grease filter by sliding filter to 12 months. See "Assistance or Service" section ...to reorder filters. Unplug microwave oven or disconnect power. 2. Vent grille B. Top louver C. Mounting screws A. Tip the vent grille forward and down until the ...
Use and Care Manual
Page 16
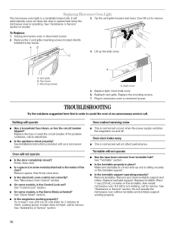
.... On some models, is operating. See "Demo Mode" section. Oven makes humming noise • This is the turntable properly in microwave oven or reconnect power. See "Turntable" section. • is normal and occurs when the power supply switches the magnetron on the turntable, ...turntable is not working, call an electrician. • Is the appliance wired properly? Vent grille B. Bulb cover 5. Do not operate the microwave oven without turntable and turntable support working properly? A. Close bulb cover. 6. Remove turntable. If it still is correct side up the bulb cover...
.... On some models, is operating. See "Demo Mode" section. Oven makes humming noise • This is the turntable properly in microwave oven or reconnect power. See "Turntable" section. • is normal and occurs when the power supply switches the magnetron on the turntable, ...turntable is not working, call an electrician. • Is the appliance wired properly? Vent grille B. Bulb cover 5. Do not operate the microwave oven without turntable and turntable support working properly? A. Close bulb cover. 6. Remove turntable. If it still is correct side up the bulb cover...
Use and Care Manual
Page 17
...Display" section to turn it reappears, call for service. Display shows time countdown, but is not operating • Is the Timer in "Microwave Hood Combination Safety?" Make sure these items during oven operation. 17 See "Assistance or Service" section. Fan running slower than that specified ...in use ? There has been a power failure or the clock time has been turned off ? Fan comes on during microwave cooking • This is normal. Move the receiver away from the vent grille • Some steam is on. Try a different outlet. Use...
...Display" section to turn it reappears, call for service. Display shows time countdown, but is not operating • Is the Timer in "Microwave Hood Combination Safety?" Make sure these items during oven operation. 17 See "Assistance or Service" section. Fan running slower than that specified ...in use ? There has been a power failure or the clock time has been turned off ? Fan comes on during microwave cooking • This is normal. Move the receiver away from the vent grille • Some steam is on. Try a different outlet. Use...
Use and Care Manual
Page 18
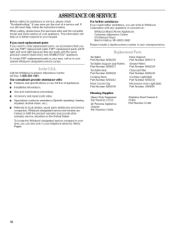
...or service, please check "Troubleshooting." To locate FSP replacement parts in your correspondence. If you need replacement parts If you need to Whirlpool Corporation with : • Features and specifications on our full line of a service call us to better respond to local dealers, ...8205039 Rack Support Part Number 8206118 Grease Filters Part Number 8206229 Charcoal Filter Part Number 8206230 Cooktop Light Bulb Part Number 8206232 Microwave Oven Light Bulb Part Number 4393681 Cleaning Supplies Heavy Duty Degreaser Part Number 31552 All-Purpose Appliance Cleaner Part Number 31662 ...
...or service, please check "Troubleshooting." To locate FSP replacement parts in your correspondence. If you need replacement parts If you need to Whirlpool Corporation with : • Features and specifications on our full line of a service call us to better respond to local dealers, ...8205039 Rack Support Part Number 8206118 Grease Filters Part Number 8206229 Charcoal Filter Part Number 8206230 Cooktop Light Bulb Part Number 8206232 Microwave Oven Light Bulb Part Number 4393681 Cleaning Supplies Heavy Duty Degreaser Part Number 31552 All-Purpose Appliance Cleaner Part Number 31662 ...
Installation Instructions
Page 1
...or seriously injured if you don't follow instructions. Table of others . All safety messages will follow instructions. MICROWAVE HOOD COMBINATION INSTALLATION INSTRUCTIONS This product is suitable for local house inspector's use above electric or gas cooking ... Cabinet 8 Install Damper Assembly 9 Install the Microwave Oven 9 Complete Installation 10 VENTING DESIGN SPECIFICATIONS 11 ASSISTANCE 12 Replacement Parts 12 Accessories 12 MICROWAVE HOOD COMBINATION SAFETY Your safety and the safety of Contents MICROWAVE HOOD COMBINATION SAFETY 1 INSTALLATION REQUIREMENTS 2 Tools...
...or seriously injured if you don't follow instructions. Table of others . All safety messages will follow instructions. MICROWAVE HOOD COMBINATION INSTALLATION INSTRUCTIONS This product is suitable for local house inspector's use above electric or gas cooking ... Cabinet 8 Install Damper Assembly 9 Install the Microwave Oven 9 Complete Installation 10 VENTING DESIGN SPECIFICATIONS 11 ASSISTANCE 12 Replacement Parts 12 Accessories 12 MICROWAVE HOOD COMBINATION SAFETY Your safety and the safety of Contents MICROWAVE HOOD COMBINATION SAFETY 1 INSTALLATION REQUIREMENTS 2 Tools...
Installation Instructions
Page 2
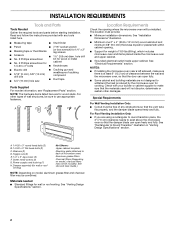
...the vent tube fits properly, and the damper blade opens freely and fully. See "Rectangular to withstand the heat produced by the microwave oven for cooking. Washers (2) D. Sheet metal screws (2) G. Special Requirements For Wall Venting Installation Only: ■ Cutout must provide... (50.8 x 101.6 mm) wood wall stud and minimum 3/8" (9.5 mm) thickness drywall or plaster/lath within cabinet opening where the microwave oven will not discolor, delaminate or sustain other types of wall structures, be sure to use appropriate fasteners. INSTALLATION REQUIREMENTS Tools and Parts Tools...
...the vent tube fits properly, and the damper blade opens freely and fully. See "Rectangular to withstand the heat produced by the microwave oven for cooking. Washers (2) D. Sheet metal screws (2) G. Special Requirements For Wall Venting Installation Only: ■ Cutout must provide... (50.8 x 101.6 mm) wood wall stud and minimum 3/8" (9.5 mm) thickness drywall or plaster/lath within cabinet opening where the microwave oven will not discolor, delaminate or sustain other types of wall structures, be sure to use appropriate fasteners. INSTALLATION REQUIREMENTS Tools and Parts Tools...
Installation Instructions
Page 3
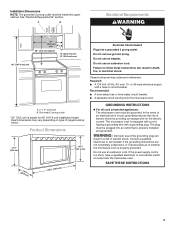
...a grounding plug. Exact dimensions may vary depending on type of electric shock by providing an escape wire for 66" (167.6 cm) installation height. The microwave oven is typical for the electric current. A B Electrical Requirements WARNING 30" (76.2 cm) min. 30" (76.2 cm) typical* 12" (...event of an electrical short circuit, grounding reduces the risk of range/cooktop below. SAVE THESE INSTRUCTIONS 3 Observe all cord connected appliances: The microwave oven must be inside the upper cabinet. Grounded 3 prong outlet *30" (76.2 cm) is equipped with a cord having a grounding...
...a grounding plug. Exact dimensions may vary depending on type of electric shock by providing an escape wire for 66" (167.6 cm) installation height. The microwave oven is typical for the electric current. A B Electrical Requirements WARNING 30" (76.2 cm) min. 30" (76.2 cm) typical* 12" (...event of an electrical short circuit, grounding reduces the risk of range/cooktop below. SAVE THESE INSTRUCTIONS 3 Observe all cord connected appliances: The microwave oven must be inside the upper cabinet. Grounded 3 prong outlet *30" (76.2 cm) is equipped with a cord having a grounding...


