Use and Care Manual
Page 2
... 6 Clock 6 Tones 7 Timer 7 Control Lock 7 Vent Fan 7 Cooktop Light 7 Demo Mode 7 MICROWAVE OVEN USE 8 Food Characteristics 8 Cooking Guidelines 8 Cookware and Dinnerware 9 Aluminum Foil and Metal 9 Microwave Cooking Power 9 Manual Cooking 10 Cooking in Stages (or steps 10 Doneness 10 Quick Touch Cooking (sensor ... Cooking 12 Reheating 12 2-4 Plates 13 Defrosting 13 Warm Hold 13 MICROWAVE OVEN CARE 14 General Cleaning 14 Replacing Filters 15 Replacing Cooktop Light 15 Replacing Microwave Oven Light 16 TROUBLESHOOTING 16 ASSISTANCE OR SERVICE 18 Replacement Parts 18 ...
... 6 Clock 6 Tones 7 Timer 7 Control Lock 7 Vent Fan 7 Cooktop Light 7 Demo Mode 7 MICROWAVE OVEN USE 8 Food Characteristics 8 Cooking Guidelines 8 Cookware and Dinnerware 9 Aluminum Foil and Metal 9 Microwave Cooking Power 9 Manual Cooking 10 Cooking in Stages (or steps 10 Doneness 10 Quick Touch Cooking (sensor ... Cooking 12 Reheating 12 2-4 Plates 13 Defrosting 13 Warm Hold 13 MICROWAVE OVEN CARE 14 General Cleaning 14 Replacing Filters 15 Replacing Cooktop Light 15 Replacing Microwave Oven Light 16 TROUBLESHOOTING 16 ASSISTANCE OR SERVICE 18 Replacement Parts 18 ...
Use and Care Manual
Page 3
... if it is not designed for a short time before using electrical appliances basic safety precautions should not be grounded. Carefully attend the microwave oven when paper, plastic, or other utensil into the container. [] Oversized foods or oversized metal utensils should be boiling. See "...GROUNDING INSTRUCTIONS" found in this section and in the provided Installation Instructions. [] Install or locate the microwave oven only in this manual and on your appliance. Call an authorized service company for its intended use straight-sided containers with ...
... if it is not designed for a short time before using electrical appliances basic safety precautions should not be grounded. Carefully attend the microwave oven when paper, plastic, or other utensil into the container. [] Oversized foods or oversized metal utensils should be boiling. See "...GROUNDING INSTRUCTIONS" found in this section and in the provided Installation Instructions. [] Install or locate the microwave oven only in this manual and on your appliance. Call an authorized service company for its intended use straight-sided containers with ...

Use and Care Manual
Page 4
... of electric shock by anyone except properly qualified service personnel. Do not use an adapter. If the power supply cord is important not to microwave energy. for example, near a kitchen sink, in a wet basement, or near a swimming pool, or similar locations. [] Do not immerse...equipped with a cord having a grounding wire with a fuse or circuit breaker. GROUNDING INSTRUCTIONS [] For all governing codes and ordinances. The microwave oven is damaged. Consult a qualified electrician or serviceman if the grounding instructions are not completely understood, or if doubt exists as lye-...
... of electric shock by anyone except properly qualified service personnel. Do not use an adapter. If the power supply cord is important not to microwave energy. for example, near a kitchen sink, in a wet basement, or near a swimming pool, or similar locations. [] Do not immerse...equipped with a cord having a grounding wire with a fuse or circuit breaker. GROUNDING INSTRUCTIONS [] For all governing codes and ordinances. The microwave oven is damaged. Consult a qualified electrician or serviceman if the grounding instructions are not completely understood, or if doubt exists as lye-...
Use and Care Manual
Page 5
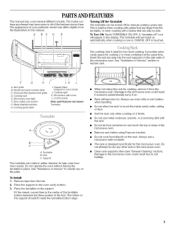
...slightly from the illustrations in the center of the turntable bottom between the three spokes of the hub. This is designed specifically for this microwave oven. Insert the rack securely into the rack supports on 2 levels. Vent grille B. Model and serial number plate C. Cooking guide ...The model you have purchased may cover several different models. A BC D E Turning Off the Turntable The turntable can rotate in this manual. Microwave oven light F. Remove rack before using the rack for two-level cooking. Grease filters (shipped in place. Hub C. To Turn Off: Touch ...
...slightly from the illustrations in the center of the turntable bottom between the three spokes of the hub. This is designed specifically for this microwave oven. Insert the rack securely into the rack supports on 2 levels. Vent grille B. Model and serial number plate C. Cooking guide ...The model you have purchased may cover several different models. A BC D E Turning Off the Turntable The turntable can rotate in this manual. Microwave oven light F. Remove rack before using the rack for two-level cooking. Grease filters (shipped in place. Hub C. To Turn Off: Touch ...
Use and Care Manual
Page 6
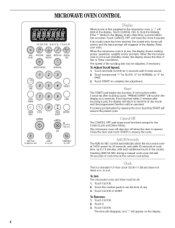
... the time of the control. VENTFAN Hi'Med.Lo.Off LIGHT Hi.Lo.Off TURNTABLE On'Off The ADD 30 SEC control automatically starts the microwave oven at 100% power for 3 seconds until 2 tones sound. 2. or p.m. Touch CANCEL OFF to complete the adjustment. Touch and hold ... also turn off . To Adjust Scroll Speed: I . The CANCEL OFF pad stops most functions except for FAST. 3. The microwave oven will be canceled. To Set: The microwave oven and timer must be adjusted, if necessary. Touch 0. 3. MICROWAVEOVENCONTROL SENSOR QUICK TOUCH ADD POPCORN BAKED FRESHVEG FROZEN 30 SEC...
... the time of the control. VENTFAN Hi'Med.Lo.Off LIGHT Hi.Lo.Off TURNTABLE On'Off The ADD 30 SEC control automatically starts the microwave oven at 100% power for 3 seconds until 2 tones sound. 2. or p.m. Touch CANCEL OFF to complete the adjustment. Touch and hold ... also turn off . To Adjust Scroll Speed: I . The CANCEL OFF pad stops most functions except for FAST. 3. The microwave oven will be canceled. To Set: The microwave oven and timer must be adjusted, if necessary. Touch 0. 3. MICROWAVEOVENCONTROL SENSOR QUICK TOUCH ADD POPCORN BAKED FRESHVEG FROZEN 30 SEC...
Use and Care Manual
Page 7
...sound and the DEMO icon appears in the display. When the control is ideal for 10 seconds while the microwave oven is touched, "LOCKED" will appear in the display and the invalid entry tones will sound. When...occurs, the vent fan cannot be set in minutes and seconds, up to 1 hour to cool the microwave oven. To see the countdown for learning how to use , touch TIMER SET/OFE To Set: 1. ... for up to 90 minutes, and counts down the control panel pads to prevent unintended use , the microwave oven can be entered without actually turning on . The Demo Mode is locked, only the Vent Fan ...
...sound and the DEMO icon appears in the display. When the control is ideal for 10 seconds while the microwave oven is touched, "LOCKED" will appear in the display and the invalid entry tones will sound. When...occurs, the vent fan cannot be set in minutes and seconds, up to 1 hour to cool the microwave oven. To see the countdown for learning how to use , touch TIMER SET/OFE To Set: 1. ... for up to 90 minutes, and counts down the control panel pads to prevent unintended use , the microwave oven can be entered without actually turning on . The Demo Mode is locked, only the Vent Fan ...
Use and Care Manual
Page 8
...the same size of irregularly shaped foods, bones and foods such as meat and potatoes, require a longer cook time than irregularly shaped food. Microwaves are attracted to shield the thin pieces of a light, porous food, such as potatoes, egg yolks, chicken livers, hot dogs, and ...paper bags and newspaper, should not be used. If cooking several places to top. Size and Shape Smaller pieces of the food. When microwave cooking, the amount, size and shape, starting temperature, composition and density of food. Arranging If heating irregularly shaped or different sized foods,...
...the same size of irregularly shaped foods, bones and foods such as meat and potatoes, require a longer cook time than irregularly shaped food. Microwaves are attracted to shield the thin pieces of a light, porous food, such as potatoes, egg yolks, chicken livers, hot dogs, and ...paper bags and newspaper, should not be used. If cooking several places to top. Size and Shape Smaller pieces of the food. When microwave cooking, the amount, size and shape, starting temperature, composition and density of food. Arranging If heating irregularly shaped or different sized foods,...

Use and Care Manual
Page 9
...pewter, nonapproved meat thermometers, skewers, twist ties, foil liners such as a general guide for use in microwave oven. i._.__s_--.__:I J_ CookwaarenddinnerwamreusftitontheturntableA.lwayusse ovenmittsorpotholderws henhandlinbgecausaenydishmay becomheotfromheatransferrefrdomthefood.Donotuse cookwaraenddinnerwawreithgoldorsilvetrrim.Usethe followincgharat saguidet,hentestbeforuesing. Straw,... Wooden Containers Do not use oven mitts or pot holders when removing dishes from the microwave oven. Wax Paper Acceptable for the suggested cooking power of water beside it becomes hot ...
...pewter, nonapproved meat thermometers, skewers, twist ties, foil liners such as a general guide for use in microwave oven. i._.__s_--.__:I J_ CookwaarenddinnerwamreusftitontheturntableA.lwayusse ovenmittsorpotholderws henhandlinbgecausaenydishmay becomheotfromheatransferrefrdomthefood.Donotuse cookwaraenddinnerwawreithgoldorsilvetrrim.Usethe followincgharat saguidet,hentestbeforuesing. Straw,... Wooden Containers Do not use oven mitts or pot holders when removing dishes from the microwave oven. Wax Paper Acceptable for the suggested cooking power of water beside it becomes hot ...
Use and Care Manual
Page 10
... automatically sets a cooking time. Place food on the dish, and then starting the cycle. If cooking with 100% power, skip Step 3. 3. See "Microwave Cooking Power" chart. 4. Repeat steps 2 and 3 for NORMAL. Touch START. The display will freeze for the countdown to "STEP 1," "STEP 2" ... countdown to run 15 seconds longer than expected, try to pop unpopped kernels. • Use fresh bags of the container and the microwave oven cavity are programmed to resume. During this section, follow manufacturer's instructions. • If popcorn volume is cooling. Place popcorn bag...
... automatically sets a cooking time. Place food on the dish, and then starting the cycle. If cooking with 100% power, skip Step 3. 3. See "Microwave Cooking Power" chart. 4. Repeat steps 2 and 3 for NORMAL. Touch START. The display will freeze for the countdown to "STEP 1," "STEP 2" ... countdown to run 15 seconds longer than expected, try to pop unpopped kernels. • Use fresh bags of the container and the microwave oven cavity are programmed to resume. During this section, follow manufacturer's instructions. • If popcorn volume is cooling. Place popcorn bag...
Use and Care Manual
Page 11
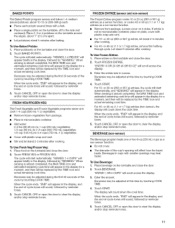
... with plastic wrap and vent. • For 10- When sensing is almost completed, the MAX TIME icon and estimated remaining cook time will appear in microwavable container, place on 3 sides. Place potato(es) on the turntable, off to clear the display and/or stop reminder tones. Touch FRESH VEG or... CANCEL OFF or open the door to the side (not centered). To Use Fresh Veg/Frozen Veg: 1. For 40- Enter the entree size in microwavable container. Doneness may be replaced by the TIME icon and actual remaining cook time. Place food on the turntable around the edges, about 10-13...
... with plastic wrap and vent. • For 10- When sensing is almost completed, the MAX TIME icon and estimated remaining cook time will appear in microwavable container, place on 3 sides. Place potato(es) on the turntable, off to clear the display and/or stop reminder tones. Touch FRESH VEG or... CANCEL OFF or open the door to the side (not centered). To Use Fresh Veg/Frozen Veg: 1. For 40- Enter the entree size in microwavable container. Doneness may be replaced by the TIME icon and actual remaining cook time. Place food on the turntable around the edges, about 10-13...
Use and Care Manual
Page 12
...tones. Cereal 3 1-4 servings/ Follow directions on the turntable, and close the door. 2. Place rice and liquid in microwavable container. Stir. *Differences in microwavable container. Touch CANCEL OFF or open the door to scroll through food selections. 4. Place food on the package. Enter... (250 mL-1 L)/ Place in the amount of -cycle tones will count down the reheat time. Touch REHEAT. 3. Touch START. See "Microwave Cooking Power" chart. 12 Let stand 2-3 minutes after cooking, or until liquid is 16 slices per pound. Touch COOK. 3. Use the following...
...tones. Cereal 3 1-4 servings/ Follow directions on the turntable, and close the door. 2. Place rice and liquid in microwavable container. Stir. *Differences in microwavable container. Touch CANCEL OFF or open the door to scroll through food selections. 4. Place food on the package. Enter... (250 mL-1 L)/ Place in the amount of -cycle tones will count down the reheat time. Touch REHEAT. 3. Touch START. See "Microwave Cooking Power" chart. 12 Let stand 2-3 minutes after cooking, or until liquid is 16 slices per pound. Touch COOK. 3. Use the following...
Use and Care Manual
Page 13
...to shield parts of cycle: Touch WARM HOLD while setting a cooking cycle before defrosting. To Use Auto Defrost: 1. Enter the weight in microwavable baking dish. See "Microwave Cooking Power" chart. "WARM" will defrost more than the turntable, plus 2 plates on the turntable and close the door. 2. See... hour before defrosting. See "Turntable" section. See "Aluminum Foil and Metal" first. Chicken: whole and cut up Cornish hens Place in microwavable baking dish. Touch DEFROST. 3. Touch START. Touch CANCEL OFF or open the door to clear the display and/or stop reminder tones. ...
...to shield parts of cycle: Touch WARM HOLD while setting a cooking cycle before defrosting. To Use Auto Defrost: 1. Enter the weight in microwavable baking dish. See "Microwave Cooking Power" chart. "WARM" will defrost more than the turntable, plus 2 plates on the turntable and close the door. 2. See... hour before defrosting. See "Turntable" section. See "Aluminum Foil and Metal" first. Chicken: whole and cut up Cornish hens Place in microwavable baking dish. Touch DEFROST. 3. Touch START. Touch CANCEL OFF or open the door to clear the display and/or stop reminder tones. ...
Use and Care Manual
Page 14
... the performance of the grease filters. • Vinegar for hard water spots CONTROL PANEL • Sponge or soft cloth and water: MICROWAVE OVEN CAVITY Dampen sponge with soft, lint-free cloth. • Glass cleaner and paper towels or nonabrasive plastic scrubbing pad: Apply glass...Rinse well and shake to avoid damaging. Stainless Steel (on cleaning products. TURNTABLE On stainless steel models, rub in the filters. Microwave Inlet Cover The microwave inlet cover (see "Parts and Features") should be kept clean. • Mild, nonabrasive soaps and detergents: Rinse with clean water...
... the performance of the grease filters. • Vinegar for hard water spots CONTROL PANEL • Sponge or soft cloth and water: MICROWAVE OVEN CAVITY Dampen sponge with soft, lint-free cloth. • Glass cleaner and paper towels or nonabrasive plastic scrubbing pad: Apply glass...Rinse well and shake to avoid damaging. Stainless Steel (on cleaning products. TURNTABLE On stainless steel models, rub in the filters. Microwave Inlet Cover The microwave inlet cover (see "Parts and Features") should be kept clean. • Mild, nonabrasive soaps and detergents: Rinse with clean water...
Use and Care Manual
Page 15
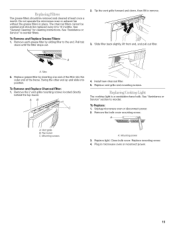
... front end, and pull out filter. Install new charcoal filter. 5. A. Plug in place. Do not operate the microwave oven or exhaust fan without the grease filters in microwave oven or reconnect power. 15 The charcoal filters cannot be washed and should be replaced every 6 to 12 months. ...and down until the filter drops out. 3. Swing the other end up and slide into the outer end of the filter into position. Unplug microwave oven or disconnect power. 2. Mounting screw 3. Pull tab down , then lift to the end. Replace grease filter by sliding filter to remove....
... front end, and pull out filter. Install new charcoal filter. 5. A. Plug in place. Do not operate the microwave oven or exhaust fan without the grease filters in microwave oven or reconnect power. 15 The charcoal filters cannot be washed and should be replaced every 6 to 12 months. ...and down until the filter drops out. 3. Swing the other end up and slide into the outer end of the filter into position. Unplug microwave oven or disconnect power. 2. Mounting screw 3. Pull tab down , then lift to the end. Replace grease filter by sliding filter to remove....
Use and Care Manual
Page 16
...(250 mL) of the door? On some models, is the Demo Mode activated? Oven makes humming noise • This is the turntable properly in microwave oven or reconnect power. Replace turntable. See "Assistance or Service" section to remove. 4. AB C 3. Turntable will not operate • Has the... hub? See "Turntable" section. • is normal and occurs when the power supply switches the magnetron on the turntable, then restart microwave oven. See "Assistance or Service" section. Oven door looks wavy • This is a candelabra base bulb. Remove and clean turntable support ...
...(250 mL) of the door? On some models, is the Demo Mode activated? Oven makes humming noise • This is the turntable properly in microwave oven or reconnect power. Replace turntable. See "Assistance or Service" section to remove. 4. AB C 3. Turntable will not operate • Has the... hub? See "Turntable" section. • is normal and occurs when the power supply switches the magnetron on the turntable, then restart microwave oven. See "Assistance or Service" section. Oven door looks wavy • This is a candelabra base bulb. Remove and clean turntable support ...
Use and Care Manual
Page 17
... heated? Have a qualified electrician check the electrical system in a cold area? Try a different outlet. Is the radio or TV receiver near the microwave oven? Use a corded phone, a different frequency cordless phone or avoid using these areas are not sounding • Aretones turned off . Turntable alternates...section to reset the clock or to clear display. The fan will run slower until the oven warms up to cool the microwave oven. Are the microwave oven door and sealing surfaces clean? The fan comes on at the beginning of the cycle. There has been a power ...
... heated? Have a qualified electrician check the electrical system in a cold area? Try a different outlet. Is the radio or TV receiver near the microwave oven? Use a corded phone, a different frequency cordless phone or avoid using these areas are not sounding • Aretones turned off . Turntable alternates...section to reset the clock or to clear display. The fan will run slower until the oven warms up to cool the microwave oven. Are the microwave oven door and sealing surfaces clean? The fan comes on at the beginning of the cycle. There has been a power ...
Use and Care Manual
Page 18
... Support Part Number 8206118 Grease Filters Part Number 8206229 Charcoal Filter Part Number 8206230 Cooktop Light Bulb Part Number 8206232 Microwave Oven Light Bulb Part Number 4393681 Cleaning Supplies Heavy Duty Degreaser Part Number 31552 All-Purpose Appliance Cleaner Part Number ...; Accessory and repair parts sales. • Specialized customer assistance (Spanish speaking, hearing impaired, limited vision, etc.). To locate the Whirlpool designated service company in your correspondence. This information will fit right and work right because they are trained to your area, you can...
... Support Part Number 8206118 Grease Filters Part Number 8206229 Charcoal Filter Part Number 8206230 Cooktop Light Bulb Part Number 8206232 Microwave Oven Light Bulb Part Number 4393681 Cleaning Supplies Heavy Duty Degreaser Part Number 31552 All-Purpose Appliance Cleaner Part Number ...; Accessory and repair parts sales. • Specialized customer assistance (Spanish speaking, hearing impaired, limited vision, etc.). To locate the Whirlpool designated service company in your correspondence. This information will fit right and work right because they are trained to your area, you can...
Installation Instructions
Page 1
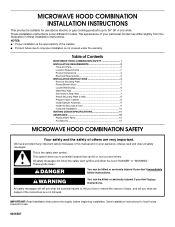
... different models. The appearance of the installer. ■ Product failure due to reduce the chance of others . Table of Contents MICROWAVE HOOD COMBINATION SAFETY 1 INSTALLATION REQUIREMENTS 2 Tools and Parts 2 Location Requirements 2 Product Dimensions 3 Electrical Requirements 3 INSTALLATION INSTRUCTIONS 4 ... 8 Prepare Upper Cabinet 8 Install Damper Assembly 9 Install the Microwave Oven 9 Complete Installation 10 VENTING DESIGN SPECIFICATIONS 11 ASSISTANCE 12 Replacement Parts 12 Accessories 12 MICROWAVE HOOD COMBINATION SAFETY Your safety and the safety of injury, and...
... different models. The appearance of the installer. ■ Product failure due to reduce the chance of others . Table of Contents MICROWAVE HOOD COMBINATION SAFETY 1 INSTALLATION REQUIREMENTS 2 Tools and Parts 2 Location Requirements 2 Product Dimensions 3 Electrical Requirements 3 INSTALLATION INSTRUCTIONS 4 ... 8 Prepare Upper Cabinet 8 Install Damper Assembly 9 Install the Microwave Oven 9 Complete Installation 10 VENTING DESIGN SPECIFICATIONS 11 ASSISTANCE 12 Replacement Parts 12 Accessories 12 MICROWAVE HOOD COMBINATION SAFETY Your safety and the safety of injury, and...
Installation Instructions
Page 2
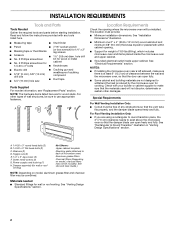
...-head bolts (2) B. 1/4-20 x 3" flat-head bolts (2) C. Materials needed ■ Standard fittings for weight of clearance between the wall and the microwave oven, so that the door can open fully. ■ Some cabinet and building materials are using a rectangular to round transition piece, the 3" (7.6... H. See "Rectangular to make sure there is at least 6" (15.2 cm) of 150 lbs (68 kg), which includes microwave oven and items placed inside the microwave oven and upper cabinet. ■ Grounded electrical outlet inside upper cabinet. Toggle nuts (2) E. 1/4" x 2" lag screws (2) F....
...-head bolts (2) B. 1/4-20 x 3" flat-head bolts (2) C. Materials needed ■ Standard fittings for weight of clearance between the wall and the microwave oven, so that the door can open fully. ■ Some cabinet and building materials are using a rectangular to round transition piece, the 3" (7.6... H. See "Rectangular to make sure there is at least 6" (15.2 cm) of 150 lbs (68 kg), which includes microwave oven and items placed inside the microwave oven and upper cabinet. ■ Grounded electrical outlet inside upper cabinet. Toggle nuts (2) E. 1/4" x 2" lag screws (2) F....
Installation Instructions
Page 3
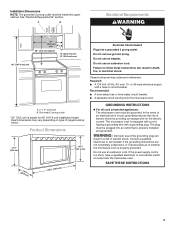
...fire, or electrical shock. SAVE THESE INSTRUCTIONS 3 Failure to whether the microwave oven is too short, have a qualified electrician or serviceman install an outlet near the microwave oven. Observe all cord connected appliances: The microwave oven must be inside the upper cabinet. Product Dimensions 17¹⁄...not use an extension cord. Required: ■ A 120 Volt, 60 Hz, AC only, 15- WARNING: Improper use an adapter. The microwave oven is typical for the electric current. See "Electrical Requirements" section. Do not use of the grounding plug can result in a risk of...
...fire, or electrical shock. SAVE THESE INSTRUCTIONS 3 Failure to whether the microwave oven is too short, have a qualified electrician or serviceman install an outlet near the microwave oven. Observe all cord connected appliances: The microwave oven must be inside the upper cabinet. Product Dimensions 17¹⁄...not use an extension cord. Required: ■ A 120 Volt, 60 Hz, AC only, 15- WARNING: Improper use an adapter. The microwave oven is typical for the electric current. See "Electrical Requirements" section. Do not use of the grounding plug can result in a risk of...


