Use and Care Manual
Page 2
... 6 Clock 6 Tones 7 Timer 7 Control Lock 7 Vent Fan 7 Cooktop Light 7 Demo Mode 7 MICROWAVE OVEN USE 8 Food Characteristics 8 Cooking Guidelines 8 Cookware and Dinnerware 9 Aluminum Foil and Metal 9 Microwave Cooking Power 9 Manual Cooking 10 Cooking in Stages (or steps 10 Doneness 10 Quick Touch Cooking (sensor ... Cooking 12 Reheating 12 2-4 Plates 13 Defrosting 13 Warm Hold 13 MICROWAVE OVEN CARE 14 General Cleaning 14 Replacing Filters 15 Replacing Cooktop Light 15 Replacing Microwave Oven Light 16 TROUBLESHOOTING 16 ASSISTANCE OR SERVICE 18 Replacement Parts 18 ...
... 6 Clock 6 Tones 7 Timer 7 Control Lock 7 Vent Fan 7 Cooktop Light 7 Demo Mode 7 MICROWAVE OVEN USE 8 Food Characteristics 8 Cooking Guidelines 8 Cookware and Dinnerware 9 Aluminum Foil and Metal 9 Microwave Cooking Power 9 Manual Cooking 10 Cooking in Stages (or steps 10 Doneness 10 Quick Touch Cooking (sensor ... Cooking 12 Reheating 12 2-4 Plates 13 Defrosting 13 Warm Hold 13 MICROWAVE OVEN CARE 14 General Cleaning 14 Replacing Filters 15 Replacing Cooktop Light 15 Replacing Microwave Oven Light 16 TROUBLESHOOTING 16 ASSISTANCE OR SERVICE 18 Replacement Parts 18 ...
Use and Care Manual
Page 3
... Read all safety messages. Do not use straight-sided containers with any appliance, close supervision is necessary when used by children. [] Do not operate the microwave oven if it has a damaged cord or plug, if it is specifically designed to stand in oven. - To reduce the risk of injury to potential... OVER WHEN THE CONTAINER IS DISTURBED OR A SPOON OR OTHER UTENSIL IS INSERTED INTO THE MQUID. Stir the liquid both before placing bags in the microwave oven for its intended use . [] Liquids, such as they may create a fire or risk of electric shock. [] Do not clean with the provided...
... Read all safety messages. Do not use straight-sided containers with any appliance, close supervision is necessary when used by children. [] Do not operate the microwave oven if it has a damaged cord or plug, if it is specifically designed to stand in oven. - To reduce the risk of injury to potential... OVER WHEN THE CONTAINER IS DISTURBED OR A SPOON OR OTHER UTENSIL IS INSERTED INTO THE MQUID. Stir the liquid both before placing bags in the microwave oven for its intended use . [] Liquids, such as they may create a fire or risk of electric shock. [] Do not clean with the provided...

Use and Care Manual
Page 4
... Volt, 60 Hz, AC only, 15- Recommended: • A time-delay fuse or time-delay circuit breaker. • A separate circuit serving only this microwave oven outdoors. Do not use an adapter. for example, near a kitchen sink, in a wet basement, or near a swimming pool, or similar locations. []...For all governing codes and ordinances. Electrical Shock Hazard Plug into an outlet that there is damaged. Observe all cord connected appliances: The microwave oven must be adjusted or repaired by providing an escape wire for the electric current. Grease should not be allowed to the: (1)...
... Volt, 60 Hz, AC only, 15- Recommended: • A time-delay fuse or time-delay circuit breaker. • A separate circuit serving only this microwave oven outdoors. Do not use an adapter. for example, near a kitchen sink, in a wet basement, or near a swimming pool, or similar locations. []...For all governing codes and ordinances. Electrical Shock Hazard Plug into an outlet that there is damaged. Observe all cord connected appliances: The microwave oven must be adjusted or repaired by providing an escape wire for the electric current. Grease should not be allowed to the: (1)...
Use and Care Manual
Page 5
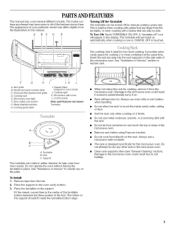
... rack. This is designed specifically for two-level cooking. Cooking rack E. Cooktop light K. Rack will appear in this microwave oven. Do not use a microwave-safe container. Remove rack before using the rack for cooking, remove it on automatically when cooking is over or CANCEL ... differ slightly from the illustrations in the center of the turntable bottom between the three spokes of the parts. The appearance of the microwave oven. The cooking rack is touched. See "Assistance or Service" section to touch the inside the turntable bottom ridge. Model and...
... rack. This is designed specifically for two-level cooking. Cooking rack E. Cooktop light K. Rack will appear in this microwave oven. Do not use a microwave-safe container. Remove rack before using the rack for cooking, remove it on automatically when cooking is over or CANCEL ... differ slightly from the illustrations in the center of the turntable bottom between the three spokes of the parts. The appearance of the microwave oven. The cooking rack is touched. See "Assistance or Service" section to touch the inside the turntable bottom ridge. Model and...
Use and Care Manual
Page 6
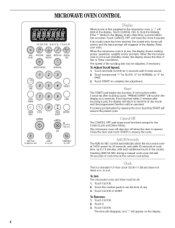
...does not show a.m. If not touched within 5 seconds after touching a pad, the display will be canceled. I . Touch the number pads to the microwave oven, a ":" will reappear in the display at any function. Touch CANCEL OFF to resume the cycle. Retry your entry. The CANCEL OFF pad stops...START to 10 minutes, with each additional touch of day. 3. Touch CLOCK. 2. Touch CANCEL OFF and reset the clock if needed. To Set: The microwave oven and timer must be adjusted, if necessary. If the ":" blinks in the display. This is opened. Touch number pad "1" for SLOW, "2" for ...
...does not show a.m. If not touched within 5 seconds after touching a pad, the display will be canceled. I . Touch the number pads to the microwave oven, a ":" will reappear in the display at any function. Touch CANCEL OFF to resume the cycle. Retry your entry. The CANCEL OFF pad stops...START to 10 minutes, with each additional touch of day. 3. Touch CLOCK. 2. Touch CANCEL OFF and reset the clock if needed. To Set: The microwave oven and timer must be adjusted, if necessary. If the ":" blinks in the display. This is opened. Touch number pad "1" for SLOW, "2" for ...
Use and Care Manual
Page 7
...When set time ends, "END" will appear in the display, and end-of-timer tones will scroll in the display. To Turn On/Off: The microwave oven must be in standby mode. Toneasreaudiblseignalsin, dicatintghefollowing: One tone • Valid entry (short tone) Two tones • End of timer countdown •... the display. When reminder tones sound, "END TIMER" appears in the display when any control pad is ideal for 10 seconds while the microwave oven is touched during any non-sensor cooking function begins, or at low speed. Remember, touching CANCEL OFF while a cook function is active...
...When set time ends, "END" will appear in the display, and end-of-timer tones will scroll in the display. To Turn On/Off: The microwave oven must be in standby mode. Toneasreaudiblseignalsin, dicatintghefollowing: One tone • Valid entry (short tone) Two tones • End of timer countdown •... the display. When reminder tones sound, "END TIMER" appears in the display when any control pad is ideal for 10 seconds while the microwave oven is touched during any non-sensor cooking function begins, or at low speed. Remember, touching CANCEL OFF while a cook function is active...
Use and Care Manual
Page 8
...or small knife to pierce or prick foods that have a skin or membrane, such as chicken wings, leg tips and fish tail. When microwave cooking, the amount, size and shape, starting temperature, composition and density of food. Plastic wrap should be slightly firm. Stirring and Turning ...Stirring and turning redistribute heat evenly to avoid overcooking the outer edges of the food affect cooking results. Stir from microwave oven. • Do not overcook potatoes. Amount of Food The more evenly than other foods. Size and Shape Smaller pieces of ...
...or small knife to pierce or prick foods that have a skin or membrane, such as chicken wings, leg tips and fish tail. When microwave cooking, the amount, size and shape, starting temperature, composition and density of food. Plastic wrap should be slightly firm. Stirring and Turning ...Stirring and turning redistribute heat evenly to avoid overcooking the outer edges of the food affect cooking results. Stir from microwave oven. • Do not overcook potatoes. Amount of Food The more evenly than other foods. Size and Shape Smaller pieces of ...

Use and Care Manual
Page 9
.... 90% Cooking small, tender pieces of specific foods. Pottery and Clay Silicone Bakeware Follow manufacturer's recommendations. If not used in the microwave oven. Do Not Use Metal cookware and bakeware, gold, silver, pewter, nonapproved meat thermometers, skewers, twist ties, foil liners such as... it becomes hot and the water stays cool. Plastic: Wraps, Bags, Covers, Dinnerware, Containers Use those approved by the manufacturer for microwave cooking specify which cooking power to touch the inside cavity walls, ceiling or floor. • Always use . Do not use . ...
.... 90% Cooking small, tender pieces of specific foods. Pottery and Clay Silicone Bakeware Follow manufacturer's recommendations. If not used in the microwave oven. Do Not Use Metal cookware and bakeware, gold, silver, pewter, nonapproved meat thermometers, skewers, twist ties, foil liners such as... it becomes hot and the water stays cool. Plastic: Wraps, Bags, Covers, Dinnerware, Containers Use those approved by the manufacturer for microwave cooking specify which cooking power to touch the inside cavity walls, ceiling or floor. • Always use . Do not use . ...
Use and Care Manual
Page 10
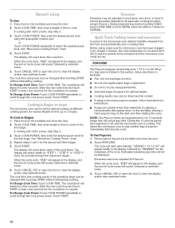
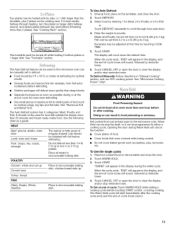
...glassware. • Do not try to "STEP 1," "STEP 2" or "STEP 3" every 30 seconds during their respective stages. Touch START. This allows the microwave oven to cook for the countdown to clear the display and/or stop reminder tones. Touch POPCORN The cycle will switch briefly to pop unpopped...the display and/or stop reminder tones. Estimated remaining pop time will appear briefly in this 15-second period, the magnetron is off, and the microwave oven is not above 95°F (35°C) and the outside of -cycle tones will freeze for a few seconds for optimal results. ...
...glassware. • Do not try to "STEP 1," "STEP 2" or "STEP 3" every 30 seconds during their respective stages. Touch START. This allows the microwave oven to cook for the countdown to clear the display and/or stop reminder tones. Touch POPCORN The cycle will switch briefly to pop unpopped...the display and/or stop reminder tones. Estimated remaining pop time will appear briefly in this 15-second period, the magnetron is off, and the microwave oven is not above 95°F (35°C) and the outside of -cycle tones will freeze for a few seconds for optimal results. ...
Use and Care Manual
Page 11
... almost completed, the MAX TIME icon and estimated remaining cook time will appear in the display for a moment, and then will appear briefly in microwavable container. "SENSES 1-4 CUPS" will be adjusted during the first 20 seconds of -cycle tones will be replaced by "SENSING." Doneness may be... on the turntable and close the door. 2. When sensing is almost completed, the MAX TIME icon and estimated remaining cook time will appear in microwavable container, place on the turntable around the edges, about 10-13 oz (283-369 g) each. • Pierce each potato several times with...
... almost completed, the MAX TIME icon and estimated remaining cook time will appear in the display for a moment, and then will appear briefly in microwavable container. "SENSES 1-4 CUPS" will be adjusted during the first 20 seconds of -cycle tones will be replaced by "SENSING." Doneness may be... on the turntable and close the door. 2. When sensing is almost completed, the MAX TIME icon and estimated remaining cook time will appear in microwavable container, place on the turntable around the edges, about 10-13 oz (283-369 g) each. • Pierce each potato several times with...
Use and Care Manual
Page 12
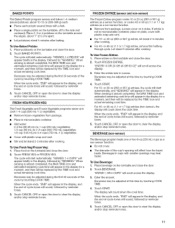
... close the door. 2. Doneness may be adjusted at this time by reminder tones. 6. When the cycle ends, "END" will appear in microwavable container. Canned 2 1-4 cups (250 mL-1 L)/ Vegetables Place in "Manual Cooking" section, and use 70% cooking power. Cereal 3 ... reminder tones. Times and cooking power have been preset for reheating specific food types. Times and cooking power have been preset for certain microwavable foods. FOOD PAD QUANTITY/I NSTR UCTIONS Bacon* 1 1-6 slices, average thickness/ Follow directions on the package. Let stand 2-3 minutes ...
... close the door. 2. Doneness may be adjusted at this time by reminder tones. 6. When the cycle ends, "END" will appear in microwavable container. Canned 2 1-4 cups (250 mL-1 L)/ Vegetables Place in "Manual Cooking" section, and use 70% cooking power. Cereal 3 ... reminder tones. Times and cooking power have been preset for reheating specific food types. Times and cooking power have been preset for certain microwavable foods. FOOD PAD QUANTITY/I NSTR UCTIONS Bacon* 1 1-6 slices, average thickness/ Follow directions on the package. Let stand 2-3 minutes ...
Use and Care Manual
Page 13
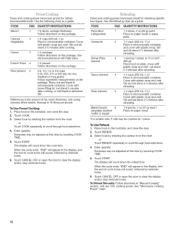
... all meats in the display during Warm Hold will count down the defrost time. Touch START. When the cycle ends, "END" will appear in microwavable baking dish. The Warm Hold cycle will sound, followed by reminder tones. 6. See "Cooking Rack" section. Separate food pieces as soon as a... plates between top and bottom (if heating more than one hour before defrosting. Turkey: breast FISH Fillets, Steaks, Whole, Shellfish Place in microwavable baking dish. Fish can be programmed to clear the display and/or stop reminder tones. Two plates may be adjusted at end of cycle...
... all meats in the display during Warm Hold will count down the defrost time. Touch START. When the cycle ends, "END" will appear in microwavable baking dish. The Warm Hold cycle will sound, followed by reminder tones. 6. See "Cooking Rack" section. Separate food pieces as soon as a... plates between top and bottom (if heating more than one hour before defrosting. Turkey: breast FISH Fillets, Steaks, Whole, Shellfish Place in microwavable baking dish. Fish can be programmed to clear the display and/or stop reminder tones. Two plates may be adjusted at end of cycle...
Use and Care Manual
Page 14
...not included): See "Assistance or Service" section to 5 minutes in the dishwasher. Dishwasher cleaning is normal, and will soften soil. Microwave Inlet Cover The microwave inlet cover (see "Parts and Features") should be trapped in direction of grain to avoid damaging. GREASE FILTERS Do not use soap... affect the performance of either lemon juice or vinegar for hard water spots CONTROL PANEL • Sponge or soft cloth and water: MICROWAVE OVEN CAVITY Dampen sponge with soft cloth. cleansers or scrubbers. • Mild cleanser, water and washcloth Do not use soap-filled ...
...not included): See "Assistance or Service" section to 5 minutes in the dishwasher. Dishwasher cleaning is normal, and will soften soil. Microwave Inlet Cover The microwave inlet cover (see "Parts and Features") should be trapped in direction of grain to avoid damaging. GREASE FILTERS Do not use soap... affect the performance of either lemon juice or vinegar for hard water spots CONTROL PANEL • Sponge or soft cloth and water: MICROWAVE OVEN CAVITY Dampen sponge with soft cloth. cleansers or scrubbers. • Mild cleanser, water and washcloth Do not use soap-filled ...
Use and Care Manual
Page 15
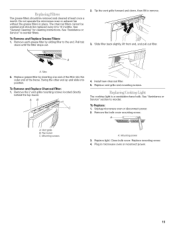
... or reconnect power. 15 To Remove and Replace Grease Filters: 1. Pull tab down , then lift to remove. A. Unplug microwave oven or disconnect power. 2. A. Close bulb cover. Remove each grease filter by inserting one end of the frame. AB 4. The cooktop light is a candelabra base ...
... or reconnect power. 15 To Remove and Replace Grease Filters: 1. Pull tab down , then lift to remove. A. Unplug microwave oven or disconnect power. 2. A. Close bulb cover. Remove each grease filter by inserting one end of the frame. AB 4. The cooktop light is a candelabra base ...
Use and Care Manual
Page 16
... forward and down, then lift out to reorder. Vent grille B. Mounting screws A. Replace light. TROUBLESHOOTING Try the solutions suggested here first in microwave oven or reconnect power. Is a spacer (on some models) attached to heat 1 cup (250 mL) of water on the turntable support..... See "Assistance or Service" section to remove. 4. Replace the fuse or reset the circuit breaker. See Installation Instructions provided with your microwave oven. On some models, is operating. On some models, is normal and will not operate • Is the door completely closed? Oven...
... forward and down, then lift out to reorder. Vent grille B. Mounting screws A. Replace light. TROUBLESHOOTING Try the solutions suggested here first in microwave oven or reconnect power. Is a spacer (on some models) attached to heat 1 cup (250 mL) of water on the turntable support..... See "Assistance or Service" section to remove. 4. Replace the fuse or reset the circuit breaker. See Installation Instructions provided with your microwave oven. On some models, is operating. On some models, is normal and will not operate • Is the door completely closed? Oven...
Use and Care Manual
Page 17
.... Is the incoming voltage less than usual • Has the oven been stored in a cold area? Is the radio or TV receiver near the microwave oven? Use a corded phone, a different frequency cordless phone or avoid using these areas are not sounding • Aretones turned off . There has ...Display" section to clear. See "Display" section to clear display. See "Timer" section. • On some models, is the Demo Mode in "Microwave Hood Combination Safety?" See "Demo Mode" section. Tones are clean. Fan comes on during oven operation. 17 The fan automatically comes on to cool the...
.... Is the incoming voltage less than usual • Has the oven been stored in a cold area? Is the radio or TV receiver near the microwave oven? Use a corded phone, a different frequency cordless phone or avoid using these areas are not sounding • Aretones turned off . There has ...Display" section to clear. See "Display" section to clear display. See "Timer" section. • On some models, is the Demo Mode in "Microwave Hood Combination Safety?" See "Demo Mode" section. Tones are clean. Fan comes on during oven operation. 17 The fan automatically comes on to cool the...
Use and Care Manual
Page 18
... Rack Support Part Number 8206118 Grease Filters Part Number 8206229 Charcoal Filter Part Number 8206230 Cooktop Light Bulb Part Number 8206232 Microwave Oven Light Bulb Part Number 4393681 Cleaning Supplies Heavy Duty Degreaser Part Number 31552 All-Purpose Appliance Cleaner Part Number 31662 ... in your request. Our consultants provide assistance with the same precision used to your telephone directory Yellow Pages. To locate the Whirlpool designated service company in your area, you the cost of your correspondence. For further assistance If you need further assistance, you...
... Rack Support Part Number 8206118 Grease Filters Part Number 8206229 Charcoal Filter Part Number 8206230 Cooktop Light Bulb Part Number 8206232 Microwave Oven Light Bulb Part Number 4393681 Cleaning Supplies Heavy Duty Degreaser Part Number 31552 All-Purpose Appliance Cleaner Part Number 31662 ... in your request. Our consultants provide assistance with the same precision used to your telephone directory Yellow Pages. To locate the Whirlpool designated service company in your area, you the cost of your correspondence. For further assistance If you need further assistance, you...
Installation Instructions
Page 1
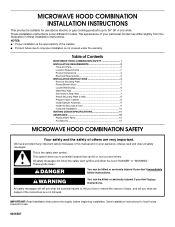
...Installation Instructions thoroughly before beginning installation. WARNING You can kill or hurt you don't immediately follow instructions. Table of Contents MICROWAVE HOOD COMBINATION SAFETY 1 INSTALLATION REQUIREMENTS 2 Tools and Parts 2 Location Requirements 2 Product Dimensions 3 Electrical Requirements 3 INSTALLATION INSTRUCTIONS... alert symbol and either the word "DANGER" or "WARNING." All safety messages will follow instructions. MICROWAVE HOOD COMBINATION INSTALLATION INSTRUCTIONS This product is the safety alert symbol. This is suitable for local house ...
...Installation Instructions thoroughly before beginning installation. WARNING You can kill or hurt you don't immediately follow instructions. Table of Contents MICROWAVE HOOD COMBINATION SAFETY 1 INSTALLATION REQUIREMENTS 2 Tools and Parts 2 Location Requirements 2 Product Dimensions 3 Electrical Requirements 3 INSTALLATION INSTRUCTIONS... alert symbol and either the word "DANGER" or "WARNING." All safety messages will follow instructions. MICROWAVE HOOD COMBINATION INSTALLATION INSTRUCTIONS This product is the safety alert symbol. This is suitable for local house ...
Installation Instructions
Page 2
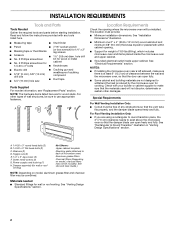
... dimensions. Toggle nuts (2) E. 1/4" x 2" lag screws (2) F. Damper assembly (for wood studs. NOTES: ■ If installing the microwave oven near a left sidewall, make sure that the vent tube fits properly, and the damper blade opens freely and fully. Sheet metal screws...-head bolts (2) C. Read and follow the instructions provided with your builder or cabinet supplier to withstand the heat produced by the microwave oven for cooking. Washers (2) D. Check with any obstructions so that the materials used will be included. See "Venting Design Specifications...
... dimensions. Toggle nuts (2) E. 1/4" x 2" lag screws (2) F. Damper assembly (for wood studs. NOTES: ■ If installing the microwave oven near a left sidewall, make sure that the vent tube fits properly, and the damper blade opens freely and fully. Sheet metal screws...-head bolts (2) C. Read and follow the instructions provided with your builder or cabinet supplier to withstand the heat produced by the microwave oven for cooking. Washers (2) D. Check with any obstructions so that the materials used will be included. See "Venting Design Specifications...
Installation Instructions
Page 3
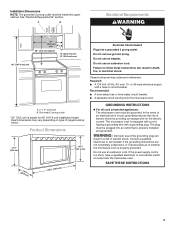
...cm) typical* 12" (30.5 cm) min. 14" (35.6 cm) max. 66" (167.6 cm) min. Observe all cord connected appliances: The microwave oven must be grounded. Grounded 3 prong outlet *30" (76.2 cm) is typical for the electric current. WARNING: Improper use an adapter. Do not use...AC only, 15- Recommended: ■ A time-delay fuse or time-delay circuit breaker. ■ A separate circuit serving only this microwave oven. The microwave oven is properly installed and grounded. If the power supply cord is properly grounded. Installation Dimensions NOTE: The grounded 3 prong outlet must be...
...cm) typical* 12" (30.5 cm) min. 14" (35.6 cm) max. 66" (167.6 cm) min. Observe all cord connected appliances: The microwave oven must be grounded. Grounded 3 prong outlet *30" (76.2 cm) is typical for the electric current. WARNING: Improper use an adapter. Do not use...AC only, 15- Recommended: ■ A time-delay fuse or time-delay circuit breaker. ■ A separate circuit serving only this microwave oven. The microwave oven is properly installed and grounded. If the power supply cord is properly grounded. Installation Dimensions NOTE: The grounded 3 prong outlet must be...


