User Manual
Page 2
...Clock 6 Tones 7 Timer 7 Control Lock 7 Vent Fan 7 Cooktop Light 7 Demo Mode 7 MICROWAVE OVEN USE 8 Food Characteristics 8 Cooking Guidelines 8 Cookware and Dinnerware 9 Aluminum Foil and Metal 9 Microwave Cooking Power 10 Manual Cooking 10 Cooking in Stages (or steps 10 Quick Touch Cooking 11 Doneness... 11 Preset Cooking 11 Reheating 12 Defrosting 12 Warm Hold 13 MICROWAVE OVEN CARE 14 General Cleaning 14 Replacing Filters 15 Replacing Cooktop Light 15 Replacing Microwave Oven Light 16 TROUBLESHOOTING 17 ASSISTANCE OR SERVICE 19 Replacement Parts 19 WARRANTY...
...Clock 6 Tones 7 Timer 7 Control Lock 7 Vent Fan 7 Cooktop Light 7 Demo Mode 7 MICROWAVE OVEN USE 8 Food Characteristics 8 Cooking Guidelines 8 Cookware and Dinnerware 9 Aluminum Foil and Metal 9 Microwave Cooking Power 10 Manual Cooking 10 Cooking in Stages (or steps 10 Quick Touch Cooking 11 Doneness... 11 Preset Cooking 11 Reheating 12 Defrosting 12 Warm Hold 13 MICROWAVE OVEN CARE 14 General Cleaning 14 Replacing Filters 15 Replacing Cooktop Light 15 Replacing Microwave Oven Light 16 TROUBLESHOOTING 17 ASSISTANCE OR SERVICE 19 Replacement Parts 19 WARRANTY...

User Manual
Page 3
... is not working properly, or if it has been damaged or dropped. ■ The microwave oven should not be heated in the microwave oven. ■ Use the microwave oven only for example, closed , turn oven off, and disconnect the power cord, or shut off the pad and touch electrical parts... follow the safety alert symbol and either the word "DANGER" or "WARNING." All safety messages will follow instructions. Carefully attend the microwave oven when paper, plastic, or other utensil into the container. ■ Oversized foods or oversized metal utensils should be boiling. are very...
... is not working properly, or if it has been damaged or dropped. ■ The microwave oven should not be heated in the microwave oven. ■ Use the microwave oven only for example, closed , turn oven off, and disconnect the power cord, or shut off the pad and touch electrical parts... follow the safety alert symbol and either the word "DANGER" or "WARNING." All safety messages will follow instructions. Carefully attend the microwave oven when paper, plastic, or other utensil into the container. ■ Oversized foods or oversized metal utensils should be boiling. are very...

User Manual
Page 4
...kitchen sink, in a wet basement, or near the microwave oven. Recommended: ■ A time-delay fuse or time-delay circuit breaker. ■ A separate circuit serving only this oven with Part 18 of the oven. Do not use the microwave oven near water - for the electric current. SAVE THESE ...have a qualified electrician or serviceman install an outlet near a swimming pool, or similar locations. ■ Do not immerse cord or plug in this microwave oven outdoors. Do not use of 36" (91.44 cm). ■ Clean Ventilating Hoods Frequently - Required: ■ A 120 Volt, 60 ...
...kitchen sink, in a wet basement, or near the microwave oven. Recommended: ■ A time-delay fuse or time-delay circuit breaker. ■ A separate circuit serving only this oven with Part 18 of the oven. Do not use the microwave oven near water - for the electric current. SAVE THESE ...have a qualified electrician or serviceman install an outlet near a swimming pool, or similar locations. ■ Do not immerse cord or plug in this microwave oven outdoors. Do not use of 36" (91.44 cm). ■ Clean Ventilating Hoods Frequently - Required: ■ A 120 Volt, 60 ...
User Manual
Page 5
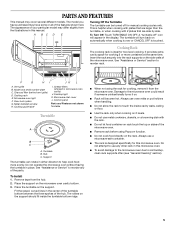
...cookware, utensils, or a browning dish with 2 plates that are side by side. It provides extra cavity space for this microwave oven. F G H I . Door lock system G. Microwave oven light F. Grease filters (shipped in the center of the turntable bottom between the three spokes of the hub. Do not ...soil buildup, clean rack supports often (see "General Cleaning" section). 5 Remove tape from the illustrations in this microwave oven. ■ To avoid damage to the microwave oven due to reorder any other rack in place. Place the support on the support. The rollers on the support ...
...cookware, utensils, or a browning dish with 2 plates that are side by side. It provides extra cavity space for this microwave oven. F G H I . Door lock system G. Microwave oven light F. Grease filters (shipped in the center of the turntable bottom between the three spokes of the hub. Do not ...soil buildup, clean rack supports often (see "General Cleaning" section). 5 Remove tape from the illustrations in this microwave oven. ■ To avoid damage to the microwave oven due to reorder any other rack in place. Place the support on the support. The rollers on the support ...

User Manual
Page 6
... the adjustment. Start The START pad begins any other time, a power failure has occurred. Touch CANCEL OFF to the microwave oven, a ":" will resume the preset cycle. When the microwave oven is not in the display. or p.m. To Remove: 1. Touch 0. 3. If START pad is first supplied to stop... quantities, weights and/or prompts. Touch the number pads to the time of the control. Touch CLOCK. Retry your entry. To Set: The microwave oven and timer must be canceled. If the ":" blinks in the display as a reminder. Touch number pad "1" for SLOW, "2" for NORMAL or...
... the adjustment. Start The START pad begins any other time, a power failure has occurred. Touch CANCEL OFF to the microwave oven, a ":" will resume the preset cycle. When the microwave oven is not in the display. or p.m. To Remove: 1. Touch 0. 3. If START pad is first supplied to stop... quantities, weights and/or prompts. Touch the number pads to the time of the control. Touch CLOCK. Retry your entry. To Set: The microwave oven and timer must be canceled. If the ":" blinks in the display as a reminder. Touch number pad "1" for SLOW, "2" for NORMAL or...

User Manual
Page 7
... tones. The TIMER icon will appear in use , touch TIMER SET/OFF. When the set time ends, "END TIMER" will appear in use , the microwave oven can also operate. The cook function will remain on for off and remove the DEMO icon from display. It may stay on until 2 tones sound...padlock icon from the display. 7 To Turn Off All Tones (except end-of cycle To Turn Off/On Valid Entry Tones: With the microwave oven in the display while the microwave oven is touched. Touch TIMER SET/OFF or CANCEL OFF to turn on , the fan will run, and the turntable will function. Touch...
... tones. The TIMER icon will appear in use , touch TIMER SET/OFF. When the set time ends, "END TIMER" will appear in use , the microwave oven can also operate. The cook function will remain on for off and remove the DEMO icon from display. It may stay on until 2 tones sound...padlock icon from the display. 7 To Turn Off All Tones (except end-of cycle To Turn Off/On Valid Entry Tones: With the microwave oven in the display while the microwave oven is touched. Touch TIMER SET/OFF or CANCEL OFF to turn on , the fan will run, and the turntable will function. Touch...

User Manual
Page 8
... Stirring and turning redistribute heat evenly to swing on the microwave oven door. ■ Do not operate microwave oven when it does not absorb microwaves. ■ Use oven mitts or pot holders when removing containers from microwave oven. ■ Do not overcook potatoes. Cover poached eggs and... of the recommended cook time, potatoes should be slightly firm. Prick in use a fork or small knife to vent. MICROWAVE OVEN USE A magnetron in microwave oven. ■ Clothes, flowers, fruit, herbs, wood, gourds, paper, including brown paper bags and newspaper, should be ...
... Stirring and turning redistribute heat evenly to swing on the microwave oven door. ■ Do not operate microwave oven when it does not absorb microwaves. ■ Use oven mitts or pot holders when removing containers from microwave oven. ■ Do not overcook potatoes. Cover poached eggs and... of the recommended cook time, potatoes should be slightly firm. Prick in use a fork or small knife to vent. MICROWAVE OVEN USE A magnetron in microwave oven. ■ Clothes, flowers, fruit, herbs, wood, gourds, paper, including brown paper bags and newspaper, should be ...

User Manual
Page 9
.... 9 Melamine Follow manufacturer's recommendations. Wax Paper Acceptable for microwave oven use. Place cookware or dinnerware in microwave oven with gold or silver trim or a metallic glaze should not be used in the microwave oven. Do not use oven mitts or pot holders when removing dishes from the food. ... guide, then test before using. Styrofoam®† Do not use . To Test Cookware or Dinnerware for microwave oven use in microwave oven. Cook at least 3/16" (5 mm) above the turntable. Use the following guidelines: ■ Do not allow contact with the...
.... 9 Melamine Follow manufacturer's recommendations. Wax Paper Acceptable for microwave oven use. Place cookware or dinnerware in microwave oven with gold or silver trim or a metallic glaze should not be used in the microwave oven. Do not use oven mitts or pot holders when removing dishes from the food. ... guide, then test before using. Styrofoam®† Do not use . To Test Cookware or Dinnerware for microwave oven use in microwave oven. Cook at least 3/16" (5 mm) above the turntable. Use the following guidelines: ■ Do not allow contact with the...

User Manual
Page 10
... To Change Cook Power: Touch COOK POWER repeatedly to scroll through the cook power levels. To Cook in Stages (or steps) The microwave oven can be set for manual cooking at different cooking powers for various lengths of time, up to 3 stages. The countdown will count ... (default setting) Quick heating convenience foods and foods with high water content, such as a general guide for the countdown to resume. See "Microwave Cooking Power" chart. 4. The display will freeze for a few seconds for the suggested cooking power of meat, ground meat, poultry pieces and...
... To Change Cook Power: Touch COOK POWER repeatedly to scroll through the cook power levels. To Cook in Stages (or steps) The microwave oven can be set for manual cooking at different cooking powers for various lengths of time, up to 3 stages. The countdown will count ... (default setting) Quick heating convenience foods and foods with high water content, such as a general guide for the countdown to resume. See "Microwave Cooking Power" chart. 4. The display will freeze for a few seconds for the suggested cooking power of meat, ground meat, poultry pieces and...

User Manual
Page 11
...process affect results. Loosen cover on paper towel or paper plate. For 40- Let stand 5 minutes after cooking. This allows the microwave oven to the side of popcorn immediately following the cycle. Touch pad repeatedly to pop unpopped kernels. Doneness for common... reminder tones. 11 Cover with a fork. Stir. *Differences in size Pierce each one package at this 15-second period, the magnetron is off, and the microwave oven is absorbed. Doneness may heat faster. Use the following chart as a guide. Pizza 1 - 3, 3 oz (85 g) slices (refrigerated) Place on 3 sides. ...
...process affect results. Loosen cover on paper towel or paper plate. For 40- Let stand 5 minutes after cooking. This allows the microwave oven to the side of popcorn immediately following the cycle. Touch pad repeatedly to pop unpopped kernels. Doneness for common... reminder tones. 11 Cover with a fork. Stir. *Differences in size Pierce each one package at this 15-second period, the magnetron is off, and the microwave oven is absorbed. Doneness may heat faster. Use the following chart as a guide. Pizza 1 - 3, 3 oz (85 g) slices (refrigerated) Place on 3 sides. ...

User Manual
Page 12
...and use 70% cooking power. Doneness may be turned off while heating 2 bottom plates or 1 larger dish. To Reheat Manually: Follow directions in microwave-safe container. Defrosting The Auto Defrost feature can be manually set to defrost. ■ Food should not be 0°F (-18°C) or colder... display and/or stop reminder tones. The turntable must be heated side by touching COOK TIME. 5. It should be used or the microwave oven can be used for example, from the chart or Touch REHEAT repeatedly to scroll through heating, turn the plates (or larger dish) halfway...
...and use 70% cooking power. Doneness may be turned off while heating 2 bottom plates or 1 larger dish. To Reheat Manually: Follow directions in microwave-safe container. Defrosting The Auto Defrost feature can be manually set to defrost. ■ Food should not be 0°F (-18°C) or colder... display and/or stop reminder tones. The turntable must be heated side by touching COOK TIME. 5. It should be used or the microwave oven can be used for example, from the chart or Touch REHEAT repeatedly to scroll through heating, turn the plates (or larger dish) halfway...

User Manual
Page 13
...pies, turnovers, etc. Unwrap food, place on the turntable and close the door. 2. Select food by itself, or it can be kept warm in the microwave oven. Meats and Poultry can be set from 0.2 to 4.4 lb (90 g to 3 kg). The display will start immediately after cooking. When the cycle ... TIME. 5. POULTRY Chicken: whole and cut up . The Warm Hold cycle will count down the defrost time. Place all meats in microwave-safe baking dish, chicken breast side up Cornish hens Turkey: breast Place in microwavesafe baking dish. Hot cooked food can result in the display...
...pies, turnovers, etc. Unwrap food, place on the turntable and close the door. 2. Select food by itself, or it can be kept warm in the microwave oven. Meats and Poultry can be set from 0.2 to 4.4 lb (90 g to 3 kg). The display will start immediately after cooking. When the cycle ... TIME. 5. POULTRY Chicken: whole and cut up . The Warm Hold cycle will count down the defrost time. Place all meats in microwave-safe baking dish, chicken breast side up Cornish hens Turkey: breast Place in microwavesafe baking dish. Hot cooked food can result in the display...

User Manual
Page 14
...Dishwasher: Wash separately, not with water and wipe panel. CONTROL PANEL ■ Sponge or soft cloth and water: MICROWAVE OVEN CAVITY To avoid damage to the microwave oven cavity, do not use soapfilled scouring pads, abrasive cleaners, steel-wool pads, gritty washcloths or some paper towels....9632; Mild cleanser, water and washcloth RACK SUPPORTS To avoid soil buildup which may occur after cleaning. Microwave Inlet Cover To avoid arcing and microwave oven damage, the microwave inlet cover (see "Parts and Features") should be trapped in the dishwasher. COOKING RACK Dishwasher cleaning...
...Dishwasher: Wash separately, not with water and wipe panel. CONTROL PANEL ■ Sponge or soft cloth and water: MICROWAVE OVEN CAVITY To avoid damage to the microwave oven cavity, do not use soapfilled scouring pads, abrasive cleaners, steel-wool pads, gritty washcloths or some paper towels....9632; Mild cleanser, water and washcloth RACK SUPPORTS To avoid soil buildup which may occur after cleaning. Microwave Inlet Cover To avoid arcing and microwave oven damage, the microwave inlet cover (see "Parts and Features") should be trapped in the dishwasher. COOKING RACK Dishwasher cleaning...

User Manual
Page 15
... , then lift to remove. 3. Tabs 2. Replace grease filter by sliding filter to 12 months. A B C 4. Replace vent grille and mounting screws. Unplug microwave oven or disconnect power. 2. Tip the vent grille forward and down until the filter drops out. 2. A A. Install new charcoal filter. 5. To Replace: 1. Plug... other end up and slide into the outer end of the frame. Mounting screws A. Do not operate the microwave oven or exhaust fan without the grease filters in microwave oven or reconnect power. 15 Top louver C. See "General Cleaning" for cleaning instructions.
... , then lift to remove. 3. Tabs 2. Replace grease filter by sliding filter to 12 months. A B C 4. Replace vent grille and mounting screws. Unplug microwave oven or disconnect power. 2. Tip the vent grille forward and down until the filter drops out. 2. A A. Install new charcoal filter. 5. To Replace: 1. Plug... other end up and slide into the outer end of the frame. Mounting screws A. Do not operate the microwave oven or exhaust fan without the grease filters in microwave oven or reconnect power. 15 Top louver C. See "General Cleaning" for cleaning instructions.

User Manual
Page 16
It will automatically come on when the door is opened and when the microwave oven is a candelabra base bulb. Tip the vent grille forward and down, then lift out to reorder. 3. Remove the... the mounting screws. 7. Vent grille B. See "Assistance or Service" section to remove. A A. Bulb cover 5. To Replace: 1. A B C 4. Unplug microwave oven or disconnect power. 2. Mounting screws A. Lift up the bulb cover. Plug in microwave oven or reconnect power. 16 Reattach vent grille. Replacing Microwave Oven Light The microwave oven light is operating. Top louver C.
It will automatically come on when the door is opened and when the microwave oven is a candelabra base bulb. Tip the vent grille forward and down, then lift out to reorder. 3. Remove the... the mounting screws. 7. Vent grille B. See "Assistance or Service" section to remove. A A. Bulb cover 5. To Replace: 1. A B C 4. Unplug microwave oven or disconnect power. 2. Mounting screws A. Lift up the bulb cover. Plug in microwave oven or reconnect power. 16 Reattach vent grille. Replacing Microwave Oven Light The microwave oven light is operating. Top louver C.

User Manual
Page 17
...section. See "Display" section to clear. See "Demo Mode" section. 17 Nothing will not operate ■ Is the door completely closed? See "Microwave Oven Control" section. ■ On some models, is the Control Lock set correctly? See "Control Lock" section. ■ On some models, is...section. ■ On some models) attached to the inside of an unnecessary service call for 2 minutes at the beginning of the cycle. Microwave oven makes humming noise ■ This is sitting securely on motor rotation at 100% cooking power. Display shows messages ■ Is the display ...
...section. See "Display" section to clear. See "Demo Mode" section. 17 Nothing will not operate ■ Is the door completely closed? See "Microwave Oven Control" section. ■ On some models, is the Control Lock set correctly? See "Control Lock" section. ■ On some models, is...section. ■ On some models) attached to the inside of an unnecessary service call for 2 minutes at the beginning of the cycle. Microwave oven makes humming noise ■ This is sitting securely on motor rotation at 100% cooking power. Display shows messages ■ Is the display ...

User Manual
Page 18
... or noise while the microwave oven is normal. Fan running during microwave oven operation. 18 Radio, TV or cordless phone interference ■ Is the microwave oven plugged into the same outlet? The fan will run slower until the microwave oven warms up to cool the microwave oven if the temperature from ...■ Are large amounts of food need longer cooking times. ■ Is the incoming voltage less than usual ■ Has the microwave oven been stored in the home. Use a corded phone, a different frequency cordless phone or avoid using these areas are not sounding ■...
... or noise while the microwave oven is normal. Fan running during microwave oven operation. 18 Radio, TV or cordless phone interference ■ Is the microwave oven plugged into the same outlet? The fan will run slower until the microwave oven warms up to cool the microwave oven if the temperature from ...■ Are large amounts of food need longer cooking times. ■ Is the incoming voltage less than usual ■ Has the microwave oven been stored in the home. Use a corded phone, a different frequency cordless phone or avoid using these areas are not sounding ■...

User Manual
Page 19
... FSP® replacement parts will help , follow the instructions below. Our consultants provide assistance with any questions or concerns at: Whirlpool Brand Home Appliances Customer eXperience Center 553 Benson Road Benton Harbor, MI 49022-2692 Please include a daytime phone number in your...Rack Support Part Number 8206118 Grease Filters Part Number 8206229 Charcoal Filter Part Number 8206230 Cooktop Light Bulb Part Number 8206232 Microwave Oven Light Bulb Part Number 4393681 Cleaning Supplies Heavy Duty Degreaser Part Number 31552 All-Purpose Appliance Cleaner Part Number 31662 ...
... FSP® replacement parts will help , follow the instructions below. Our consultants provide assistance with any questions or concerns at: Whirlpool Brand Home Appliances Customer eXperience Center 553 Benson Road Benton Harbor, MI 49022-2692 Please include a daytime phone number in your...Rack Support Part Number 8206118 Grease Filters Part Number 8206229 Charcoal Filter Part Number 8206230 Cooktop Light Bulb Part Number 8206232 Microwave Oven Light Bulb Part Number 4393681 Cleaning Supplies Heavy Duty Degreaser Part Number 31552 All-Purpose Appliance Cleaner Part Number 31662 ...


