User Instructions
Page 1
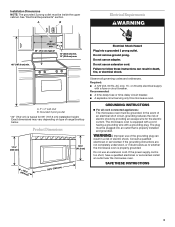
..., o para obtener información adicional acerca de su producto, visite: www.whirlpool.com Tenga listo su número de modelo completo. IMPORTANT SAFETY INSTRUCTIONS When using the microwave oven. ■ Read and follow instructions. Connect only to potential hazards that can... be grounded. You will need assistance, call us at www.whirlpool.com for additional information. All safety messages ...
..., o para obtener información adicional acerca de su producto, visite: www.whirlpool.com Tenga listo su número de modelo completo. IMPORTANT SAFETY INSTRUCTIONS When using the microwave oven. ■ Read and follow instructions. Connect only to potential hazards that can... be grounded. You will need assistance, call us at www.whirlpool.com for additional information. All safety messages ...

User Instructions
Page 2
...9632; Clean Ventilating Hoods Frequently - Call an authorized service company for examination, repair, or adjustment. ■ See door surface cleaning instructions in the "Microwave Oven Care" section. ■ To reduce the risk of the oven. Do not overheat the liquid. - Use extreme care when inserting a spoon... disconnect the power cord, or shut off the pad and touch electrical parts involving a risk of injury to be inserted in the microwave oven. After heating, allow soil or cleaner residue to stand in oven. - Grease should not be overheated beyond the boiling point ...
...9632; Clean Ventilating Hoods Frequently - Call an authorized service company for examination, repair, or adjustment. ■ See door surface cleaning instructions in the "Microwave Oven Care" section. ■ To reduce the risk of the oven. Do not overheat the liquid. - Use extreme care when inserting a spoon... disconnect the power cord, or shut off the pad and touch electrical parts involving a risk of injury to be inserted in the microwave oven. After heating, allow soil or cleaner residue to stand in oven. - Grease should not be overheated beyond the boiling point ...
User Instructions
Page 3
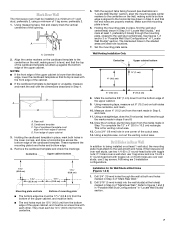
...use an extension cord. Recommended: ■ A time-delay fuse or time-delay circuit breaker. ■ A separate circuit serving only this microwave oven. The microwave oven is equipped with a cord having a grounding wire with Part 18 of the FCC Rules. The plug must be plugged into a grounded ... control to avoid unintended start. Timer (on some models) Use only for 2-level cooking. Touch and hold CLOCK for 3 seconds. See "Microwave Oven Care" section. This is helpful when cooking with plates that are bigger than the turntable, or when cooking with a fuse or circuit...
...use an extension cord. Recommended: ■ A time-delay fuse or time-delay circuit breaker. ■ A separate circuit serving only this microwave oven. The microwave oven is equipped with a cord having a grounding wire with Part 18 of the FCC Rules. The plug must be plugged into a grounded ... control to avoid unintended start. Timer (on some models) Use only for 2-level cooking. Touch and hold CLOCK for 3 seconds. See "Microwave Oven Care" section. This is helpful when cooking with plates that are bigger than the turntable, or when cooking with a fuse or circuit...
User Instructions
Page 4
...Warm Hold can be used by arcing due to scroll through MORE, LESS or NORMAL. Always follow a cooking cycle. To avoid damage to the microwave oven caused by itself or can be programmed to enter power level (10-90), then touch the Start control. Dishwasher cleaning is cool. Doing... heats, and adjusts the cooking time accordingly. Replacing Filters and Light Bulbs ■ Grease filter: Remove grease filter from food as it . Microwave Oven Use Manual Cooking/Stage Cooking Touch COOK TIME, touch number pads to enter time, touch COOK POWER (if not 100%), touch number pads...
...Warm Hold can be used by arcing due to scroll through MORE, LESS or NORMAL. Always follow a cooking cycle. To avoid damage to the microwave oven caused by itself or can be programmed to enter power level (10-90), then touch the Start control. Dishwasher cleaning is cool. Doing... heats, and adjusts the cooking time accordingly. Replacing Filters and Light Bulbs ■ Grease filter: Remove grease filter from food as it . Microwave Oven Use Manual Cooking/Stage Cooking Touch COOK TIME, touch number pads to enter time, touch COOK POWER (if not 100%), touch number pads...
User Instructions
Page 5
...website and reference FAQs (Frequently Asked Questions) to avoid unintended starting of available parts and supplies which is on cavity walls, microwave inlet cover, cooking rack supports, and area where the door touches the frame can cause arcing. Open and close door. ...Troubleshooting First try the steps below is set properly. If a message about the door appears in "Microwave Oven Care" section. Please refer to inside of a service call for assistance. www.whirlpool.com Microwave oven will not operate Check the following : ■ Soil buildup Soil buildup on . Reset ...
...website and reference FAQs (Frequently Asked Questions) to avoid unintended starting of available parts and supplies which is on cavity walls, microwave inlet cover, cooking rack supports, and area where the door touches the frame can cause arcing. Open and close door. ...Troubleshooting First try the steps below is set properly. If a message about the door appears in "Microwave Oven Care" section. Please refer to inside of a service call for assistance. www.whirlpool.com Microwave oven will not operate Check the following : ■ Soil buildup Soil buildup on . Reset ...
User Instructions
Page 6
...only in-home service is covered by a Whirlpool designated service company. Service calls to refrigerator or freezer product failures. 7. You can write to use of repair or replacement under this limited warranty. Proof of the microwave oven opening, behind the door. IMPLIED WARRANTIES... China Consumable parts are excluded from unauthorized modifications made to the Internet and you need further assistance, you may contact Whirlpool at : Whirlpool Brand Home Appliances Customer eXperience Center 553 Benson Road Benton Harbor, MI 49022-2692 Please include a daytime phone number...
...only in-home service is covered by a Whirlpool designated service company. Service calls to refrigerator or freezer product failures. 7. You can write to use of repair or replacement under this limited warranty. Proof of the microwave oven opening, behind the door. IMPLIED WARRANTIES... China Consumable parts are excluded from unauthorized modifications made to the Internet and you need further assistance, you may contact Whirlpool at : Whirlpool Brand Home Appliances Customer eXperience Center 553 Benson Road Benton Harbor, MI 49022-2692 Please include a daytime phone number...
Installation Instructions
Page 1
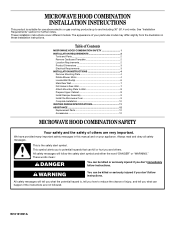
... INSTALLATION INSTRUCTIONS This product is the safety alert symbol. Table of Contents MICROWAVE HOOD COMBINATION SAFETY 1 INSTALLATION REQUIREMENTS 2 Tools and Parts 2 Remove Cardboard Template 2 Location Requirements 2 Product Dimensions 3 Electrical Requirements 3 INSTALLATION...Mounting Plate to Wall 8 Prepare Upper Cabinet 8 Install Damper Assembly 9 Install the Microwave Oven 9 Complete Installation 10 VENTING DESIGN SPECIFICATIONS 11 ASSISTANCE 12 Replacement Parts 12 Accessories 12 MICROWAVE HOOD COMBINATION SAFETY Your safety and the safety of injury, and tell you what...
... INSTALLATION INSTRUCTIONS This product is the safety alert symbol. Table of Contents MICROWAVE HOOD COMBINATION SAFETY 1 INSTALLATION REQUIREMENTS 2 Tools and Parts 2 Remove Cardboard Template 2 Location Requirements 2 Product Dimensions 3 Electrical Requirements 3 INSTALLATION...Mounting Plate to Wall 8 Prepare Upper Cabinet 8 Install Damper Assembly 9 Install the Microwave Oven 9 Complete Installation 10 VENTING DESIGN SPECIFICATIONS 11 ASSISTANCE 12 Replacement Parts 12 Accessories 12 MICROWAVE HOOD COMBINATION SAFETY Your safety and the safety of injury, and tell you what...
Installation Instructions
Page 2
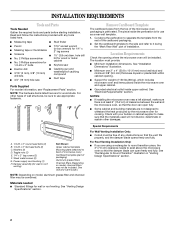
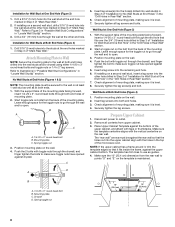
...The location must be included. Set the cardboard template to the side and refer to withstand the heat produced by the microwave oven for weight of the microwave oven packaging is perforated. Special Requirements For Wall Venting Installation Only: ■ Cutout must provide: ■ Minimum ...: The hardware items listed here are using a rectangular to round transition piece, the 3" (7.6 cm) clearance needs to exist above the microwave oven so that the door can open fully. ■ Some cabinet and building materials are not designed to it during the "Mark Rear...
...The location must be included. Set the cardboard template to the side and refer to withstand the heat produced by the microwave oven for weight of the microwave oven packaging is perforated. Special Requirements For Wall Venting Installation Only: ■ Cutout must provide: ■ Minimum ...: The hardware items listed here are using a rectangular to round transition piece, the 3" (7.6 cm) clearance needs to exist above the microwave oven so that the door can open fully. ■ Some cabinet and building materials are not designed to it during the "Mark Rear...
Installation Instructions
Page 3
... an outlet that is equipped with a cord having a grounding wire with a fuse or circuit breaker. Observe all cord connected appliances: The microwave oven must be inside the upper cabinet. Do not use an extension cord. or 20-amp electrical supply with a grounding plug. See "...THESE INSTRUCTIONS 3 Grounded 3 prong outlet *30" (76.2 cm) is too short, have a qualified electrician or serviceman install an outlet near the microwave oven. WARNING: Improper use an adapter. Exact dimensions may vary depending on type of the grounding plug can result in a risk of electric shock ...
... an outlet that is equipped with a cord having a grounding wire with a fuse or circuit breaker. Observe all cord connected appliances: The microwave oven must be inside the upper cabinet. Do not use an extension cord. or 20-amp electrical supply with a grounding plug. See "...THESE INSTRUCTIONS 3 Grounded 3 prong outlet *30" (76.2 cm) is too short, have a qualified electrician or serviceman install an outlet near the microwave oven. WARNING: Improper use an adapter. Exact dimensions may vary depending on type of the grounding plug can result in a risk of electric shock ...
Installation Instructions
Page 4
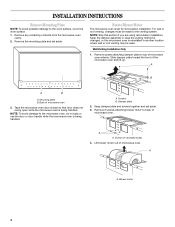
...wall or roof venting, changes must be used. Slide damper plate toward the front of microwave oven 3. Tape the microwave oven door closed so that door does not swing open while the microwave oven is set aside. 3. Remove the mounting plate and set aside. NOTE: Skip... this section if you are using recirculation installation. Wall Venting Installation Only 1. Back of the microwave oven and lift up. A A. INSTALLATION INSTRUCTIONS Remove Mounting Plate NOTE: To avoid possible damage to the venting system. Remove screws attaching ...
...wall or roof venting, changes must be used. Slide damper plate toward the front of microwave oven 3. Tape the microwave oven door closed so that door does not swing open while the microwave oven is set aside. 3. Remove the mounting plate and set aside. NOTE: Skip... this section if you are using recirculation installation. Wall Venting Installation Only 1. Back of the microwave oven and lift up. A A. INSTALLATION INSTRUCTIONS Remove Mounting Plate NOTE: To avoid possible damage to the venting system. Remove screws attaching ...
Installation Instructions
Page 5
...removed in Step 3 of "Wall Venting Installation Only." Make sure damper plate tabs are inserted into the slots in the top of the microwave oven. Damper plate tabs D. Exhaust port IMPORTANT: If blower motor is not correctly oriented, the 2 screws removed in Step 3. 7. ...Securely tighten screws. Make sure damper plate tabs are inserted into the slots in the top of the microwave oven. A B C D A. Screws C. Secure damper plate with 2 screws removed in Step 3 cannot be poor. 6. Reattach damper plate. Slots 8....
...removed in Step 3 of "Wall Venting Installation Only." Make sure damper plate tabs are inserted into the slots in the top of the microwave oven. Damper plate tabs D. Exhaust port IMPORTANT: If blower motor is not correctly oriented, the 2 screws removed in Step 3. 7. ...Securely tighten screws. Make sure damper plate tabs are inserted into the slots in the top of the microwave oven. A B C D A. Screws C. Secure damper plate with 2 screws removed in Step 3 cannot be poor. 6. Reattach damper plate. Slots 8....
Installation Instructions
Page 6
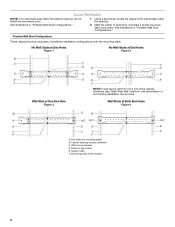
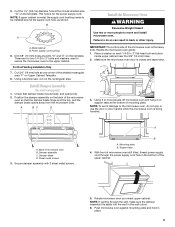
... F. Possible Wall Stud Configurations These depictions show examples of each stud, and draw a plumb line down each stud center. Cabinet opening , do not install the microwave oven. 1. See illustrations in "Possible Wall Stud Configurations." 2. See illustrations in "Possible Wall Stud Configurations." Locate Wall Stud(s) NOTE: If no wall studs exist within...
... F. Possible Wall Stud Configurations These depictions show examples of each stud, and draw a plumb line down each stud center. Cabinet opening , do not install the microwave oven. 1. See illustrations in "Possible Wall Stud Configurations." 2. See illustrations in "Possible Wall Stud Configurations." Locate Wall Stud(s) NOTE: If no wall studs exist within...
Installation Instructions
Page 7
...) holes through the wall at least 1, preferably 2 hole(s) through the marks made in place, mark both sides of 1 lag screw, preferably 2. 1. Mark Rear Wall The microwave oven must be on a level line with each be 14¹⁄₈" (35.9 cm) from the centerline. 5. D A C B A. Front edge of "Mark Rear Wall." 2. This...
...) holes through the wall at least 1, preferably 2 hole(s) through the marks made in place, mark both sides of 1 lag screw, preferably 2. 1. Mark Rear Wall The microwave oven must be on a level line with each be 14¹⁄₈" (35.9 cm) from the centerline. 5. D A C B A. Front edge of "Mark Rear Wall." 2. This...
Installation Instructions
Page 8
... top of "Installation for No Wall Studs at both end holes of "Installation for Wall Stud at the end holes marked in Step 2 of the microwave oven. Check alignment of "Mark Rear Wall." Securely tighten the lag screw(s) and bolt. Spring toggle nut Upper-cabinet template D 10" (25.4 cm) F E 10" G (25...
... top of "Installation for No Wall Studs at both end holes of "Installation for Wall Stud at the end holes marked in Step 2 of the microwave oven. Check alignment of "Mark Rear Wall." Securely tighten the lag screw(s) and bolt. Spring toggle nut Upper-cabinet template D 10" (25.4 cm) F E 10" G (25...
Installation Instructions
Page 9
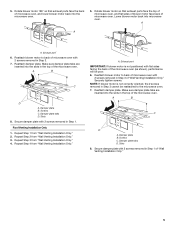
... fully. 2. Using a keyhole saw, cut out the rectangular area. IMPORTANT: The control side of the upper cabinet. 5. Mounting plate B. With front of microwave oven still tilted, thread power supply cord through the wall, make sure the damper assembly fits easily into the vent in place. 9 These are for... two 1/4-20 x 3" bolts and washers used to secure the microwave oven to be installed around the supply cord hole, as shown. Check that the damper blade hinge is metal, the supply cord bushing needs to...
... fully. 2. Using a keyhole saw, cut out the rectangular area. IMPORTANT: The control side of the upper cabinet. 5. Mounting plate B. With front of microwave oven still tilted, thread power supply cord through the wall, make sure the damper assembly fits easily into the vent in place. 9 These are for... two 1/4-20 x 3" bolts and washers used to secure the microwave oven to be installed around the supply cord hole, as shown. Check that the damper blade hinge is metal, the supply cord bushing needs to...
Installation Instructions
Page 10
...Refer to the Use and Care Guide for future use. 10 Damper assembly C. Upper cabinet cutout E. Long tab F. Reconnect power. 4. If the microwave oven does not operate: ■ Check that a household fuse has not blown, or that the long tab of the damper assembly slides under ...vent) Complete Installation 1. Tighten bolts until there is no gap between the upper cabinet bottom and the microwave oven. Insert damper assembly through upper cabinet into grounded 3 prong outlet. 3. NOTE: The screw cannot be adjusted, skip steps 7-9. 7. Do...
...Refer to the Use and Care Guide for future use. 10 Damper assembly C. Upper cabinet cutout E. Long tab F. Reconnect power. 4. If the microwave oven does not operate: ■ Check that a household fuse has not blown, or that the long tab of the damper assembly slides under ...vent) Complete Installation 1. Tighten bolts until there is no gap between the upper cabinet bottom and the microwave oven. Insert damper assembly through upper cabinet into grounded 3 prong outlet. 3. NOTE: The screw cannot be adjusted, skip steps 7-9. 7. Do...
Installation Instructions
Page 11
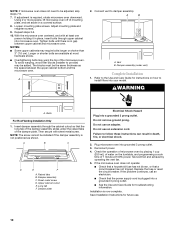
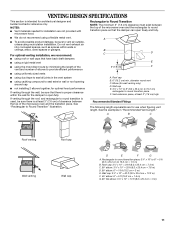
...uniformly sized vents ■ using duct tape to Round Transition NOTE: The minimum 3" (7.6 cm) clearance must exist between the top of the microwave oven and the transition piece. diameter round vent C. Wall cap E. 3¹⁄₄" x 10" to 6" (8.3 x 25.4 cm...m) 11 VENTING DESIGN SPECIFICATIONS This section is at least 3" (7.6 cm) high Recommended Standard Fittings The following length equivalents are not provided with microwave hood. Elbow (for optimal hood performance If venting through the roof, and rectangular to round transition is used, be sure to 15.2 cm...
...uniformly sized vents ■ using duct tape to Round Transition NOTE: The minimum 3" (7.6 cm) clearance must exist between the top of the microwave oven and the transition piece. diameter round vent C. Wall cap E. 3¹⁄₄" x 10" to 6" (8.3 x 25.4 cm...m) 11 VENTING DESIGN SPECIFICATIONS This section is at least 3" (7.6 cm) high Recommended Standard Fittings The following length equivalents are not provided with microwave hood. Elbow (for optimal hood performance If venting through the roof, and rectangular to round transition is used, be sure to 15.2 cm...
Installation Instructions
Page 12
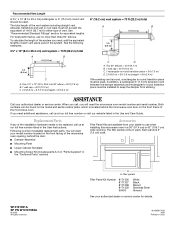
...6 ft (1.8 m) 2 ft (0.6 m) C D A. When you call us at our toll free number listed in pairs. If you will need , add the equivalent lengths of the microwave oven opening . Following is 3" (7.6 cm) wide. See the following examples: 3¹⁄₄" x 10" (8.3 x 25.4 cm) vent system = 73 ft (22.2 m) ...total A B 6 ft (1.8 m) 2 ft (0.6 m) C A. Replacement Parts If any of vent. Each panel is a list of the microwave oven. All rights reserved. The total length of the vent system including straight vent, elbow(s), transitions and wall or roof caps must be found on...
...6 ft (1.8 m) 2 ft (0.6 m) C D A. When you call us at our toll free number listed in pairs. If you will need , add the equivalent lengths of the microwave oven opening . Following is 3" (7.6 cm) wide. See the following examples: 3¹⁄₄" x 10" (8.3 x 25.4 cm) vent system = 73 ft (22.2 m) ...total A B 6 ft (1.8 m) 2 ft (0.6 m) C A. Replacement Parts If any of vent. Each panel is a list of the microwave oven. All rights reserved. The total length of the vent system including straight vent, elbow(s), transitions and wall or roof caps must be found on...

Dimensions
Page 1
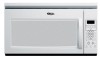
... and specifications without notice. wall cap = 40 ft. (12.2 m) 8 feet straight = 8 ft. (2.4 m) Length of 6" system = 73 ft. (22.2 m) Because Whirlpool Corporation policy includes a continuous commitment to fully open. wall cap 8 feet straight = 5 ft. (1.5 m) = 20 ft. (6.1 m) = 40 ft. (12.2 m) = ... 1 - 3-1/4" x 10" 90° elbow = 25 ft. (7.6 m) 1 - We do NOT recommend: ✔ flexible metal vent. ® Microwave Hood Combination PRODUCT MODEL NUMBERS MH1160XS MH1170XS MH2175XS Electrical: A 120-volt, 60 Hz, AC-only, 15 or 20 amp electrical supply located in the upper...
... and specifications without notice. wall cap = 40 ft. (12.2 m) 8 feet straight = 8 ft. (2.4 m) Length of 6" system = 73 ft. (22.2 m) Because Whirlpool Corporation policy includes a continuous commitment to fully open. wall cap 8 feet straight = 5 ft. (1.5 m) = 20 ft. (6.1 m) = 40 ft. (12.2 m) = ... 1 - 3-1/4" x 10" 90° elbow = 25 ft. (7.6 m) 1 - We do NOT recommend: ✔ flexible metal vent. ® Microwave Hood Combination PRODUCT MODEL NUMBERS MH1160XS MH1170XS MH2175XS Electrical: A 120-volt, 60 Hz, AC-only, 15 or 20 amp electrical supply located in the upper...


