User Instructions
Page 1
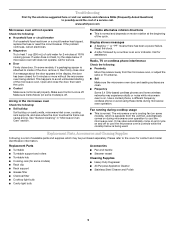
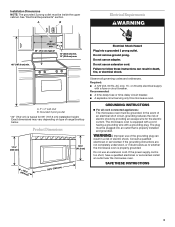
... you to potential hazards that can be followed, including the following: WARNING: To reduce the risk of the microwave oven opening, behind the door. All safety messages will need assistance, call us at www.whirlpool.com for additional information. for example, closed glass jars - This symbol alerts you don't immediately follow instructions...
... you to potential hazards that can be followed, including the following: WARNING: To reduce the risk of the microwave oven opening, behind the door. All safety messages will need assistance, call us at www.whirlpool.com for additional information. for example, closed glass jars - This symbol alerts you don't immediately follow instructions...

User Instructions
Page 2
... of 36" (91.44 cm). ■ Clean Ventilating Hoods Frequently - It is not designed for storage purposes. Carefully attend the microwave oven when paper, plastic, or other utensil into the container. ■ Oversized foods or oversized metal utensils should not be boiling. ...If materials inside the oven to facilitate cooking. - It is important not to microwave energy. After heating, allow soil or cleaner residue to the: (1) Door (bent), (2) Hinges and latches (broken or loosened), (3) Door seals ...
... of 36" (91.44 cm). ■ Clean Ventilating Hoods Frequently - It is not designed for storage purposes. Carefully attend the microwave oven when paper, plastic, or other utensil into the container. ■ Oversized foods or oversized metal utensils should not be boiling. ...If materials inside the oven to facilitate cooking. - It is important not to microwave energy. After heating, allow soil or cleaner residue to the: (1) Door (bent), (2) Hinges and latches (broken or loosened), (3) Door seals ...
User Instructions
Page 3
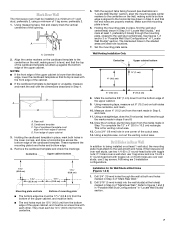
...is properly installed and grounded. Recommended: ■ A time-delay fuse or time-delay circuit breaker. ■ A separate circuit serving only this microwave oven. Touch CLOCK or the Start control. Repeat to turn back on . Turntable cannot be grounded. Touch CLOCK. 2. Touch and hold number... pad "2" for the electric current. Repeat to turn back on . See "Microwave Oven Care" section. Turntable Turntable may be used independently during any cook function. or 20-amp electrical supply with plates that are bigger...
...is properly installed and grounded. Recommended: ■ A time-delay fuse or time-delay circuit breaker. ■ A separate circuit serving only this microwave oven. Touch CLOCK or the Start control. Repeat to turn back on . Turntable cannot be grounded. Touch CLOCK. 2. Touch and hold number... pad "2" for the electric current. Repeat to turn back on . See "Microwave Oven Care" section. Turntable Turntable may be used independently during any cook function. or 20-amp electrical supply with plates that are bigger...
User Instructions
Page 4
... repeatedly to enter power level (10-90), then touch the Start control. The Warm Hold function uses 10% cook power. Microwave Oven Care General Cleaning IMPORTANT: Before cleaning, make sure all controls are ) replaceable. ■ Cavity light: The cavity light... bulb is replaceable. 4 Dishwasher cleaning is behind the door. Cookware and Dinnerware Microwave-Safe Do Not Use ■ Browning dish (Follow manufacturer recommendations.) ■ Ceramic glass, glass ■ China, earthenware (Follow manufacturer recommendations...
... repeatedly to enter power level (10-90), then touch the Start control. The Warm Hold function uses 10% cook power. Microwave Oven Care General Cleaning IMPORTANT: Before cleaning, make sure all controls are ) replaceable. ■ Cavity light: The cavity light... bulb is replaceable. 4 Dishwasher cleaning is behind the door. Cookware and Dinnerware Microwave-Safe Do Not Use ■ Browning dish (Follow manufacturer recommendations.) ■ Ceramic glass, glass ■ China, earthenware (Follow manufacturer recommendations...
User Instructions
Page 5
...Turntable ■ Turntable support and rollers ■ Turntable hub ■ Cooking rack (for assistance. www.whirlpool.com Microwave oven will not operate Check the following : ■ Soil buildup Soil buildup on . If microwave oven still does not operate, call an electrician. ■ Magnetron Try to cool the... close the door, then start the cycle. ■ Control Make sure control is an error indicator. See "General Cleaning" in the microwave oven Check the following : ■ Household fuse or circuit breaker If a household fuse has blown or a circuit breaker has tripped, ...
...Turntable ■ Turntable support and rollers ■ Turntable hub ■ Cooking rack (for assistance. www.whirlpool.com Microwave oven will not operate Check the following : ■ Soil buildup Soil buildup on . If microwave oven still does not operate, call an electrician. ■ Magnetron Try to cool the... close the door, then start the cycle. ■ Control Make sure control is an error indicator. See "General Cleaning" in the microwave oven Check the following : ■ Household fuse or circuit breaker If a household fuse has blown or a circuit breaker has tripped, ...
User Instructions
Page 6
... that have access to the Internet and you need further assistance, you on the upper or lower front facing of the microwave oven opening, behind the door. SOME STATES AND PROVINCES DO NOT ALLOW THE EXCLUSION OR LIMITATION OF INCIDENTAL OR CONSEQUENTIAL DAMAGES... alteration, misuse, abuse, fire, flood, acts of God, improper installation, installation not in accordance with the product, Whirlpool Corporation or Whirlpool Canada LP (hereafter "Whirlpool") will pay for future reference. The cost of repair or replacement under this limited warranty. LIMITATION OF REMEDIES CUSTOMER'S ...
... that have access to the Internet and you need further assistance, you on the upper or lower front facing of the microwave oven opening, behind the door. SOME STATES AND PROVINCES DO NOT ALLOW THE EXCLUSION OR LIMITATION OF INCIDENTAL OR CONSEQUENTIAL DAMAGES... alteration, misuse, abuse, fire, flood, acts of God, improper installation, installation not in accordance with the product, Whirlpool Corporation or Whirlpool Canada LP (hereafter "Whirlpool") will pay for future reference. The cost of repair or replacement under this limited warranty. LIMITATION OF REMEDIES CUSTOMER'S ...
Installation Instructions
Page 1
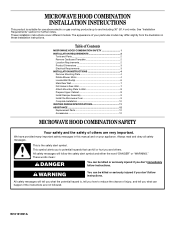
... follow instructions. WARNING You can happen if the instructions are very important. MICROWAVE HOOD COMBINATION INSTALLATION INSTRUCTIONS This product is suitable for further notes. The appearance of Contents MICROWAVE HOOD COMBINATION SAFETY 1 INSTALLATION REQUIREMENTS 2 Tools and Parts 2 Remove Cardboard ... 8 Prepare Upper Cabinet 8 Install Damper Assembly 9 Install the Microwave Oven 9 Complete Installation 10 VENTING DESIGN SPECIFICATIONS 11 ASSISTANCE 12 Replacement Parts 12 Accessories 12 MICROWAVE HOOD COMBINATION SAFETY Your safety and the safety of injury, and...
... follow instructions. WARNING You can happen if the instructions are very important. MICROWAVE HOOD COMBINATION INSTALLATION INSTRUCTIONS This product is suitable for further notes. The appearance of Contents MICROWAVE HOOD COMBINATION SAFETY 1 INSTALLATION REQUIREMENTS 2 Tools and Parts 2 Remove Cardboard ... 8 Prepare Upper Cabinet 8 Install Damper Assembly 9 Install the Microwave Oven 9 Complete Installation 10 VENTING DESIGN SPECIFICATIONS 11 ASSISTANCE 12 Replacement Parts 12 Accessories 12 MICROWAVE HOOD COMBINATION SAFETY Your safety and the safety of injury, and...
Installation Instructions
Page 2
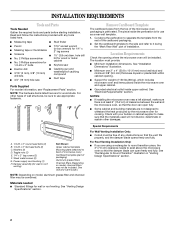
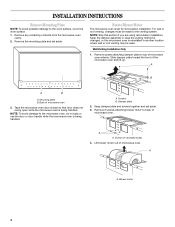
... wall structures, be combined. See "Venting Design Specifications" section. The location must be installed. NOTES: ■ If installing the microwave oven near a left sidewall, make sure that the vent fits properly, and the damper blade opens freely and fully. See "Rectangular... (2) F. Damper assembly (for wood studs. Remove Cardboard Template The cardboard piece from the rest of clearance between the wall and the microwave oven, so that the damper blade can open freely and fully. INSTALLATION REQUIREMENTS Tools and Parts Tools Needed Gather the required tools and ...
... wall structures, be combined. See "Venting Design Specifications" section. The location must be installed. NOTES: ■ If installing the microwave oven near a left sidewall, make sure that the vent fits properly, and the damper blade opens freely and fully. See "Rectangular... (2) F. Damper assembly (for wood studs. Remove Cardboard Template The cardboard piece from the rest of clearance between the wall and the microwave oven, so that the damper blade can open freely and fully. INSTALLATION REQUIREMENTS Tools and Parts Tools Needed Gather the required tools and ...
Installation Instructions
Page 3
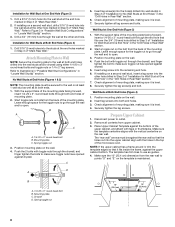
... not use an extension cord. Recommended: ■ A time-delay fuse or time-delay circuit breaker. ■ A separate circuit serving only this microwave oven. Product Dimensions 17¹⁄₄" (43.8 cm) 16¹⁄₄" (41.3 cm) (401.05³c⁄₄m") 29⁷... min. Grounded 3 prong outlet *30" (76.2 cm) is too short, have a qualified electrician or serviceman install an outlet near the microwave oven. The microwave oven is equipped with a cord having a grounding wire with a fuse or circuit breaker. WARNING: Improper use an adapter. Do not use an...
... not use an extension cord. Recommended: ■ A time-delay fuse or time-delay circuit breaker. ■ A separate circuit serving only this microwave oven. Product Dimensions 17¹⁄₄" (43.8 cm) 16¹⁄₄" (41.3 cm) (401.05³c⁄₄m") 29⁷... min. Grounded 3 prong outlet *30" (76.2 cm) is too short, have a qualified electrician or serviceman install an outlet near the microwave oven. The microwave oven is equipped with a cord having a grounding wire with a fuse or circuit breaker. WARNING: Improper use an adapter. Do not use an...
Installation Instructions
Page 4
... wall or roof venting may be made to back of microwave oven. Lift blower motor out of microwave oven 3. A A. Remove any remaining contents from the microwave oven cavity. 2. Wall Venting Installation Only 1. Back of microwave oven. Keep damper plate and screws together and set aside...section if you are using recirculation installation. Slide damper plate toward the front of the microwave oven and lift up. Screws (in case the venting method is changed, or the microwave oven is being handled. Blower motor 4 Damper plate 2. A Screws B. INSTALLATION INSTRUCTIONS...
... wall or roof venting may be made to back of microwave oven. Lift blower motor out of microwave oven 3. A A. Remove any remaining contents from the microwave oven cavity. 2. Wall Venting Installation Only 1. Back of microwave oven. Keep damper plate and screws together and set aside...section if you are using recirculation installation. Slide damper plate toward the front of the microwave oven and lift up. Screws (in case the venting method is changed, or the microwave oven is being handled. Blower motor 4 Damper plate 2. A Screws B. INSTALLATION INSTRUCTIONS...
Installation Instructions
Page 5
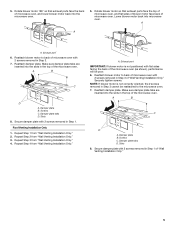
...poor. 6. Securely tighten screws. Screws C. Rotate blower motor 180° so that exhaust ports face the top of microwave oven, and flat sides of blower motor face back of "Wall Venting Installation Only." Reattach blower motor to the... microwave oven. 7. Slots 8. A. A B C D A. Damper plate B. A A A. Make sure damper plate tabs are inserted into the slots in Step 3 of microwave oven. 5. Reattach damper plate. Repeat Step 4 from "Wall Venting Installation Only...
...poor. 6. Securely tighten screws. Screws C. Rotate blower motor 180° so that exhaust ports face the top of microwave oven, and flat sides of blower motor face back of "Wall Venting Installation Only." Reattach blower motor to the... microwave oven. 7. Slots 8. A. A B C D A. Damper plate B. A A A. Make sure damper plate tabs are inserted into the slots in Step 3 of microwave oven. 5. Reattach damper plate. Repeat Step 4 from "Wall Venting Installation Only...
Installation Instructions
Page 6
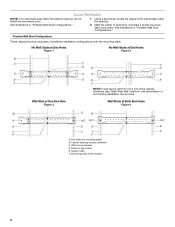
... Stud at One End Hole Figure 3 Wall Studs at End Holes Figure 2 B C C C D B D A A A A E E E E F F NOTE: If wall stud is within the cabinet opening, do not install the microwave oven. 1. Wall stud centerlines D. Holes for lag screws E. Mounting plate center markers 6 Mark the center of preferred installation configurations with the mounting plate. End holes...
... Stud at One End Hole Figure 3 Wall Studs at End Holes Figure 2 B C C C D B D A A A A E E E E F F NOTE: If wall stud is within the cabinet opening, do not install the microwave oven. 1. Wall stud centerlines D. Holes for lag screws E. Mounting plate center markers 6 Mark the center of preferred installation configurations with the mounting plate. End holes...
Installation Instructions
Page 7
... front edge of the cabinet. ■ If the cardboard template is level. 6. They must each be on at End Holes (Figures 1 & 2) 1. D. D A C B A. Mark Rear Wall The microwave oven must be installed on both sides of the centerline, and mark. 10. NOTES: ■ If the front edge of the cutout area. 14. Make...
... front edge of the cabinet. ■ If the cardboard template is level. 6. They must each be on at End Holes (Figures 1 & 2) 1. D. D A C B A. Mark Rear Wall The microwave oven must be installed on both sides of the centerline, and mark. 10. NOTES: ■ If the front edge of the cutout area. 14. Make...
Installation Instructions
Page 8
... hole that fits over the 3/4" (19 mm) hole drilled in Step 3 of "Installation for Wall Stud at the end holes marked in Step 3 of the microwave oven. Leave enough space for No Wall Studs at the end hole marked in Step 3 of "Installation for the toggle nut to go through the...
... hole that fits over the 3/4" (19 mm) hole drilled in Step 3 of "Installation for Wall Stud at the end holes marked in Step 3 of the microwave oven. Leave enough space for No Wall Studs at the end hole marked in Step 3 of "Installation for the toggle nut to go through the...
Installation Instructions
Page 9
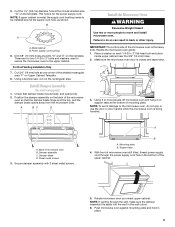
...185;⁄₂" (3.8 cm) diameter hole at points "D" and "E" on support tabs at one corner of microwave oven B. B A A. Metal cabinet B. Damper blade D. Rotate microwave oven up toward upper cabinet. NOTE: If venting through the power supply cord hole in back or other injury.... Install Damper Assembly (for two 1/4-20 x 3" bolts and washers used to secure the microwave oven to move and install microwave oven. Handle the microwave oven gently. 1. Make sure the microwave oven door is for the power supply cord. 5. Mounting plate B. A. Using a keyhole saw...
...185;⁄₂" (3.8 cm) diameter hole at points "D" and "E" on support tabs at one corner of microwave oven B. B A A. Metal cabinet B. Damper blade D. Rotate microwave oven up toward upper cabinet. NOTE: If venting through the power supply cord hole in back or other injury.... Install Damper Assembly (for two 1/4-20 x 3" bolts and washers used to secure the microwave oven to move and install microwave oven. Handle the microwave oven gently. 1. Make sure the microwave oven door is for the power supply cord. 5. Mounting plate B. A. Using a keyhole saw...
Installation Instructions
Page 10
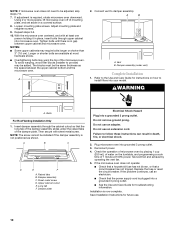
...cabinet into your model. Damper assembly C. Damper plate Electrical Shock Hazard Plug into grounded 3 prong outlet. 3. Failure to install filters into microwave oven. Repeat steps 3-6. 10. A B C D E F A. Do not use an adapter. Replace the fuse or reset the ... secure with at least one person holding it in death, fire, or electrical shock. 2. Raised tabs B. Installation is required, rotate microwave oven downward. Save Installation Instructions for instructions on a covered surface. 8. A B A. Refer to damper assembly. Reconnect power. 4. ...
...cabinet into your model. Damper assembly C. Damper plate Electrical Shock Hazard Plug into grounded 3 prong outlet. 3. Failure to install filters into microwave oven. Repeat steps 3-6. 10. A B C D E F A. Do not use an adapter. Replace the fuse or reset the ... secure with at least one person holding it in death, fire, or electrical shock. 2. Raised tabs B. Installation is required, rotate microwave oven downward. Save Installation Instructions for instructions on a covered surface. 8. A B A. Refer to damper assembly. Reconnect power. 4. ...
Installation Instructions
Page 11
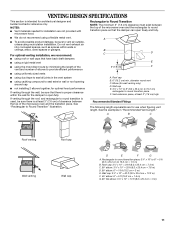
...9632; using a rigid metal vent E ■ using the most direct route by minimizing the length of the 3" (7.6 cm) F vent and number of the microwave oven and the transition piece. Rectangular to round transition piece: 3¹⁄₄" x 10" to 6" = 5 ft (8.3 x 25.4 cm to open ...transition is used, be sure there is at least 3" (7.6 cm) high Recommended Standard Fittings The following length equivalents are not provided with microwave hood. diameter round vent C. NOTES: ■ Vent materials needed for installation are for wall venting only) D. See the examples in the...
...9632; using a rigid metal vent E ■ using the most direct route by minimizing the length of the 3" (7.6 cm) F vent and number of the microwave oven and the transition piece. Rectangular to round transition piece: 3¹⁄₄" x 10" to 6" = 5 ft (8.3 x 25.4 cm to open ...transition is used, be sure there is at least 3" (7.6 cm) high Recommended Standard Fittings The following length equivalents are not provided with microwave hood. diameter round vent C. NOTES: ■ Vent materials needed for installation are for wall venting only) D. See the examples in the...
Installation Instructions
Page 12
...10" (8.3 x 25.4 cm) rectangular or 6" (15.2 cm) round vent should be used . For best performance, use when installing this microwave oven in the "Tools and Parts" section) Accessories Filler Panel Kits are available from sticking. One 3¹⁄₄" x 10" (8.3 x... 1 wall cap = 40 ft (12.2 m) C. 1 rectangular to round transition piece must not exceed the equivalent of 140 ft (42.7 m) for either type of the microwave oven. In addition, a rectangular 3" (7.6 cm) extension vent between the damper assembly and rectangular to round transition piece = 5 ft (1.5 m) D. 2 ft (0.6 m) +...
...10" (8.3 x 25.4 cm) rectangular or 6" (15.2 cm) round vent should be used . For best performance, use when installing this microwave oven in the "Tools and Parts" section) Accessories Filler Panel Kits are available from sticking. One 3¹⁄₄" x 10" (8.3 x... 1 wall cap = 40 ft (12.2 m) C. 1 rectangular to round transition piece must not exceed the equivalent of 140 ft (42.7 m) for either type of the microwave oven. In addition, a rectangular 3" (7.6 cm) extension vent between the damper assembly and rectangular to round transition piece = 5 ft (1.5 m) D. 2 ft (0.6 m) +...

Dimensions
Page 1
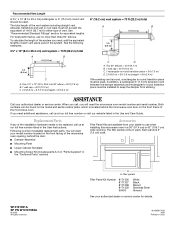
... . We recommend: ✔ using rigid metal vent. ✔ that length of vent and number of 6" system = 73 ft. (22.2 m) Because Whirlpool Corporation policy includes a continuous commitment to change without notice. Recommended vent length Use 3-1/4" x 10" (8.3 cm x 25.4 cm) rectangular or 6" (15.2...of the exhaust damper. 3-1/4" x 10" (8.3 cm x 25.4 cm) through -the-roof Recommended standard fittings 3-1/4" x 10" to the microwave oven hood. See "Electrical Requirements" section. The total length of the vent system including straight vent, elbow(s), transitions, wall or roof caps ...
... . We recommend: ✔ using rigid metal vent. ✔ that length of vent and number of 6" system = 73 ft. (22.2 m) Because Whirlpool Corporation policy includes a continuous commitment to change without notice. Recommended vent length Use 3-1/4" x 10" (8.3 cm x 25.4 cm) rectangular or 6" (15.2...of the exhaust damper. 3-1/4" x 10" (8.3 cm x 25.4 cm) through -the-roof Recommended standard fittings 3-1/4" x 10" to the microwave oven hood. See "Electrical Requirements" section. The total length of the vent system including straight vent, elbow(s), transitions, wall or roof caps ...


