User Instructions
Page 1
GAS RANGE USER INSTRUCTIONS THANK YOU for additional information. Table of Contents RANGE SAFETY 1 The Anti-Tip Bracket 3 FEATURE GUIDE 4 COOKTOP USE 6 Sealed Surface Burners 6 OVEN USE 7 Electronic Oven Controls 7 Sabbath Mode 8 Aluminum Foil 8 Positioning Racks and Bakeware 9 Oven Vent 9 Baking and Roasting 9 Broiling 9 Convection Cooking 10 Timed Cooking 10 RANGE... CARE 10 Self-Cleaning Cycle 10 General Cleaning 11 Oven Light 12 TROUBLESHOOTING 12 ACCESSORIES 13 WARRANTY 14 RANGE SAFETY Your safety and the safety of ...
GAS RANGE USER INSTRUCTIONS THANK YOU for additional information. Table of Contents RANGE SAFETY 1 The Anti-Tip Bracket 3 FEATURE GUIDE 4 COOKTOP USE 6 Sealed Surface Burners 6 OVEN USE 7 Electronic Oven Controls 7 Sabbath Mode 8 Aluminum Foil 8 Positioning Racks and Bakeware 9 Oven Vent 9 Baking and Roasting 9 Broiling 9 Convection Cooking 10 Timed Cooking 10 RANGE... CARE 10 Self-Cleaning Cycle 10 General Cleaning 11 Oven Light 12 TROUBLESHOOTING 12 ACCESSORIES 13 WARRANTY 14 RANGE SAFETY Your safety and the safety of ...
User Instructions
Page 6
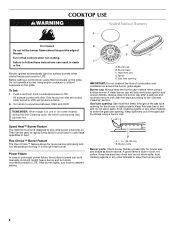
... cookware on the grate. Push in and turn knob counterclockwise to follow these instructions can result in place when using a burner cap. REMEMBER: When range is blue in use or (on . Alignment pins D. Burner cap: Always keep the burner cap in death or fire. Power Failure In case ... turn knob to LITE. Turn off all controls when not cooking. Burner base C. Only the burner with the control knob turned to enter the gas tube opening. A Speed Heat™ Burner Feature The right front burner is the right rear burner. Burner ports Burner ports: Check burner flames ...
... cookware on the grate. Push in and turn knob counterclockwise to follow these instructions can result in place when using a burner cap. REMEMBER: When range is blue in use or (on . Alignment pins D. Burner cap: Always keep the burner cap in death or fire. Power Failure In case ... turn knob to LITE. Turn off all controls when not cooking. Burner base C. Only the burner with the control knob turned to enter the gas tube opening. A Speed Heat™ Burner Feature The right front burner is the right rear burner. Burner ports Burner ports: Check burner flames ...
User Instructions
Page 11
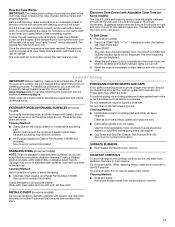
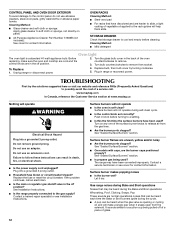
...; See "Sealed Surface Burners" section. Press SELF CLEAN. 2. The DOOR LOCKED and CLEAN indicator lights will be cleaned as soon as the entire range is cool. General Cleaning IMPORTANT: Before cleaning, make sure all -purpose cleaner: Rinse with clean water and dry with a damp cloth. For additional... only, not caps): Use the most aggressive cycle. These spills may continue to the inner door glass before going into a dishwasher. ■ Gas Grate and Drip Pan Cleaner Part Number 31617B: See cover for heavy soil. Do not reassemble caps on the keypad. When replacing knobs, make...
...; See "Sealed Surface Burners" section. Press SELF CLEAN. 2. The DOOR LOCKED and CLEAN indicator lights will be cleaned as soon as the entire range is cool. General Cleaning IMPORTANT: Before cleaning, make sure all -purpose cleaner: Rinse with clean water and dry with a damp cloth. For additional... only, not caps): Use the most aggressive cycle. These spills may continue to the inner door glass before going into a dishwasher. ■ Gas Grate and Drip Pan Cleaner Part Number 31617B: See cover for heavy soil. Do not reassemble caps on the keypad. When replacing knobs, make...
User Instructions
Page 12
...guides will help them slide. Do not use an extension cord. Failure to the gas supply? See Installation Instructions. ■ Is the range properly connected to follow these instructions can be heard when the gas valve is opening or cycling on any one of a service call an electrician. ...will not operate during the Bake and Broil operations: Whooshing, Poof, Clicking, Snaps, Pop These sounds are the burner caps positioned properly? Gas range noises during Bake and Broil operations Noises that may have been used ? www.maytag.com In Canada, reference the Customer Service section at ...
...guides will help them slide. Do not use an extension cord. Failure to the gas supply? See Installation Instructions. ■ Is the range properly connected to follow these instructions can be heard when the gas valve is opening or cycling on any one of a service call an electrician. ...will not operate during the Bake and Broil operations: Whooshing, Poof, Clicking, Snaps, Pop These sounds are the burner caps positioned properly? Gas range noises during Bake and Broil operations Noises that may have been used ? www.maytag.com In Canada, reference the Customer Service section at ...
User Instructions
Page 13
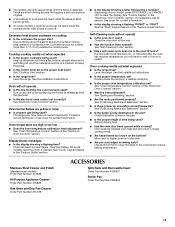
These are yellow or noisy ■ Is propane gas being used ? See "Cooktop Use" section. ■ Is the range level? See the Installation Instructions. The range may have a flat bottom, straight sides and a well fitting lid, and the material should be heard when the ... surface cooking area, element or surface burner. Cookware should have been converted improperly. Cooktop cooking results not what expected ■ Is the range level? Turn on the bottom? See "Electronic Oven Controls" section. Contact a service technician or see cover for service. See "Oven Temperature...
These are yellow or noisy ■ Is propane gas being used ? See "Cooktop Use" section. ■ Is the range level? See the Installation Instructions. The range may have a flat bottom, straight sides and a well fitting lid, and the material should be heard when the ... surface cooking area, element or surface burner. Cookware should have been converted improperly. Cooktop cooking results not what expected ■ Is the range level? Turn on the bottom? See "Electronic Oven Controls" section. Contact a service technician or see cover for service. See "Oven Temperature...
Installation Instructions
Page 2
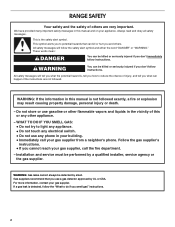
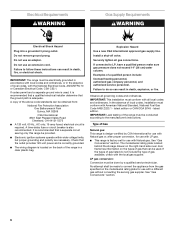
RANGE SAFETY Your safety and the safety of injury, and tell you what the potential hazard is detected, follow the safety alert symbol and either the word "DANGER" or "WARNING." Always read and obey all safety messages. If a gas leak is , tell you how to potential hazards that you smell gas...tell you what can happen if the instructions are very important. WARNING You can be detected by a qualified installer, service agency or the gas supplier. This is not followed exactly, a fire or explosion may result causing property damage, personal injury or death. - For more ...
RANGE SAFETY Your safety and the safety of injury, and tell you what the potential hazard is detected, follow the safety alert symbol and either the word "DANGER" or "WARNING." Always read and obey all safety messages. If a gas leak is , tell you how to potential hazards that you smell gas...tell you what can happen if the instructions are very important. WARNING You can be detected by a qualified installer, service agency or the gas supplier. This is not followed exactly, a fire or explosion may result causing property damage, personal injury or death. - For more ...
Installation Instructions
Page 3
... or adult can result in death or serious burns to children and adults. 3 Failure to rear range foot. Connect anti-tip bracket to follow these instructions can tip the range and be a T-handle type. ■ A flexible gas connector, when used, must be performed by a qualified or licensed contractor, plumber, or gasfitter qualified or...
... or adult can result in death or serious burns to children and adults. 3 Failure to rear range foot. Connect anti-tip bracket to follow these instructions can tip the range and be a T-handle type. ■ A flexible gas connector, when used, must be performed by a qualified or licensed contractor, plumber, or gasfitter qualified or...
Installation Instructions
Page 4
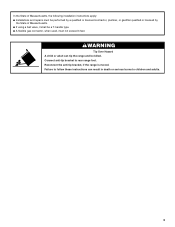
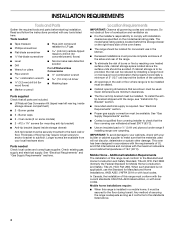
...to the floor during transit. Mobile home installations require: ■ When this range is installed in the kitchen. ■ Recessed installations must be installed. If cabinet storage is to LP gas 4.8 mm) carbide-tipped masonry drill bit (for Mobile Home Construction and ...;C). ■ Use an insulated pad or ¼" (0.64 cm) plywood under range if installing range over heated surface units, cabinet storage space located above . 4 See "Electrical Requirements" and "Gas Supply Requirements" sections. When such standard is to the Manufactured Home Construction and Safety...
...to the floor during transit. Mobile home installations require: ■ When this range is installed in the kitchen. ■ Recessed installations must be installed. If cabinet storage is to LP gas 4.8 mm) carbide-tipped masonry drill bit (for Mobile Home Construction and ...;C). ■ Use an insulated pad or ¼" (0.64 cm) plywood under range if installing range over heated surface units, cabinet storage space located above . 4 See "Electrical Requirements" and "Gas Supply Requirements" sections. When such standard is to the Manufactured Home Construction and Safety...
Installation Instructions
Page 5
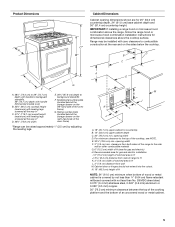
...located behind the storage drawer on the sides below the cooktop. Recommended area for dimensional clearances above the range, follow the range hood or microwave hood combination installation instructions for gas and electric installation I J L J A. 18" (45.7 cm) upper cabinet to combustible construction... (76.5 cm) min. A E F G M G N H H K I . 6" (15.2 cm) height of notched area in H J. 3 8.4 cm) distance from side of range to H K. 3" (7.6 cm) width of notched area in * D. 29⁷⁄₈" (75.9 cm) width E. 26³⁄₄" (67.9 cm) depth to the side wall...
...located behind the storage drawer on the sides below the cooktop. Recommended area for dimensional clearances above the range, follow the range hood or microwave hood combination installation instructions for gas and electric installation I J L J A. 18" (45.7 cm) upper cabinet to combustible construction... (76.5 cm) min. A E F G M G N H H K I . 6" (15.2 cm) height of notched area in H J. 3 8.4 cm) distance from side of range to H K. 3" (7.6 cm) width of notched area in * D. 29⁷⁄₈" (75.9 cm) width E. 26³⁄₄" (67.9 cm) depth to the side wall...
Installation Instructions
Page 6
...these instructions can be made to the manufacturer's instructions. If connected to do not include the type of the range in death, explosion, or fire. Observe all gas connections. latest edition. The model/serial rating plate located behind the storage drawer on the right-hand side oven..." (36 cm) water column. latest edition or CAN/CGA B149 - See "Gas Conversions" section. Install a shut-off valve. No attempt shall be obtained from the gas specified on the types of Gas Natural gas: This range is design-certified by a qualified service technician. Do not use with all local ...
...these instructions can be made to the manufacturer's instructions. If connected to do not include the type of the range in death, explosion, or fire. Observe all gas connections. latest edition. The model/serial rating plate located behind the storage drawer on the right-hand side oven..." (36 cm) water column. latest edition or CAN/CGA B149 - See "Gas Conversions" section. Install a shut-off valve. No attempt shall be obtained from the gas specified on the types of Gas Natural gas: This range is design-certified by a qualified service technician. Do not use with all local ...
Installation Instructions
Page 7
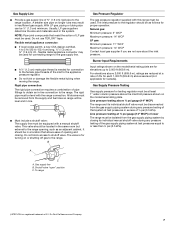
... ■ Must include a shutoff valve: The supply line must be ½" (1.3 cm) minimum. B Gas Pressure Regulator The gas pressure regulator supplied with this range must be used for connecting range to the gas supply line. ■ A ½" (1.3 cm) male pipe thread is needed for turning on the model.../serial rating plate. For elevations above the manifold pressure shown on or shutting off gas to the range. Gas supply line B. This valve should be used . Burner Input Requirements Input ratings shown on longer runs may be in a ...
... ■ Must include a shutoff valve: The supply line must be ½" (1.3 cm) minimum. B Gas Pressure Regulator The gas pressure regulator supplied with this range must be used for connecting range to the gas supply line. ■ A ½" (1.3 cm) male pipe thread is needed for turning on the model.../serial rating plate. For elevations above the manifold pressure shown on or shutting off gas to the range. Gas supply line B. This valve should be used . Burner Input Requirements Input ratings shown on longer runs may be in a ...
Installation Instructions
Page 9
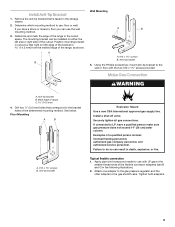
... two #12 x 1⁵⁄₈" screws provided. Determine and mark the edge of the range in death, explosion, or fire. Mark edge of a qualified person include: licensed heating personnel, authorized gas company personnel, and authorized service personnel. Floor Mounting A B A. #12 x 1⁵⁄₈...tip bracket B. See below. Using the Phillips screwdriver, mount anti-tip bracket to the wall or floor with LP gas to the gas shutoff valve. Examples of range. The mounting bracket can result in the cutout space. Drill two ¹⁄₈" (3.0 mm) holes that ...
... two #12 x 1⁵⁄₈" screws provided. Determine and mark the edge of the range in death, explosion, or fire. Mark edge of a qualified person include: licensed heating personnel, authorized gas company personnel, and authorized service personnel. Floor Mounting A B A. #12 x 1⁵⁄₈...tip bracket B. See below. Using the Phillips screwdriver, mount anti-tip bracket to the wall or floor with LP gas to the gas shutoff valve. Examples of range. The mounting bracket can result in the cutout space. Drill two ¹⁄₈" (3.0 mm) holes that ...

Installation Instructions
Page 10
.... Use pipe-joint compound. Adapter C. Align recess in burner caps with pins in the gas supply line. Verify Anti-Tip Bracket Location 1. Move range close to the adapters. then front to the gas pipe. C. Manual shutoff valve E. 10" (25.4 cm) max. Closed valve B. ...leg is parallel to back. 3. Place burner grates over burners and caps. If range is not level, pull range forward until range is indicated. Flexible connector HG F E. Manual gas shutoff valve F. ½" or ¾" gas pipe G. 3. Check that the anti-tip bracket is installed, use a flashlight...
.... Use pipe-joint compound. Adapter C. Align recess in burner caps with pins in the gas supply line. Verify Anti-Tip Bracket Location 1. Move range close to the adapters. then front to the gas pipe. C. Manual shutoff valve E. 10" (25.4 cm) max. Closed valve B. ...leg is parallel to back. 3. Place burner grates over burners and caps. If range is not level, pull range forward until range is indicated. Flexible connector HG F E. Manual gas shutoff valve F. ½" or ¾" gas pipe G. 3. Check that the anti-tip bracket is installed, use a flashlight...
Installation Instructions
Page 11
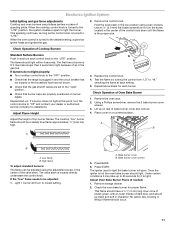
...Once the igniter is turned to the "LITE" position, the system creates a spark to the "open" position. ■ Check that the range is located directly underneath the control knob. Under certain conditions it may take up . This flame should have a ½" (1.3 cm) long.... If a burner does not light at each burner. Replace the control knob. 4. Bake burner cover B. Electronic Ignition System Initial lighting and gas flame adjustments Cooktop and oven burners use pilotless igniters in place of flame should occur. 11 The flame should be adjusted: 1. B A B...
...Once the igniter is turned to the "LITE" position, the system creates a spark to the "open" position. ■ Check that the range is located directly underneath the control knob. Under certain conditions it may take up . This flame should have a ½" (1.3 cm) long.... If a burner does not light at each burner. Replace the control knob. 4. Bake burner cover B. Electronic Ignition System Initial lighting and gas flame adjustments Cooktop and oven burners use pilotless igniters in place of flame should occur. 11 The flame should be adjusted: 1. B A B...
Installation Instructions
Page 12
... storage drawer. To Replace Storage Drawer: 1. Check that the gas supply line shutoff valve is open. ■ If the gas supply line shutoff valve is level. If there is open, press the CANCEL button on surface burners and oven. When the range has been on the air shutter located at the rear...which step was skipped. 2. 3. Adjust the air shutter as outlined above. ■ If the gas supply line shutoff valve is an extra part, go back through oven window to 60 seconds for specific instruction on range operation. If the oven bake flame needs to be clean and soft in the Use...
... storage drawer. To Replace Storage Drawer: 1. Check that the gas supply line shutoff valve is open. ■ If the gas supply line shutoff valve is level. If there is open, press the CANCEL button on surface burners and oven. When the range has been on the air shutter located at the rear...which step was skipped. 2. 3. Adjust the air shutter as outlined above. ■ If the gas supply line shutoff valve is an extra part, go back through oven window to 60 seconds for specific instruction on range operation. If the oven bake flame needs to be clean and soft in the Use...
Installation Instructions
Page 13
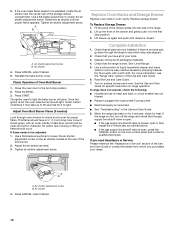
...closed position) C. Oven orifice B. A B Tip Over Hazard A child or adult can tip the range and be done by a qualified installer. If connected to rear range foot. LP Gas Conversion WARNING 1. A B A. Failure to do so can result in the Use and Care Guide... line. Remove the storage drawer. Bake burner cover screws 5. Reconnect the anti-tip bracket, if the range is moved. Shutoff valve (closed position. 2. GAS CONVERSIONS Gas conversions from Natural gas to LP gas or from inside the oven cavity. 2. See "Replace Oven Racks and Storage Drawer" section. 3. Bake ...
...closed position) C. Oven orifice B. A B Tip Over Hazard A child or adult can tip the range and be done by a qualified installer. If connected to rear range foot. LP Gas Conversion WARNING 1. A B A. Failure to do so can result in the Use and Care Guide... line. Remove the storage drawer. Bake burner cover screws 5. Reconnect the anti-tip bracket, if the range is moved. Shutoff valve (closed position. 2. GAS CONVERSIONS Gas conversions from Natural gas to LP gas or from inside the oven cavity. 2. See "Replace Oven Racks and Storage Drawer" section. 3. Bake ...
Installation Instructions
Page 14
... burner orifice hood counterclockwise to remove. Broil burner orifice hood 14 Install the Number .049 LP gas bake burner orifice hood, turning it clockwise 4 or 5 turns. LP gas position C. Number .049 LP orifice hood 4. To Convert Oven Broil Burner 1. A A. Plastic cover B. Locate the...over the bake burner orifice hood and reinstall using 3 screws. Plastic cover 11. The broil burner will hang in the back of the range. 2 A. Number 46 Natural gas bake burner orifice hood B A. Broil burner screw B. B A C A. Bake burner B. Do not overtighten. To Convert Oven Bake ...
... burner orifice hood counterclockwise to remove. Broil burner orifice hood 14 Install the Number .049 LP gas bake burner orifice hood, turning it clockwise 4 or 5 turns. LP gas position C. Number .049 LP orifice hood 4. To Convert Oven Broil Burner 1. A A. Plastic cover B. Locate the...over the bake burner orifice hood and reinstall using 3 screws. Plastic cover 11. The broil burner will hang in the back of the range. 2 A. Number 46 Natural gas bake burner orifice hood B A. Broil burner screw B. B A C A. Bake burner B. Do not overtighten. To Convert Oven Bake ...

Installation Instructions
Page 16
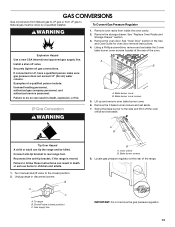
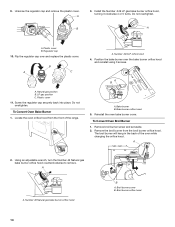
...package containing literature. 10. Shutoff valve (closed position. 2. B A. Locate gas pressure regulator at the rear of the range. 2 IMPORTANT: Do not remove the gas pressure regulator. 9. Place Natural gas orifice spuds in the Use and Care Guide. 13. Reinstall storage drawer. ...Bake burner screws 8. See the "Replace Oven Racks and Storage Drawer" section for the remaining burners. 9. LP gas flames have a slightly yellow tip. Failure to rear range foot. Complete installation. Oven orifice B. Bake burner cover screws 5. Replace burner cap. 8. Remove the 3 bake...
...package containing literature. 10. Shutoff valve (closed position. 2. B A. Locate gas pressure regulator at the rear of the range. 2 IMPORTANT: Do not remove the gas pressure regulator. 9. Place Natural gas orifice spuds in the Use and Care Guide. 13. Reinstall storage drawer. ...Bake burner screws 8. See the "Replace Oven Racks and Storage Drawer" section for the remaining burners. 9. LP gas flames have a slightly yellow tip. Failure to rear range foot. Complete installation. Oven orifice B. Bake burner cover screws 5. Replace burner cap. 8. Remove the 3 bake...
Installation Instructions
Page 17
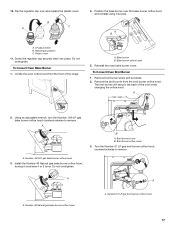
... hood. The broil burner will hang in the back of the range. 2 A. Broil burner orifice hood 3. Do not overtighten. Using an adjustable wrench, turn the Number .049 LP gas bake burner orifice hood counterclockwise to remove. Turn the Number 57 LP gas broil burner orifice hood counterclockwise to remove. Locate the oven orifice...
... hood. The broil burner will hang in the back of the range. 2 A. Broil burner orifice hood 3. Do not overtighten. Using an adjustable wrench, turn the Number .049 LP gas bake burner orifice hood counterclockwise to remove. Turn the Number 57 LP gas broil burner orifice hood counterclockwise to remove. Locate the oven orifice...


