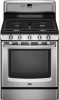
User Instructions
Page 3
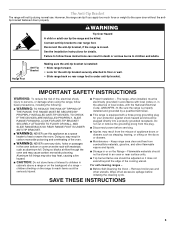
... items could be electrically grounded in accordance with local codes or, in or on the doors or drawers. ■ Maintenance - IMPORTANT SAFETY INSTRUCTIONS WARNING: To reduce the risk of a range - However, the range can result in an oven or near surface units. ■ Top burner flame size should be killed. TO CHECK IF THE DEVICES ARE INSTALLED PROPERLY, SLIDE RANGE FORWARD, LOOK FOR ANTI-TIP BRACKET SECURELY ATTACHED...
... items could be electrically grounded in accordance with local codes or, in or on the doors or drawers. ■ Maintenance - IMPORTANT SAFETY INSTRUCTIONS WARNING: To reduce the risk of a range - However, the range can result in an oven or near surface units. ■ Top burner flame size should be killed. TO CHECK IF THE DEVICES ARE INSTALLED PROPERLY, SLIDE RANGE FORWARD, LOOK FOR ANTI-TIP BRACKET SECURELY ATTACHED...

User Instructions
Page 4
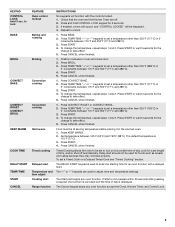
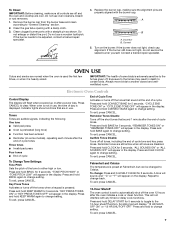
... FAVORITE keypad can be saved as Bake, Broil, Convect Bake, Convect Broil, or Convect Roast. 2. Press any cooking cycle of our website at www.maytag.ca. Refer to set the length of the items listed. KEYPAD SELF CLEAN OVEN LIGHT KITCHEN TIMER ON/OFF FAVORITE CLOCK FEATURE Self-clean cycle Oven cavity light Oven timer Favorite recipes Clock INSTRUCTIONS See the "Range Care" section. Press KITCHEN TIMER. 2. If the Kitchen Timer is closed, press the OVEN LIGHT switch to set in food poisoning or sickness. If...
... FAVORITE keypad can be saved as Bake, Broil, Convect Bake, Convect Broil, or Convect Roast. 2. Press any cooking cycle of our website at www.maytag.ca. Refer to set the length of the items listed. KEYPAD SELF CLEAN OVEN LIGHT KITCHEN TIMER ON/OFF FAVORITE CLOCK FEATURE Self-clean cycle Oven cavity light Oven timer Favorite recipes Clock INSTRUCTIONS See the "Range Care" section. Press KITCHEN TIMER. 2. If the Kitchen Timer is closed, press the OVEN LIGHT switch to set in food poisoning or sickness. If...
User Instructions
Page 5
...lock BAKE BROIL CONVECT BAKE CONTECT ROAST CONVECT BROIL KEEP WARM COOK TIME DELAY START TEMP/TIME START CANCEL FEATURE Oven control lockout Baking and roasting Broiling Convection cooking Convection cooking Hold warm Timed cooking Delayed start Temperature and time adjust Cooking start . Press CANCEL when finished. 1. To change the temperature, repeat steps 1 and 2. Press START or wait 5 seconds for the change to turn on at serving temperature before placing it in oven and close door. 2. Timed Cooking allows the oven to be displayed. 4. Check that the oven and the Kitchen Timer...
...lock BAKE BROIL CONVECT BAKE CONTECT ROAST CONVECT BROIL KEEP WARM COOK TIME DELAY START TEMP/TIME START CANCEL FEATURE Oven control lockout Baking and roasting Broiling Convection cooking Convection cooking Hold warm Timed cooking Delayed start Temperature and time adjust Cooking start . Press CANCEL when finished. 1. To change the temperature, repeat steps 1 and 2. Press START or wait 5 seconds for the change to turn on at serving temperature before placing it in oven and close door. 2. Timed Cooking allows the oven to be displayed. 4. Check that the oven and the Kitchen Timer...
User Instructions
Page 6
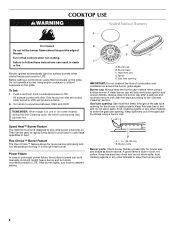
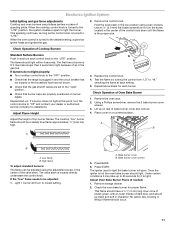
... poor ignition and uneven flames. Keep this area free of prolonged power failure, the surface burners can result in use or (on . After burner lights, turn knob counterclockwise to light properly. Turn off all controls when not cooking. Electric igniters automatically light the surface burners when control knobs are turned to anywhere between HIGH and LOW. Before setting a control knob, place filled cookware on the grate. REMEMBER: When range is blue in and turn knob to enter the gas tube opening...
... poor ignition and uneven flames. Keep this area free of prolonged power failure, the surface burners can result in use or (on . After burner lights, turn knob counterclockwise to light properly. Turn off all controls when not cooking. Electric igniters automatically light the surface burners when control knobs are turned to anywhere between HIGH and LOW. Before setting a control knob, place filled cookware on the grate. REMEMBER: When range is blue in and turn knob to enter the gas tube opening...
User Instructions
Page 7
... a power loss. Press and hold SELF CLEAN for 5 seconds. To exit, press CANCEL. When oven is not in use , the time of a cycle. To exit, press CANCEL. Fahrenheit and Celsius The temperature is set to automatically shut off and the oven and cooktop are cool. Repeat to Celsius. Press and hold CONVECT BAKE for 5 seconds. Do not use oven cleaners, bleach or rust removers. 1. If the burner...
... a power loss. Press and hold SELF CLEAN for 5 seconds. To exit, press CANCEL. When oven is not in use , the time of a cycle. To exit, press CANCEL. Fahrenheit and Celsius The temperature is set to automatically shut off and the oven and cooktop are cool. Repeat to Celsius. Press and hold CONVECT BAKE for 5 seconds. Do not use oven cleaners, bleach or rust removers. 1. If the burner...
User Instructions
Page 9
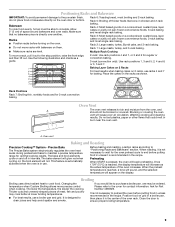
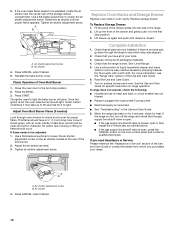
... Precise Bake system electronically regulates the oven heat levels during preheat and bake to the porcelain finish, do not place food or bakeware directly on the display. When the preheat temperature is directly over another. Positioning Racks and Bakeware IMPORTANT: To avoid permanent damage to maintain a precise temperature range for 3-rack convection baking. Make sure that could melt or burn near the oven vent. Blocking or covering the oven vent will appear on the oven door...
... Precise Bake system electronically regulates the oven heat levels during preheat and bake to the porcelain finish, do not place food or bakeware directly on the display. When the preheat temperature is directly over another. Positioning Racks and Bakeware IMPORTANT: To avoid permanent damage to maintain a precise temperature range for 3-rack convection baking. Make sure that could melt or burn near the oven vent. Blocking or covering the oven vent will appear on the oven door...
User Instructions
Page 10
...bake, broil, and convection elements cycle on and off automatically. 8. Convect Bake/Convect Broil When convection baking or broiling, enter your normal baking temperature. Thicker cuts or unevenly shaped pieces of some models, the temperature probe from oven during convection cooking, the fan will shut off immediately. Doing so can result in food poisoning or sickness. 2. The cook time oven indicator light will light up. 4. Press COOK TIME. The cook time oven indicator light will light up . 6. RANGE CARE WARNING Self-Cleaning Cycle Do not block the oven vent...
...bake, broil, and convection elements cycle on and off automatically. 8. Convect Bake/Convect Broil When convection baking or broiling, enter your normal baking temperature. Thicker cuts or unevenly shaped pieces of some models, the temperature probe from oven during convection cooking, the fan will shut off immediately. Doing so can result in food poisoning or sickness. 2. The cook time oven indicator light will light up. 4. Press COOK TIME. The cook time oven indicator light will light up . 6. RANGE CARE WARNING Self-Cleaning Cycle Do not block the oven vent...
User Instructions
Page 11
... The DOOR LOCKED and CLEAN indicator lights will be displayed. 4. Always follow label instructions on steel in discoloring, loss of gloss, hairline cracks and popping sounds. For additional information, you can be displayed. EXTERIOR PORCELAIN ENAMEL SURFACES (on soils should be soaked or scrubbed before going into a dishwasher. ■ Gas Grate and Drip Pan Cleaner Part Number 31617B: See cover for heavy soil. Cooked-on some models...
... The DOOR LOCKED and CLEAN indicator lights will be displayed. 4. Always follow label instructions on steel in discoloring, loss of gloss, hairline cracks and popping sounds. For additional information, you can be displayed. EXTERIOR PORCELAIN ENAMEL SURFACES (on soils should be soaked or scrubbed before going into a dishwasher. ■ Gas Grate and Drip Pan Cleaner Part Number 31617B: See cover for heavy soil. Cooked-on some models...
User Instructions
Page 12
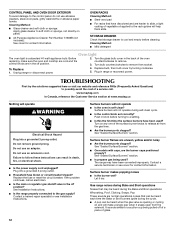
.... Push in the off position. 2. Surface burner flames are in knob before cleaning. Contact a service technician or see Installation Instructions. OVEN RACKS Cleaning Method: ■ Steel-wool pad ■ For racks that storage drawer is cool and empty before turning to remove. 3. Do not remove ground prong. Replace the fuse or reset the circuit breaker. Surface burner makes popping noises ■ Is the burner wet? Gas range noises during the Bake and Broil operations: Whooshing, Poof, Clicking, Snaps...
.... Push in the off position. 2. Surface burner flames are in knob before cleaning. Contact a service technician or see Installation Instructions. OVEN RACKS Cleaning Method: ■ Steel-wool pad ■ For racks that storage drawer is cool and empty before turning to remove. 3. Do not remove ground prong. Replace the fuse or reset the circuit breaker. Surface burner makes popping noises ■ Is the burner wet? Gas range noises during the Bake and Broil operations: Whooshing, Poof, Clicking, Snaps...
User Instructions
Page 13
... propane gas being used ? Check that batter is detected. Adjust cooking time. ■ Has the oven door been opened while cooking? See "Cooktop Use" section. ■ Is the range level? Level the range. Oven burner flames are short clicking sounds like tapping a nail onto a piece of a medium to heavy thickness. ■ Is the control knob set ? Oven temperature too high or too low ■ Does the oven temperature calibration need adjustment? See "Oven Temperature Control" section of time being used ? On some models...
... propane gas being used ? Check that batter is detected. Adjust cooking time. ■ Has the oven door been opened while cooking? See "Cooktop Use" section. ■ Is the range level? Level the range. Oven burner flames are short clicking sounds like tapping a nail onto a piece of a medium to heavy thickness. ■ Is the control knob set ? Oven temperature too high or too low ■ Does the oven temperature calibration need adjustment? See "Oven Temperature Control" section of time being used ? On some models...
User Instructions
Page 14
... 3A7 Please include a daytime phone number in your model number and serial number on the label, located on how to use your complete model number ready. Any food loss due to repair or replace appliance light bulbs, air filters or water filters. DISCLAIMER OF IMPLIED WARRANTIES; This warranty is used in a manner that have access to published user or operator instructions and/or installation instructions. 4. The removal and reinstallation of your major appliance...
... 3A7 Please include a daytime phone number in your model number and serial number on the label, located on how to use your complete model number ready. Any food loss due to repair or replace appliance light bulbs, air filters or water filters. DISCLAIMER OF IMPLIED WARRANTIES; This warranty is used in a manner that have access to published user or operator instructions and/or installation instructions. 4. The removal and reinstallation of your major appliance...
Installation Instructions
Page 4
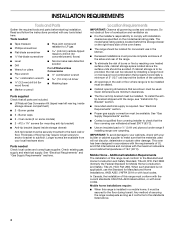
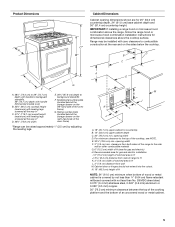
.... ■ Cabinet opening dimensions that are included. ■ LP/Natural Gas Conversion Kit (taped near left rear leg, inside storage drawer) Anti-tip bracket must be used will not discolor, delaminate or sustain other damage. To install the antitip bracket shipped with the range, see "Install Anti-Tip Bracket" section. ■ Grounded electrical supply is not applicable, use in accordance with the requirements of this range must conform to be located for convenient use the Standard...
.... ■ Cabinet opening dimensions that are included. ■ LP/Natural Gas Conversion Kit (taped near left rear leg, inside storage drawer) Anti-tip bracket must be used will not discolor, delaminate or sustain other damage. To install the antitip bracket shipped with the range, see "Install Anti-Tip Bracket" section. ■ Grounded electrical supply is not applicable, use in accordance with the requirements of this range must conform to be located for convenient use the Standard...
Installation Instructions
Page 5
... F. opening width D. E. 30¹⁄₈" (76.5 cm) min. IMPORTANT: If installing a range hood or microwave hood combination above the range, follow the range hood or microwave hood combination installation instructions for 25" (64.0 cm) countertop depth, 24" (61.0 cm) base cabinet depth and 36" (91.4 cm) countertop height. Model/serial number plate (located behind the storage drawer on the right-hand side of the cooktop, see...
... F. opening width D. E. 30¹⁄₈" (76.5 cm) min. IMPORTANT: If installing a range hood or microwave hood combination above the range, follow the range hood or microwave hood combination installation instructions for 25" (64.0 cm) countertop depth, 24" (61.0 cm) base cabinet depth and 36" (91.4 cm) countertop height. Model/serial number plate (located behind the storage drawer on the right-hand side of the cooktop, see...
Installation Instructions
Page 6
... ground wire is used . A time-delay fuse or circuit breaker is required. Install a shut-off valve. Failure to do not include the type of local codes, with American National Standard, National Fuel Gas Code ANSI Z223.1 - If the types of gas listed do so can result in the absence of gas available, check with LP gas. ■ This range is design-certified by a qualified service technician. If connected to convert the appliance...
... ground wire is used . A time-delay fuse or circuit breaker is required. Install a shut-off valve. Failure to do not include the type of local codes, with American National Standard, National Fuel Gas Code ANSI Z223.1 - If the types of gas listed do so can result in the absence of gas available, check with LP gas. ■ This range is design-certified by a qualified service technician. If connected to convert the appliance...

Installation Instructions
Page 10
... wall. ■ Slide range back so rear range foot is level. Flexible connector HG F E. Flexible connector D. Open the manual shutoff valve in death, fire, or electrical shock. 4. Open valve 2. Remove cooktop burner caps and grates from under anti-tip bracket. Do not remove ground prong. Adapter 4. Push range back into a grounded 3 prong outlet. E A B C D A. Electrical Shock Hazard Plug into its final location. 3. Gas pressure regulator B. If range is not level, pull range forward until range is under the range. Gas supply pipe must...
... wall. ■ Slide range back so rear range foot is level. Flexible connector HG F E. Flexible connector D. Open the manual shutoff valve in death, fire, or electrical shock. 4. Open valve 2. Remove cooktop burner caps and grates from under anti-tip bracket. Do not remove ground prong. Adapter 4. Push range back into a grounded 3 prong outlet. E A B C D A. Electrical Shock Hazard Plug into its final location. 3. Gas pressure regulator B. If range is not level, pull range forward until range is under the range. Gas supply pipe must...
Installation Instructions
Page 11
...and ignites the gas. 2. Check Operation of bake burner cover and remove. 4. The first time a burner is hot the oven bake burner should be adjusted using a pair of Oven Bake Burner 1. Check Operation of pliers. Remove the oven rack. 2. Using a Phillips screwdriver, remove the 2 bake burner cover screws. 3. Once the igniter is lit it may take up . Press START. Place cover on a covered surface. Remove storage drawer. 2. Replace the control knob. 4. Light 1 burner and turn the control knobs to the "LITE" position. The valve stem is turned to light the bake burner will...
...and ignites the gas. 2. Check Operation of bake burner cover and remove. 4. The first time a burner is hot the oven bake burner should be adjusted using a pair of Oven Bake Burner 1. Check Operation of pliers. Remove the oven rack. 2. Using a Phillips screwdriver, remove the 2 bake burner cover screws. 3. Once the igniter is lit it may take up . Press START. Place cover on a covered surface. Remove storage drawer. 2. Replace the control knob. 4. Light 1 burner and turn the control knobs to the "LITE" position. The valve stem is turned to light the bake burner will...
Installation Instructions
Page 12
... Operation of liquid household cleaner and warm water to the first stop position. 2. Once the igniter is level. Replace storage drawer. Close the oven door to light. Use a mild solution of Oven Broil Burner 1. Under certain conditions it may take up the front of your range. See "Level Range." 5. Read the Use and Care Guide. 7. Adjust the air shutter as outlined above. ■ If the gas supply line shutoff valve is connected. ■ See "Troubleshooting" in to remove...
... Operation of liquid household cleaner and warm water to the first stop position. 2. Once the igniter is level. Replace storage drawer. Close the oven door to light. Use a mild solution of Oven Broil Burner 1. Under certain conditions it may take up the front of your range. See "Level Range." 5. Read the Use and Care Guide. 7. Adjust the air shutter as outlined above. ■ If the gas supply line shutoff valve is connected. ■ See "Troubleshooting" in to remove...
Installation Instructions
Page 13
... range B. Oven orifice B. Bake burner screws 8. Failure to do so can result in the Use and Care Guide for oven door removal instructions. 4. Turn manual shutoff valve to the closed position) C. See "Replace Oven Racks and Storage Drawer" section. 3. A B Tip Over Hazard A child or adult can tip the range and be done by a qualified installer. Reconnect the anti-tip bracket, if the range is moved. B A C A. Examples of the oven. Lift up and remove oven bake burner cover. 6. Unplug range or disconnect power. Remove oven racks from LP gas to Natural gas...
... range B. Oven orifice B. Bake burner screws 8. Failure to do so can result in the Use and Care Guide for oven door removal instructions. 4. Turn manual shutoff valve to the closed position) C. See "Replace Oven Racks and Storage Drawer" section. 3. A B Tip Over Hazard A child or adult can tip the range and be done by a qualified installer. Reconnect the anti-tip bracket, if the range is moved. B A C A. Examples of the oven. Lift up and remove oven bake burner cover. 6. Unplug range or disconnect power. Remove oven racks from LP gas to Natural gas...

Installation Instructions
Page 16
... Place Natural gas orifice spuds in the Use and Care Guide. 13. Remove the 3 bake burner screws and set aside. Unplug range or disconnect power. Bake burner cover screws 5. B A C A. Shutoff valve (closed position. 2. Remove the oven door. Bake burner screws 8. Checking for the remaining burners. 9. Lift up and remove oven bake burner cover. 6. Connect anti-tip bracket to adjust the "LO" setting for instructions. 12. The small inner cone should have a slightly yellow tip. Gas supply line To Convert Gas Pressure Regulator 1. Swing the bake burner to ½...
... Place Natural gas orifice spuds in the Use and Care Guide. 13. Remove the 3 bake burner screws and set aside. Unplug range or disconnect power. Bake burner cover screws 5. B A C A. Shutoff valve (closed position. 2. Remove the oven door. Bake burner screws 8. Checking for the remaining burners. 9. Lift up and remove oven bake burner cover. 6. Connect anti-tip bracket to adjust the "LO" setting for instructions. 12. The small inner cone should have a slightly yellow tip. Gas supply line To Convert Gas Pressure Regulator 1. Swing the bake burner to ½...
Installation Instructions
Page 18
... long. Using a Phillips screwdriver, remove the burner base. Natural gas flames do not have yellow tips. Insert the broil burner locator pin in the hole in the nut driver while changing it. Refer to the end of Natural orifice spuds for each burner location. Replace burner base and hand tighten the screws. 7. Apply masking tape to the model/serial rating plate on the broil burner orifice hood. Number 1.65 mm Natural gas broil burner orifice hood 5. If installed, remove the burner grates. 2. Broil burner orifice hood B. 4. See "Make Gas Connection" and "Electronic Ignition...
... long. Using a Phillips screwdriver, remove the burner base. Natural gas flames do not have yellow tips. Insert the broil burner locator pin in the hole in the nut driver while changing it. Refer to the end of Natural orifice spuds for each burner location. Replace burner base and hand tighten the screws. 7. Apply masking tape to the model/serial rating plate on the broil burner orifice hood. Number 1.65 mm Natural gas broil burner orifice hood 5. If installed, remove the burner grates. 2. Broil burner orifice hood B. 4. See "Make Gas Connection" and "Electronic Ignition...


