Use and Care Guide
Page 2
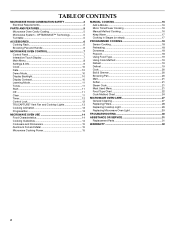
... SAFETY 3 Electrical Requirements 4 PARTS AND FEATURES 5 Microwave Oven Cavity Coating 5 Microwave System - OPTIMAWAVE™ Technology 5 Turntable 5 ACCESSORIES 6 Cooking Rack 6 Browning Pan and Handle 6 MICROWAVE OVEN CONTROL 7 Control Panel 7 Interactive Touch Display 7 Main Menu 8 Settings & Info 9 Clock 10 Date 10 Demo Mode 10 Display Backlight 10 Display Contrast 10 Learning Mode 11 Tones 11 Start 11 Off 11 Clear 11 Timer 12 Control Lock 12 TRUCAPTURE® Vent Fan and Cooktop Lights 13 Cooking Animation 13 Progress Bar 13 MICROWAVE OVEN USE 14 Food...
... SAFETY 3 Electrical Requirements 4 PARTS AND FEATURES 5 Microwave Oven Cavity Coating 5 Microwave System - OPTIMAWAVE™ Technology 5 Turntable 5 ACCESSORIES 6 Cooking Rack 6 Browning Pan and Handle 6 MICROWAVE OVEN CONTROL 7 Control Panel 7 Interactive Touch Display 7 Main Menu 8 Settings & Info 9 Clock 10 Date 10 Demo Mode 10 Display Backlight 10 Display Contrast 10 Learning Mode 11 Tones 11 Start 11 Off 11 Clear 11 Timer 12 Control Lock 12 TRUCAPTURE® Vent Fan and Cooktop Lights 13 Cooking Animation 13 Progress Bar 13 MICROWAVE OVEN USE 14 Food...
Use and Care Guide
Page 3
... electric shock. SAVE THESE INSTRUCTIONS 3 Remove wire twist-ties from the microwave oven is the safety alert symbol. Do not use the cavity for example, closed , turn oven off, and disconnect the power cord, or shut off the pad and touch electrical parts involving a risk of burns, electric shock, fire, injury to persons, or exposure to facilitate cooking. ■ Read and follow instructions. Do not leave paper products, cooking...
... electric shock. SAVE THESE INSTRUCTIONS 3 Remove wire twist-ties from the microwave oven is the safety alert symbol. Do not use the cavity for example, closed , turn oven off, and disconnect the power cord, or shut off the pad and touch electrical parts involving a risk of burns, electric shock, fire, injury to persons, or exposure to facilitate cooking. ■ Read and follow instructions. Do not leave paper products, cooking...
Use and Care Guide
Page 4
.... (b) Do not place any openings on the microwave oven. ■ Do not store this oven when not in use paper products when appliance is operated in the "PAN BROWN" mode (on models with the door open since open-door operation can result in operation. ■ When flambeing foods under the hood, turn the fan on. ■ Use care when cleaning the vent-hood filter. Observe all cord connected appliances: The microwave oven must be allowed to accumulate...
.... (b) Do not place any openings on the microwave oven. ■ Do not store this oven when not in use paper products when appliance is operated in the "PAN BROWN" mode (on models with the door open since open-door operation can result in operation. ■ When flambeing foods under the hood, turn the fan on. ■ Use care when cleaning the vent-hood filter. Observe all cord connected appliances: The microwave oven must be allowed to accumulate...
Use and Care Guide
Page 5
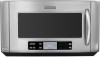
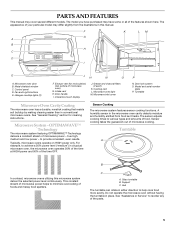
...handle I E A. Cooking rack L. Door lock system O. For example, to provide consistent, even results. F K L M G A B H C D I . Control panel D. Interactive touch display J. This constant stream of microwave power helps to various types and amounts of food. Microwave oven light M. Sensor Cooking The microwave system features sensor cooking functions. The sensor adjusts cooking times to minimize overcooking of your particular model may differ slightly from food as it heats. See "Assistance or Service" to help cook food more evenly. Fan and Lights buttons E. Turntable...
...handle I E A. Cooking rack L. Door lock system O. For example, to provide consistent, even results. F K L M G A B H C D I . Control panel D. Interactive touch display J. This constant stream of microwave power helps to various types and amounts of food. Microwave oven light M. Sensor Cooking The microwave system features sensor cooking functions. The sensor adjusts cooking times to minimize overcooking of your particular model may differ slightly from food as it heats. See "Assistance or Service" to help cook food more evenly. Fan and Lights buttons E. Turntable...
Use and Care Guide
Page 6
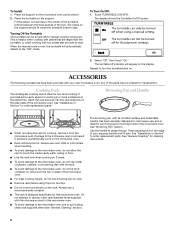
... to soil buildup, clean rack supports often (see "General Cleaning" section). Place gripping end on the display. To Install: 1. The turntable off for microwave use browning pan on rack. ■ Remove rack before using the rack for two-level cooking. See "Browning Pan" section. See "Assistance or Service" to the microwave oven, do not let food container on rack touch the top or sides of the microwave oven. This is ideal for replacement. ACCESSORIES The...
... to soil buildup, clean rack supports often (see "General Cleaning" section). Place gripping end on the display. To Install: 1. The turntable off for microwave use browning pan on rack. ■ Remove rack before using the rack for two-level cooking. See "Browning Pan" section. See "Assistance or Service" to the microwave oven, do not let food container on rack touch the top or sides of the microwave oven. This is ideal for replacement. ACCESSORIES The...
Use and Care Guide
Page 8
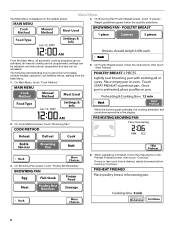
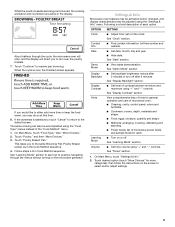
... the instructions on the default screen. On Cook Method screen, touch "Browning Pan." Main Menu 4. If more or less cook time is displayed on the Preheat Finished screen, then touch "Continue." settings can be adjusted; all automatic cooking programs can be activated; On Main Menu, touch "Cook Method." 5. The following demonstrates how to pan brown 2 boneless chicken breasts, using the Cook Method menus, starting from...
... the instructions on the default screen. On Cook Method screen, touch "Browning Pan." Main Menu 4. If more or less cook time is displayed on the Preheat Finished screen, then touch "Continue." settings can be adjusted; all automatic cooking programs can be activated; On Main Menu, touch "Cook Method." 5. The following demonstrates how to pan brown 2 boneless chicken breasts, using the Cook Method menus, starting from...
Use and Care Guide
Page 9
... Browning Pan-Poultry Breast screen as in the Cook Method sequence. 4. Follow steps 4-8 in the display. See "Display Contrast" section Hints View comprehensive lists of hints for general operation and care of microwave oven: ■ Cleaning: cavity, control panel, odors and turntable. ■ Cookware: covers, depth, materials and shape. ■ Food: eggs, moisture, quantity and shape. ■ Methods: arranging, covering, defrosting and standing. ■ Power levels: list of microwave power...
... Browning Pan-Poultry Breast screen as in the Cook Method sequence. 4. Follow steps 4-8 in the display. See "Display Contrast" section Hints View comprehensive lists of hints for general operation and care of microwave oven: ■ Cleaning: cavity, control panel, odors and turntable. ■ Cookware: covers, depth, materials and shape. ■ Food: eggs, moisture, quantity and shape. ■ Methods: arranging, covering, defrosting and standing. ■ Power levels: list of microwave power...
Use and Care Guide
Page 11
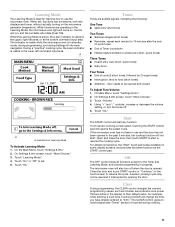
... tones, followed by opening the door. If the microwave oven has not been in use the microwave oven. On Settings & Info screen, touch "More Choices." 3. Learning Mode The Learning Mode is ideal for learning how to use and the door has not been opened in the Learning Mode, the microwave oven light will come on, the fan will run, and the turntable will not start or resume the cooking cycle. Touch...
... tones, followed by opening the door. If the microwave oven has not been in use the microwave oven. On Settings & Info screen, touch "More Choices." 3. Learning Mode The Learning Mode is ideal for learning how to use and the door has not been opened in the Learning Mode, the microwave oven light will come on, the fan will run, and the turntable will not start or resume the cooking cycle. Touch...
Use and Care Guide
Page 14
... increments of food will not melt in the microwave oven because it is empty. ■ The turntable must be in place and correct side up when microwave oven is in use. Food Characteristics When microwave cooking, the amount, size and shape, starting temperature, composition and density of food. Stirring and Turning Stirring and turning redistribute heat evenly to avoid overcooking the outer edges of...
... increments of food will not melt in the microwave oven because it is empty. ■ The turntable must be in place and correct side up when microwave oven is in use. Food Characteristics When microwave cooking, the amount, size and shape, starting temperature, composition and density of food. Stirring and Turning Stirring and turning redistribute heat evenly to avoid overcooking the outer edges of...
Use and Care Guide
Page 15
... the microwave oven (on the turntable. Paper: Towels, Dinnerware, Napkins Use nonrecycled and those approved by percent, name or number. Aluminum foil and some models), aluminum foil for use by the manufacturer for microwave cooking specify which cooking power to touch the inside cavity walls, ceiling or floor. ■ Always use . Wax Paper Acceptable for shielding, and approved meat thermometers may become hot from heat transferred...
... the microwave oven (on the turntable. Paper: Towels, Dinnerware, Napkins Use nonrecycled and those approved by percent, name or number. Aluminum foil and some models), aluminum foil for use by the manufacturer for microwave cooking specify which cooking power to touch the inside cavity walls, ceiling or floor. ■ Always use . Wax Paper Acceptable for shielding, and approved meat thermometers may become hot from heat transferred...
Use and Care Guide
Page 16
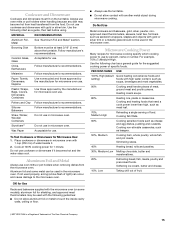
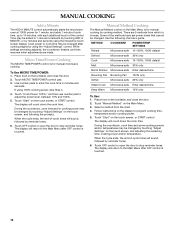
... START control. The display will count down the cook time. Browning Pan Browning Pan 100% only Soften Microwave-safe 20% only Steam Cook Microwave-safe Enter desired time. Touch "Manual Method" on the turntable, and close the door. 2. Touch OFF control or open the door to stop reminder tones. There are made. Keep Warm Microwave-safe 10% only To Use: 1. The display will count down the cook time. Some of the control. METHOD COOKWARE POWER/TEMP SETTINGS Reheat Microwave-safe...
... START control. The display will count down the cook time. Browning Pan Browning Pan 100% only Soften Microwave-safe 20% only Steam Cook Microwave-safe Enter desired time. Touch "Manual Method" on the turntable, and close the door. 2. Touch OFF control or open the door to stop reminder tones. There are made. Keep Warm Microwave-safe 10% only To Use: 1. The display will count down the cook time. Some of the control. METHOD COOKWARE POWER/TEMP SETTINGS Reheat Microwave-safe...
Use and Care Guide
Page 17
... can be changed by reminder tones. 5. To Cook in "Manual Method Cooking." 2. Follow steps 1-4 in "Micro Time/Power Cooking," or follow screen prompts to stop reminder tones. Touch "Add A Step" on the turntable, and close the door. 2. During the countdown, cook time and/or cooking power for subsequent stage programming. Touch OFF control or open the door to program the next stage. 4. The display will count down the warm time.
... can be changed by reminder tones. 5. To Cook in "Manual Method Cooking." 2. Follow steps 1-4 in "Micro Time/Power Cooking," or follow screen prompts to stop reminder tones. Touch "Add A Step" on the turntable, and close the door. 2. During the countdown, cook time and/or cooking power for subsequent stage programming. Touch OFF control or open the door to program the next stage. 4. The display will count down the warm time.

Use and Care Guide
Page 18
... the turntable, and close the door. 2. The display will show when the microwave oven is touched. 18 No amounts need to escape. NOTES: ■ The microwave oven should be added to the Main Menu after OFF control is sensing, and will be attended at all microwave cooking functions, the microwave oven should be adjusted are equal. The sensor determines the appropriate popping time of the Meat and...
... the turntable, and close the door. 2. The display will show when the microwave oven is touched. 18 No amounts need to escape. NOTES: ■ The microwave oven should be added to the Main Menu after OFF control is sensing, and will be attended at all microwave cooking functions, the microwave oven should be adjusted are equal. The sensor determines the appropriate popping time of the Meat and...
Use and Care Guide
Page 19
... pieces as soon as specific food items available, sensor functions and amounts. Reheat Defrost Cook Boil & Simmer Browning Pan Melt Soften Steam Cook This menu allows you want , and then choose your food and/ or microwave oven for specific food items and amounts. All food items are available through this manual, or review your selections, and to start with the type of...
... pieces as soon as specific food items available, sensor functions and amounts. Reheat Defrost Cook Boil & Simmer Browning Pan Melt Soften Steam Cook This menu allows you want , and then choose your food and/ or microwave oven for specific food items and amounts. All food items are available through this manual, or review your selections, and to start with the type of...
Use and Care Guide
Page 20
... will start the cycle. Simmering Rice Place food and water/liquid, covered, in the display. Browning Pan The Browning Pan menu has a selection of oven mitts is a sensor function. To Use: Place food on the turntable, and close the door. Simmering Pasta The water will stop and prompt you to boil before cooking begins. When the water boils, the microwave oven will need to turn over...
... will start the cycle. Simmering Rice Place food and water/liquid, covered, in the display. Browning Pan The Browning Pan menu has a selection of oven mitts is a sensor function. To Use: Place food on the turntable, and close the door. Simmering Pasta The water will stop and prompt you to boil before cooking begins. When the water boils, the microwave oven will need to turn over...
Use and Care Guide
Page 27
... MICROWAVE OVEN DOOR AND EXTERIOR The area where the microwave oven door and frame touch when closed should be kept clean. GREASE FILTERS CONTROL PANEL/INTERACTIVE TOUCH DISPLAY Do not use abrasive cleaners, steel-wool pads or gritty washcloths. To avoid damage to remove. Use gentle pressure when wiping the touch screen. ■ Glass cleaner and soft cloth: Apply glass cleaner to remove embedded dirt and grease. MICROWAVE OVEN CARE General Cleaning...
... MICROWAVE OVEN DOOR AND EXTERIOR The area where the microwave oven door and frame touch when closed should be kept clean. GREASE FILTERS CONTROL PANEL/INTERACTIVE TOUCH DISPLAY Do not use abrasive cleaners, steel-wool pads or gritty washcloths. To avoid damage to remove. Use gentle pressure when wiping the touch screen. ■ Glass cleaner and soft cloth: Apply glass cleaner to remove embedded dirt and grease. MICROWAVE OVEN CARE General Cleaning...
Use and Care Guide
Page 29
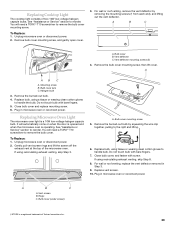
... capsule bulbs. For wall or roof venting, replace the vent deflector removed in microwave oven or reconnect power. Bulb cover B. Unplug microwave oven or disconnect power. 2. Plug in microwave oven or reconnect power. Bulb cover (under screen) †®TORX is a 10W low-voltage halogen capsule bulb. Replacing Cooktop Light The cooktop light consists of the microwave oven. A B C A. Do not touch bulb with bare fingers. 7. See "Assistance or Service" section to handle the bulb. Vent deflector C. Mounting screw B. Replace bulb, using tissue or wearing clean...
... capsule bulbs. For wall or roof venting, replace the vent deflector removed in microwave oven or reconnect power. Bulb cover B. Unplug microwave oven or disconnect power. 2. Plug in microwave oven or reconnect power. Bulb cover (under screen) †®TORX is a 10W low-voltage halogen capsule bulb. Replacing Cooktop Light The cooktop light consists of the microwave oven. A B C A. Do not touch bulb with bare fingers. 7. See "Assistance or Service" section to handle the bulb. Vent deflector C. Mounting screw B. Replace bulb, using tissue or wearing clean...
Use and Care Guide
Page 30
... reset the circuit breaker. See Installation Instructions provided with your microwave oven. Try to the inside of the door? See "Microwave Oven Control" section. ■ Is the Control Lock set properly? The door has been closed for service. Remove and clean turntable support and rollers. Turntable alternates rotation directions ■ This is normal and depends on some models) attached to heat 1 cup (250 mL) of cold water for 2 minutes at the beginning of food being used. Fan...
... reset the circuit breaker. See Installation Instructions provided with your microwave oven. Try to the inside of the door? See "Microwave Oven Control" section. ■ Is the Control Lock set properly? The door has been closed for service. Remove and clean turntable support and rollers. Turntable alternates rotation directions ■ This is normal and depends on some models) attached to heat 1 cup (250 mL) of cold water for 2 minutes at the beginning of food being used. Fan...
Use and Care Guide
Page 31
... service companies. If you use only factory specified parts. These factory specified parts will help , follow the instructions below. Replacement Parts Turntable Part Number 8205992 Turntable Support and Rollers Part Number 8206222 Turntable Hub Part Number 8205994 Cooking Rack (rectangular) Part Number 8206117 Cooking Rack Spacer Part Number 8206116 Cooking Rack Hook Part Number 8206118 Browning Pan Part Number 8205996 Browning Pan Handle Part Number W10120838 Grease Filters (2) Part Number W10120839 Charcoal Filters (2) Part Number W10120840 Cooktop and Microwave Oven Light Part...
... service companies. If you use only factory specified parts. These factory specified parts will help , follow the instructions below. Replacement Parts Turntable Part Number 8205992 Turntable Support and Rollers Part Number 8206222 Turntable Hub Part Number 8205994 Cooking Rack (rectangular) Part Number 8206117 Cooking Rack Spacer Part Number 8206116 Cooking Rack Hook Part Number 8206118 Browning Pan Part Number 8205996 Browning Pan Handle Part Number W10120838 Grease Filters (2) Part Number W10120839 Charcoal Filters (2) Part Number W10120840 Cooktop and Microwave Oven Light Part...
Use and Care Guide
Page 32
... replace appliance light bulbs, air filters or water filters. The removal and reinstallation of purchase, when this appliance is operated and maintained according to instructions attached to defects in -warranty service. IMPLIED WARRANTIES, INCLUDING WARRANTIES OF MERCHANTABILITY OR FITNESS FOR A PARTICULAR PURPOSE, ARE LIMITED TO ONE YEAR OR THE SHORTEST PERIOD ALLOWED BY LAW. You can be repaired in remote locations. 9. Dealer name Address Phone number Model number Serial number...
... replace appliance light bulbs, air filters or water filters. The removal and reinstallation of purchase, when this appliance is operated and maintained according to instructions attached to defects in -warranty service. IMPLIED WARRANTIES, INCLUDING WARRANTIES OF MERCHANTABILITY OR FITNESS FOR A PARTICULAR PURPOSE, ARE LIMITED TO ONE YEAR OR THE SHORTEST PERIOD ALLOWED BY LAW. You can be repaired in remote locations. 9. Dealer name Address Phone number Model number Serial number...


