

Use and Care Guide
Page 3
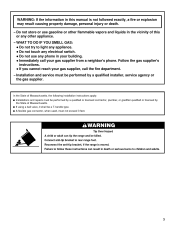
..., a fire or explosion may result causing property damage, personal injury or death. - Follow the gas supplier's instructions. • If you don't immediately follow instructions. This appliance can be killed or seriously injured if you cannot reach your gas supplier from a neighbor's phone.... WARNING: If the information in your building. • Immediately call your gas supplier, call the fire department. - Installation and service ...
..., a fire or explosion may result causing property damage, personal injury or death. - Follow the gas supplier's instructions. • If you don't immediately follow instructions. This appliance can be killed or seriously injured if you cannot reach your gas supplier from a neighbor's phone.... WARNING: If the information in your building. • Immediately call your gas supplier, call the fire department. - Installation and service ...
Use and Care Guide
Page 4
...a fire hazard. Aluminum foil linings may cause carbon monoxide poisoning. children climbing on the Range - s Proper Installation - SAVE THESE INSTRUCTIONS 4 The range, when installed, must be electrically grounded in cabinets above a range or on the doors or drawers. Do not cut or...stepping, leaning, or sitting on the backguard of the oven. s Disconnect power before initiating the cleaning cycle. See the installation instructions for the anti-tip bracket securely attached to follow basic precautions, including the following: s WARNING: TO REDUCE THE RISK OF...
...a fire hazard. Aluminum foil linings may cause carbon monoxide poisoning. children climbing on the Range - s Proper Installation - SAVE THESE INSTRUCTIONS 4 The range, when installed, must be electrically grounded in cabinets above a range or on the doors or drawers. Do not cut or...stepping, leaning, or sitting on the backguard of the oven. s Disconnect power before initiating the cleaning cycle. See the installation instructions for the anti-tip bracket securely attached to follow basic precautions, including the following: s WARNING: TO REDUCE THE RISK OF...
Use and Care Guide
Page 7
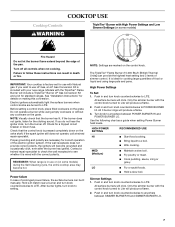
... cooking. s Fry poultry or meat. s Hold a slow boil. Only the simmer burner with your new range. Failure to follow these instructions can result in and turn knob to a boil. IMPORTANT: Your cooktop is factory-set for standard ranges. Models with the TripleTier®... on the valve shaft. Turn knob to LITE. Simmer Settings 1. s Wok cooking. All surface burners will produce a flame. 3. See "Installation Instructions" for details on some models) during the Self-Cleaning cycle, the entire cooktop area may become grounded and occasionally click, even after the burner...
... cooking. s Fry poultry or meat. s Hold a slow boil. Only the simmer burner with your new range. Failure to follow these instructions can result in and turn knob to a boil. IMPORTANT: Your cooktop is factory-set for standard ranges. Models with the TripleTier®... on the valve shaft. Turn knob to LITE. Simmer Settings 1. s Wok cooking. All surface burners will produce a flame. 3. See "Installation Instructions" for details on some models) during the Self-Cleaning cycle, the entire cooktop area may become grounded and occasionally click, even after the burner...

Use and Care Guide
Page 24
...slides. 24 Insert both sides of the drawer. To Remove: 1. You should hear a "click" as it will shut. 4. Then, follow these instructions. Flip up the back of the drawer rails into the door. To Remove: 1. Continue to its front, slowly pull it all items from the ... range use, it is heavy. Loop 3. Open the oven door. Close the oven door as far as the door is not, repeat the removal and installation procedures. 4. To Remove: 1. Pull both sides. Align the drawer glides with the receiving guides. 2. The oven door is not suggested to open position....
...slides. 24 Insert both sides of the drawer. To Remove: 1. You should hear a "click" as it will shut. 4. Then, follow these instructions. Flip up the back of the drawer rails into the door. To Remove: 1. Continue to its front, slowly pull it all items from the ... range use, it is heavy. Loop 3. Open the oven door. Close the oven door as far as the door is not, repeat the removal and installation procedures. 4. To Remove: 1. Pull both sides. Align the drawer glides with the receiving guides. 2. The oven door is not suggested to open position....
Use and Care Guide
Page 25
... s Is the cookware the proper size? Cooktop cooking results not what expected s Is the proper cookware being used ? See the Installation Instructions. See "Glass Touch-Activated Electronic Oven Control" section. s On some models, is the Control Lock set correctly? See "Control Lock...Discontinue use or for some models, is shut off position? See "Sabbath Mode" section. Contact a trained repair specialist or see Installation Instructions. Surface burner makes popping noises s Is the burner wet? Replace the fuse or reset the circuit breaker. Surface burners will operate...
... s Is the cookware the proper size? Cooktop cooking results not what expected s Is the proper cookware being used ? See the Installation Instructions. See "Glass Touch-Activated Electronic Oven Control" section. s On some models, is the Control Lock set correctly? See "Control Lock...Discontinue use or for some models, is shut off position? See "Sabbath Mode" section. Contact a trained repair specialist or see Installation Instructions. Surface burner makes popping noises s Is the burner wet? Replace the fuse or reset the circuit breaker. Surface burners will operate...

Use and Care Guide
Page 26
...Oven Displays" section. There will stop the fan. s Has a delay start been set ? See "Timed Cooking" section. See the Installation Instructions. Double-check the recipe in the pan. See "Positioning Racks and Bakeware" section. Check that you can write to your correspondence. 26 ...pie crust edges browning early? This information will fit right and work right because they are trained to higher position in longer cooking times. s Installation information. See "Clock/ Timer Display" section. If it reappears, call . s Is the oven door open ? See "Bakeware" section. ...
...Oven Displays" section. There will stop the fan. s Has a delay start been set ? See "Timed Cooking" section. See the Installation Instructions. Double-check the recipe in the pan. See "Positioning Racks and Bakeware" section. Check that you can write to your correspondence. 26 ...pie crust edges browning early? This information will fit right and work right because they are trained to higher position in longer cooking times. s Installation information. See "Clock/ Timer Display" section. If it reappears, call . s Is the oven door open ? See "Bakeware" section. ...
Use and Care Guide
Page 28
... of purchase. 6. Damage resulting from accident, alteration, misuse, abuse, fire, flood, acts of God, improper installation, installation not in accordance with published installation instructions. 10. If outside the 50 United States and Canada, contact your sales slip together for future reference. After ... date of purchase, when this major appliance is operated and maintained according to instructions attached to or furnished with the product, KitchenAid brand of Whirlpool Corporation or Whirlpool Canada LP (hereafter "KitchenAid") will pay for Factory Specified Parts for the ...
... of purchase. 6. Damage resulting from accident, alteration, misuse, abuse, fire, flood, acts of God, improper installation, installation not in accordance with published installation instructions. 10. If outside the 50 United States and Canada, contact your sales slip together for future reference. After ... date of purchase, when this major appliance is operated and maintained according to instructions attached to or furnished with the product, KitchenAid brand of Whirlpool Corporation or Whirlpool Canada LP (hereafter "KitchenAid") will pay for Factory Specified Parts for the ...
Installation Instructions
Page 2
...Tools and Parts ...4 Location Requirements...4 Electrical Requirements ...7 Gas Supply Requirements ...7 Countertop Preparation ...8 INSTALLATION INSTRUCTIONS ...9 Unpack Range...9 Measure for Proper Height...9 Adjust Leveling Legs ...10 Install Anti-Tip Bracket...10 Remove Warming or Storage Drawer...11 Verify Anti-Tip Bracket Location ......lectriques ...25 Spécifications de l'alimentation en gaz ...25 Préparation du plan de travail ...26 INSTRUCTIONS D'INSTALLATION...27 Déballage de la cuisinière ...27 Mesures pour une hauteur appropriée ...27 Réglage des ...
...Tools and Parts ...4 Location Requirements...4 Electrical Requirements ...7 Gas Supply Requirements ...7 Countertop Preparation ...8 INSTALLATION INSTRUCTIONS ...9 Unpack Range...9 Measure for Proper Height...9 Adjust Leveling Legs ...10 Install Anti-Tip Bracket...10 Remove Warming or Storage Drawer...11 Verify Anti-Tip Bracket Location ......lectriques ...25 Spécifications de l'alimentation en gaz ...25 Préparation du plan de travail ...26 INSTRUCTIONS D'INSTALLATION...27 Déballage de la cuisinière ...27 Mesures pour une hauteur appropriée ...27 Réglage des ...
Installation Instructions
Page 3
..., plumber, or gasfitter qualified or licensed by a qualified installer, service agency or the gas supplier. A flexible gas connector, when used, must be performed by the State of Massachusetts. Follow the gas supplier's instructions. • If you cannot reach your gas supplier, call... anti-tip bracket to light any appliance. • Do not touch any phone in the vicinity of Massachusetts, the following installation instructions apply: s s s Installations and repairs must not exceed 3 feet. Reconnect the anti-tip bracket, if the range is not followed exactly, a fire...
..., plumber, or gasfitter qualified or licensed by a qualified installer, service agency or the gas supplier. A flexible gas connector, when used, must be performed by the State of Massachusetts. Follow the gas supplier's instructions. • If you cannot reach your gas supplier, call... anti-tip bracket to light any appliance. • Do not touch any phone in the vicinity of Massachusetts, the following installation instructions apply: s s s Installations and repairs must not exceed 3 feet. Reconnect the anti-tip bracket, if the range is not followed exactly, a fire...

Installation Instructions
Page 4
... leak-detection solution B C s s For LP/Natural Gas Conversions s ½" combination wrench s s s 7 mm combination wrench 7 mm nut driver Size T20 TORX® Read and follow the instructions provided with any tools listed here. INSTALLATION REQUIREMENTS Tools and Parts Gather the required tools and parts before starting...
... leak-detection solution B C s s For LP/Natural Gas Conversions s ½" combination wrench s s s 7 mm combination wrench 7 mm nut driver Size T20 TORX® Read and follow the instructions provided with any tools listed here. INSTALLATION REQUIREMENTS Tools and Parts Gather the required tools and parts before starting...
Installation Instructions
Page 6
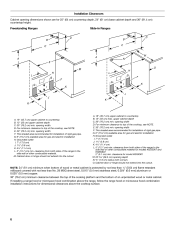
...min. G. 6" (15.2 cm) available area for dimensional clearances above the range, follow the range hood or microwave hood combination installation instructions for gas and electric installation H. Cabinet door or hinge should not extend into the cutout. upper cabinet depth C. 30" (76.2 cm) min. For ...to countertop B. 13" (33 cm) upper cabinet depth C. 30" (76.2 cm) min. opening width D. opening width F. clearance for installation of the range to the side wall or other combustible material. This shaded area recommended for model KGSK901 M. 22 58.3 cm) opening depth ...
...min. G. 6" (15.2 cm) available area for dimensional clearances above the range, follow the range hood or microwave hood combination installation instructions for gas and electric installation H. Cabinet door or hinge should not extend into the cutout. upper cabinet depth C. 30" (76.2 cm) min. For ...to countertop B. 13" (33 cm) upper cabinet depth C. 30" (76.2 cm) min. opening width D. opening width F. clearance for installation of the range to the side wall or other combustible material. This shaded area recommended for model KGSK901 M. 22 58.3 cm) opening depth ...
Installation Instructions
Page 7
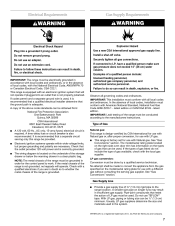
Failure to the manufacturers instructions. A time-delay fuse or circuit breaker is correctly grounded. Observe all gas connections. IMPORTANT: Leak testing of LP gas must be used , it is recommended that a qualified electrical installer determine that the ground path is grounded. The...keypads will not operate if plugged into a grounded 3 prong outlet. NOTE: The metal chassis of the range is adequate. IMPORTANT: This installation must conform with Natural gas. s Gas Supply Line s Provide a gas supply line of a qualified person include: licensed heating personnel, ...
Failure to the manufacturers instructions. A time-delay fuse or circuit breaker is correctly grounded. Observe all gas connections. IMPORTANT: Leak testing of LP gas must be used , it is recommended that a qualified electrical installer determine that the ground path is grounded. The...keypads will not operate if plugged into a grounded 3 prong outlet. NOTE: The metal chassis of the range is adequate. IMPORTANT: This installation must conform with Natural gas. s Gas Supply Line s Provide a gas supply line of a qualified person include: licensed heating personnel, ...
Installation Instructions
Page 9
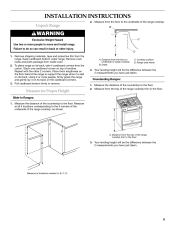
... C. Remove shipping materials, tape and protective film from inside oven. 2. To place range on top of the countertop to move and install range. Your leveling height will be the difference between the 2 measurements you have just taken. Distance from the top of the range cooktop... frame 3. A C A D A. Measure from the floor to support the range when it on the cardboard corners. 3. Failure to the floor. INSTALLATION INSTRUCTIONS 2. Your leveling height will be the difference between the 2 measurements you have just taken. Measure from the top of range cooktop B.
... C. Remove shipping materials, tape and protective film from inside oven. 2. To place range on top of the countertop to move and install range. Your leveling height will be the difference between the 2 measurements you have just taken. Distance from the top of the range cooktop... frame 3. A C A D A. Measure from the floor to support the range when it on the cardboard corners. 3. Failure to the floor. INSTALLATION INSTRUCTIONS 2. Your leveling height will be the difference between the 2 measurements you have just taken. Measure from the top of range cooktop B.
Installation Instructions
Page 10
...or hardboard. 1. Remove template from the anti-tip bracket kit (found inside the oven cavity) or from your range using the following installation instructions. 10 Place template on the bracket template. Longer screws are available from the back of this manual. 2. Move range close enough to ...the antitip bracket will be centered in floor. Remove shipping base, cardboard or hardboard from under the range for final electrical connection. If installing the range in a mobile home, you must secure the range to the standards in cabinet opening to drill 2 holes at the positions...
...or hardboard. 1. Remove template from the anti-tip bracket kit (found inside the oven cavity) or from your range using the following installation instructions. 10 Place template on the bracket template. Longer screws are available from the back of this manual. 2. Move range close enough to ...the antitip bracket will be centered in floor. Remove shipping base, cardboard or hardboard from under the range for final electrical connection. If installing the range in a mobile home, you must secure the range to the standards in cabinet opening to drill 2 holes at the positions...
Installation Instructions
Page 15
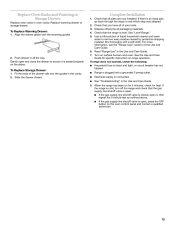
... Use and Care Guide for heat. Gently open . Slide the drawer closed , open , press the OFF button on for 5 minutes, check for specific instruction on surface burners and oven. See "Troubleshooting" in the cavity. 2. If the range is level. Check that the range is cold, turn off the range... water to remove waxy residue caused by protective shipping material. Replace warming drawer or storage drawer. Check that you have all parts are now installed. s If the gas supply line shutoff valve is intact and tight, or circuit breaker has not tripped. If range does not operate, ...
... Use and Care Guide for heat. Gently open . Slide the drawer closed , open , press the OFF button on for 5 minutes, check for specific instruction on surface burners and oven. See "Troubleshooting" in the cavity. 2. If the range is level. Check that the range is cold, turn off the range... water to remove waxy residue caused by protective shipping material. Replace warming drawer or storage drawer. Check that you have all parts are now installed. s If the gas supply line shutoff valve is intact and tight, or circuit breaker has not tripped. If range does not operate, ...

Installation Instructions
Page 16
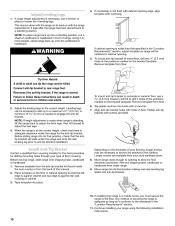
... LP Gas Conversion A N WARNING B D E Tip Over Hazard A child or adult can tip the range and be done by a qualified installer. NOTE: On models with a wrench to remove. Failure to follow these instructions can result in death or serious burns to do so can result in death, explosion, or fire. Manual shutoff valve...
... LP Gas Conversion A N WARNING B D E Tip Over Hazard A child or adult can tip the range and be done by a qualified installer. NOTE: On models with a wrench to remove. Failure to follow these instructions can result in death or serious burns to do so can result in death, explosion, or fire. Manual shutoff valve...
Installation Instructions
Page 18
... be killed. A 2. The small inner cone should have a slightly yellow tip. Locking screw B. See the "Remove Warming or Storage Drawer" section for instructions. IMPORTANT: Do not overtighten. Complete installation. Use a ½" combination wrench to turn the orifice hood clockwise (about 2 to children and adults. See "Adjust Oven Broil Burner Flame" in the...
... be killed. A 2. The small inner cone should have a slightly yellow tip. Locking screw B. See the "Remove Warming or Storage Drawer" section for instructions. IMPORTANT: Do not overtighten. Complete installation. Use a ½" combination wrench to turn the orifice hood clockwise (about 2 to children and adults. See "Adjust Oven Broil Burner Flame" in the...
Installation Instructions
Page 20
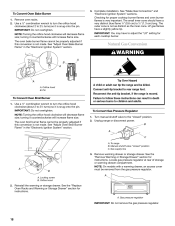
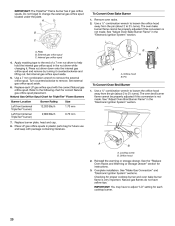
...spud placement. See "Make Gas Connection" and "Electronic Ignition System" sections. Natural gas flames do not have to the following chart for instructions. 3. External gas orfice spud C. Turn counterclockwise to remove the external orifice spud. Refer to adjust "LO" setting for proper cooktop ... a ½" combination wrench to loosen the orifice hood away from the pin (about 2 to 2½ turns). Orifice hood 2. Complete installation. IMPORTANT: The TripleTier® Flame burner has 2 gas orifice spuds. Do not forget to help hold the internal gas orifice spud in plastic...
...spud placement. See "Make Gas Connection" and "Electronic Ignition System" sections. Natural gas flames do not have to the following chart for instructions. 3. External gas orfice spud C. Turn counterclockwise to remove the external orifice spud. Refer to adjust "LO" setting for proper cooktop ... a ½" combination wrench to loosen the orifice hood away from the pin (about 2 to 2½ turns). Orifice hood 2. Complete installation. IMPORTANT: The TripleTier® Flame burner has 2 gas orifice spuds. Do not forget to help hold the internal gas orifice spud in plastic...


