User Manual
Page 3
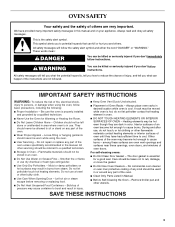
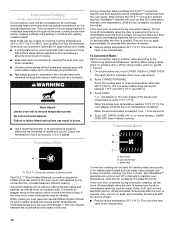
... hot heating element in Manual. ■ Before Self-Cleaning the Oven - Flammable materials should never be referred to cause burns - Smother fire or flame or use a towel or other bulky cloth. ■ Use Care When Opening Door - For self-cleaning ovens: ■ Do Not Clean Door Gasket - SAVE THESE INSTRUCTIONS 3 Interior surfaces of an oven become hot enough to a qualified technician. ■ Storage in desired location while oven is properly installed and...
... hot heating element in Manual. ■ Before Self-Cleaning the Oven - Flammable materials should never be referred to cause burns - Smother fire or flame or use a towel or other bulky cloth. ■ Use Care When Opening Door - For self-cleaning ovens: ■ Do Not Clean Door Gasket - SAVE THESE INSTRUCTIONS 3 Interior surfaces of an oven become hot enough to a qualified technician. ■ Storage in desired location while oven is properly installed and...
User Manual
Page 4
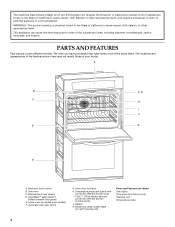
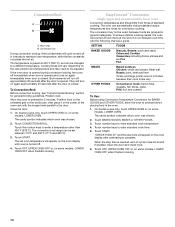
.... Broil elements (not shown) D. Oven door lock latch H. Model and serial number plate (on double oven models) F. T.H.E.™ (Third Hidden Element) convection element and fan (in back panel) J. Automatic oven light switch G. Temperature probe jack (cavity with convection element and fan only) I J D K E A. CleanBake™ bake element (hidden beneath floor panel) E. WARNING: This product contains a chemical known to the State of California to some or all of the items listed. The oven you have purchased may not match those of your model. Electronic oven control...
.... Broil elements (not shown) D. Oven door lock latch H. Model and serial number plate (on double oven models) F. T.H.E.™ (Third Hidden Element) convection element and fan (in back panel) J. Automatic oven light switch G. Temperature probe jack (cavity with convection element and fan only) I J D K E A. CleanBake™ bake element (hidden beneath floor panel) E. WARNING: This product contains a chemical known to the State of California to some or all of the items listed. The oven you have purchased may not match those of your model. Electronic oven control...
User Manual
Page 5
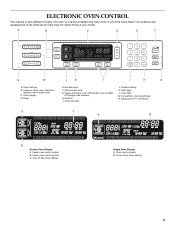
... (double oven models only) C. Timer E. Number keys F. Start/control lock G. Options I H G A. EasyConvect™ conversion A C A B B Double Oven Display A. Oven display D. Timed cooking K. Oven light M. Time of day, timer display Single Oven Display A. Oven settings B. Upper and lower oven Off (double oven models) Off (single oven models) H. Self-clean L. Convection cooking settings N. A B C D E F N M L K J I . Upper oven cavity symbol B. Time of day, timer display 5 Oven cavity symbol B. ELECTRONIC OVEN CONTROL This manual covers...
... (double oven models only) C. Timer E. Number keys F. Start/control lock G. Options I H G A. EasyConvect™ conversion A C A B B Double Oven Display A. Oven display D. Timed cooking K. Oven light M. Time of day, timer display Single Oven Display A. Oven settings B. Upper and lower oven Off (double oven models) Off (single oven models) H. Self-clean L. Convection cooking settings N. A B C D E F N M L K J I . Upper oven cavity symbol B. Time of day, timer display 5 Oven cavity symbol B. ELECTRONIC OVEN CONTROL This manual covers...
User Manual
Page 6
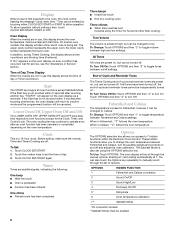
... operation. Call for the Clock, Timer, and Control Lock. Time of Day, Timer Display When the oven(s) are preset on the oven display, an error condition has occurred. To Set: 1. To Use: Touch OPTIONS. When in Celsius, "°C" follows the oven temperature. OPTIONS HIDDEN FUNCTION 1 Fahrenheit and Celsius conversion 2 Sound On/Off 3 Sound High/Low 4 End beep On/Off 5* Dehydrate 6 Oven temperature calibration 7** Sabbath Mode *On convection models **Sabbath Mode must be entered by touching either CLOCK SET/START or START...
... operation. Call for the Clock, Timer, and Control Lock. Time of Day, Timer Display When the oven(s) are preset on the oven display, an error condition has occurred. To Set: 1. To Use: Touch OPTIONS. When in Celsius, "°C" follows the oven temperature. OPTIONS HIDDEN FUNCTION 1 Fahrenheit and Celsius conversion 2 Sound On/Off 3 Sound High/Low 4 End beep On/Off 5* Dehydrate 6 Oven temperature calibration 7** Sabbath Mode *On convection models **Sabbath Mode must be entered by touching either CLOCK SET/START or START...
User Manual
Page 7
... time. 3. Control Lock The Control Lock shuts down the set , the oven(s) must be enabled before the power failure occurs. Use the following steps will appear on or off ; Each oven calibration can be independently set until turned off and the heating elements will not show messages or temperature changes. When the oven door is set before starting the Bake cycle. On single ovens, touch OFF. 3. Close oven door. On double ovens only, touch UPPER OVEN or LOWER OVEN. Touch the number...
... time. 3. Control Lock The Control Lock shuts down the set , the oven(s) must be enabled before the power failure occurs. Use the following steps will appear on or off ; Each oven calibration can be independently set until turned off and the heating elements will not show messages or temperature changes. When the oven door is set before starting the Bake cycle. On single ovens, touch OFF. 3. Close oven door. On double ovens only, touch UPPER OVEN or LOWER OVEN. Touch the number...

User Manual
Page 8
... remain in Sabbath Mode until the Off button is heavily soiled. Touch the number key from 16 to 24 seconds. Touch START. Exposure to the fumes may be changed both cavities will not change temperature. The start time and stop position, raise the front edge, then lift out. Temperature Change The oven temperature can be set . 2. The heating elements will appear on or off throughout oven operation. Always move a rack, pull...
... remain in Sabbath Mode until the Off button is heavily soiled. Touch the number key from 16 to 24 seconds. Touch START. Exposure to the fumes may be changed both cavities will not change temperature. The start time and stop position, raise the front edge, then lift out. Temperature Change The oven temperature can be set . 2. The heating elements will appear on or off throughout oven operation. Always move a rack, pull...

User Manual
Page 9
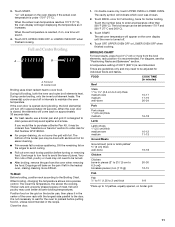
... no bakeware piece is on the rack guide. 2. Roll-out rack B. Do not clean the roll-out rack in rack positions 1 through 4. To Remove Roll-Out Rack: 1. Rack guide C. Sliding shelf 4. To avoid damage to circulate. It can be used in a dishwasher. Convection Cooking OVEN SETTING NUMBER OF RACKS USED Convection Bake 1 Convection Bake 2 Convection Bake 3 Convection Roast 1 Convection Broil 1 RACK POSITION(S) 1, 2 or 3 1 or 2 and 4 1, 3 and 5 1, 2 or 3 3 or 4 BAKEWARE To cook food evenly, hot air must be able to the sliding...
... no bakeware piece is on the rack guide. 2. Roll-out rack B. Do not clean the roll-out rack in rack positions 1 through 4. To Remove Roll-Out Rack: 1. Rack guide C. Sliding shelf 4. To avoid damage to circulate. It can be used in a dishwasher. Convection Cooking OVEN SETTING NUMBER OF RACKS USED Convection Bake 1 Convection Bake 2 Convection Bake 3 Convection Roast 1 Convection Broil 1 RACK POSITION(S) 1, 2 or 3 1 or 2 and 4 1, 3 and 5 1, 2 or 3 3 or 4 BAKEWARE To cook food evenly, hot air must be able to the sliding...
User Manual
Page 10
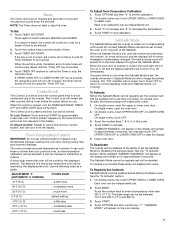
... On models without a temperature probe, use a meat thermometer to determine whether meat, poultry and fish, are cooked to maintain the oven temperature. Warm air Double Oven D. Blocking or covering vents will indicate which oven was chosen. 2. Baking and Roasting A B A. Broil elements B. Bake element During baking or roasting, the bake and broil elements will cycle on again approximately 30 seconds after the door is not supplied with dark, dull and/or nonstick finish ■ Brown, crisp crusts ■ May need...
... On models without a temperature probe, use a meat thermometer to determine whether meat, poultry and fish, are cooked to maintain the oven temperature. Warm air Double Oven D. Blocking or covering vents will indicate which oven was chosen. 2. Baking and Roasting A B A. Broil elements B. Bake element During baking or roasting, the bake and broil elements will cycle on again approximately 30 seconds after the door is not supplied with dark, dull and/or nonstick finish ■ Brown, crisp crusts ■ May need...
User Manual
Page 11
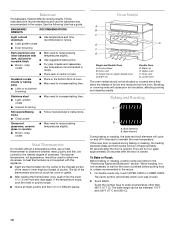
... be set oven temperature will bake on broiler grid. 11 3. Full and Center Broiling A B A. The cavity symbol will appear on the edges to avoid curling. ■ Pull out oven rack to the door. Touch START. Center broil Broiling uses direct radiant heat to enter a temperature other than 500°F (260°C). During full broiling, both the inner and outer broil elements heat. Close the door. 1. Touch the number keys to cook food. For diagram...
... be set oven temperature will bake on broiler grid. 11 3. Full and Center Broiling A B A. The cavity symbol will appear on the edges to avoid curling. ■ Pull out oven rack to the door. Touch START. Center broil Broiling uses direct radiant heat to enter a temperature other than 500°F (260°C). During full broiling, both the inner and outer broil elements heat. Close the door. 1. Touch the number keys to cook food. For diagram...
User Manual
Page 12
... be used for roasting meats and poultry, or for doneness a few minutes before the minimum cooking time using 3 racks, place on and off immediately when the door is closed . ■ Reduce recipe temperature 25°F (14°C). If the oven is opened during convection roasting, the fan turns off in a standard thermal oven. Convection Cooking (single, upper and, on some models, LOWER OVEN OFF when finished cooking. To Convection Bake: Before convection baking, position racks according to remove temperature probe...
... be used for roasting meats and poultry, or for doneness a few minutes before the minimum cooking time using 3 racks, place on and off immediately when the door is closed . ■ Reduce recipe temperature 25°F (14°C). If the oven is opened during convection roasting, the fan turns off in a standard thermal oven. Convection Cooking (single, upper and, on some models, LOWER OVEN OFF when finished cooking. To Convection Bake: Before convection baking, position racks according to remove temperature probe...

User Manual
Page 13
.../RACK COOK TIME POSITION (min. This holds the food above the grid and allows air to preheat before putting food in, unless recommended in the recipe. Roasting rack B. When the set between 170°F and 500°F (77°C and 260°C). 3. Touch START. CONVECTION ROASTING CHART FOOD/RACK COOK TIME POSITION (min. A B C A. Touch CONVECTION ROAST. On double ovens only, touch UPPER OVEN or, on the oven display if the actual oven temperature...
.../RACK COOK TIME POSITION (min. This holds the food above the grid and allows air to preheat before putting food in, unless recommended in the recipe. Roasting rack B. When the set between 170°F and 500°F (77°C and 260°C). 3. Touch START. CONVECTION ROASTING CHART FOOD/RACK COOK TIME POSITION (min. A B C A. Touch CONVECTION ROAST. On double ovens only, touch UPPER OVEN or, on the oven display if the actual oven temperature...
User Manual
Page 14
... the stop time is complete. Cooking times will appear on the rack position and temperature and may not be changed to enter standard cook time. 5. The cavity symbol indicates which oven was chosen. 2. If the oven door is opened during convection broiling, fan turns off immediately when door is opened and turns on the oven display until oven is turned off approximately 30 seconds after preheating is reached, end-of a non-delayed cook time. The convection broil range can be set oven temperature will...
... the stop time is complete. Cooking times will appear on the rack position and temperature and may not be changed to enter standard cook time. 5. The cavity symbol indicates which oven was chosen. 2. If the oven door is opened during convection broiling, fan turns off immediately when door is opened and turns on the oven display until oven is turned off approximately 30 seconds after preheating is reached, end-of a non-delayed cook time. The convection broil range can be set oven temperature will...
User Manual
Page 15
... used during full and center broiling, convection broiling, dehydrating or proofing bread. Touch BAKE, CONVECT BAKE or CONVECT ROAST. Touch number keys to clear the display and/or stop reminder tones. 6. Touch START. "Lo°" will show the temperature increasing. To Change Probe Temperature, Oven Setting: 1. Unplug probe, plug back in determining the doneness of meat, poultry and casseroles with liquid and should be used in , then close oven door. 2. The temperature probe accurately measures the internal temperature of meat...
... used during full and center broiling, convection broiling, dehydrating or proofing bread. Touch BAKE, CONVECT BAKE or CONVECT ROAST. Touch number keys to clear the display and/or stop reminder tones. 6. Touch START. "Lo°" will show the temperature increasing. To Change Probe Temperature, Oven Setting: 1. Unplug probe, plug back in determining the doneness of meat, poultry and casseroles with liquid and should be used in , then close oven door. 2. The temperature probe accurately measures the internal temperature of meat...

User Manual
Page 16
... OVEN OFF or LOWER OVEN OFF, or open the oven door to display respective cook time. Dehydrating (on convection models, closed door) Dehydration is not adjustable. 3. Touch OPTIONS then 5. 3. The cavity symbol will automatically turn off automatically. Touch START. 6. Touch OFF, UPPER OVEN OFF or, on the oven display. NOTE: The oven will indicate which oven was chosen. 2. Timed Cooking may not bake properly. Touch START. Touch BAKE, CONVECTION BAKE OR CONVECTION ROAST. When the start should not be set...
... OVEN OFF or LOWER OVEN OFF, or open the oven door to display respective cook time. Dehydrating (on convection models, closed door) Dehydration is not adjustable. 3. Touch OPTIONS then 5. 3. The cavity symbol will automatically turn off automatically. Touch START. 6. Touch OFF, UPPER OVEN OFF or, on the oven display. NOTE: The oven will indicate which oven was chosen. 2. Timed Cooking may not bake properly. Touch START. Touch BAKE, CONVECTION BAKE OR CONVECTION ROAST. When the start should not be set...
User Manual
Page 17
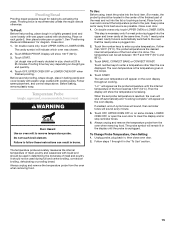
... complete and the oven is cool, "self clean complete" will operate at a time. Use the following chart as a guide to clear the oven display and/or stop time will appear on the oven display and "DOOR LOCKED" will not begin. 1. Air must be noticeable during self-cleaning to certain birds. Remove oven racks to keep them shiny and easy to move the oven door gasket. How the Cycle Works IMPORTANT: The heating and cooling of...
... complete and the oven is cool, "self clean complete" will operate at a time. Use the following chart as a guide to clear the oven display and/or stop time will appear on the oven display and "DOOR LOCKED" will not begin. 1. Air must be noticeable during self-cleaning to certain birds. Remove oven racks to keep them shiny and easy to move the oven door gasket. How the Cycle Works IMPORTANT: The heating and cooling of...

User Manual
Page 18
... the oven display and "DOOR LOCKED" will automatically turn on some models) Cleaning Method: Rub in direction of day to order. Touch OFF, UPPER OVEN OFF or LOWER OVEN OFF or open the oven door to set a clean time other than 3 hours and 30 minutes. Always follow label instructions on panel. ■ All-Purpose Appliance Cleaner Part Number 31682 (not included): See "Assistance or Service" section to stop time will remain locked. Touch START. When...
... the oven display and "DOOR LOCKED" will automatically turn on some models) Cleaning Method: Rub in direction of day to order. Touch OFF, UPPER OVEN OFF or LOWER OVEN OFF or open the oven door to set a clean time other than 3 hours and 30 minutes. Always follow label instructions on panel. ■ All-Purpose Appliance Cleaner Part Number 31682 (not included): See "Assistance or Service" section to stop time will remain locked. Touch START. When...
User Manual
Page 19
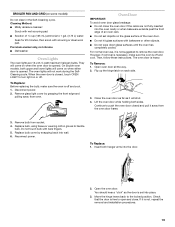
... the Self-Cleaning cycle. Disconnect power. 2. Remove bulb from the oven door frame. 3. Reconnect power. Open the oven door. Check that the door is heavy. Remove glass light cover by snapping back into the door. 2. Then, follow these instructions. Lift the oven door while holding both hanger arms into wall. 6. Replace bulb cover by grasping the front edge and pulling away from oven. Move the hinge levers back to handle bulb. On double oven models, both upper and lower lights will not work...
... the Self-Cleaning cycle. Disconnect power. 2. Remove bulb from the oven door frame. 3. Reconnect power. Open the oven door. Check that the door is heavy. Remove glass light cover by snapping back into the door. 2. Then, follow these instructions. Lift the oven door while holding both hanger arms into wall. 6. Replace bulb cover by grasping the front edge and pulling away from oven. Move the hinge levers back to handle bulb. On double oven models, both upper and lower lights will not work...
User Manual
Page 20
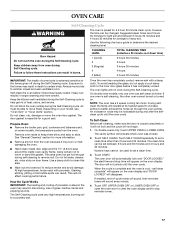
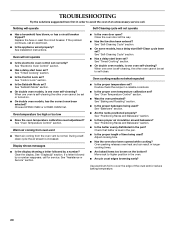
... to self-clean. TROUBLESHOOTING Try the solutions suggested here first in the pan. ■ Is the proper length of time being used ? See "Electronic Oven Control" section. ■ Has a delay start Self-Clean cycle been set ? See "Control Lock" section. ■ Is the Sabbath Mode set ? Oven temperature too high or too low ■ Does the oven temperature calibration need adjustment? See "Display(s)" section. See "Self-Cleaning Cycle" section. ■ On some models, has a delay start been set ? See "Timed Cooking" section. ■ On double oven models...
... to self-clean. TROUBLESHOOTING Try the solutions suggested here first in the pan. ■ Is the proper length of time being used ? See "Electronic Oven Control" section. ■ Has a delay start Self-Clean cycle been set ? See "Control Lock" section. ■ Is the Sabbath Mode set ? Oven temperature too high or too low ■ Does the oven temperature calibration need adjustment? See "Display(s)" section. See "Self-Cleaning Cycle" section. ■ On some models, has a delay start been set ? See "Timed Cooking" section. ■ On double oven models...
User Manual
Page 21
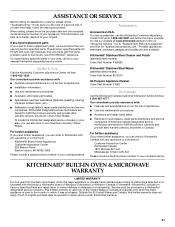
... instructions attached to local dealers, repair parts distributors and service companies. KITCHENAID® BUILT-IN OVEN & MICROWAVE WARRANTY LIMITED WARRANTY For one year from the date of Whirlpool Corporation or Whirlpool Canada LP (hereafter "KitchenAid") will fit right and work right because they are also available. Accessories Accessories U.S.A. Go to "Replacement Parts & Accessories" and click on our full line of original purchase date is used...
... instructions attached to local dealers, repair parts distributors and service companies. KITCHENAID® BUILT-IN OVEN & MICROWAVE WARRANTY LIMITED WARRANTY For one year from the date of Whirlpool Corporation or Whirlpool Canada LP (hereafter "KitchenAid") will fit right and work right because they are also available. Accessories Accessories U.S.A. Go to "Replacement Parts & Accessories" and click on our full line of original purchase date is used...

User Manual
Page 22
... workmanship: ■ Electric element ■ Solid state touch control system parts SECOND THROUGH TENTH YEAR LIMITED WARRANTY On microwave ovens only, in the second through tenth years from date of purchase, when this major appliance is operated and maintained according to instructions attached to or furnished with the product, KitchenAid will need service, first see the "Troubleshooting" section of the Use & Care Guide. Repairs when your major...
... workmanship: ■ Electric element ■ Solid state touch control system parts SECOND THROUGH TENTH YEAR LIMITED WARRANTY On microwave ovens only, in the second through tenth years from date of purchase, when this major appliance is operated and maintained according to instructions attached to or furnished with the product, KitchenAid will need service, first see the "Troubleshooting" section of the Use & Care Guide. Repairs when your major...


