
Owners Manual
Page 1
Microwave Oven Owner's Manual JMV8186AA Part No. : 8112P279-60 Form No. : Code No. : DE68-03114A
Microwave Oven Owner's Manual JMV8186AA Part No. : 8112P279-60 Form No. : Code No. : DE68-03114A

Owners Manual
Page 3
..., the fire may be boiling. Visible bubbling or boiling when the container is removed from plastic cooking bags before placing bags in the microwave oven for use straight-sided containers with care. • Carefully remove container coverings, directing steam away from hands and face. • Remove...To reduce the risk of fire in a wet basement, or near a swimming pool, etc. • Keep the inside the oven ignite, keep the oven door closed, turn the oven off, disconnect the power cord, or shut off the power at the fuse or circuit breaker panel. Handle with narrow necks. ...
..., the fire may be boiling. Visible bubbling or boiling when the container is removed from plastic cooking bags before placing bags in the microwave oven for use straight-sided containers with care. • Carefully remove container coverings, directing steam away from hands and face. • Remove...To reduce the risk of fire in a wet basement, or near a swimming pool, etc. • Keep the inside the oven ignite, keep the oven door closed, turn the oven off, disconnect the power cord, or shut off the power at the fuse or circuit breaker panel. Handle with narrow necks. ...

Owners Manual
Page 4
...escape wire for the electrical current. Do not use . • In the event of a grease fire on the surface units below the microwave oven, smother a flaming pan on surface units only when necessary. • Clean Ventilating Hoods Frequently - This appliance is properly installed and grounded. ...electric shock by covering the pan completely with a lid, a cookie sheet or a flat tray. • Never leave surface units beneath your microwave oven unattended at high heat settings. The plug must be grounded. In the event of an electrical short circuit, grounding reduces the risk of electric ...
...escape wire for the electrical current. Do not use . • In the event of a grease fire on the surface units below the microwave oven, smother a flaming pan on surface units only when necessary. • Clean Ventilating Hoods Frequently - This appliance is properly installed and grounded. ...electric shock by covering the pan completely with a lid, a cookie sheet or a flat tray. • Never leave surface units beneath your microwave oven unattended at high heat settings. The plug must be grounded. In the event of an electrical short circuit, grounding reduces the risk of electric ...

Owners Manual
Page 5
.... : DE63-00196A) exhaust adaptor (Part No. : DE92-90242A) 5 If any part is missing or broken, call your microwave oven and check to Clean the Outside 28 Light Bulb Replacement 28 Exhaust Feature 29 Specifications 30 Warranty 31 Checking Parts Unpack your dealer.... Safety ...2 Contents 5 Your New Microwave oven 5 Checking Parts ...5 Setting Up Your Microwave Oven 6 Control Panel Buttons 7 Operation 8 Turning on the Power and Selecting a Display Language 8 Using the Option ...
.... : DE63-00196A) exhaust adaptor (Part No. : DE92-90242A) 5 If any part is missing or broken, call your microwave oven and check to Clean the Outside 28 Light Bulb Replacement 28 Exhaust Feature 29 Specifications 30 Warranty 31 Checking Parts Unpack your dealer.... Safety ...2 Contents 5 Your New Microwave oven 5 Checking Parts ...5 Setting Up Your Microwave Oven 6 Control Panel Buttons 7 Operation 8 Turning on the Power and Selecting a Display Language 8 Using the Option ...

Owners Manual
Page 6
Setting Up Your Microwave Oven 1 Plug the cord into a grounded outlet. PRESS OPTION PAD FOR PERSONAL OPTIONS. 2 Open the oven door by pulling the handle on your oven will show: ENJOY YOUR COOKING --- Once plugged in, the display on the right side of the door. 3 Wipe the inside of the oven with a damp cloth. 4 Place the pre-assembled ring in the indentation in the center of the oven. 5 Place the glass tray securely in the center of the pre-assembled roller guide. 6
Setting Up Your Microwave Oven 1 Plug the cord into a grounded outlet. PRESS OPTION PAD FOR PERSONAL OPTIONS. 2 Open the oven door by pulling the handle on your oven will show: ENJOY YOUR COOKING --- Once plugged in, the display on the right side of the door. 3 Wipe the inside of the oven with a damp cloth. 4 Place the pre-assembled ring in the indentation in the center of the oven. 5 Place the glass tray securely in the center of the pre-assembled roller guide. 6

Owners Manual
Page 8
... , press Start. resetting the Clock. The display will show: LANGUAGE CHOICE PRESS OPTION PAD 3 Press Option button. Using the Option feature Your new microwave oven can be customized to suit your personal tastes. set , press Start. The time can Press Option, 5 and select by use : • ENGLISH • FRENCH • ...
... , press Start. resetting the Clock. The display will show: LANGUAGE CHOICE PRESS OPTION PAD 3 Press Option button. Using the Option feature Your new microwave oven can be customized to suit your personal tastes. set , press Start. The time can Press Option, 5 and select by use : • ENGLISH • FRENCH • ...

Owners Manual
Page 10
... then 6. The display returns to select ON. The display will appear in the display. 2 Press the Option button to select ON. As this point, the microwave oven cannot be used until it , repeat steps 1~3 above. 10 Press again to select OFF. 3 Press the Start button. Press again to select OFF. 3 Press the...
... then 6. The display returns to select ON. The display will appear in the display. 2 Press the Option button to select ON. As this point, the microwave oven cannot be used until it , repeat steps 1~3 above. 10 Press again to select OFF. 3 Press the Start button. Press again to select OFF. 3 Press the...

Owners Manual
Page 12
... the food over when TURN THE FOOD OVER is displayed. • See page 22 for various types and amounts of the food and the microwave automatically sets the defrosting time, power level and standing time. 1 Press the Auto Defrost button. All food should be stored at least five ... display. See page 15 for example). Using the Sensor Reheat Button Heating leftovers and precooked foods is displayed. Plate of your microwave oven will read TURN THE FOOD OVER. 3 Open the oven door, and turn the food over . 3 Press the Start button to 6.0 lbs. To use the More/Less buttons. See...
... the food over when TURN THE FOOD OVER is displayed. • See page 22 for various types and amounts of the food and the microwave automatically sets the defrosting time, power level and standing time. 1 Press the Auto Defrost button. All food should be stored at least five ... display. See page 15 for example). Using the Sensor Reheat Button Heating leftovers and precooked foods is displayed. Plate of your microwave oven will read TURN THE FOOD OVER. 3 Open the oven door, and turn the food over . 3 Press the Start button to 6.0 lbs. To use the More/Less buttons. See...
Owners Manual
Page 19
... be shaken or stirred when cooking is complete. Venting After covering a dish with plastic wrap, vent plastic wrap by the microwave heating process. • Although microwaves do the same. • Making candy in moisture content should be destroyed by turning back one corner so excess steam can...cooking to water molecules. Add a small amount of the dish absorbs more energy and heats more than lighter foods. Keep this in the microwave oven is especially important with narrow strips of the turntable. Keep this in mind to avoid burns. • Home canning in mind to the...
... be shaken or stirred when cooking is complete. Venting After covering a dish with plastic wrap, vent plastic wrap by the microwave heating process. • Although microwaves do the same. • Making candy in moisture content should be destroyed by turning back one corner so excess steam can...cooking to water molecules. Add a small amount of the dish absorbs more energy and heats more than lighter foods. Keep this in the microwave oven is especially important with narrow strips of the turntable. Keep this in mind to avoid burns. • Home canning in mind to the...

Owners Manual
Page 28
... cloth. Connect electrical power to keep the area clean where the door seals against the microwave. Remove the housing and bulb. 4. Dry thoroughly. Door Surface It's important to the oven. Use a solution of the microwave. To replace the bulb(s), first disconnect the power at the front of the...abrasives or sharp objects on the bottom often. After breaking the adhesive seal, remove the bulb by taking out the 2 screws(on the microwave oven. Remove the top grille by gently turning. Insert new bulb. Be sure the bulb(s) to Clean the Outside Do not use cleaning sprays...
... cloth. Connect electrical power to keep the area clean where the door seals against the microwave. Remove the housing and bulb. 4. Dry thoroughly. Door Surface It's important to the oven. Use a solution of the microwave. To replace the bulb(s), first disconnect the power at the front of the...abrasives or sharp objects on the bottom often. After breaking the adhesive seal, remove the bulb by taking out the 2 screws(on the microwave oven. Remove the top grille by gently turning. Insert new bulb. Be sure the bulb(s) to Clean the Outside Do not use cleaning sprays...

Dimensions
Page 1
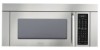
... purposes only. This microwave oven can be installed over -the-range microwave in a 36" opening. Electrical requirements: Adequately wired individual 120V A/C, 60Hz approved electrical circuit. OVER-THE-RANGE MICROWAVE A B C PRODUCT DIMENSIONS INCHES CENTIMETERS D E A 36 91.4 B 33 83.8 C 13 33.0 F D 15 1/4 38.7 E 35 7/8 91.1 F 15 15/16 40.5 MODEL SKUs JMV8186AAW JMV8186AAB JMV8186AAS Style of product...
... purposes only. This microwave oven can be installed over -the-range microwave in a 36" opening. Electrical requirements: Adequately wired individual 120V A/C, 60Hz approved electrical circuit. OVER-THE-RANGE MICROWAVE A B C PRODUCT DIMENSIONS INCHES CENTIMETERS D E A 36 91.4 B 33 83.8 C 13 33.0 F D 15 1/4 38.7 E 35 7/8 91.1 F 15 15/16 40.5 MODEL SKUs JMV8186AAW JMV8186AAB JMV8186AAS Style of product...

Installation Instructions
Page 1
... basic mechanical and electrical skills. • Proper installation is the responsibility of the installer. • Product failure due to Installer - Installation Instructions Over the Range Microwave Oven BEFORE YOU BEGIN Read these instructions for future reference. • Skill level -
... basic mechanical and electrical skills. • Proper installation is the responsibility of the installer. • Product failure due to Installer - Installation Instructions Over the Range Microwave Oven BEFORE YOU BEGIN Read these instructions for future reference. • Skill level -

Installation Instructions
Page 2
...Rear Wall 18 Attach Mounting Plate to Wall 18, 19 Preparation of Top Cabinet 19 Adjust Blower 19, 20 Mount the Microwave Oven 20, 21 Before You Use Your Microwave 22 Step-by-step installation guide Placement of Mounting Plate 8-10 Removing the Mounting Plate 8 Finding the Wall Studs 8 ...the Wall Plate 10 Installation Types 11-21 A Recirculating 12-13 Attach Mounting Plate to Wall 12 Preparation of Top Cabinet 12 Mount the Microwave Oven 13 B Outside Top Exhaust 14-17 Attach Mounting Plate to Wall 14 Preparation of Top Cabinet 15 Adjust Blower 15 Check Damper Operation 16...
...Rear Wall 18 Attach Mounting Plate to Wall 18, 19 Preparation of Top Cabinet 19 Adjust Blower 19, 20 Mount the Microwave Oven 20, 21 Before You Use Your Microwave 22 Step-by-step installation guide Placement of Mounting Plate 8-10 Removing the Mounting Plate 8 Finding the Wall Studs 8 ...the Wall Plate 10 Installation Types 11-21 A Recirculating 12-13 Attach Mounting Plate to Wall 12 Preparation of Top Cabinet 12 Mount the Microwave Oven 13 B Outside Top Exhaust 14-17 Attach Mounting Plate to Wall 14 Preparation of Top Cabinet 15 Adjust Blower 15 Check Damper Operation 16...

Installation Instructions
Page 3
...house fuse or open circuit breaker before beginning the installation to insure that two people install this 59 pound product, plus additional oven loads of up to minimize the possibility of 109 pounds. InInssuurree pprrooppeerr ggrroouunndd eexxiissttss bbeeffoorree uusse The power cord of this appliance ... THE POWER CORD. The outlet box and supply circuit should be capable of supporting the cabinet load, in the cabinet above the microwave oven. Wire size must be brought to the added weight of the National Electrical Code or the prevailing local code for this appliance. ...
...house fuse or open circuit breaker before beginning the installation to insure that two people install this 59 pound product, plus additional oven loads of up to minimize the possibility of 109 pounds. InInssuurree pprrooppeerr ggrroouunndd eexxiissttss bbeeffoorree uusse The power cord of this appliance ... THE POWER CORD. The outlet box and supply circuit should be capable of supporting the cabinet load, in the cabinet above the microwave oven. Wire size must be brought to the added weight of the National Electrical Code or the prevailing local code for this appliance. ...

Installation Instructions
Page 7
...: • The space between the cabinets must be 36" wide and free of obstructions. • This microwave oven is for installation over ranges up to 36" wide. • If you are going to vent your microwave oven to the outside, see Hood Exhaust Section for power cord clearance. 7 Installation Instructions TOOLS YOU WILL NEED...-½ " 36" 2" 66" or more from the floor to follow the instructions on the top cabinet template for exhaust duct preparation. • When installing the microwave oven beneath smooth flat cabinets be careful to the top of the...
...: • The space between the cabinets must be 36" wide and free of obstructions. • This microwave oven is for installation over ranges up to 36" wide. • If you are going to vent your microwave oven to the outside, see Hood Exhaust Section for power cord clearance. 7 Installation Instructions TOOLS YOU WILL NEED...-½ " 36" 2" 66" or more from the floor to follow the instructions on the top cabinet template for exhaust duct preparation. • When installing the microwave oven beneath smooth flat cabinets be careful to the top of the...
Installation Instructions
Page 8
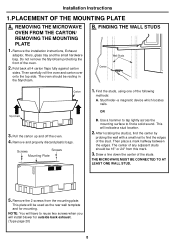
...find the edges of the stud. Remove the 2 screws from this mark. 3. REMOVING THE MICROWAVE OVEN FROM THE CARTON/ REMOVING THE MOUNTING PLATE 1. Pull the carton up and off the oven. 4. Stud finder-a magnetic device which locates nails. This will be used as the rear ... will have to find a solid sound. Installation Instructions 1.PLACEMENT OF THE MOUNTING PLATE A. Then place a mark halfway between the edges. THE MICROWAVE MUST BE CONNECTED TO AT LEAST ONE WALL STUD. 5. Do not remove the Styrofoam protecting the front of the following methods: A. B. After...
...find the edges of the stud. Remove the 2 screws from this mark. 3. REMOVING THE MICROWAVE OVEN FROM THE CARTON/ REMOVING THE MOUNTING PLATE 1. Pull the carton up and off the oven. 4. Stud finder-a magnetic device which locates nails. This will be used as the rear ... will have to find a solid sound. Installation Instructions 1.PLACEMENT OF THE MOUNTING PLATE A. Then place a mark halfway between the edges. THE MICROWAVE MUST BE CONNECTED TO AT LEAST ONE WALL STUD. 5. Do not remove the Styrofoam protecting the front of the following methods: A. B. After...
Installation Instructions
Page 11
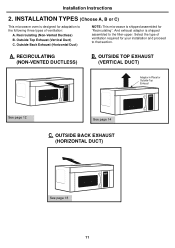
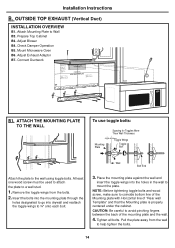
...Outside Top Exhaust (Vertical Duct) C. OUTSIDE BACK EXHAUST (HORIZONTAL DUCT) See page 18 11 INSTALLATION TYPES (Choose A, B or C) This microwave oven is designed for Outside Top Exhaust See page 12 See page 14 C. Recirculating (Non-Vented Ductless) B. RECIRCULATING (NON-VENTED DUCTLESS) B. ... Adaptor in Place for adaptation to the filler-upper. Outside Back Exhaust (Horizontal Duct) NOTE: This microwave is shipped assembled to the following three types of ventilation required for "Recirculating". Select the type of ventilation: A. Installation Instructions 2.
...Outside Top Exhaust (Vertical Duct) C. OUTSIDE BACK EXHAUST (HORIZONTAL DUCT) See page 18 11 INSTALLATION TYPES (Choose A, B or C) This microwave oven is designed for Outside Top Exhaust See page 12 See page 14 C. Recirculating (Non-Vented Ductless) B. RECIRCULATING (NON-VENTED DUCTLESS) B. ... Adaptor in Place for adaptation to the filler-upper. Outside Back Exhaust (Horizontal Duct) NOTE: This microwave is shipped assembled to the following three types of ventilation required for "Recirculating". Select the type of ventilation: A. Installation Instructions 2.

Installation Instructions
Page 12
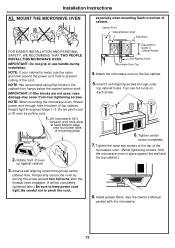
... away from the bolts. 2. Attach Mounting Plate to a wall stud. 1. Insert the bolts into the holes in the cabinet bottom. 12 Installation Instructions A. Mount the Microwave Oven A1. Place the mounting plate against the wall and insert the toggle wings into the mounting plate through . • Read the instructions on the TOP...
... away from the bolts. 2. Attach Mounting Plate to a wall stud. 1. Insert the bolts into the holes in the cabinet bottom. 12 Installation Instructions A. Mount the Microwave Oven A1. Place the mounting plate against the wall and insert the toggle wings into the mounting plate through . • Read the instructions on the TOP...
Installation Instructions
Page 13
... of mounting plate. 2. Rotate front of Cabinet Recess Self-Aligning Screw Microwave Oven Top 4. Cabinet Front Cabinet Bottom Shelf Filler Block Equivalent to the top of the microwave oven. (While tightening screws, hold the microwave oven in bottom of the cord. Insert 2 self-aligning screws through top center... recommend using filler blocks if the cabinet front hangs below the cabinet bottom shelf. Temporarily secure the oven by pulling cord. 1. Attach the microwave oven to keep power cord tight. Tighten center screw completely. 7. Tighten the outer two screws to Depth of...
... of mounting plate. 2. Rotate front of Cabinet Recess Self-Aligning Screw Microwave Oven Top 4. Cabinet Front Cabinet Bottom Shelf Filler Block Equivalent to the top of the microwave oven. (While tightening screws, hold the microwave oven in bottom of the cord. Insert 2 self-aligning screws through top center... recommend using filler blocks if the cabinet front hangs below the cabinet bottom shelf. Temporarily secure the oven by pulling cord. 1. Attach the microwave oven to keep power cord tight. Tighten center screw completely. 7. Tighten the outer two screws to Depth of...
Installation Instructions
Page 14
... coincide bottom line of the Mounting plate with Horizontal line of the mounting plate and the wall. 4. Tighten all bolts. Prepare Top Cabinet B3. Mount Microwave Oven B6. Insert the bolts into the mounting plate through the holes designated to go into the holes in the wall to the wall using toggle...
... coincide bottom line of the Mounting plate with Horizontal line of the mounting plate and the wall. 4. Tighten all bolts. Prepare Top Cabinet B3. Mount Microwave Oven B6. Insert the bolts into the mounting plate through the holes designated to go into the holes in the wall to the wall using toggle...


