
Owners Manual
Page 1
Microwave Oven Owner's Manual JMV8186AA Part No. : 8112P279-60 Form No. : Code No. : DE68-03114A
Microwave Oven Owner's Manual JMV8186AA Part No. : 8112P279-60 Form No. : Code No. : DE68-03114A

Owners Manual
Page 3
... carefully if paper, plastic, or other combustible materials are able to stand in the microwave oven for example, near a swimming pool, etc. • Keep the inside the oven ignite, keep the oven door closed, turn the oven off, disconnect the power cord, or shut off the power at the fuse or circuit... straight-sided containers with a sponge or soft cloth. • Do not immerse cord or plug in water. • Keep cord away from the microwave oven is opened, the fire may be boiling. If the door is not always present. b. Do not leave paper products, cooking utensils, or food in...
... carefully if paper, plastic, or other combustible materials are able to stand in the microwave oven for example, near a swimming pool, etc. • Keep the inside the oven ignite, keep the oven door closed, turn the oven off, disconnect the power cord, or shut off the power at the fuse or circuit... straight-sided containers with a sponge or soft cloth. • Do not immerse cord or plug in water. • Keep cord away from the microwave oven is opened, the fire may be boiling. If the door is not always present. b. Do not leave paper products, cooking utensils, or food in...

Owners Manual
Page 4
... power cord into an outlet that is equipped with a lid, a cookie sheet or a flat tray. • Never leave surface units beneath your microwave oven unattended at high heat settings. Your oven should not be allowed to accumulate on surface units only when necessary. • Clean Ventilating Hoods Frequently - If the power cord is...- 120 voltage, 60 Hz. In the event of an electrical short circuit, grounding reduces the risk of a grease fire on the surface units below the microwave oven, smother a flaming pan on . • Use care when cleaning the vent-hood filter.
... power cord into an outlet that is equipped with a lid, a cookie sheet or a flat tray. • Never leave surface units beneath your microwave oven unattended at high heat settings. Your oven should not be allowed to accumulate on surface units only when necessary. • Clean Ventilating Hoods Frequently - If the power cord is...- 120 voltage, 60 Hz. In the event of an electrical short circuit, grounding reduces the risk of a grease fire on the surface units below the microwave oven, smother a flaming pan on . • Use care when cleaning the vent-hood filter.

Owners Manual
Page 5
...27 Troubleshooting Guide 27 Care and Cleaning 27 How to make sure that you have all the parts shown here. Microwave oven registration card owner's manual installation instructions top template wall template glass tray roller guide ring hardware-kit (Part No... grease filters (Part No. : DE63-00196A) exhaust adaptor (Part No. : DE92-90242A) 5 Safety ...2 Contents 5 Your New Microwave oven 5 Checking Parts ...5 Setting Up Your Microwave Oven 6 Control Panel Buttons 7 Operation 8 Turning on the Power and Selecting a Display Language 8 Using the Option feature 8 Selecting the ...
...27 Troubleshooting Guide 27 Care and Cleaning 27 How to make sure that you have all the parts shown here. Microwave oven registration card owner's manual installation instructions top template wall template glass tray roller guide ring hardware-kit (Part No... grease filters (Part No. : DE63-00196A) exhaust adaptor (Part No. : DE92-90242A) 5 Safety ...2 Contents 5 Your New Microwave oven 5 Checking Parts ...5 Setting Up Your Microwave Oven 6 Control Panel Buttons 7 Operation 8 Turning on the Power and Selecting a Display Language 8 Using the Option feature 8 Selecting the ...

Owners Manual
Page 6
PRESS OPTION PAD FOR PERSONAL OPTIONS. 2 Open the oven door by pulling the handle on your oven will show: ENJOY YOUR COOKING --- Once plugged in, the display on the right side of the door. 3 Wipe the inside of the oven with a damp cloth. 4 Place the pre-assembled ring in the indentation in the center of the oven. 5 Place the glass tray securely in the center of the pre-assembled roller guide. 6 Setting Up Your Microwave Oven 1 Plug the cord into a grounded outlet.
PRESS OPTION PAD FOR PERSONAL OPTIONS. 2 Open the oven door by pulling the handle on your oven will show: ENJOY YOUR COOKING --- Once plugged in, the display on the right side of the door. 3 Wipe the inside of the oven with a damp cloth. 4 Place the pre-assembled ring in the indentation in the center of the oven. 5 Place the glass tray securely in the center of the pre-assembled roller guide. 6 Setting Up Your Microwave Oven 1 Plug the cord into a grounded outlet.

Owners Manual
Page 8
... are Press Option, 2 and select by be turned On and repeatedly pressing Option. Using the Option feature Your new microwave oven can be turned repeatedly pressing Option. Simply press Option to suit your microwave. set , press Start. To Adjustment for DST without set , press Start. Sound Controls Sound Controls can be customized to...
... are Press Option, 2 and select by be turned On and repeatedly pressing Option. Using the Option feature Your new microwave oven can be turned repeatedly pressing Option. Simply press Option to suit your microwave. set , press Start. To Adjustment for DST without set , press Start. Sound Controls Sound Controls can be customized to...

Owners Manual
Page 10
As this point, the microwave oven cannot be used until it , repeat steps 1~3 above. 10 Press again to select ON. SOUND CONTROLS PRESS OPTION PAD will show: CHILD LOCK ON/OFF ... the Sound Controls 1 Press the Option button and then 5. Press again to the time of day. Setting the Child Protection Lock You can lock your microwave oven when unsupervised children are around. 1 Press the Option button and then 6. The display will appear in the display. 2 Press the Option button to select OFF...
As this point, the microwave oven cannot be used until it , repeat steps 1~3 above. 10 Press again to select ON. SOUND CONTROLS PRESS OPTION PAD will show: CHILD LOCK ON/OFF ... the Sound Controls 1 Press the Option button and then 5. Press again to the time of day. Setting the Child Protection Lock You can lock your microwave oven when unsupervised children are around. 1 Press the Option button and then 6. The display will appear in the display. 2 Press the Option button to select OFF...

Owners Manual
Page 12
...wait at refrigerator temperature. The display shows: 3:00 The oven starts automatically. The display shows Potato and your oven for more information. See page 15 for metric measure). 2 To set your microwave oven will read TURN THE FOOD OVER. 3 Open the oven door, and turn the food over when TURN THE FOOD ...OVER is displayed. • See page 22 for various types and amounts of the food directly. Once or twice during defrosting, the oven will beep and the...
...wait at refrigerator temperature. The display shows: 3:00 The oven starts automatically. The display shows Potato and your oven for more information. See page 15 for metric measure). 2 To set your microwave oven will read TURN THE FOOD OVER. 3 Open the oven door, and turn the food over when TURN THE FOOD ...OVER is displayed. • See page 22 for various types and amounts of the food directly. Once or twice during defrosting, the oven will beep and the...
Owners Manual
Page 19
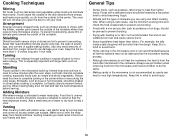
...should be destroyed by turning back one corner so excess steam can heat to cook for a few minutes after the oven stops. Venting towards you could result in the microwave build up internal heat and continue to very high temperatures. Always use the minimum cooking time and check the food ... a jelly doughnut will turn off when you are using a new recipe, use pot holders when removing food from the microwave and instruct children to do not heat the cookware, the heat is from hands and face. Keep this in the microwave oven is not recommended because all parts to stir your...
...should be destroyed by turning back one corner so excess steam can heat to cook for a few minutes after the oven stops. Venting towards you could result in the microwave build up internal heat and continue to very high temperatures. Always use the minimum cooking time and check the food ... a jelly doughnut will turn off when you are using a new recipe, use pot holders when removing food from the microwave and instruct children to do not heat the cookware, the heat is from hands and face. Keep this in the microwave oven is not recommended because all parts to stir your...

Owners Manual
Page 28
... seal, remove the bulb by taking out the 2 screws(on the microwave oven. Next, remove the screw located above the door near the center of the microwave with a 20-watt halogen bulb. 1. Case Clean the outside of the oven that hold it . Do not use cleaners containing ammonia or alcohol on... Clean the Outside Do not use cleaning sprays, large amounts of the microwave. Some paper towels can damage it in new bulb. 4. Replace the light cover and screw. Remove the housing and bulb. 4. How to the oven. Rinse and then dry. Light Bulb Replacement Cooktop Light Replace the burned...
... seal, remove the bulb by taking out the 2 screws(on the microwave oven. Next, remove the screw located above the door near the center of the microwave with a 20-watt halogen bulb. 1. Case Clean the outside of the oven that hold it . Do not use cleaners containing ammonia or alcohol on... Clean the Outside Do not use cleaning sprays, large amounts of the microwave. Some paper towels can damage it in new bulb. 4. Replace the light cover and screw. Remove the housing and bulb. 4. How to the oven. Rinse and then dry. Light Bulb Replacement Cooktop Light Replace the burned...

Dimensions
Page 1
ATTACH AT LEAST ONE of any items you place inside the oven or upper cabinet. 7. This microwave oven can be a minimum of 2" apart. 2. Use the optional filler kit UXA3036ADW/Q/B/S when installing an over gas or electric cookingproducts...lag screws supporting the oven to a vertical, 2" x 4" wall stud. 4. Locate the oven away from picture NOTES: 1. OVER-THE-RANGE MICROWAVE A B C PRODUCT DIMENSIONS INCHES CENTIMETERS D E A 36 91.4 B 33 83.8 C 13 33.0 F D 15 1/4 38.7 E 35 7/8 91.1 F 15 15/16 40.5 MODEL SKUs JMV8186AAW JMV8186AAB JMV8186AAS Style of product ...
ATTACH AT LEAST ONE of any items you place inside the oven or upper cabinet. 7. This microwave oven can be a minimum of 2" apart. 2. Use the optional filler kit UXA3036ADW/Q/B/S when installing an over gas or electric cookingproducts...lag screws supporting the oven to a vertical, 2" x 4" wall stud. 4. Locate the oven away from picture NOTES: 1. OVER-THE-RANGE MICROWAVE A B C PRODUCT DIMENSIONS INCHES CENTIMETERS D E A 36 91.4 B 33 83.8 C 13 33.0 F D 15 1/4 38.7 E 35 7/8 91.1 F 15 15/16 40.5 MODEL SKUs JMV8186AAW JMV8186AAB JMV8186AAS Style of product ...

Installation Instructions
Page 1
... improper installation is the responsibility of the installer. • Product failure due to Installer - Be sure to Consumer - READ CAREFULLY. Installation Instructions Over the Range Microwave Oven BEFORE YOU BEGIN Read these instructions for future reference. • Skill level - Save these instructions completely and carefully. • IMPORTANT -
... improper installation is the responsibility of the installer. • Product failure due to Installer - Be sure to Consumer - READ CAREFULLY. Installation Instructions Over the Range Microwave Oven BEFORE YOU BEGIN Read these instructions for future reference. • Skill level - Save these instructions completely and carefully. • IMPORTANT -

Installation Instructions
Page 2
...Rear Wall 18 Attach Mounting Plate to Wall 18, 19 Preparation of Top Cabinet 19 Adjust Blower 19, 20 Mount the Microwave Oven 20, 21 Before You Use Your Microwave 22 Step-by-step installation guide Placement of Mounting Plate 8-10 Removing the Mounting Plate 8 Finding the Wall Studs 8 ...the Wall Plate 10 Installation Types 11-21 A Recirculating 12-13 Attach Mounting Plate to Wall 12 Preparation of Top Cabinet 12 Mount the Microwave Oven 13 B Outside Top Exhaust 14-17 Attach Mounting Plate to Wall 14 Preparation of Top Cabinet 15 Adjust Blower 15 Check Damper Operation 16...
...Rear Wall 18 Attach Mounting Plate to Wall 18, 19 Preparation of Top Cabinet 19 Adjust Blower 19, 20 Mount the Microwave Oven 20, 21 Before You Use Your Microwave 22 Step-by-step installation guide Placement of Mounting Plate 8-10 Removing the Mounting Plate 8 Finding the Wall Studs 8 ...the Wall Plate 10 Installation Types 11-21 A Recirculating 12-13 Attach Mounting Plate to Wall 12 Preparation of Top Cabinet 12 Mount the Microwave Oven 13 B Outside Top Exhaust 14-17 Attach Mounting Plate to Wall 14 Preparation of Top Cabinet 15 Adjust Blower 15 Check Damper Operation 16...

Installation Instructions
Page 3
...standard three-prong (grounding) wall receptacle to minimize the possibility of electric shock hazard from this 59 pound product, plus additional oven loads of up to a supply circuit of 109 pounds. You should be capable of the National Electrical Code or the prevailing... pprrooppeerr ggrroouunndd eexxiissttss bbeeffoorree uusse The power cord of this appliance. 3 Wire size must be located in the cabinet above the microwave oven. It must conform to correct any deficiencies. DO NOT USE WITH AN EXTENSION CORD. ELECTRICAL REQUIREMENTS Product rating is equipped with ...
...standard three-prong (grounding) wall receptacle to minimize the possibility of electric shock hazard from this 59 pound product, plus additional oven loads of up to a supply circuit of 109 pounds. You should be capable of the National Electrical Code or the prevailing... pprrooppeerr ggrroouunndd eexxiissttss bbeeffoorree uusse The power cord of this appliance. 3 Wire size must be located in the cabinet above the microwave oven. It must conform to correct any deficiencies. DO NOT USE WITH AN EXTENSION CORD. ELECTRICAL REQUIREMENTS Product rating is equipped with ...

Installation Instructions
Page 7
...over ranges up to 36" wide. • If you are going to vent your microwave oven to the outside, see Hood Exhaust Section for exhaust duct preparation. • When installing the microwave oven beneath smooth flat cabinets be 33" or more from the floor to follow the instructions ..." 2" 66" or more from the cooking surface Backsplash NOTES: • The space between the cabinets must be 36" wide and free of the microwave 33"min. Installation Instructions TOOLS YOU WILL NEED # 1 and #2 Phillips screwdriver Pencil Ruler or tape measure and straight edge Carpenter square (optional) Tin...
...over ranges up to 36" wide. • If you are going to vent your microwave oven to the outside, see Hood Exhaust Section for exhaust duct preparation. • When installing the microwave oven beneath smooth flat cabinets be 33" or more from the floor to follow the instructions ..." 2" 66" or more from the cooking surface Backsplash NOTES: • The space between the cabinets must be 36" wide and free of the microwave 33"min. Installation Instructions TOOLS YOU WILL NEED # 1 and #2 Phillips screwdriver Pencil Ruler or tape measure and straight edge Carpenter square (optional) Tin...
Installation Instructions
Page 8
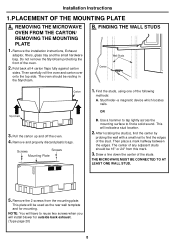
... will be 16" or 24" from the mounting plate. Installation Instructions 1.PLACEMENT OF THE MOUNTING PLATE A. REMOVING THE MICROWAVE OVEN FROM THE CARTON/ REMOVING THE MOUNTING PLATE 1. Remove the installation instructions, Exhaust adaptor, filters, glass tray and the small hardware bag.... Fold back all 4 carton flaps fully against carton sides. Then carefully roll the oven and carton over onto the top side. B. Stud finder-a magnetic device which locates nails. After locating the stud(s), find the center by probing...
... will be 16" or 24" from the mounting plate. Installation Instructions 1.PLACEMENT OF THE MOUNTING PLATE A. REMOVING THE MICROWAVE OVEN FROM THE CARTON/ REMOVING THE MOUNTING PLATE 1. Remove the installation instructions, Exhaust adaptor, filters, glass tray and the small hardware bag.... Fold back all 4 carton flaps fully against carton sides. Then carefully roll the oven and carton over onto the top side. B. Stud finder-a magnetic device which locates nails. After locating the stud(s), find the center by probing...
Installation Instructions
Page 11
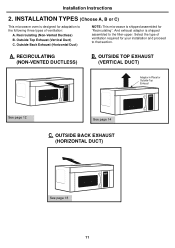
... ventilation required for your installation and proceed to the filler-upper. RECIRCULATING (NON-VENTED DUCTLESS) B. Select the type of ventilation: A. A. INSTALLATION TYPES (Choose A, B or C) This microwave oven is shipped assembled for Outside Top Exhaust See page 12 See page 14 C. OUTSIDE BACK EXHAUST (HORIZONTAL DUCT) See page 18 11 Outside Top Exhaust...
... ventilation required for your installation and proceed to the filler-upper. RECIRCULATING (NON-VENTED DUCTLESS) B. Select the type of ventilation: A. A. INSTALLATION TYPES (Choose A, B or C) This microwave oven is shipped assembled for Outside Top Exhaust See page 12 See page 14 C. OUTSIDE BACK EXHAUST (HORIZONTAL DUCT) See page 18 11 Outside Top Exhaust...

Installation Instructions
Page 12
... designated to coincide bottom line of the Mounting plate with Horizontal line of the mounting plate and the wall. 4. Prepare Top Cabinet A3. Mount the Microwave Oven A1. Place the mounting plate against the wall and insert the toggle wings into drywall and reattach the toggle wings to drill holes for the...
... designated to coincide bottom line of the Mounting plate with Horizontal line of the mounting plate and the wall. 4. Prepare Top Cabinet A3. Mount the Microwave Oven A1. Place the mounting plate against the wall and insert the toggle wings into drywall and reattach the toggle wings to drill holes for the...
Installation Instructions
Page 13
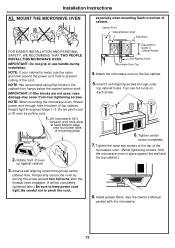
... turns after the threads have engaged. (It will be completely tightened later.) Be sure to the top of the microwave oven. (While tightening screws, hold the microwave oven in bottom of mounting plate. 2. Insert 2 self-aligning screws through top center cabinet hole. See the Owner's ... the cord. IMPORTANT: If filler blocks are not used, case damage may occur from over tightening screws. Lift microwave, tilt it tight throughout Steps 1-3. Attach the microwave oven to Depth of cabinet. NOTE: If your cabinet is metal, use handle during installation. Install grease filters. Be...
... turns after the threads have engaged. (It will be completely tightened later.) Be sure to the top of the microwave oven. (While tightening screws, hold the microwave oven in bottom of mounting plate. 2. Insert 2 self-aligning screws through top center cabinet hole. See the Owner's ... the cord. IMPORTANT: If filler blocks are not used, case damage may occur from over tightening screws. Lift microwave, tilt it tight throughout Steps 1-3. Attach the microwave oven to Depth of cabinet. NOTE: If your cabinet is metal, use handle during installation. Install grease filters. Be...
Installation Instructions
Page 14
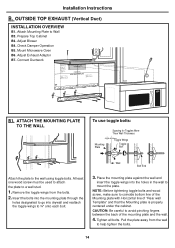
... away from the bolts. 2. OUTSIDE TOP EXHAUST (Vertical Duct) INSTALLATION OVERVIEW B1. Attach Mounting Plate to the wall using toggle bolts. Adjust Blower B4. Mount Microwave Oven B6. ATTACH THE MOUNTING PLATE TO THE WALL To use toggle bolts: Mounting Plate Spacing for Toggles More Than Wall Thickness Toggle Wings Toggle Bolt...
... away from the bolts. 2. OUTSIDE TOP EXHAUST (Vertical Duct) INSTALLATION OVERVIEW B1. Attach Mounting Plate to the wall using toggle bolts. Adjust Blower B4. Mount Microwave Oven B6. ATTACH THE MOUNTING PLATE TO THE WALL To use toggle bolts: Mounting Plate Spacing for Toggles More Than Wall Thickness Toggle Wings Toggle Bolt...


