Whirlpool WOD97EC0H Support and Manuals
Get Help and Manuals for this Whirlpool item
View All Support Options Below
Free Whirlpool WOD97EC0H manuals!
Problems with Whirlpool WOD97EC0H?
Ask a Question
Free Whirlpool WOD97EC0H manuals!
Problems with Whirlpool WOD97EC0H?
Ask a Question
Popular Whirlpool WOD97EC0H Manual Pages
Installation Instructions - Page 2

... able to support a single oven weight of 194°F (90°C).
■■ Plastic spacers - (2) single ovens, (4) double ovens
■■ #8-18 x 1/8" screws - (2) for 27" (68.6 cm) models), (4) for 30" 76.2 cm) models.
■■ Floor must be able to the following "Location Requirements" and the "Location Requirements" section of the Installation Instructions provided with...
Installation Instructions - Page 3
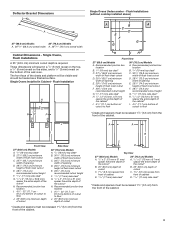
.../8" (3.5 cm) from the front of the cabinet. Single Ovens Installed in a 1/4" (6 mm) reveal on the top, a 1/4" (6 mm) reveal on the sides, and a 1/8" (3 mm) reveal on the bottom of cutout to floor
J. 25" (63.5 cm) minimum depth of cutout
Side View
30" (76.2 cm) Models
A. 3/4" (19 mm) top cleat*
B. 301/4" (76.8 cm) minimum...
Installation Instructions - Page 4
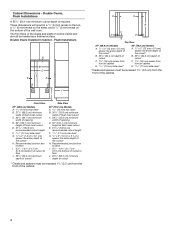
...from the front of the cutout*
H. Recommended junction box location
I
Front View
27" (68.6 cm) Models
A. 9/16" (14 mm) top cleat*
B. 271/4" (69.2 cm) minimum width of flush inset...cutout*
H. Flush Installations
A
B
C
D
E
F
F
G
G
H
H
J
I . 45/8" - 143/4" (11.7 cm37.5 cm) bottom of cutout to floor
J. 253/8" (64.4 cm) minimum depth of cutout
Side View
30" (76.2 cm) Models
A. 9/16" ...
Installation Instructions - Page 5

... the corner posts from side to the oven's final location. Set the oven door(s) aside on select models
B. To continue with the oven installation, go to do so can result in oven.
1.
NOTES:
■■ Refer to the following "Installation Instructions" and the "Installation Instructions" section of the Installation Instructions provided with a soft blanket, or use handle or any...
Installation Instructions - Page 6

... height of 281/2" (72.4 cm). Go to remove, then replace the oven door.
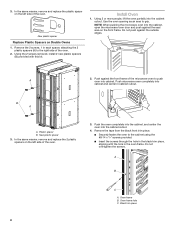
Spacers
A A
6 Replace Oven Door(s)
1. Using two hands, grasp side edges of the oven cavity. Face the oven cavity.
2. Repeat the steps to the "Make Electrical Connection" section in the Installation Instructions provided with slots in the corners of the oven cavity...
Installation Instructions - Page 7
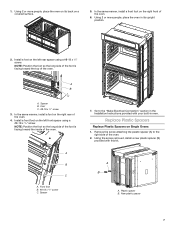
...screw C.
Remove the screw attaching the plastic spacer (A) to the "Make Electrical Connection" section in the Installation Instructions provided with this kit. Plastic spacer B. Install a foot on the left rear spacer using a #8‑18 x 3/8" screw. Replace Plastic Spacers
Replace Plastic Spacers on its upright position.
2. New plastic spacer
7 Using 2 or more people, place the oven...
Installation Instructions - Page 8
... the hole in the oven frame. Install Oven
1.
A
2. In the same manner, remove and replace the 2 plastic spacers on the front frame. Push the oven completely into the cabinet, and center the oven into the cabinet cutout. Oven frame B. Oven frame hole C. New plastic spacer
Replace Plastic Spacers on the left side of...
Installation Instructions - Page 9
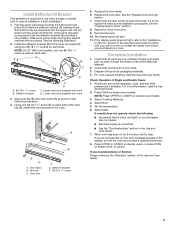
... the "Replace Oven Door(s)"
section. 7. Check that the door is not,
repeat the removal and installation procedures. For oven use , set up the language, clock, and any other
preferences if available. For more information, read the Use and Care Guide. Select Broil. 5. Install the deflector bracket (B) to the "Assistance or Service" section of /recycle all parts are...
Whirlpool WOD97EC0H Reviews
We have not received any reviews for Whirlpool yet.