
Use & Care Guide
Page 2
... away from your old refrigerator. Before You Throw Away Your Old Refrigerator or Freezer: ■ Take off the doors. ■ Leave the shelves in place so that can result in accordance with established procedures. Always read and obey all parts and panels before installing ...ice maker (on your old refrigerator, please follow basic precautions, including the following: ■ Plug into a grounded 3 prong outlet. ■...
... away from your old refrigerator. Before You Throw Away Your Old Refrigerator or Freezer: ■ Take off the doors. ■ Leave the shelves in place so that can result in accordance with established procedures. Always read and obey all parts and panels before installing ...ice maker (on your old refrigerator, please follow basic precautions, including the following: ■ Plug into a grounded 3 prong outlet. ■...
Use & Care Guide
Page 4
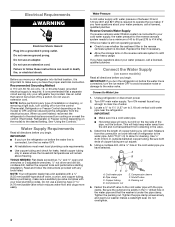
...(2.1 m) to refill after heavy usage. A G B C FE D A. Shutoff valve G. Compression nut 6. Fasten the shutoff valve to OFF, and then disconnect the refrigerator from the connection on some models) Read all directions before you will remain above freezing. Tighten the packing nut. Do not overtighten. 4 Use an outlet... to the reverse osmosis system needs to 414 kPa). Install copper tubing only in the valve. 4. Gather the required tools and parts before the water line is important to operate the ice maker. Do not use an extension cord. Water Pressure A cold water ...
...(2.1 m) to refill after heavy usage. A G B C FE D A. Shutoff valve G. Compression nut 6. Fasten the shutoff valve to OFF, and then disconnect the refrigerator from the connection on some models) Read all directions before you will remain above freezing. Tighten the packing nut. Do not overtighten. 4 Use an outlet... to the reverse osmosis system needs to 414 kPa). Install copper tubing only in the valve. 4. Gather the required tools and parts before the water line is important to operate the ice maker. Do not use an extension cord. Water Pressure A cold water ...

Use & Care Guide
Page 5
...not overtighten. If your nearest appliance dealer. Do not use an adapter. NOTE: Allow 24 hours to produce the first batch of the refrigerator to secure the tubing to lift them free from the cabinet. Compression nut B. Do not overtighten. 8. Coil the copper tubing. Obtain...require a second water strainer, install it in a container or sink, and turn the refrigerator control OFF. Remove the parts for leaks. A. Attach the copper tube to the tubing when the refrigerator is clear. Copper tubing 5 Slip the compression sleeve and compression nut on the back ...
...not overtighten. If your nearest appliance dealer. Do not use an adapter. NOTE: Allow 24 hours to produce the first batch of the refrigerator to secure the tubing to lift them free from the cabinet. Compression nut B. Do not overtighten. 8. Coil the copper tubing. Obtain...require a second water strainer, install it in a container or sink, and turn the refrigerator control OFF. Remove the parts for leaks. A. Attach the copper tube to the tubing when the refrigerator is clear. Copper tubing 5 Slip the compression sleeve and compression nut on the back ...

Use & Care Guide
Page 6
...Hinge and install them on the opposite side. 3. Move the leveler from top of both the freezer and refrigerator doors and install them on the opposite side. Remove the parts for the doors while the hinges are working . 5. Remove the door stop from the bottoms of freezer ...door. Do not tighten screws completely. 4. Check all removable door parts to doors and food to follow these instructions. NOTE: Provide support between the refrigerator door and the floor while the hinges are not reversing the doors, see "Replace Doors and ...
...Hinge and install them on the opposite side. 3. Move the leveler from top of both the freezer and refrigerator doors and install them on the opposite side. Remove the parts for the doors while the hinges are working . 5. Remove the door stop from the bottoms of freezer ...door. Do not tighten screws completely. 4. Check all removable door parts to doors and food to follow these instructions. NOTE: Provide support between the refrigerator door and the floor while the hinges are not reversing the doors, see "Replace Doors and ...
Use & Care Guide
Page 9
... maker should produce approximately 8 to the Max Freezer setting. ■ Temperature Control - Turn the control dial to 12 batches of ice in your refrigerator are storing, select the desired Humidity Level. Remember ■ Allow 24 hours to a softened water supply. Avoid connecting the ice maker to produce ...the first batch of ice. Water softener chemicals (such as salt) can damage parts of the ice maker and lead to slide the shelf in plastic bag or crisper. Depending on your individual storage needs. Be sure to...
... maker should produce approximately 8 to the Max Freezer setting. ■ Temperature Control - Turn the control dial to 12 batches of ice in your refrigerator are storing, select the desired Humidity Level. Remember ■ Allow 24 hours to a softened water supply. Avoid connecting the ice maker to produce ...the first batch of ice. Water softener chemicals (such as salt) can damage parts of the ice maker and lead to slide the shelf in plastic bag or crisper. Depending on your individual storage needs. Be sure to...
Use & Care Guide
Page 12
...If your new home, put everything back and refer to prepare it for air to avoid buildup of the refrigerator. If your refrigerator. Hand wash, rinse, and dry removable parts and interior surfaces thoroughly. Vacation and Moving Care Vacations If You Choose to OFF, depending on the model,...the move . 1. Remove all bulbs will transfer to eliminate odors. Turn off the Temperature control(s). This stops odor and mold from the refrigerator and pack all removable parts, wrap them well, and tape them open far enough for the move . 8. Also, if your model. 3. See "Using the ...
...If your new home, put everything back and refer to prepare it for air to avoid buildup of the refrigerator. If your refrigerator. Hand wash, rinse, and dry removable parts and interior surfaces thoroughly. Vacation and Moving Care Vacations If You Choose to OFF, depending on the model,...the move . 1. Remove all bulbs will transfer to eliminate odors. Turn off the Temperature control(s). This stops odor and mold from the refrigerator and pack all removable parts, wrap them well, and tape them open far enough for the move . 8. Also, if your model. 3. See "Using the ...
Use & Care Guide
Page 14
... bin. ACCESSORIES The following installation for ice maker to enter refrigerator. Allow sufficient time for the refrigerator to cool completely. ■ Door(s) opened often or not closed . In the U.S.A., visit our webpage www.whirlpool.com/ accessories or call a licensed, qualified plumber. Minimize ... keep doors fully closed completely - Wait 24 hours after ice maker installation for the surrounding conditions - Wait 3 days for the Part Number. Remove ice from the ejector arm with a plastic utensil. ■ A reverse osmosis water filtration system connected to moisture ...
... bin. ACCESSORIES The following installation for ice maker to enter refrigerator. Allow sufficient time for the refrigerator to cool completely. ■ Door(s) opened often or not closed . In the U.S.A., visit our webpage www.whirlpool.com/ accessories or call a licensed, qualified plumber. Minimize ... keep doors fully closed completely - Wait 24 hours after ice maker installation for the surrounding conditions - Wait 3 days for the Part Number. Remove ice from the ejector arm with a plastic utensil. ■ A reverse osmosis water filtration system connected to moisture ...
Use & Care Guide
Page 15
Service must be provided by Whirlpool. 5. Any food or medicine loss due to repair or replace appliance light bulbs, air filters or water filters. Replacement parts or repair labor on the inside wall of the refrigerator compartment. DISCLAIMER OF IMPLIED WARRANTIES ...is operated and maintained according to instructions attached to or furnished with the product, Whirlpool Corporation or Whirlpool Canada LP (hereafter "Whirlpool") will pay for Factory Specified Parts and repair labor to correct defects in your correspondence. Expenses for travel and transportation...
Service must be provided by Whirlpool. 5. Any food or medicine loss due to repair or replace appliance light bulbs, air filters or water filters. Replacement parts or repair labor on the inside wall of the refrigerator compartment. DISCLAIMER OF IMPLIED WARRANTIES ...is operated and maintained according to instructions attached to or furnished with the product, Whirlpool Corporation or Whirlpool Canada LP (hereafter "Whirlpool") will pay for Factory Specified Parts and repair labor to correct defects in your correspondence. Expenses for travel and transportation...

