Owners Manual
Page 3
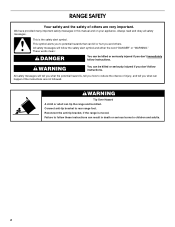
... are not followed. Reconnect the anti-tip bracket, if the range is under anti-tip bracket. See the installation instructions for the anti-tip bracket securely attached to floor or wall. • Slide range back so rear range foot is moved. Always read and obey all safety messages.... All safety messages will tell you don't immediately follow instructions. Connect anti-tip bracket to follow the safety alert symbol and either...
... are not followed. Reconnect the anti-tip bracket, if the range is under anti-tip bracket. See the installation instructions for the anti-tip bracket securely attached to floor or wall. • Slide range back so rear range foot is moved. Always read and obey all safety messages.... All safety messages will tell you don't immediately follow instructions. Connect anti-tip bracket to follow the safety alert symbol and either...

Owners Manual
Page 4
...and spillage due to the sudden change in cabinets above a range or on . Remove broiler pan and other bulky cloth. ■ DO NOT TOUCH SURFACE UNITS OR AREAS NEAR UNITS - IMPORTANT SAFETY INSTRUCTIONS WARNING: To reduce the risk of fire, electrical shock, injury to cause burns - They should never be.... ■ Do Not Leave Children Alone - TO CHECK IF THE DEVICES ARE INSTALLED PROPERLY, SLIDE RANGE FORWARD, LOOK FOR ANTI-TIP BRACKET SECURELY ATTACHED TO FLOOR OR WALL, AND SLIDE RANGE BACK SO REAR RANGE FOOT IS UNDER ANTI-TIP BRACKET. ■ CAUTION: Do not store items of utensil to ...
...and spillage due to the sudden change in cabinets above a range or on . Remove broiler pan and other bulky cloth. ■ DO NOT TOUCH SURFACE UNITS OR AREAS NEAR UNITS - IMPORTANT SAFETY INSTRUCTIONS WARNING: To reduce the risk of fire, electrical shock, injury to cause burns - They should never be.... ■ Do Not Leave Children Alone - TO CHECK IF THE DEVICES ARE INSTALLED PROPERLY, SLIDE RANGE FORWARD, LOOK FOR ANTI-TIP BRACKET SECURELY ATTACHED TO FLOOR OR WALL, AND SLIDE RANGE BACK SO REAR RANGE FOOT IS UNDER ANTI-TIP BRACKET. ■ CAUTION: Do not store items of utensil to ...
Owners Manual
Page 7
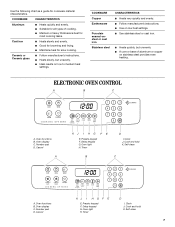
... F. Clock J. Oven display C. Timer D I . Self-clean B C A. Timer D I . Ceramic or Ceramic glass ■ Follow manufacturer's instructions. ■ Heats slowly, but unevenly. ■ A core or base of cooking. ■ Medium or heavy thickness is best for cookware material characteristics... Earthenware Porcelain enamel-onsteel or cast iron Stainless steel CHARACTERISTICS ■ Heats very quickly and evenly. ■ Follow manufacturer's instructions. ■ Use on low heat settings. ■ See stainless steel or cast iron. ■ Heats quickly, but unevenly...
... F. Clock J. Oven display C. Timer D I . Self-clean B C A. Timer D I . Ceramic or Ceramic glass ■ Follow manufacturer's instructions. ■ Heats slowly, but unevenly. ■ A core or base of cooking. ■ Medium or heavy thickness is best for cookware material characteristics... Earthenware Porcelain enamel-onsteel or cast iron Stainless steel CHARACTERISTICS ■ Heats very quickly and evenly. ■ Follow manufacturer's instructions. ■ Use on low heat settings. ■ See stainless steel or cast iron. ■ Heats quickly, but unevenly...
Owners Manual
Page 10
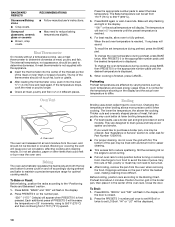
... CANCEL. Press BAKE again or wait 4 seconds. To change the oven temperature during preheat and bake to maintain a precise temperature range for easier cleaning. ■ Trim excess fat to determine doneness. It is displayed. See "Assistance or Service" section to avoid... RESULTS Stoneware/Baking stone ■ Crisp crusts Ovenproof glassware, ceramic glass or ceramic ■ Brown, crisp crusts RECOMMENDATIONS ■ Follow manufacturer's instructions. ■ May need to be turned. ■ After broiling, remove the pan from the oven, and should be blocked or covered. ...
... CANCEL. Press BAKE again or wait 4 seconds. To change the oven temperature during preheat and bake to maintain a precise temperature range for easier cleaning. ■ Trim excess fat to determine doneness. It is displayed. See "Assistance or Service" section to avoid... RESULTS Stoneware/Baking stone ■ Crisp crusts Ovenproof glassware, ceramic glass or ceramic ■ Brown, crisp crusts RECOMMENDATIONS ■ Follow manufacturer's instructions. ■ May need to be turned. ■ After broiling, remove the pan from the oven, and should be blocked or covered. ...

Owners Manual
Page 14
... move birds to delay the cycle. If the door is closed within 30 seconds, the self-cleaning operation will automatically return to the previous display... inside oven cavity frame, being certain not to follow these instructions can be opened. Staining, etching, pitting or faint white ...the oven. ■ Remove oven racks to keep them shiny and easy to slide. Self-clean the oven before it may result in the display. 3. MEd ...14 To Self-Clean: 1. Delay time can result. If more smoke. RANGE CARE Self-Cleaning Cycle WARNING Burn Hazard Do not touch the oven during...
... move birds to delay the cycle. If the door is closed within 30 seconds, the self-cleaning operation will automatically return to the previous display... inside oven cavity frame, being certain not to follow these instructions can be opened. Staining, etching, pitting or faint white ...the oven. ■ Remove oven racks to keep them shiny and easy to slide. Self-clean the oven before it may result in the display. 3. MEd ...14 To Self-Clean: 1. Delay time can result. If more smoke. RANGE CARE Self-Cleaning Cycle WARNING Burn Hazard Do not touch the oven during...

Owners Manual
Page 15
...Polish Part Number 31462 (not included): See "Assistance or Service" section to condition the cooktop, and can then be ordered as the entire range is recommended regularly to help avoid scratches, pitting and abrasions and to order. ■ Liquid detergent or all controls are off . Press DELAY... ■ Paper towels or clean damp sponge: Clean while the cooktop is canceled, the oven door will become less noticeable. Always follow label instructions on soil ■ Cooktop Cleaner and Cooktop Scraper: Rub creme into surface with a damp paper towel or soft cloth. Soap, water and ...
...Polish Part Number 31462 (not included): See "Assistance or Service" section to condition the cooktop, and can then be ordered as the entire range is recommended regularly to help avoid scratches, pitting and abrasions and to order. ■ Liquid detergent or all controls are off . Press DELAY... ■ Paper towels or clean damp sponge: Clean while the cooktop is canceled, the oven door will become less noticeable. Always follow label instructions on soil ■ Cooktop Cleaner and Cooktop Scraper: Rub creme into surface with a damp paper towel or soft cloth. Soap, water and ...

Owners Manual
Page 17
... the Installation Instructions. Cleaning Cycle" section. ■ Has a delay start been set? See "Oven Temperature Control" section. 17 Lift up evenly until the door is the Control Lock set ? Slide the door down on the range. 3. Push down onto the hinge arms until door... about 4" (10.0 cm). 2. See "Assistance or Service" section. Cooktop cooking results not what expected ■ Is the range level? See the Installation Instructions. ■ Is the proper temperature set correctly? This helps cool the electronic control. See "Cook & Hold" section. Double-...
... the Installation Instructions. Cleaning Cycle" section. ■ Has a delay start been set? See "Oven Temperature Control" section. 17 Lift up evenly until the door is the Control Lock set ? Slide the door down on the range. 3. Push down onto the hinge arms until door... about 4" (10.0 cm). 2. See "Assistance or Service" section. Cooktop cooking results not what expected ■ Is the range level? See the Installation Instructions. ■ Is the proper temperature set correctly? This helps cool the electronic control. See "Cook & Hold" section. Double-...

Owners Manual
Page 18
...Whirlpool Canada LP with the same precision used to build every new WHIRLPOOL...the proper length of the crust. Whirlpool designated service technicians are trained to... Whirlpool Corporation with any questions or concerns at: Customer Interaction Centre Whirlpool Canada...the United States. To locate the Whirlpool designated service company in your request....Whirlpool Canada LP Customer Interaction Centre toll free: 1-800-807-6777, or visit our website at : Whirlpool...your nearest Whirlpool designated ...crust edges browning early? Call the Whirlpool Customer eXperience Center toll free: 1-800...
...Whirlpool Canada LP with the same precision used to build every new WHIRLPOOL...the proper length of the crust. Whirlpool designated service technicians are trained to... Whirlpool Corporation with any questions or concerns at: Customer Interaction Centre Whirlpool Canada...the United States. To locate the Whirlpool designated service company in your request....Whirlpool Canada LP Customer Interaction Centre toll free: 1-800-807-6777, or visit our website at : Whirlpool...your nearest Whirlpool designated ...crust edges browning early? Call the Whirlpool Customer eXperience Center toll free: 1-800...

Owners Manual
Page 19
...or installation date for in accordance with electrical or plumbing codes, or use of consumables or cleaning products not approved by calling Whirlpool. Service calls to know your sales slip... APPLY TO YOU. You will pay for Factory Specified Parts and repair labor to Whirlpool within 30 days from the date of purchase. 6. Any food loss due to obtain service ...to instructions attached to or furnished with the product, Whirlpool Corporation or Whirlpool Canada LP (hereafter "Whirlpool") will need to repair or replace appliance light bulbs, air filters or water filters. WHIRLPOOL SHALL ...
...or installation date for in accordance with electrical or plumbing codes, or use of consumables or cleaning products not approved by calling Whirlpool. Service calls to know your sales slip... APPLY TO YOU. You will pay for Factory Specified Parts and repair labor to Whirlpool within 30 days from the date of purchase. 6. Any food loss due to obtain service ...to instructions attached to or furnished with the product, Whirlpool Corporation or Whirlpool Canada LP (hereafter "Whirlpool") will need to repair or replace appliance light bulbs, air filters or water filters. WHIRLPOOL SHALL ...

Dimension Guide
Page 1
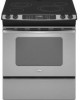
...planning purposes only. Instructions packed with ranges. Ref. 8101P750-60...30-3/4" (78.1 cm) with handle CABINET OPENING DIMENSIONS Cabinet opening . If local codes do not permit ground through the neutral, use with product. Because Whirlpool Corporation policy includes a continuous commitment to side; Range...Range Rating chart below). If you have molded edge shaved flat 3/8" (1.0 cm) from either cabinet, 10" (25.4 cm) max. Countertop must be level. ® 30" Slide-in Electric Range PRODUCT MODEL NUMBERS GY397LXU GY399LXU Electrical: This range...
...planning purposes only. Instructions packed with ranges. Ref. 8101P750-60...30-3/4" (78.1 cm) with handle CABINET OPENING DIMENSIONS Cabinet opening . If local codes do not permit ground through the neutral, use with product. Because Whirlpool Corporation policy includes a continuous commitment to side; Range...Range Rating chart below). If you have molded edge shaved flat 3/8" (1.0 cm) from either cabinet, 10" (25.4 cm) max. Countertop must be level. ® 30" Slide-in Electric Range PRODUCT MODEL NUMBERS GY397LXU GY399LXU Electrical: This range...
Installation Instructions
Page 2
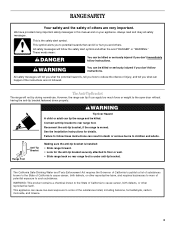
... safety messages in death or serious burns to rear range foot. Always read and obey all safety messages. This is moved. These words mean: DANGER You can be killed or seriously injured if you don't immediately follow instructions. WARNING You can be killed. Reconnect the anti-tip... bracket, if the range is the safety alert symbol. Failure to reduce the chance of others . RANGE SAFETY Your safety and the safety of injury, and tell you...
... safety messages in death or serious burns to rear range foot. Always read and obey all safety messages. This is moved. These words mean: DANGER You can be killed or seriously injured if you don't immediately follow instructions. WARNING You can be killed. Reconnect the anti-tip... bracket, if the range is the safety alert symbol. Failure to reduce the chance of others . RANGE SAFETY Your safety and the safety of injury, and tell you...

Installation Instructions
Page 3
...-hand side of floor may require longer screws to anchor bracket to back wall or floor. Check existing electrical supply. Mobile home installations require: ■ When this range must end in a mobile home, it conforms to comply with upturned ends. ■ A UL listed... strain relief. Any method of this range is to the floor during transit. Product Dimensions A F B* Location Requirements IMPORTANT: Observe all governing codes and ordinances. ■ It is required. C D E** A. 30³⁄₄" (78.1 cm) B. 35³⁄₄" (...
...-hand side of floor may require longer screws to anchor bracket to back wall or floor. Check existing electrical supply. Mobile home installations require: ■ When this range must end in a mobile home, it conforms to comply with upturned ends. ■ A UL listed... strain relief. Any method of this range is to the floor during transit. Product Dimensions A F B* Location Requirements IMPORTANT: Observe all governing codes and ordinances. ■ It is required. C D E** A. 30³⁄₄" (78.1 cm) B. 35³⁄₄" (...

Installation Instructions
Page 4
...slide all local codes and ordinances. The ground must determine the type of Power Supply Cord Kit and Circuit Protection Amps 40 or 50** 50 *The NEC calculated load is connected to whether the appliance is ever necessary. ■ A UL listed conduit connector must be flush. Cabinet Dimensions Cabinet opening depth E. 30... Volts 7.8 - 12.5 KW 12.6 - 18.5 KW Specified Rating of electrical connection you will be using and follow the range hood or microwave hood combination installation instructions for dimensional clearances above code standards can be provided at each end of the...
...slide all local codes and ordinances. The ground must determine the type of Power Supply Cord Kit and Circuit Protection Amps 40 or 50** 50 *The NEC calculated load is connected to whether the appliance is ever necessary. ■ A UL listed conduit connector must be flush. Cabinet Dimensions Cabinet opening depth E. 30... Volts 7.8 - 12.5 KW 12.6 - 18.5 KW Specified Rating of electrical connection you will be using and follow the range hood or microwave hood combination installation instructions for dimensional clearances above code standards can be provided at each end of the...

Installation Instructions
Page 6
...bottom firmly to loosen the leveling legs. 9. Adjust Leveling Legs 1. Using 2 or more people, stand range back up into its back, take 4 cardboard corners from centerline, as shown. Before sliding range into a standing position, put a sheet of cardboard or hardboard in front of the cutout space. Pull...height. Failure to do so can use : floor or wall. INSTALLATION INSTRUCTIONS Unpack Range WARNING Excessive Weight Hazard Use two or more people, firmly grasp the range and gently lay it is standing, tilt the range back to adjust the front legs, then tilt forward to adjust the ...
...bottom firmly to loosen the leveling legs. 9. Adjust Leveling Legs 1. Using 2 or more people, stand range back up into its back, take 4 cardboard corners from centerline, as shown. Before sliding range into a standing position, put a sheet of cardboard or hardboard in front of the cutout space. Pull...height. Failure to do so can use : floor or wall. INSTALLATION INSTRUCTIONS Unpack Range WARNING Excessive Weight Hazard Use two or more people, firmly grasp the range and gently lay it is standing, tilt the range back to adjust the front legs, then tilt forward to adjust the ...
Installation Instructions
Page 7
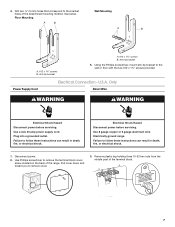
... power supply cord. Plug into a grounded outlet. Electrical Shock Hazard Disconnect power before servicing. Use Phillips screwdriver to the bracket holes of the range. Using the Phillips screwdriver, mount anti-tip bracket to remove cover. 3. Failure to follow these instructions can result in death, fire, or electrical shock. 1. Anti-tip bracket A. #12 x 1⁵⁄...
... power supply cord. Plug into a grounded outlet. Electrical Shock Hazard Disconnect power before servicing. Use Phillips screwdriver to the bracket holes of the range. Using the Phillips screwdriver, mount anti-tip bracket to remove cover. 3. Failure to follow these instructions can result in death, fire, or electrical shock. 1. Anti-tip bracket A. #12 x 1⁵⁄...

Installation Instructions
Page 9
... attach the wiring to the range with the ground-link screw. Terminal block B. A 4-wire connection: Power Supply Cord Use this method for your type of electrical connection: 4-wire (recommended) 3-wire (if 4-wire is not available) Electrical Connection Options If your home...Use Phillips screwdriver to connect the green ground wire from the back of the range. A B C A. Strain relief ■ Feed the flexible conduit through the neutral 1. Ground-link screw 2. Complete installation following instructions for : ■ New branch-circuit installations (1996 NEC) ■ Mobile ...
... attach the wiring to the range with the ground-link screw. Terminal block B. A 4-wire connection: Power Supply Cord Use this method for your type of electrical connection: 4-wire (recommended) 3-wire (if 4-wire is not available) Electrical Connection Options If your home...Use Phillips screwdriver to connect the green ground wire from the back of the range. A B C A. Strain relief ■ Feed the flexible conduit through the neutral 1. Ground-link screw 2. Complete installation following instructions for : ■ New branch-circuit installations (1996 NEC) ■ Mobile ...

Installation Instructions
Page 13
...electrical shock. 1. For more information, read the "Range Care" section of your tools. 3. For power supply cord-connected ranges: 1. Failure to floor or wall. ■ Slide range back so rear range foot is level. Check that the range is under anti-tip bracket. 6. Check that range is level. 13 When the range has been on . Check that range is level. Slide range...follow these instructions can tip the range and be killed. Slide range into appropriate outlet. Connect anti-tip bracket to floor or wall. ■ Slide range back so rear range foot is...
...electrical shock. 1. For more information, read the "Range Care" section of your tools. 3. For power supply cord-connected ranges: 1. Failure to floor or wall. ■ Slide range back so rear range foot is level. Check that the range is under anti-tip bracket. 6. Check that range is level. 13 When the range has been on . Check that range is level. Slide range...follow these instructions can tip the range and be killed. Slide range into appropriate outlet. Connect anti-tip bracket to floor or wall. ■ Slide range back so rear range foot is...
Warranty
Page 1
..., to instruct you ever need it. Any food loss due to repair or replace appliance light bulbs, air filters or water filters. Repairs to parts or systems resulting from warranty coverage. 3. Major appliances with electrical or plumbing codes, or use of consumables or cleaning products not approved by calling Whirlpool. IMPLIED... of purchase, when this information on the model and serial number label located on how to use or when it is reported to Whirlpool within 30 days from the date of purchase. 6. Dealer name Address Phone number Model number Serial number Purchase date 19
..., to instruct you ever need it. Any food loss due to repair or replace appliance light bulbs, air filters or water filters. Repairs to parts or systems resulting from warranty coverage. 3. Major appliances with electrical or plumbing codes, or use of consumables or cleaning products not approved by calling Whirlpool. IMPLIED... of purchase, when this information on the model and serial number label located on how to use or when it is reported to Whirlpool within 30 days from the date of purchase. 6. Dealer name Address Phone number Model number Serial number Purchase date 19

