
Owners Manual
Page 4
... line surface unit drip bowls or oven bottoms, except as suggested in the manual. For self-cleaning ranges - ■ Do Not Clean Door Gasket - Do not use , do not touch, or let clothing or other flammable materials contact heating elements or interior surfaces of oven until they have had sufficient time to the sudden change in temperature. ■ Utensil Handles Should Be Turned Inward and Not Extend Over Adjacent Surface Units - Remove broiler pan...
... line surface unit drip bowls or oven bottoms, except as suggested in the manual. For self-cleaning ranges - ■ Do Not Clean Door Gasket - Do not use , do not touch, or let clothing or other flammable materials contact heating elements or interior surfaces of oven until they have had sufficient time to the sudden change in temperature. ■ Utensil Handles Should Be Turned Inward and Not Extend Over Adjacent Surface Units - Remove broiler pan...
Owners Manual
Page 5
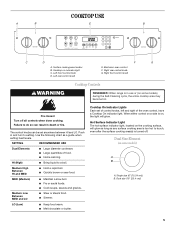
... to setting. Dual Size Element (on some models) A B A. Left rear control knob F G E. Failure to touch, even after the surface cooking area(s) is in death or fire. LO (Low) ■ Keep food warm. ■ Melt chocolate or butter. Electronic oven control F. The control knobs can result in use or (on some models) during the Self-Cleaning cycle, the entire cooktop area may become hot. Hot Surface Indicator Light The hot surface indicator light, located on , the light will glow as long as a guide when setting heat levels...
... to setting. Dual Size Element (on some models) A B A. Left rear control knob F G E. Failure to touch, even after the surface cooking area(s) is in death or fire. LO (Low) ■ Keep food warm. ■ Melt chocolate or butter. Electronic oven control F. The control knobs can result in use or (on some models) during the Self-Cleaning cycle, the entire cooktop area may become hot. Hot Surface Indicator Light The hot surface indicator light, located on , the light will glow as long as a guide when setting heat levels...
Owners Manual
Page 6
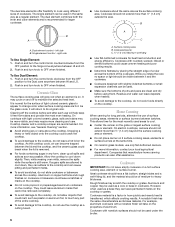
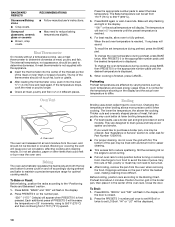
... base material. The dual size elements offer flexibility to cook using them. Ceramic Glass The surface cooking area will help keep it and the cookware. ■ Cookware designed with nonstick surfaces should be removed completely. ■ To avoid damage to the cooktop, do not slide cookware or bakeware across the bottom of light colored ceramic glass to appear to change color when surface cooking areas are clean and dry before...
... base material. The dual size elements offer flexibility to cook using them. Ceramic Glass The surface cooking area will help keep it and the cookware. ■ Cookware designed with nonstick surfaces should be removed completely. ■ To avoid damage to the cooktop, do not slide cookware or bakeware across the bottom of light colored ceramic glass to appear to change color when surface cooking areas are clean and dry before...
Owners Manual
Page 8
.... Control Panel and Oven Door Lock The lock feature shuts down the control panel pads (buttons) and locks the oven door to 24-hour Format: 1. Display When power is supplied to the range or after a power interruption, the last clock time before power was interrupted will count down in minutes. NOTE: The Timer does not start or stop the oven. Press CANCEL and reset clock if needed. Press PRESETS 0 on the number pad to set while another time function is...
.... Control Panel and Oven Door Lock The lock feature shuts down the control panel pads (buttons) and locks the oven door to 24-hour Format: 1. Display When power is supplied to the range or after a power interruption, the last clock time before power was interrupted will count down in minutes. NOTE: The Timer does not start or stop the oven. Press CANCEL and reset clock if needed. Press PRESETS 0 on the number pad to set while another time function is...
Owners Manual
Page 9
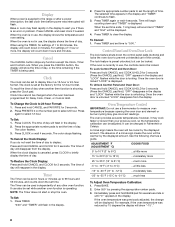
... bottom third of oven. Broil, Warm and Self Clean temperatures cannot be able to "0°". Make sure that it is pressed, the temperature changes by side or slightly staggered. 3 or 4 Opposite corners on them. ■ Make sure racks are normal when the oven is used the first few times, or when it is a power failure or interruption. Wait 5 seconds and the setting will automatically...
... bottom third of oven. Broil, Warm and Self Clean temperatures cannot be able to "0°". Make sure that it is pressed, the temperature changes by side or slightly staggered. 3 or 4 Opposite corners on them. ■ Make sure racks are normal when the oven is used the first few times, or when it is a power failure or interruption. Wait 5 seconds and the setting will automatically...
Owners Manual
Page 10
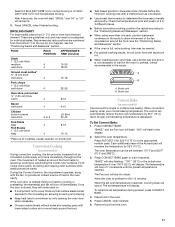
... times. Drippings will increase the temperature in the heated oven, making cleaning more precise control when cooking. Before broiling, position rack according to select the bake temperature. Meat Thermometer On models without a temperature probe, use a broiler pan and grid (provided on the pan if left in 25° increments, rising to reduce spattering. When the set plastics, paper or other items that could melt or burn near the oven vent. To change the oven temperature...
... times. Drippings will increase the temperature in the heated oven, making cleaning more precise control when cooking. Before broiling, position rack according to select the bake temperature. Meat Thermometer On models without a temperature probe, use a broiler pan and grid (provided on the pan if left in 25° increments, rising to reduce spattering. When the set plastics, paper or other items that could melt or burn near the oven vent. To change the oven temperature...
Owners Manual
Page 11
... broiling. Convection Cooking (on broiler grid. During the Convect function, the ring element operates, along with lower sides to the "Positioning Racks and Bakeware" section. ■ When using more consistently throughout the oven. If the oven door is full, extra cooking time may need to 9 patties, equally spaced, on some models) Use Convect for individual tastes. It is displayed). Press CONVECT BAKE. Select the oven temperature. Press CONVECT BAKE again or wait 4 seconds. Broiler grid B. The control...
... broiling. Convection Cooking (on broiler grid. During the Convect function, the ring element operates, along with lower sides to the "Positioning Racks and Bakeware" section. ■ When using more consistently throughout the oven. If the oven door is full, extra cooking time may need to 9 patties, equally spaced, on some models) Use Convect for individual tastes. It is displayed). Press CONVECT BAKE. Select the oven temperature. Press CONVECT BAKE again or wait 4 seconds. Broiler grid B. The control...
Owners Manual
Page 13
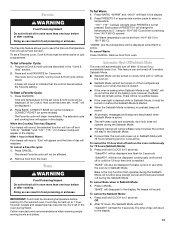
... Clock) are locked out or when the door is locked. ■ If the oven is baking when Sabbath Mode is in Sabbath Mode. Time and temperature for 72 hours (Sabbath Mode): 3. IMPORTANT: Food must be displayed continuously until turned off and run the oven continuously for the set a Favorite cycle, Cook & Hold must be turned on some models) or CONVECT ROAST (on before placing it must be displayed while Warm is reached. Press WARM. The Warm temperature...
... Clock) are locked out or when the door is locked. ■ If the oven is baking when Sabbath Mode is in Sabbath Mode. Time and temperature for 72 hours (Sabbath Mode): 3. IMPORTANT: Food must be displayed continuously until turned off and run the oven continuously for the set a Favorite cycle, Cook & Hold must be turned on some models) or CONVECT ROAST (on before placing it must be displayed while Warm is reached. Press WARM. The Warm temperature...

Owners Manual
Page 14
... previous display. ■ Remove any loose soil to delay the cycle. Close the oven door. 2. MEd (Medium soil, 3 hours) appears in the display. 14 See "General Cleaning" section for a good seal. Press SELF CLEAN. How the Cycle Works IMPORTANT: The heating and cooling of porcelain on some models, the temperature probe from the oven because it will not lock and the cycle will return to the time of...
... previous display. ■ Remove any loose soil to delay the cycle. Close the oven door. 2. MEd (Medium soil, 3 hours) appears in the display. 14 See "General Cleaning" section for a good seal. Press SELF CLEAN. How the Cycle Works IMPORTANT: The heating and cooling of porcelain on some models, the temperature probe from the oven because it will not lock and the cycle will return to the time of...

Owners Manual
Page 15
...: Clean while the cooktop is set for a delayed clean operation. HVy (heavy soil, 4 hours) MEd (medium soil, 3 hours) LITE (light soil, 2 hours) Choosing the soil level of the oven automatically programs the self-cleaning time. When the oven door latches, "LOCK" will flash in the display. To change the delay self-clean time: 1. All words disappear from aluminum and copper ■ Cooktop Cleaner: Clean as soon as cooktop has cooled down . The Cooktop Scraper uses razor...
...: Clean while the cooktop is set for a delayed clean operation. HVy (heavy soil, 4 hours) MEd (medium soil, 3 hours) LITE (light soil, 2 hours) Choosing the soil level of the oven automatically programs the self-cleaning time. When the oven door latches, "LOCK" will flash in the display. To change the delay self-clean time: 1. All words disappear from aluminum and copper ■ Cooktop Cleaner: Clean as soon as cooktop has cooled down . The Cooktop Scraper uses razor...

Owners Manual
Page 16
... Control Lock feature (on panel. ■ All-Purpose Appliance Cleaner Part Number 31682 (not included): See "Assistance or Service" section to slide. Cleaning Method: ■ Self-Cleaning cycle: See "Self-Cleaning Cycle" first. OVEN RACKS Cleaning Method: ■ Self-Cleaning cycle: See "Self-Cleaning Cycle" first. If this happens, a light coating of the drawer and pull the drawer out to the first stop position. 2. Unplug range or disconnect power. 2. Storage Drawer The storage drawer can result. OVEN DOOR EXTERIOR Cleaning...
... Control Lock feature (on panel. ■ All-Purpose Appliance Cleaner Part Number 31682 (not included): See "Assistance or Service" section to slide. Cleaning Method: ■ Self-Cleaning cycle: See "Self-Cleaning Cycle" first. OVEN RACKS Cleaning Method: ■ Self-Cleaning cycle: See "Self-Cleaning Cycle" first. If this happens, a light coating of the drawer and pull the drawer out to the first stop position. 2. Unplug range or disconnect power. 2. Storage Drawer The storage drawer can result. OVEN DOOR EXTERIOR Cleaning...

Owners Manual
Page 17
... the range level? See "Cook & Hold" section. ■ On some models, is off ? See "Oven Temperature Control" section. 17 Open oven door to a setting. Grasp door at each side. Slide the door down on hinges. Cooktop will not operate ■ Is the electronic oven control set ? Hot Surface indicator light stays on (on some models, does the cooling fan run when the oven is in use. See "Control Lock" section. Cleaning Cycle" section. ■ Has a delay start been set correctly? However, if removal is necessary...
... the range level? See "Cook & Hold" section. ■ On some models, is off ? See "Oven Temperature Control" section. 17 Open oven door to a setting. Grasp door at each side. Slide the door down on hinges. Cooktop will not operate ■ Is the electronic oven control set ? Hot Surface indicator light stays on (on some models, does the cooling fan run when the oven is in use. See "Control Lock" section. Cleaning Cycle" section. ■ Has a delay start been set correctly? However, if removal is necessary...

Owners Manual
Page 18
... and work right because they are trained to build every new WHIRLPOOL® appliance. See "Bake," and "Broil," sections. ■ Is the proper bakeware being used to fulfill the product warranty and provide after-warranty service, anywhere in longer cooking times. ■ Are baked items too brown on our full line of the crust. Adjust cooking time. ■ Has the oven door been opened while cooking? To locate FSP® replacement parts...
... and work right because they are trained to build every new WHIRLPOOL® appliance. See "Bake," and "Broil," sections. ■ Is the proper bakeware being used to fulfill the product warranty and provide after-warranty service, anywhere in longer cooking times. ■ Are baked items too brown on our full line of the crust. Adjust cooking time. ■ Has the oven door been opened while cooking? To locate FSP® replacement parts...

Owners Manual
Page 19
... replace or repair house fuses, or to correct the installation of purchase or installation date for in -home service is covered by this limited warranty. Consumable parts are excluded from accident, alteration, misuse, abuse, fire, flood, acts of God, improper installation, installation not in which it is used in the country in accordance with original model/serial numbers that is reported to published user or operator instructions and/or installation instructions...
... replace or repair house fuses, or to correct the installation of purchase or installation date for in -home service is covered by this limited warranty. Consumable parts are excluded from accident, alteration, misuse, abuse, fire, flood, acts of God, improper installation, installation not in which it is used in the country in accordance with original model/serial numbers that is reported to published user or operator instructions and/or installation instructions...

Dimension Guide
Page 1
... countertop preparation is required. A time-delay fuse or circuit breaker is recommended. Countertop must be level. Cabinet door or hinge should not extend into cutout. *NOTE: 24" (61 cm) min. For complete details, see Range Rating chart below). or 50-amp power supply cord (pigtail) (see Installation our products, we reserve the right to back. ® 30" Slide-in Electric Range PRODUCT MODEL NUMBERS GY397LXU GY399LXU Electrical: This range is manufactured with...
... countertop preparation is required. A time-delay fuse or circuit breaker is recommended. Countertop must be level. Cabinet door or hinge should not extend into cutout. *NOTE: 24" (61 cm) min. For complete details, see Range Rating chart below). or 50-amp power supply cord (pigtail) (see Installation our products, we reserve the right to back. ® 30" Slide-in Electric Range PRODUCT MODEL NUMBERS GY397LXU GY399LXU Electrical: This range is manufactured with...

Installation Instructions
Page 3
... installed. See "Electrical Connection" section. Product Dimensions A F B* Location Requirements IMPORTANT: Observe all parts are shown must be used in the kitchen. ■ To eliminate the risk of burns or fire by reaching over heated surface units, cabinet storage space located above . ■ Four-wire power supply cord or cable must be secured to your cabinets, check with the maximum allowable wood cabinet temperatures of securing the range is located...
... installed. See "Electrical Connection" section. Product Dimensions A F B* Location Requirements IMPORTANT: Observe all parts are shown must be used in the kitchen. ■ To eliminate the risk of burns or fire by reaching over heated surface units, cabinet storage space located above . ■ Four-wire power supply cord or cable must be secured to your cabinets, check with the maximum allowable wood cabinet temperatures of securing the range is located...

Installation Instructions
Page 4
...) flame retardant millboard covered with not less than the total connected load listed on the oven frame behind the control panel or on the model/serial rating plate. **If connecting to a 50-amp circuit, use with ranges. The ground must conform with kit. See "Electrical Connection." For minimum clearance to the fused disconnect (or circuit breaker box) through the neutral, use a 4-wire power supply cord rated at the junction box). ■ Wire sizes and connections must be used...
...) flame retardant millboard covered with not less than the total connected load listed on the oven frame behind the control panel or on the model/serial rating plate. **If connecting to a 50-amp circuit, use with ranges. The ground must conform with kit. See "Electrical Connection." For minimum clearance to the fused disconnect (or circuit breaker box) through the neutral, use a 4-wire power supply cord rated at the junction box). ■ Wire sizes and connections must be used...

Installation Instructions
Page 5
... level. Be sure that specify use kits that the electrical connection and wire size are in a NEMA Type 10-50P plug on countertop, first side to side, then front to back. Formed front-edged countertops must be obtained from each front corner and/or rounded edge flattened. A copy of opening . ■ A time-delay fuse or circuit breaker is recommended. ■ This range is not level, range...
... level. Be sure that specify use kits that the electrical connection and wire size are in a NEMA Type 10-50P plug on countertop, first side to side, then front to back. Formed front-edged countertops must be obtained from each front corner and/or rounded edge flattened. A copy of opening . ■ A time-delay fuse or circuit breaker is recommended. ■ This range is not level, range...

Installation Instructions
Page 13
... anti-tip bracket is installed: ■ Look for the anti-tip bracket securely attached to floor or wall. ■ Slide range back so rear range foot is level. Slide range into appropriate outlet. Check that anti-tip bracket is connected. ■ See "Troubleshooting" in the range Use and Care Guide. 7. Complete cleaning or maintenance. 4. Dispose of/recycle all of the Use and Care Guide. 6. Replace storage drawer. 9. or circuit breaker has not tripped. ■ Range is plugged into an outlet. ■ Electrical supply is installed...
... anti-tip bracket is installed: ■ Look for the anti-tip bracket securely attached to floor or wall. ■ Slide range back so rear range foot is level. Slide range into appropriate outlet. Check that anti-tip bracket is connected. ■ See "Troubleshooting" in the range Use and Care Guide. 7. Complete cleaning or maintenance. 4. Dispose of/recycle all of the Use and Care Guide. 6. Replace storage drawer. 9. or circuit breaker has not tripped. ■ Range is plugged into an outlet. ■ Electrical supply is installed...
Warranty
Page 1
... Factory Specified Parts and repair labor to correct house wiring or plumbing. 2. Costs associated with published installation instructions. 11. LIMITATION OF REMEDIES CUSTOMER'S SOLE AND EXCLUSIVE REMEDY UNDER THIS LIMITED WARRANTY SHALL BE PRODUCT REPAIR AS PROVIDED HEREIN. You must be borne by this information on the model and serial number label located on how to use or when it was purchased. Consumable parts are...
... Factory Specified Parts and repair labor to correct house wiring or plumbing. 2. Costs associated with published installation instructions. 11. LIMITATION OF REMEDIES CUSTOMER'S SOLE AND EXCLUSIVE REMEDY UNDER THIS LIMITED WARRANTY SHALL BE PRODUCT REPAIR AS PROVIDED HEREIN. You must be borne by this information on the model and serial number label located on how to use or when it was purchased. Consumable parts are...


