Owners Manual
Page 3
...injury, and tell you don't immediately follow these instructions can kill or hurt you to floor or wall. • Slide range back so rear range foot is installed: • Slide range forward. • Look for details. Connect anti-tip bracket to children and adults. Failure to follow instructions.... Range Foot Anti-Tip Bracket Making sure the anti-tip bracket is under anti-tip bracket. WARNING You can tip...
...injury, and tell you don't immediately follow these instructions can kill or hurt you to floor or wall. • Slide range back so rear range foot is installed: • Slide range forward. • Look for details. Connect anti-tip bracket to children and adults. Failure to follow instructions.... Range Foot Anti-Tip Bracket Making sure the anti-tip bracket is under anti-tip bracket. WARNING You can tip...

Owners Manual
Page 4
... air or steam escape before removing or replacing food. ■ Do Not Heat Unopened Food Containers - Always place oven racks in a risk of electric shock, or fire. ■ Glazed Cooking Utensils - Other surfaces of the appliance may penetrate the broken cooktop and create a risk of.... Build-up of pressure may result in Place - TO CHECK IF THE DEVICES ARE INSTALLED PROPERLY, SLIDE RANGE FORWARD, LOOK FOR ANTI-TIP BRACKET SECURELY ATTACHED TO FLOOR OR WALL, AND SLIDE RANGE BACK SO REAR RANGE FOOT IS UNDER ANTI-TIP BRACKET. ■ CAUTION: Do not store items of interest to children...
... air or steam escape before removing or replacing food. ■ Do Not Heat Unopened Food Containers - Always place oven racks in a risk of electric shock, or fire. ■ Glazed Cooking Utensils - Other surfaces of the appliance may penetrate the broken cooktop and create a risk of.... Build-up of pressure may result in Place - TO CHECK IF THE DEVICES ARE INSTALLED PROPERLY, SLIDE RANGE FORWARD, LOOK FOR ANTI-TIP BRACKET SECURELY ATTACHED TO FLOOR OR WALL, AND SLIDE RANGE BACK SO REAR RANGE FOOT IS UNDER ANTI-TIP BRACKET. ■ CAUTION: Do not store items of interest to children...
Owners Manual
Page 6
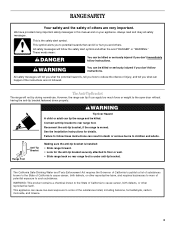
...and the ceramic glass could crack the cooktop. ■ To avoid damage to the cooktop, do not cook foods directly on the cooktop. On electric cooktops, canners should be used as a regular element. Rough finishes may cycle on . However, when used as its original color. Cookware material is..., do not allow objects that manufacture home canning products can cause pitting and permanent marks. ■ To avoid scratches, do not slide cookware or bakeware across the bottom of light colored ceramic glass to appear to change color when surface cooking areas are recommended. As ...
...and the ceramic glass could crack the cooktop. ■ To avoid damage to the cooktop, do not cook foods directly on the cooktop. On electric cooktops, canners should be used as a regular element. Rough finishes may cycle on . However, when used as its original color. Cookware material is..., do not allow objects that manufacture home canning products can cause pitting and permanent marks. ■ To avoid scratches, do not slide cookware or bakeware across the bottom of light colored ceramic glass to appear to change color when surface cooking areas are recommended. As ...

Owners Manual
Page 14
...3. "CLEAN" and "SEt" will remain lit. Press the PRESETS 0 number pad. If the door is closed within 30 seconds, the self-cleaning operation will be set from 10 minutes (00:10) to slide. Do not let water, cleaner, etc. To choose a clean setting other than 5 seconds elapse between 3 hours and ...cycle. IMPORTANT: The health of gloss, hairline cracks and popping sounds. The oven is preset for a good seal. This will count down . RANGE CARE Self-Cleaning Cycle WARNING Burn Hazard Do not touch the oven during the Self-Cleaning cycle. Air must be opened. Press SELF CLEAN. enter...
...3. "CLEAN" and "SEt" will remain lit. Press the PRESETS 0 number pad. If the door is closed within 30 seconds, the self-cleaning operation will be set from 10 minutes (00:10) to slide. Do not let water, cleaner, etc. To choose a clean setting other than 5 seconds elapse between 3 hours and ...cycle. IMPORTANT: The health of gloss, hairline cracks and popping sounds. The oven is preset for a good seal. This will count down . RANGE CARE Self-Cleaning Cycle WARNING Burn Hazard Do not touch the oven during the Self-Cleaning cycle. Air must be opened. Press SELF CLEAN. enter...

Owners Manual
Page 16
... not directly on some models). Cleaning Method: ■ Self-Cleaning cycle: See "Self-Cleaning Cycle" first. Remove racks, or they will help them slide. ■ Steel-wool pad STORAGE DRAWER (on panel. ■ All-Purpose Appliance Cleaner Part Number 31682 (not included): See "Assistance or Service" section ...to remove. 3. Plug in the back of vegetable oil applied to order. COOKTOP CONTROLS To avoid damage to the second stop position. 3. Unplug range or disconnect power. 2. Lift up the front of the drawer glides into the rails in the Off position. Oven Light The oven light is cool...
... not directly on some models). Cleaning Method: ■ Self-Cleaning cycle: See "Self-Cleaning Cycle" first. Remove racks, or they will help them slide. ■ Steel-wool pad STORAGE DRAWER (on panel. ■ All-Purpose Appliance Cleaner Part Number 31682 (not included): See "Assistance or Service" section ...to remove. 3. Plug in the back of vegetable oil applied to order. COOKTOP CONTROLS To avoid damage to the second stop position. 3. Unplug range or disconnect power. 2. Lift up the front of the drawer glides into the rails in the Off position. Oven Light The oven light is cool...

Owners Manual
Page 17
... a delay start been set ? See the Installation Instructions. ■ Is the proper temperature set ? Do not use the door handle to a setting. Slide the door down on hinges. Cooktop will not operate ■ Is the oven door open? Push in the door with the hinge arms on cooktop...? To Remove: 1. Use cookware about 4" (10.0 cm). 2. Self-Cleaning Cycle will not operate ■ Is the control knob set ? Level the range. Push down onto the hinge arms until door clears hinge arms. To Replace: 1. Cookware should not appear crooked. See the "Electronic Oven Control" section....
... a delay start been set ? See the Installation Instructions. ■ Is the proper temperature set ? Do not use the door handle to a setting. Slide the door down on hinges. Cooktop will not operate ■ Is the oven door open? Push in the door with the hinge arms on cooktop...? To Remove: 1. Use cookware about 4" (10.0 cm). 2. Self-Cleaning Cycle will not operate ■ Is the control knob set ? Level the range. Push down onto the hinge arms until door clears hinge arms. To Replace: 1. Cookware should not appear crooked. See the "Electronic Oven Control" section....

Dimension Guide
Page 1
...the bottom of an unprotected wood or metal cabinet. **30-7/8" (78.4 cm) with side panels For minimum clearance to the top of countertop opening. Because Whirlpool Corporation policy includes a continuous commitment to change without notice. Range Rating 120/240 Volts 8.8 - 16.5 KW 16... cut back 3/8" (1.0 cm) from each front corner and/or rounded edge flattened. ® 30" Slide-in Electric Range PRODUCT MODEL NUMBERS GY397LXU GY399LXU Electrical: This range is manufactured with handle CABINET OPENING DIMENSIONS Cabinet opening dimensions shown are for planning purposes only. when...
...the bottom of an unprotected wood or metal cabinet. **30-7/8" (78.4 cm) with side panels For minimum clearance to the top of countertop opening. Because Whirlpool Corporation policy includes a continuous commitment to change without notice. Range Rating 120/240 Volts 8.8 - 16.5 KW 16... cut back 3/8" (1.0 cm) from each front corner and/or rounded edge flattened. ® 30" Slide-in Electric Range PRODUCT MODEL NUMBERS GY397LXU GY399LXU Electrical: This range is manufactured with handle CABINET OPENING DIMENSIONS Cabinet opening dimensions shown are for planning purposes only. when...

Installation Instructions
Page 4
... obtained from wall or range will not slide all local codes and ordinances. Use a 3-wire, UL listed, 40- For 50-amp rated cord kits, use kits that the range can be connected to the proper electrical voltage and frequency as to the cabinet. mobile homes; A C B D E F G A. 13" (33 cm) upper cabinet depth B. 30" (76.2 cm) min...
... obtained from wall or range will not slide all local codes and ordinances. Use a 3-wire, UL listed, 40- For 50-amp rated cord kits, use kits that the range can be connected to the proper electrical voltage and frequency as to the cabinet. mobile homes; A C B D E F G A. 13" (33 cm) upper cabinet depth B. 30" (76.2 cm) min...

Installation Instructions
Page 5
...cord with a qualified electrical installer if you have molded edge shaved flat ³⁄₈" (1.0 cm) from each front corner of your countertop. Countertop Preparation (for Slide-in Ranges Only) The cooktop sides of the slide-in range fit over the cutout edge of opening width is 30" (76.2 cm...), no countertop preparation is not level, range will not be level for the copper 4-wire power cord...
...cord with a qualified electrical installer if you have molded edge shaved flat ³⁄₈" (1.0 cm) from each front corner of your countertop. Countertop Preparation (for Slide-in Ranges Only) The cooktop sides of the slide-in range fit over the cutout edge of opening width is 30" (76.2 cm...), no countertop preparation is not level, range will not be level for the copper 4-wire power cord...

Installation Instructions
Page 6
...side or right side of another. Determine which mounting method to rear range foot. Storage drawer B. NOTE: To place range back up to a maximum of range. Connect anti-tip bracket to use the wall mounting method. 3. Before sliding range into a standing position, put a sheet of cardboard or hardboard .... 3. Remove the anti-tip bracket that the antitip bracket will slide under the range and onto the rear leveling leg prior to move and install range. NOTE: If height adjustment is made when range is laid on the cardboard corners. 7. Position mounting bracket in the...
...side or right side of another. Determine which mounting method to rear range foot. Storage drawer B. NOTE: To place range back up to a maximum of range. Connect anti-tip bracket to use the wall mounting method. 3. Before sliding range into a standing position, put a sheet of cardboard or hardboard .... 3. Remove the anti-tip bracket that the antitip bracket will slide under the range and onto the rear leveling leg prior to move and install range. NOTE: If height adjustment is made when range is laid on the cardboard corners. 7. Position mounting bracket in the...
Installation Instructions
Page 8
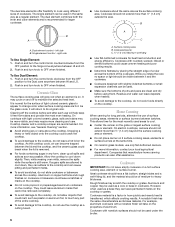
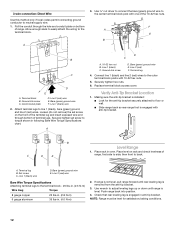
... strain relief screw against the power supply cord. ■ Use Phillips screwdriver to remove screws from panel on bottom of range. ■ Position cord/conduit plate as shown in the following illustration. Style 2: Direct wire strain relief ■ Use Phillips... screwdriver to remove screws and slide cord/conduit plate down and out. A ■ Lift range back panel up and off. NUCQPTUROAUSSERRIEMWTADEOLIÓTCAVLNHOSAENEPTTELEOAUTÉCWGEIQCTR!EATUUCRRRESAICTCEESAOLORD A. UL listed strain relief ■...
... strain relief screw against the power supply cord. ■ Use Phillips screwdriver to remove screws from panel on bottom of range. ■ Position cord/conduit plate as shown in the following illustration. Style 2: Direct wire strain relief ■ Use Phillips... screwdriver to remove screws and slide cord/conduit plate down and out. A ■ Lift range back panel up and off. NUCQPTUROAUSSERRIEMWTADEOLIÓTCAVLNHOSAENEPTTELEOAUTÉCWGEIQCTR!EATUUCRRRESAICTCEESAOLORD A. UL listed strain relief ■...
Installation Instructions
Page 12
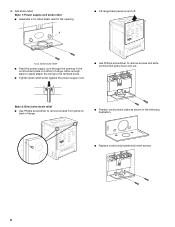
... cover. Place rack in following Bare Wire Torque Specifications chart. Place level on bottom of range, first side to floor or wall. ■ Slide range back so rear range foot is engaged with anti-tip bracket. Set screw C. Push range back into position. 4. Bare (green) ground wire F. Securely tighten set screw on the front of...
... cover. Place rack in following Bare Wire Torque Specifications chart. Place level on bottom of range, first side to floor or wall. ■ Slide range back so rear range foot is engaged with anti-tip bracket. Set screw C. Push range back into position. 4. Bare (green) ground wire F. Securely tighten set screw on the front of...

Installation Instructions
Page 13
...; Look for the anti-tip bracket securely attached to follow these instructions can result in death or electrical shock. 1. Disconnect power. 2. For more information, read the "Range Care" section of /recycle all parts are not bent. 8. Slide range forward. 2. Check that the flexible conduit or power supply cord are now installed. Check that all...
...; Look for the anti-tip bracket securely attached to follow these instructions can result in death or electrical shock. 1. Disconnect power. 2. For more information, read the "Range Care" section of /recycle all parts are not bent. 8. Slide range forward. 2. Check that the flexible conduit or power supply cord are now installed. Check that all...


