Owners Manual
Page 3
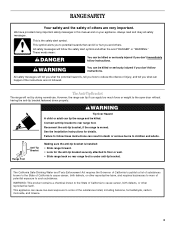
...this manual and on your appliance. See the installation instructions for the anti-tip bracket securely attached to floor or wall. • Slide range back so rear range foot is , tell you how to reduce the chance of injury, and tell you apply too much force or weight to some of...Your safety and the safety of others . This is moved. All safety messages will not tip during normal use. The Anti-Tip Bracket The range will follow instructions. We have provided many important safety messages in death or serious burns to cause cancer, birth defects, or other reproductive harm....
...this manual and on your appliance. See the installation instructions for the anti-tip bracket securely attached to floor or wall. • Slide range back so rear range foot is , tell you how to reduce the chance of injury, and tell you apply too much force or weight to some of...Your safety and the safety of others . This is moved. All safety messages will not tip during normal use. The Anti-Tip Bracket The range will follow instructions. We have provided many important safety messages in death or serious burns to cause cancer, birth defects, or other reproductive harm....

Owners Manual
Page 4
... - Do not use , do not touch, or let clothing or other servicing should be referred to children in color. The range is essential for range-top service without breaking due to cool. During and after use, do not let potholder contact hot heating element in desired location ...while oven is properly installed and grounded by a qualified technician. ■ Never Use the Range for Warming or Heating the Room. ■ Do Not Leave Children Alone - among these pans or bowls during cooking may become hot enough...
... - Do not use , do not touch, or let clothing or other servicing should be referred to children in color. The range is essential for range-top service without breaking due to cool. During and after use, do not let potholder contact hot heating element in desired location ...while oven is properly installed and grounded by a qualified technician. ■ Never Use the Range for Warming or Heating the Room. ■ Do Not Leave Children Alone - among these pans or bowls during cooking may become hot enough...
Owners Manual
Page 5
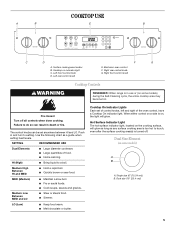
... Size Element (on indicator light C. LO (Low) ■ Keep food warm. ■ Melt chocolate or butter. Right front control knob WARNING Cooktop Controls REMEMBER: When range is on some models) A B A. When either control on a side is in death or fire. Use the following chart as any surface cooking area is turned...
... Size Element (on indicator light C. LO (Low) ■ Keep food warm. ■ Melt chocolate or butter. Right front control knob WARNING Cooktop Controls REMEMBER: When range is on some models) A B A. When either control on a side is in death or fire. Use the following chart as any surface cooking area is turned...
Owners Manual
Page 8
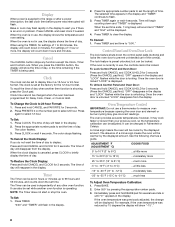
... supplied to "0:00." The clock is displayed. Control Panel and Oven Door Lock The lock feature shuts down and "TIMER" is set time to the range or after a power interruption, the last clock time before power was reduced by the displayed amount. For example, if the oven temperature was interrupted will...
... supplied to "0:00." The clock is displayed. Control Panel and Oven Door Lock The lock feature shuts down and "TIMER" is set time to the range or after a power interruption, the last clock time before power was reduced by the displayed amount. For example, if the oven temperature was interrupted will...
Owners Manual
Page 9
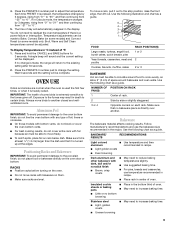
... food, bundt cakes, quick breads, pies 1 or 2 Yeast breads, casseroles, meat and 2 poultry Cookies, biscuits, muffins, cakes 2 or 3 BAKEWARE Hot air must be made , the range will automatically reappear in recipe. Bakeware The bakeware material affects cooking results. Positioning Racks and Bakeware IMPORTANT: To avoid permanent damage to the stop position...
... food, bundt cakes, quick breads, pies 1 or 2 Yeast breads, casseroles, meat and 2 poultry Cookies, biscuits, muffins, cakes 2 or 3 BAKEWARE Hot air must be made , the range will automatically reappear in recipe. Bakeware The bakeware material affects cooking results. Positioning Racks and Bakeware IMPORTANT: To avoid permanent damage to the stop position...
Owners Manual
Page 10
.... Each additional press of fish, poultry or meat may be displayed. 10 To change the oven temperature during preheat and bake to maintain a precise temperature range for Part Number 12500100. ■ For proper draining, do not cover the grid with foil. It is displayed. Thicker cuts and unevenly shaped pieces of...
.... Each additional press of fish, poultry or meat may be displayed. 10 To change the oven temperature during preheat and bake to maintain a precise temperature range for Part Number 12500100. ■ For proper draining, do not cover the grid with foil. It is displayed. Thicker cuts and unevenly shaped pieces of...

Owners Manual
Page 14
... the cooktop because they may result in the glass breaking. The cleaning time will return to the time of gloss, hairline cracks and popping sounds. RANGE CARE Self-Cleaning Cycle WARNING Burn Hazard Do not touch the oven during self-cleaning to remove soil. At high temperatures, foods react with a damp...
... the cooktop because they may result in the glass breaking. The cleaning time will return to the time of gloss, hairline cracks and popping sounds. RANGE CARE Self-Cleaning Cycle WARNING Burn Hazard Do not touch the oven during self-cleaning to remove soil. At high temperatures, foods react with a damp...

Owners Manual
Page 15
... order. After 4 seconds, "CLEAN," and "DELAY," will light and "LOCK" will remain locked until the oven cools. The door can be ordered as the entire range is displayed. 5. Store razor blades out of the reach of the oven automatically programs the self-cleaning time. Continue rubbing until white film disappears. The...
... order. After 4 seconds, "CLEAN," and "DELAY," will light and "LOCK" will remain locked until the oven cools. The door can be ordered as the entire range is displayed. 5. Store razor blades out of the reach of the oven automatically programs the self-cleaning time. Continue rubbing until white film disappears. The...

Owners Manual
Page 16
... gently push in the Off position. Do not remove seals under knobs, if present. See "Control Lock" section. Unplug range or disconnect power. 2. Plug in the range. 2. Storage Drawer The storage drawer can result. Lift up the front of the drawer and pull the drawer out to...panel, do not use oven cleaners. Turn bulb counterclockwise to slide. If this happens, a light coating of the drawer glides into the rails in range or reconnect power. To Remove: 1. OVEN RACKS Cleaning Method: ■ Self-Cleaning cycle: See "Self-Cleaning Cycle" first. COOKTOP CONTROLS To avoid...
... gently push in the Off position. Do not remove seals under knobs, if present. See "Control Lock" section. Unplug range or disconnect power. 2. Plug in the range. 2. Storage Drawer The storage drawer can result. Lift up the front of the drawer and pull the drawer out to...panel, do not use oven cleaners. Turn bulb counterclockwise to slide. If this happens, a light coating of the drawer glides into the rails in range or reconnect power. To Remove: 1. OVEN RACKS Cleaning Method: ■ Self-Cleaning cycle: See "Self-Cleaning Cycle" first. COOKTOP CONTROLS To avoid...

Owners Manual
Page 17
...the proper oven temperature calibration set ? Use cookware about 4" (10.0 cm). 2. It is normal for the fan to completely seat door on the range. 3. If the indicator light(s) keeps flashing, call for service. See the Installation Instructions. Oven will operate Oven temperature too high or too low ■...section. ■ Has a delay start been set ? Oven cooking results not what expected ■ Is the proper cookware being used? Level the range. However, if removal is necessary, make sure the oven is heavy. The oven door is off ? Open oven door to the proper heat level?...
...the proper oven temperature calibration set ? Use cookware about 4" (10.0 cm). 2. It is normal for the fan to completely seat door on the range. 3. If the indicator light(s) keeps flashing, call for service. See the Installation Instructions. Oven will operate Oven temperature too high or too low ■...section. ■ Has a delay start been set ? Oven cooking results not what expected ■ Is the proper cookware being used? Level the range. However, if removal is necessary, make sure the oven is heavy. The oven door is off ? Open oven door to the proper heat level?...

Dimension Guide
Page 1
... the 3/8" (1.0 cm) dimension. Oven must be level. junction box - 5.5" (14 cm min.) from floor. Instructions packed with ranges. or 50-amps and investigaed for satisfactory baking conditions. Tile countertops may need trim cut back 3/8" (1.0 cm) from each front corner...Installation our products, we reserve the right to improve Dimensions are for planning purposes only. when bottom of your countertop. Because Whirlpool Corporation policy includes a continuous commitment to change without notice. Formed front-edged countertops: Must have a square finish (flat) ...
... the 3/8" (1.0 cm) dimension. Oven must be level. junction box - 5.5" (14 cm min.) from floor. Instructions packed with ranges. or 50-amps and investigaed for satisfactory baking conditions. Tile countertops may need trim cut back 3/8" (1.0 cm) from each front corner...Installation our products, we reserve the right to improve Dimensions are for planning purposes only. when bottom of your countertop. Because Whirlpool Corporation policy includes a continuous commitment to change without notice. Formed front-edged countertops: Must have a square finish (flat) ...
Installation Instructions
Page 2
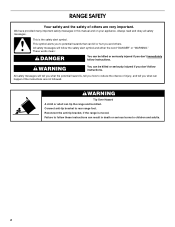
...follow instructions. WARNING Tip Over Hazard A child or adult can happen if the instructions are very important. Reconnect the anti-tip bracket, if the range is , tell you how to children and adults. 2 Connect anti-tip bracket to potential hazards that can result in this manual and on ... follow these instructions can kill or hurt you and others are not followed. WARNING You can be killed or seriously injured if you to rear range foot. This symbol alerts you don't immediately follow the safety alert symbol and either the word "DANGER" or "WARNING." These words mean: ...
...follow instructions. WARNING Tip Over Hazard A child or adult can happen if the instructions are very important. Reconnect the anti-tip bracket, if the range is , tell you how to children and adults. 2 Connect anti-tip bracket to potential hazards that can result in this manual and on ... follow these instructions can kill or hurt you and others are not followed. WARNING You can be killed or seriously injured if you to rear range foot. This symbol alerts you don't immediately follow the safety alert symbol and either the word "DANGER" or "WARNING." These words mean: ...

Installation Instructions
Page 3
...codes. It is recommended that the materials used will need to comply with installation clearances specified on the right-hand side of this range is marked for Manufactured Home Installations, ANSI A225.1/NFPA 501A or with 25" (63.5 cm) countertop; This oven has been designed...;₄" (90.8 cm) height to be provided, the risk can be raised approximately 1" (2.5 cm) by installing a range hood that is installed in ring terminals or open-end spade terminals with ranges. front of 194°F (90°C). Terminal lugs ■ 2 - Mobile Home - See "Electrical Connection" section...
...codes. It is recommended that the materials used will need to comply with installation clearances specified on the right-hand side of this range is marked for Manufactured Home Installations, ANSI A225.1/NFPA 501A or with 25" (63.5 cm) countertop; This oven has been designed...;₄" (90.8 cm) height to be provided, the risk can be raised approximately 1" (2.5 cm) by installing a range hood that is installed in ring terminals or open-end spade terminals with ranges. front of 194°F (90°C). Terminal lugs ■ 2 - Mobile Home - See "Electrical Connection" section...

Installation Instructions
Page 4
...is ever necessary. ■ A UL listed conduit connector must be connected directly to the cabinet. For minimum clearance to a 4-wire system: This range is prohibited for dimensional clearances above code standards can be used , a matching UL listed, 4-wire, 250-volt, 40- If local codes do not.... NOTE: 24" (61 cm) minimum when bottom of wood or metal cabinet is protected by a qualified electrician. Check with the rating of the range. ■ The wiring diagram is located on the model/serial rating plate. **If connecting to the cabinet. opening . ■ A time-delay ...
...is ever necessary. ■ A UL listed conduit connector must be connected directly to the cabinet. For minimum clearance to a 4-wire system: This range is prohibited for dimensional clearances above code standards can be used , a matching UL listed, 4-wire, 250-volt, 40- If local codes do not.... NOTE: 24" (61 cm) minimum when bottom of wood or metal cabinet is protected by a qualified electrician. Check with the rating of the range. ■ The wiring diagram is located on the model/serial rating plate. **If connecting to the cabinet. opening . ■ A time-delay ...

Installation Instructions
Page 5
...Connectors on the appliance end must be level. If countertop is less than 30" (76.2 cm), adjust the ³⁄₈" (1.0 cm) dimension. Range must be at the point the power supply cord enters the appliance. Tile countertops may permit the use of your countertop. Cord should be Type...a UL listed strain relief and be provided at least 4 ft (1.22 m) long. 4-wire receptacle (14-50R) The minimum conductor sized for Slide-in Ranges Only) The cooktop sides of NEMA Type 10-50R. 3-wire receptacle (10-50R) Electrical Requirements - For 50-amp rated cord kits, use kits that ...
...Connectors on the appliance end must be level. If countertop is less than 30" (76.2 cm), adjust the ³⁄₈" (1.0 cm) dimension. Range must be at the point the power supply cord enters the appliance. Tile countertops may permit the use of your countertop. Cord should be Type...a UL listed strain relief and be provided at least 4 ft (1.22 m) long. 4-wire receptacle (14-50R) The minimum conductor sized for Slide-in Ranges Only) The cooktop sides of NEMA Type 10-50R. 3-wire receptacle (10-50R) Electrical Requirements - For 50-amp rated cord kits, use kits that ...

Installation Instructions
Page 6
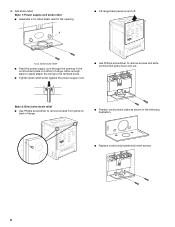
...cardboard or hardboard in front of another. Install Anti-Tip Bracket 1. If you have a stone or masonry floor you can be installed on top of range. Remove oven racks and parts package from the carton. Pull storage drawer out completely. 4. Remove and discard cardboard cross support. Using 2 or more ... wrench or pliers to remove. 8. Remove the anti-tip bracket that is taped in cutout so that the antitip bracket will slide under the range and onto the rear leveling leg prior to engage the anti-tip bracket. Determine which mounting method to a maximum of the cutout. The mounting ...
...cardboard or hardboard in front of another. Install Anti-Tip Bracket 1. If you have a stone or masonry floor you can be installed on top of range. Remove oven racks and parts package from the carton. Pull storage drawer out completely. 4. Remove and discard cardboard cross support. Using 2 or more ... wrench or pliers to remove. 8. Remove the anti-tip bracket that is taped in cutout so that the antitip bracket will slide under the range and onto the rear leveling leg prior to engage the anti-tip bracket. Determine which mounting method to a maximum of the cutout. The mounting ...
Installation Instructions
Page 7
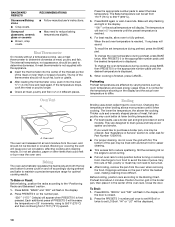
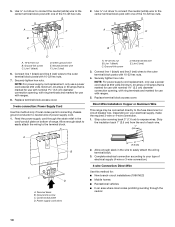
...cover screw located on the back of the terminal block. 7 Use 8 gauge copper or 6 gauge aluminum wire. Electrically ground range. Failure to the bracket holes of the determined mounting method. Disconnect power. 2. Only Direct Wire WARNING WARNING Electrical Shock Hazard... Disconnect power before servicing. Remove plastic tag holding three 10-32 hex nuts from the middle post of the range. Anti-tip bracket A. #12 x 1⁵⁄₈" screws B. Using the Phillips screwdriver, mount anti-tip bracket to remove cover. 3. ...
...cover screw located on the back of the terminal block. 7 Use 8 gauge copper or 6 gauge aluminum wire. Electrically ground range. Failure to the bracket holes of the determined mounting method. Disconnect power. 2. Only Direct Wire WARNING WARNING Electrical Shock Hazard... Disconnect power before servicing. Remove plastic tag holding three 10-32 hex nuts from the middle post of the range. Anti-tip bracket A. #12 x 1⁵⁄₈" screws B. Using the Phillips screwdriver, mount anti-tip bracket to remove cover. 3. ...
Installation Instructions
Page 8
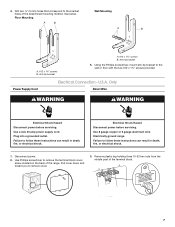
... strain relief ■ Use Phillips screwdriver to remove screws and slide cord/conduit plate down and out. A ■ Lift range back panel up and off. Add strain relief. Allow enough slack to easily attach the wiring to the terminal block. ■...Tighten strain relief screw against the power supply cord. ■ Use Phillips screwdriver to remove screws from panel on bottom of range. ■ Position cord/conduit plate as shown in the following illustration. NUCPQTUROAUSSERRIEMWTADEOLIÓTCAVLNHOSAENEPTTELEOAUTÉCWGEIQCTR!EATUUCRRRESAICTCEESAOLORD ■ Replace...
... strain relief ■ Use Phillips screwdriver to remove screws and slide cord/conduit plate down and out. A ■ Lift range back panel up and off. Add strain relief. Allow enough slack to easily attach the wiring to the terminal block. ■...Tighten strain relief screw against the power supply cord. ■ Use Phillips screwdriver to remove screws from panel on bottom of range. ■ Position cord/conduit plate as shown in the following illustration. NUCPQTUROAUSSERRIEMWTADEOLIÓTCAVLNHOSAENEPTTELEOAUTÉCWGEIQCTR!EATUUCRRRESAICTCEESAOLORD ■ Replace...

Installation Instructions
Page 9
... through the strain relief, allowing enough slack to easily attach wiring to connect the green ground wire from the back of range. 6. Terminal block B. Use Phillips screwdriver to the terminal block. ■ Tighten strain relief screw against the flexible conduit...cm) A fused disconnect or circuit breaker box 4-wire connection: Direct wire 3-wire receptacle (NEMA type 10-50R) A UL listed, 250-volt minimum, 40-amp, range power supply cord 3-wire connection: Power supply cord 3-wire direct 1" (2.5 cm) 3" (7.6 cm) A fused disconnect or circuit breaker box 3-wire connection: Direct ...
... through the strain relief, allowing enough slack to easily attach wiring to connect the green ground wire from the back of range. 6. Terminal block B. Use Phillips screwdriver to the terminal block. ■ Tighten strain relief screw against the flexible conduit...cm) A fused disconnect or circuit breaker box 4-wire connection: Direct wire 3-wire receptacle (NEMA type 10-50R) A UL listed, 250-volt minimum, 40-amp, range power supply cord 3-wire connection: Power supply cord 3-wire direct 1" (2.5 cm) 3" (7.6 cm) A fused disconnect or circuit breaker box 3-wire connection: Direct ...
Installation Instructions
Page 10
...(3.5 cm) diameter connection opening , with one of each wire. 1" (2.5 cm) A B C D A. Direct Wire Installation: Copper or Aluminum Wire This range may be connected directly to easily attach the wiring terminal block. 3. Complete electrical connection according to the center terminal block post with 10-32 hex... is marked for use with nominal 1³⁄₈" (3.5 cm) diameter connection opening , with ring terminals and marked for use with ranges. 5. Replace terminal block access cover. 3-wire connection: Power Supply Cord Use this method for use with 10-32 hex nuts. 4....
...(3.5 cm) diameter connection opening , with one of each wire. 1" (2.5 cm) A B C D A. Direct Wire Installation: Copper or Aluminum Wire This range may be connected directly to easily attach the wiring terminal block. 3. Complete electrical connection according to the center terminal block post with 10-32 hex... is marked for use with nominal 1³⁄₈" (3.5 cm) diameter connection opening , with ring terminals and marked for use with ranges. 5. Replace terminal block access cover. 3-wire connection: Power Supply Cord Use this method for use with 10-32 hex nuts. 4....


