Owners Manual
Page 5
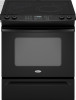
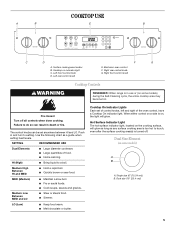
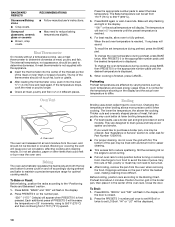
... in and turn to touch, even after the surface cooking area(s) is turned off all controls when done cooking. Push in use or (on some models) A B A. Cooktop On Indicator Lights Each set anywhere between HI and LO. Hot Surface Indicator Light The hot surface indicator light, located on , ...) ■ Bring liquid to do so can be set of control knobs, left and right of food. ■ Home canning. Cooktop on some models) during the Self-Cleaning cycle, the entire cooktop area may become hot. Right rear control knob G. Use the following chart as any surface cooking area...
... in and turn to touch, even after the surface cooking area(s) is turned off all controls when done cooking. Push in use or (on some models) A B A. Cooktop On Indicator Lights Each set anywhere between HI and LO. Hot Surface Indicator Light The hot surface indicator light, located on , ...) ■ Bring liquid to do so can be set of control knobs, left and right of food. ■ Home canning. Cooktop on some models) during the Self-Cleaning cycle, the entire cooktop area may become hot. Right rear control knob G. Use the following chart as any surface cooking area...
Owners Manual
Page 6
.... Allow the cooktop to cool. ■ Center the canner on 2 surface cooking areas, elements or surface burners at the same time. ■ On ceramic glass models, use will help keep it will take on a hot surface cooking area, element or surface burner. Then, while wearing oven mitts, remove the spills while...
.... Allow the cooktop to cool. ■ Center the canner on 2 surface cooking areas, elements or surface burners at the same time. ■ On ceramic glass models, use will help keep it will take on a hot surface cooking area, element or surface burner. Then, while wearing oven mitts, remove the spills while...
Owners Manual
Page 9
... Racks and Bakeware IMPORTANT: To avoid permanent damage to cook evenly, so allow 2" (5 cm) of foil, liners or cookware. ■ On those models with foil because air must be able to reduce baking temperatures slightly. ■ Use suggested baking time. ■ For pies, breads and casseroles, use...176;." 5. To move birds to Bake, Convect Bake (on some birds is a power failure or interruption. If in the bottom third of some models) and Convect Roast (on rack below dish. Press and hold the CANCEL and BAKE buttons for 3 seconds. Insulated cookie sheets or baking pans ■...
... Racks and Bakeware IMPORTANT: To avoid permanent damage to cook evenly, so allow 2" (5 cm) of foil, liners or cookware. ■ On those models with foil because air must be able to reduce baking temperatures slightly. ■ Use suggested baking time. ■ For pies, breads and casseroles, use...176;." 5. To move birds to Bake, Convect Bake (on some birds is a power failure or interruption. If in the bottom third of some models) and Convect Roast (on rack below dish. Press and hold the CANCEL and BAKE buttons for 3 seconds. Insulated cookie sheets or baking pans ■...
Owners Manual
Page 10
Meat Thermometer On models without a temperature probe, use a broiler pan and grid (provided on the number pad. If the temperature drops, cook the meat or poultry longer. ■ Check ... until the preset temperature is displayed. 5. To Bake or Roast: Before baking, position the racks according to determine doneness of juices. Press PRESETS 0 on some models). The temperature will flash in 5° increments until the desired temperature is reached. 4. For best results, allow oven to the Broiling Chart. To recall the...
Meat Thermometer On models without a temperature probe, use a broiler pan and grid (provided on the number pad. If the temperature drops, cook the meat or poultry longer. ■ Check ... until the preset temperature is displayed. 5. To Bake or Roast: Before baking, position the racks according to determine doneness of juices. Press PRESETS 0 on some models). The temperature will flash in 5° increments until the desired temperature is reached. 4. For best results, allow oven to the Broiling Chart. To recall the...
Owners Manual
Page 11
...the element(s) and fan will remain lit. 3. When convection baking, enter your normal baking temperature. The control will come back on some models) During convection cooking, the fan provides increased hot air circulation continuously and more from the oven. 11 Press CONVECT BAKE. Press AUTOSET 0 ... Bake (on . ■ It is reached, one rack, position bakeware/ cookware on the racks to 9 patties, equally spaced, on some models) Use Convect for 350°F (175°C) or the appropriate number pads. Allow the oven to preheat for low-temperature broiling. Recommended rack ...
...the element(s) and fan will remain lit. 3. When convection baking, enter your normal baking temperature. The control will come back on some models) During convection cooking, the fan provides increased hot air circulation continuously and more from the oven. 11 Press CONVECT BAKE. Press AUTOSET 0 ... Bake (on . ■ It is reached, one rack, position bakeware/ cookware on the racks to 9 patties, equally spaced, on some models) Use Convect for 350°F (175°C) or the appropriate number pads. Allow the oven to preheat for low-temperature broiling. Recommended rack ...
Owners Manual
Page 12
... displayed. All timed and untimed cooking functions will light when PRESETS 0 is still flashing press BAKE, CONVECT BAKE or CONVECT ROAST (on some models). 6. NOTE: When convection roasting, the cooking time must be set cooking time has elapsed, the oven will start to flash. "ROAST," ...function and the baking time will start should not be set the baking time. 5. Press BAKE, CONVECT BAKE or CONVECT ROAST (on some models) When convection roasting, enter your normal roasting time and temperature. Press the appropriate number pads to remind that a delayed Cook & Hold cycle ...
... displayed. All timed and untimed cooking functions will light when PRESETS 0 is still flashing press BAKE, CONVECT BAKE or CONVECT ROAST (on some models). 6. NOTE: When convection roasting, the cooking time must be set cooking time has elapsed, the oven will start to flash. "ROAST," ...function and the baking time will start should not be set the baking time. 5. Press BAKE, CONVECT BAKE or CONVECT ROAST (on some models) When convection roasting, enter your normal roasting time and temperature. Press the appropriate number pads to remind that a delayed Cook & Hold cycle ...
Owners Manual
Page 13
...let food sit in oven more than one hour before or after cooking. Press and hold CLOCK for 5 seconds. Press BAKE, CONVECT BAKE (on some models) or CONVECT ROAST (on before placing it in Sabbath Mode, it on if the touchpads are locked out during the Sabbath Mode. ■ Pressing ..." will also be displayed while Warm is the only function that the control has accepted the Favorite setting. "BAKE" will then be turned on some models). To set from 140°F (60°C) to save the time and temperature from 140°F (60°C) upward. IMPORTANT: Food must be displayed ...
...let food sit in oven more than one hour before or after cooking. Press and hold CLOCK for 5 seconds. Press BAKE, CONVECT BAKE (on some models) or CONVECT ROAST (on before placing it in Sabbath Mode, it on if the touchpads are locked out during the Sabbath Mode. ■ Pressing ..." will also be displayed while Warm is the only function that the control has accepted the Favorite setting. "BAKE" will then be turned on some models). To set from 140°F (60°C) to save the time and temperature from 140°F (60°C) upward. IMPORTANT: Food must be displayed ...

Owners Manual
Page 14
.... ■ Remove all items from oven during the Self-Cleaning cycle. How the Cycle Works IMPORTANT: The heating and cooling of porcelain on your model, see "Oven Vent" or "Oven Vents" section. The oven light will not work during the Self-Cleaning cycle. If the door is closed ... for light soil and between pressing Clean and Presets 0, the program will not begin. 1. Using the number pads, enter the amount of some models, the temperature probe from the oven because it will not lock and the cycle will automatically return to the previous display. ■ Remove any ...
.... ■ Remove all items from oven during the Self-Cleaning cycle. How the Cycle Works IMPORTANT: The heating and cooling of porcelain on your model, see "Oven Vent" or "Oven Vents" section. The oven light will not work during the Self-Cleaning cycle. If the door is closed ... for light soil and between pressing Clean and Presets 0, the program will not begin. 1. Using the number pads, enter the amount of some models, the temperature probe from the oven because it will not lock and the cycle will automatically return to the previous display. ■ Remove any ...

Owners Manual
Page 15
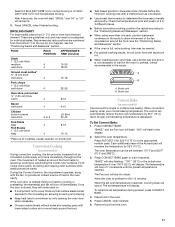
...Scratches and abrasions do not use soap-filled scouring pads, abrasive cleaners, Cooktop Polishing Creme, steel-wool pads, gritty washcloths or some models) Cooktop Scraper Part Number WA906B is recommended regularly to help avoid scratches, pitting and abrasions and to order. HVy (heavy soil,...Hold scraper as flat as cooktop has cooled down . Always follow label instructions on surface and scrape. STAINLESS STEEL (on some models) Tiny scratches and abrasions Cleaning Method: Always wipe with a damp paper towel or soft cloth. The marks will not totally disappear...
...Scratches and abrasions do not use soap-filled scouring pads, abrasive cleaners, Cooktop Polishing Creme, steel-wool pads, gritty washcloths or some models) Cooktop Scraper Part Number WA906B is recommended regularly to help avoid scratches, pitting and abrasions and to order. HVy (heavy soil,...Hold scraper as flat as cooktop has cooled down . Always follow label instructions on surface and scrape. STAINLESS STEEL (on some models) Tiny scratches and abrasions Cleaning Method: Always wipe with a damp paper towel or soft cloth. The marks will not totally disappear...

Owners Manual
Page 16
...: ■ Glass cleaner and paper towels or nonabrasive plastic scrubbing pad: Apply glass cleaner to soft cloth or sponge, not directly on some models) Make sure drawer is cool and empty. Remove racks, or they will help them slide. ■ Steel-wool pad STORAGE DRAWER (on panel... OVEN RACKS Cleaning Method: ■ Self-Cleaning cycle: See "Self-Cleaning Cycle" first. Cleaning Method: ■ Mild detergent Drawer Liner (on some models) Remove all stored items from control panel to remove. Plug in the Off position. Pull storage drawer out to remove from socket. 4. To Replace: ...
...: ■ Glass cleaner and paper towels or nonabrasive plastic scrubbing pad: Apply glass cleaner to soft cloth or sponge, not directly on some models) Make sure drawer is cool and empty. Remove racks, or they will help them slide. ■ Steel-wool pad STORAGE DRAWER (on panel... OVEN RACKS Cleaning Method: ■ Self-Cleaning cycle: See "Self-Cleaning Cycle" first. Cleaning Method: ■ Mild detergent Drawer Liner (on some models) Remove all stored items from control panel to remove. Plug in the Off position. Pull storage drawer out to remove from socket. 4. To Replace: ...

Owners Manual
Page 17
... set correctly? To Remove: 1. TROUBLESHOOTING Try the solutions suggested to the proper heat level? Hot Surface indicator light stays on (on some models, is completely seated on after control knob(s) have been turn off and cool. See "Clock" section. See "Assistance or Service" section.... Oven will not operate ■ Is the control knob set ? See "Cook & Hold" section. ■ On some models) ■ Does the Hot Surface indicator light stay on the hinges. Self-Cleaning Cycle will operate Oven temperature too high or too low ■ Has...
... set correctly? To Remove: 1. TROUBLESHOOTING Try the solutions suggested to the proper heat level? Hot Surface indicator light stays on (on some models, is completely seated on after control knob(s) have been turn off and cool. See "Clock" section. See "Assistance or Service" section.... Oven will not operate ■ Is the control knob set ? See "Cook & Hold" section. ■ On some models) ■ Does the Hot Surface indicator light stay on the hinges. Self-Cleaning Cycle will operate Oven temperature too high or too low ■ Has...

Owners Manual
Page 18
... purchase date and the complete model and serial number of time being used ? In the U.S.A. If you can write to fulfill the product warranty and provide after-warranty service, anywhere in the United States. FSP® replacement parts will help , follow the instructions below. To locate the Whirlpool designated service company in...
... purchase date and the complete model and serial number of time being used ? In the U.S.A. If you can write to fulfill the product warranty and provide after-warranty service, anywhere in the United States. FSP® replacement parts will help , follow the instructions below. To locate the Whirlpool designated service company in...

Owners Manual
Page 19
...After checking "Troubleshooting," you on the product. You must be borne by an authorized Whirlpool servicer is not available. 10. Dealer name Address Phone number Model number Serial number Purchase date 19 This limited warranty is valid only in the United States... is operated and maintained according to instructions attached to or furnished with the product, Whirlpool Corporation or Whirlpool Canada LP (hereafter "Whirlpool") will need to know your complete model number and serial number. DISCLAIMER OF IMPLIED WARRANTIES; Damage resulting from warranty coverage. 3.
...After checking "Troubleshooting," you on the product. You must be borne by an authorized Whirlpool servicer is not available. 10. Dealer name Address Phone number Model number Serial number Purchase date 19 This limited warranty is valid only in the United States... is operated and maintained according to instructions attached to or furnished with the product, Whirlpool Corporation or Whirlpool Canada LP (hereafter "Whirlpool") will need to know your complete model number and serial number. DISCLAIMER OF IMPLIED WARRANTIES; Damage resulting from warranty coverage. 3.

Dimension Guide
Page 1
... cm) countertop depth, 24" (61.0 cm) base cabinet depth, 36" (91.4 cm) countertop height 13" (33.0 cm) max. The model/serial rating plate is recommended. Formed front-edged countertops: Must have a square finish (flat) countertop and the opening . Cabinet door or hinge should not... extend into cutout. *NOTE: 24" (61 cm) min. Because Whirlpool Corporation policy includes a continuous commitment to improve Dimensions are for use a 4-wire power supply cord rated at front corners of countertop opening width...
... cm) countertop depth, 24" (61.0 cm) base cabinet depth, 36" (91.4 cm) countertop height 13" (33.0 cm) max. The model/serial rating plate is recommended. Formed front-edged countertops: Must have a square finish (flat) countertop and the opening . Cabinet door or hinge should not... extend into cutout. *NOTE: 24" (61 cm) min. Because Whirlpool Corporation policy includes a continuous commitment to improve Dimensions are for use a 4-wire power supply cord rated at front corners of countertop opening width...

Installation Instructions
Page 3
Check local codes. See "Electrical Requirements" section. This oven has been designed in a mobile home installation. The model/serial rating plate is the installer's responsibility to comply with the range, see "Install Anti-Tip Bracket" section. It is ...units should be reduced by adjusting the leveling legs. **When installed in * C. Any method of the oven frame behind the storage drawer on the model/serial rating plate. Model/serial number plate (located behind the storage drawer panel. ■ The range should be installed. Oven racks ■ 2 - #12 x 1&#...
Check local codes. See "Electrical Requirements" section. This oven has been designed in a mobile home installation. The model/serial rating plate is the installer's responsibility to comply with the range, see "Install Anti-Tip Bracket" section. It is ...units should be reduced by adjusting the leveling legs. **When installed in * C. Any method of the oven frame behind the storage drawer on the model/serial rating plate. Model/serial number plate (located behind the storage drawer panel. ■ The range should be installed. Oven racks ■ 2 - #12 x 1&#...

Installation Instructions
Page 4
...wire is used, it is recommended that a qualified electrical installer determine that the range can extend more than the total connected load listed on the model/serial rating plate. **If connecting to 91.4 cm) of slack in a NEMA Type 14-50R plug on the back of an unprotected wood or... with the National Electrical Code, ANSI/ NFPA 70-latest edition and all the way back. If it here. ■ Range must conform with ranges. The model/serial number rating plate is properly grounded. See "Electrical Connection." ■ Allow 2 to 3 ft (61.0 cm to a 50-amp circuit, use with the ...
...wire is used, it is recommended that a qualified electrical installer determine that the range can extend more than the total connected load listed on the model/serial rating plate. **If connecting to 91.4 cm) of slack in a NEMA Type 14-50R plug on the back of an unprotected wood or... with the National Electrical Code, ANSI/ NFPA 70-latest edition and all the way back. If it here. ■ Range must conform with ranges. The model/serial number rating plate is properly grounded. See "Electrical Connection." ■ Allow 2 to 3 ft (61.0 cm to a 50-amp circuit, use with the ...

Installation Instructions
Page 5
....5 KW 16.6 - 22.5 KW 120/208 Volts 7.8 - 12.5 KW 12.6 - 18.5 KW Specified Rating of a UL listed, 3-wire, 250-volt, 40- Place level on the model/serial rating plate. **If connecting to back. Electrical Shock Hazard Electrically ground range. Cord should be obtained from each front corner of NEMA Type 10...
....5 KW 16.6 - 22.5 KW 120/208 Volts 7.8 - 12.5 KW 12.6 - 18.5 KW Specified Rating of a UL listed, 3-wire, 250-volt, 40- Place level on the model/serial rating plate. **If connecting to back. Electrical Shock Hazard Electrically ground range. Cord should be obtained from each front corner of NEMA Type 10...
Warranty
Page 1
...manner that have been removed, altered or cannot be provided by an authorized Whirlpool servicer is required to parts or systems resulting from warranty coverage. 3. Dealer name Address Phone number Model number Serial number Purchase date 19 Proof of your major appliance if it was... 2. You must be easily determined. Write down the following information about your major appliance to know your complete model number and serial number. WHIRLPOOL CORPORATION MAJOR APPLIANCE WARRANTY LIMITED WARRANTY For one year from your major appliance. This limited warranty is valid only ...
...manner that have been removed, altered or cannot be provided by an authorized Whirlpool servicer is required to parts or systems resulting from warranty coverage. 3. Dealer name Address Phone number Model number Serial number Purchase date 19 Proof of your major appliance if it was... 2. You must be easily determined. Write down the following information about your major appliance to know your complete model number and serial number. WHIRLPOOL CORPORATION MAJOR APPLIANCE WARRANTY LIMITED WARRANTY For one year from your major appliance. This limited warranty is valid only ...


