
Owners Manual
Page 4
...■ Glazed Cooking Utensils - Be sure the range is equipped with ventilating hood - ■ Clean Ventilating Hoods Frequently - Do not repair or replace any part of the range. ■ Wear Proper Apparel - Select utensils having flat bottoms large enough to cause burns - Do not use a towel or ...in color. Moist or damp potholders on hot surfaces may result in ignition of clothing. Let hot air or steam escape before removing or replacing food. ■ Do Not Heat Unopened Food Containers - The range is properly installed and grounded by a qualified technician. ■ ...
...■ Glazed Cooking Utensils - Be sure the range is equipped with ventilating hood - ■ Clean Ventilating Hoods Frequently - Do not repair or replace any part of the range. ■ Wear Proper Apparel - Select utensils having flat bottoms large enough to cause burns - Do not use a towel or ...in color. Moist or damp potholders on hot surfaces may result in ignition of clothing. Let hot air or steam escape before removing or replacing food. ■ Do Not Heat Unopened Food Containers - The range is properly installed and grounded by a qualified technician. ■ ...

Owners Manual
Page 16
... before cleaning. Turn the glass bulb cover in the back of the drawer and gently push in the off position. To Remove: 1. To Replace: 1. Remove racks, or they will help them slide. ■ Steel-wool pad STORAGE DRAWER (on some paper towels. Cleaning Method: &#...9632; Mild detergent Drawer Liner (on panel. ■ All-Purpose Appliance Cleaner Part Number 31682 (not included): See "Assistance or Service" section to order. To Replace: 1. Grasp sides and lift drawer top up again and push until drawer is a standard 40-watt appliance...
... before cleaning. Turn the glass bulb cover in the back of the drawer and gently push in the off position. To Remove: 1. To Replace: 1. Remove racks, or they will help them slide. ■ Steel-wool pad STORAGE DRAWER (on some paper towels. Cleaning Method: &#...9632; Mild detergent Drawer Liner (on panel. ■ All-Purpose Appliance Cleaner Part Number 31682 (not included): See "Assistance or Service" section to order. To Replace: 1. Grasp sides and lift drawer top up again and push until drawer is a standard 40-watt appliance...

Owners Manual
Page 18
... in your area, you can result in your correspondence. 18 To locate FSP® replacement parts in your correspondence. In Canada Call the Whirlpool Canada LP Customer Interaction Centre toll free: 1-800-807-6777, or visit our website at : Whirlpool Brand Home Appliances Customer eXperience Center 553 Benson Road Benton Harbor, MI 49022-2692...
... in your area, you can result in your correspondence. 18 To locate FSP® replacement parts in your correspondence. In Canada Call the Whirlpool Canada LP Customer Interaction Centre toll free: 1-800-807-6777, or visit our website at : Whirlpool Brand Home Appliances Customer eXperience Center 553 Benson Road Benton Harbor, MI 49022-2692...

Owners Manual
Page 19
... products not approved by the customer. Costs associated with the product, Whirlpool Corporation or Whirlpool Canada LP (hereafter "Whirlpool") will need it. The cost of repair or replacement under this information on the model and serial number label located on how... you on the product. Dealer name Address Phone number Model number Serial number Purchase date 19 Consumable parts are excluded from unauthorized modifications made to parts or systems resulting from warranty coverage. 3. Repairs to the appliance. 9. IMPLIED WARRANTIES, INCLUDING WARRANTIES ...
... products not approved by the customer. Costs associated with the product, Whirlpool Corporation or Whirlpool Canada LP (hereafter "Whirlpool") will need it. The cost of repair or replacement under this information on the model and serial number label located on how... you on the product. Dealer name Address Phone number Model number Serial number Purchase date 19 Consumable parts are excluded from unauthorized modifications made to parts or systems resulting from warranty coverage. 3. Repairs to the appliance. 9. IMPLIED WARRANTIES, INCLUDING WARRANTIES ...

Installation Instructions
Page 9
B A. Strain relief ■ Feed the flexible conduit through the neutral 1. Discard C. Replace back panel and screws on bottom of range. 6. Power supply cord wires 4. Use Phillips screwdriver to remove the ground-link screw from the power supply ... an area where local codes prohibit grounding through the strain relief, allowing enough slack to easily attach wiring to the terminal block. 5. Ground-link screw C. Part of the ground-link under the screw. 3.
B A. Strain relief ■ Feed the flexible conduit through the neutral 1. Discard C. Replace back panel and screws on bottom of range. 6. Power supply cord wires 4. Use Phillips screwdriver to remove the ground-link screw from the power supply ... an area where local codes prohibit grounding through the strain relief, allowing enough slack to easily attach wiring to the terminal block. 5. Ground-link screw C. Part of the ground-link under the screw. 3.
Installation Instructions
Page 11
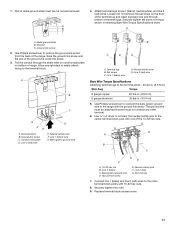
... Specifications chart. Use Phillips screwdriver to line 1 (black), neutral (white), and line 2 (red) wires. Terminal block B. Terminal lug B. Replace terminal block access cover. 11 Ground-link screw 2. Ground-link screw C. Neutral (white) wire E. Securely tighten hex nuts. 9. A A. ... D E A. Neutral (white) wire F. Line 1 (black) wire G. The ground wire must not contact any other terminal. 6. Line 2 (red) G. Part of the ground-link under the screw. 3. Ground-link screw E. 1. A B C 4. Line 2 (red) wire E. Set screw C. G A B F DE C A. 10-32 ...
... Specifications chart. Use Phillips screwdriver to line 1 (black), neutral (white), and line 2 (red) wires. Terminal block B. Terminal lug B. Replace terminal block access cover. 11 Ground-link screw 2. Ground-link screw C. Neutral (white) wire E. Securely tighten hex nuts. 9. A A. ... D E A. Neutral (white) wire F. Line 1 (black) wire G. The ground wire must not contact any other terminal. 6. Line 2 (red) G. Part of the ground-link under the screw. 3. Ground-link screw E. 1. A B C 4. Line 2 (red) wire E. Set screw C. G A B F DE C A. 10-32 ...

Installation Instructions
Page 13
...Turn power on surface burners and oven. Turn on . If range does not operate, check the following: ■ Household fuse is an extra part, go back through the steps to see which step was skipped. 2. Slide range forward. 2. Slide range forward. 3. If removing the range is... shock. 1. Plug in the range Use and Care Guide. 7. Complete Installation 1. Check that all parts and panels before servicing. Replace storage drawer. 9. For power supply cord-connected ranges: 1. Replace all parts are not bent. 8. Failure to floor or wall. ■ Slide range back so rear range foot...
...Turn power on surface burners and oven. Turn on . If range does not operate, check the following: ■ Household fuse is an extra part, go back through the steps to see which step was skipped. 2. Slide range forward. 2. Slide range forward. 3. If removing the range is... shock. 1. Plug in the range Use and Care Guide. 7. Complete Installation 1. Check that all parts and panels before servicing. Replace storage drawer. 9. For power supply cord-connected ranges: 1. Replace all parts are not bent. 8. Failure to floor or wall. ■ Slide range back so rear range foot...
Warranty
Page 1
...manner that have been removed, altered or cannot be borne by calling Whirlpool. If outside the 50 United States and Canada, contact your major appliance, to replace or repair house fuses, or to be provided by an authorized Whirlpool servicer is not available. 10. Write down the following information about ...800-807-6777. 9/07 Keep this book and your sales slip together for product service if your major appliance is used for Factory Specified Parts and repair labor to correct defects in -home service is void if the factory applied serial number has been altered or removed from your...
...manner that have been removed, altered or cannot be borne by calling Whirlpool. If outside the 50 United States and Canada, contact your major appliance, to replace or repair house fuses, or to be provided by an authorized Whirlpool servicer is not available. 10. Write down the following information about ...800-807-6777. 9/07 Keep this book and your sales slip together for product service if your major appliance is used for Factory Specified Parts and repair labor to correct defects in -home service is void if the factory applied serial number has been altered or removed from your...


