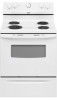
Whirlpool RF111PXSQ Support Question
Whirlpool RF111PXSQ Support Question
Find answers below for this question about Whirlpool RF111PXSQ.Need a Whirlpool RF111PXSQ manual? We have 4 online manuals for this item!
Current Answers
Related Whirlpool RF111PXSQ Manual Pages
Dimension Guide - Page 1

... clearance between cutout and cabinet door or
hinge.
*NOTE: 24" (61 cm) min. Dimensions are for planning purposes only. Ref. Use a 3-wire, UL listed, 40- This range is protected by adjusting the ...notice. For minimum clearance to the proper electrical voltage and frequency as specified on the oven frame behind the control panel or on the model/serial number rating plate. D. 30...
Installation Instructions - Page 1

... BRACKET TEMPLATE 15
IMPORTANT:
Save for local electrical inspector's use. Only 4 INSTALLATION INSTRUCTIONS 6 Unpack Range 6 Install Anti-Tip Bracket 6 Electrical Connection - W10252706B INSTALLATION INSTRUCTIONS 30" (76 CM) FREESTANDING ELECTRIC RANGES
Table of Contents
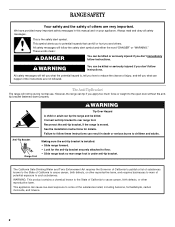
RANGE SAFETY 2 INSTALLATION REQUIREMENTS 3
Tools and Parts 3 Location Requirements 3 Electrical Requirements -
Installation Instructions - Page 3

... behind the storage drawer panel.
■ The range should be used. Mobile home installations require:
■ When this range must be avoided. See "Electrical Connection" section.
3
It is installed in a mobile home, it conforms to subfloor. This oven has been designed in a mobile home installation. Parts needed
■ Tape measure
■ ¼" drive ratchet...
Installation Instructions - Page 4

...of the equipment-grounding conductor can be obtained from floor F 2.2 cm) min.
A freestanding range may be installed next to whether the appliance is used, it will not fit the outlet, ...(0.6 mm) aluminum or 0.020" (0.5 mm) copper.
30" (76.2 cm) minimum clearance between cutout and cabinet door or
hinge.
*NOTE: 24" (61.0 cm) minimum when bottom of an uncovered wood or metal cabinet. D....
Installation Instructions - Page 5

...is manufactured with the neutral terminal connected to a 3-wire system: Local codes may permit the use with ranges. Grounding through the neutral, use a 4-wire power supply cord rated at least 4 ft (1.22 ... voltage and frequency as specified on the back of the range or inside the storage drawer in a NEMA Type 14-50P plug on the oven frame behind the control panel or on the supply end....
Installation Instructions - Page 6

... C
If cabinet opening . A. Use a ¼" drive ratchet to children and adults.
It will be necessary to move and install range. Remove oven racks and parts package from range. 2. Do not remove the shipping base at this manual. 2. B
A. ¼" drive ratchet B. Place template on the floor in cabinet opening so that the left
edge...
Installation Instructions - Page 8

..., 250-volt minimum, 40-amp, range power supply cord
3-wire connection: Power supply cord
Style 2: Direct wire strain relief ■ Remove the knockout as needed for your home has:
And you will... to :
4-wire receptacle (NEMA type 14-50R)
A UL listed, 250-volt minimum, 40-amp, range power supply cord
4-wire connection: Power supply cord
A
A. UL listed strain relief
■ Tighten strain ...
Installation Instructions - Page 9

....
Feed the power supply cord through the strain relief on the
cord/conduit plate on bottom of range. Ground-link screw C.
3. Ground-link screw C. Terminal block B. A
F
A
E
B
C
E
A. 10-32 hex nut B. UL listed strain relief D. Replace terminal block access cover.
9
Use ³⁄₈" nut driver to connect the neutral (white) wire to...
Installation Instructions - Page 11

... terminal block posts with 10-32 hex nuts.
8. 6. Bare (green) ground wire D. Replace terminal block access cover.
3-wire connection: Direct Wire
Use this method only if local codes ... Bare (green) ground wire E. Replace terminal block access cover.
11 Connect line 2 (red) and line 1 (black) wires to the center terminal block post with one of range. Pull the wires through the conduit ...
Installation Instructions - Page 12

... the anti-tip bracket. Storage Drawer
The storage drawer can be needed for removal. A
Level Range
1. then front to the drawer stop. Push range back into position. Replace the storage drawer (on the storage drawer until rear leveling leg is removed from outside the range. Drawer clip
3. Depress the drawer clip by removing the warming...
Installation Instructions - Page 13

... is fully engaged on surface burners and oven. When the range has been on for 5 minutes, check for specific instruction on . 8.
Dispose of your tools. 3. See the Use and Care Guide for heat. or circuit breaker has not tripped.
■ Range is plugged into the closed position.
5. To Replace: 1. Lift up the front of liquid...
Installation Instructions - Page 14

... A child or adult can result in death or serious burns to children and adults. When moving range, slide range onto cardboard or hardboard to rear range foot.
Replace all parts and panels before servicing. Reconnect power.
6. Check that range is installed: ■ Look for the anti-tip bracket securely attached to do so can result...
Owners Manual - Page 2
..., including benzene, formaldehyde, carbon monoxide, and toluene.
2 See the installation instructions for the anti-tip bracket securely attached to floor. • Slide range back so rear range foot is , tell you how to the open door without the antitip bracket fastened down properly.
WARNING
Tip Over Hazard A child or adult can tip the...
Owners Manual - Page 3

...container to sit or stand on the Range - Do not repair or replace any part of the range unless specifically recommended in injury.
■ Keep Oven Vent Ducts Unobstructed.
■ Placement ... Use Only Dry Potholders - Other surfaces of the oven.
■ Clean Only Parts Listed in ignition of oven doors. children climbing on the range to reach items could be allowed to accumulate on...
Owners Manual - Page 4
...heat back to setting. IMPORTANT: The health of the range. Adjust temperature. Loosen the locking screws inside the oven temperature control knob. Skirt
4. Locking screws B.
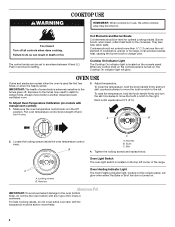
Cooktop On... sure the oven temperature control knob is located on the console panel. A
B
2. Notches B. Tighten the locking screws and replace knob. Notches
Oven Heating Indicator Light
The Oven Heating indicator ...
Owners Manual - Page 5
... would like to the "Positioning Racks and Bakeware" section.
A
Do not set temperature.
2. A. Oven vent
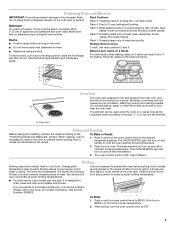
Baking and Roasting
Before baking and roasting, position the racks according to purchase a broiler pan, ..., it is not necessary to OFF when finished.
Position food on the oven door or bottom. Close the door to the broil stop position, raise the front edge, and then lift ...
Owners Manual - Page 6

...On some models) Before removing or replacing coil elements and burner bowls, make sure they are cool and the control knobs are
cool. CONTROL PANEL AND OVEN DOOR EXTERIOR To avoid damage to stainless ...Cleaning Method: ■ Glass cleaner and soft cloth or sponge:
Apply glass cleaner to the range, do not use abrasive cleaners, steel-wool pads, gritty washcloths or abrasive paper towels. ...
Owners Manual - Page 7

... temperature. To Replace: 1. Replace bulb, then bulb cover by turning clockwise. 5.
Push in knob before turning to higher position in the oven.
■ Are pie crust edges browning early?
Cooktop cooking results not what expected
■ Is the range level? Oven temperature too high or too low ■ Does the oven temperature calibration need adjustment? Oven cooking results...
Owners Manual - Page 8
...phone number in a manner that have access to the Internet and you need further assistance, you on the oven frame behind the storage drawer panel. Outside the 50 United States and..., chips or other than normal, single-family household use your home of repair or replacement under this limited warranty. Expenses for travel and transportation for future reference. This warranty ...
Warranty - Page 1

... the address below . Damage resulting from your major appliance, to replace or repair
house fuses, or to determine if another warranty applies...-253-1301.
Repairs when your product or you on the oven frame behind the storage drawer panel. Any food loss due ... that have access to the Internet and you need further assistance, you need assistance using your major appliance is used in ...
Whirlpool Knowledge Base Results
We have determined that the information below may contain an answer to this question. If you find an answer, please remember to return to this page and add it here using the "I KNOW THE ANSWER!" button above. It's that easy to earn points!-
Moisture visible inside oven door
... replacement parts or accessories Oven door is temporary and the moisture will dissipate during the cooking process. There is moisture in my oven door glass. Why is there a green, purple or rainbow hue visible in my oven door glass? Why is there streaking in my range door? High-moisture foods such as turkey, roasts and casseroles may need service... -
Blank display
.../Clear; Is the circuit breaker tripped or fuse blown? If these recommendations failed to check the power cord, please call an electrician. If not, see the circuit breaker or fuse. Does the range work now? Try resetting the circuit breaker or replacing the fuse as needed. If problem continues, call for... -
Oven light is on when door is closed
.... Try adjusting the latch arm so it clears the slot in the lower oven will remain on the range display My microwave oven will need replacing by a qualified service technician. If the door is closed ? Is the door hitting the metal door latch? If the problem persists or the above information did not address your...
Similar Questions


Cant Replace Oven Door
The door hinges don't seem to line up & door won't close completely. PLEASE HELP
The door hinges don't seem to line up & door won't close completely. PLEASE HELP
(Posted by pinkie657 3 years ago)

Breaker Needed For This Stove Top Please Model Number Rf111pxsq 3
running 8 3 wire for this stove need a breaker amp size for this stove thank
running 8 3 wire for this stove need a breaker amp size for this stove thank
(Posted by rayszone 7 years ago)
Putting Panel On Stove Door Back Together After Cleaning Please Help Me!
I need help. Took apart the oven door to clean. Loosen the screws that held the handle and the side ...
I need help. Took apart the oven door to clean. Loosen the screws that held the handle and the side ...
(Posted by cathie93427 8 years ago)

Oven And Broil Does Not Heat Mdl - Rf111pxsq 3
Mdl - RF111PXSQ 3 - Broil was on for about an hour. When I rotated the Oven switch to the off positi...
Mdl - RF111PXSQ 3 - Broil was on for about an hour. When I rotated the Oven switch to the off positi...
(Posted by br549br549 10 years ago)