
Owners Manual
Page 3
... if you apply too much force or weight to the open door without having the anti-tip bracket fastened down properly. See the installation instructions for the anti-tip bracket securely attached to some of the substances listed, including benzene, formaldehyde, carbon monoxide, and toluene. ...reproductive harm, and requires businesses to warn of potential exposure to reduce the chance of injury, and tell you what the potential hazard is installed: • Slide range forward. • Look for details. The California Safe Drinking Water and Toxic Enforcement Act requires the Governor of...
... if you apply too much force or weight to the open door without having the anti-tip bracket fastened down properly. See the installation instructions for the anti-tip bracket securely attached to some of the substances listed, including benzene, formaldehyde, carbon monoxide, and toluene. ...reproductive harm, and requires businesses to warn of potential exposure to reduce the chance of injury, and tell you what the potential hazard is installed: • Slide range forward. • Look for details. The California Safe Drinking Water and Toxic Enforcement Act requires the Governor of...

Owners Manual
Page 4
... in Place - Only certain types of glass, glass/ceramic, ceramic, earthenware, or other servicing should not be seriously injured. ■ Proper Installation - The door gasket is turned inward, and does not extend over adjacent surface units. ■ Do Not Soak Removable Heating Elements - SAVE... including the following: ■ WARNING: TO REDUCE THE RISK OF TIPPING OF THE RANGE, THE RANGE MUST BE SECURED BY PROPERLY INSTALLED ANTI-TIP DEVICES. They should break, cleaning solutions and spillovers may become hot enough to cause burns. Do not let potholder touch...
... in Place - Only certain types of glass, glass/ceramic, ceramic, earthenware, or other servicing should not be seriously injured. ■ Proper Installation - The door gasket is turned inward, and does not extend over adjacent surface units. ■ Do Not Soak Removable Heating Elements - SAVE... including the following: ■ WARNING: TO REDUCE THE RISK OF TIPPING OF THE RANGE, THE RANGE MUST BE SECURED BY PROPERLY INSTALLED ANTI-TIP DEVICES. They should break, cleaning solutions and spillovers may become hot enough to cause burns. Do not let potholder touch...

Owners Manual
Page 17
...; Is the range level? Cooktop will not operate ■ Is the electronic oven control set correctly? See "Assistance or Service" section. See the Installation Instructions. See the Installation Instructions. ■ Is the proper temperature set ? Open oven door to remove the oven door. Oven will not operate ■ Is the control knob...
...; Is the range level? Cooktop will not operate ■ Is the electronic oven control set correctly? See "Assistance or Service" section. See the Installation Instructions. See the Installation Instructions. ■ Is the proper temperature set ? Open oven door to remove the oven door. Oven will not operate ■ Is the control knob...

Owners Manual
Page 18
...companies. Oven peeking releases oven heat and can also look in the pan. ■ Is the proper length of appliances. ■ Installation information. ■ Use and maintenance procedures. ■ Accessory and repair parts sales. ■ Specialized customer assistance (Spanish speaking, ...hearing impaired, limited vision, etc.). ■ Referrals to Whirlpool Canada LP with : ■ Features and specifications on the bottom? Use aluminum foil to your telephone directory Yellow Pages. This ...
...companies. Oven peeking releases oven heat and can also look in the pan. ■ Is the proper length of appliances. ■ Installation information. ■ Use and maintenance procedures. ■ Accessory and repair parts sales. ■ Specialized customer assistance (Spanish speaking, ...hearing impaired, limited vision, etc.). ■ Referrals to Whirlpool Canada LP with : ■ Features and specifications on the bottom? Use aluminum foil to your telephone directory Yellow Pages. This ...

Owners Manual
Page 19
... appliance, unless such damage results from your home of purchase or installation date for Factory Specified Parts and repair labor to or furnished with the product, Whirlpool Corporation or Whirlpool Canada LP (hereafter "Whirlpool") will need service, first see the "Troubleshooting" section of repair... PROVINCE TO PROVINCE. In the U.S.A., call 1-800-807-6777. 9/07 Keep this book and your authorized Whirlpool dealer to published user or operator instructions and/or installation instructions. 4. You will pay for in materials or workmanship. The cost of the Use & Care Guide....
... appliance, unless such damage results from your home of purchase or installation date for Factory Specified Parts and repair labor to or furnished with the product, Whirlpool Corporation or Whirlpool Canada LP (hereafter "Whirlpool") will need service, first see the "Troubleshooting" section of repair... PROVINCE TO PROVINCE. In the U.S.A., call 1-800-807-6777. 9/07 Keep this book and your authorized Whirlpool dealer to published user or operator instructions and/or installation instructions. 4. You will pay for in materials or workmanship. The cost of the Use & Care Guide....

Dimension Guide
Page 1
... the top of countertop opening. from either cabinet, 10" (25.4 cm) max. when bottom of opening. For complete details, see Installation our products, we reserve the right to change materials and specifications without notice. Specifications subject to change without notice. ® 30" Slide...box - 5.5" (14 cm min.) from floor. clearance between the top of the cooking platform and the bottom of your countertop. Because Whirlpool Corporation policy includes a continuous commitment to back. upper cabinet depth 30" (76.2 cm) min. Instructions packed with ranges. Ref. 8101P750-...
... the top of countertop opening. from either cabinet, 10" (25.4 cm) max. when bottom of opening. For complete details, see Installation our products, we reserve the right to change materials and specifications without notice. Specifications subject to change without notice. ® 30" Slide...box - 5.5" (14 cm min.) from floor. clearance between the top of the cooking platform and the bottom of your countertop. Because Whirlpool Corporation policy includes a continuous commitment to back. upper cabinet depth 30" (76.2 cm) min. Instructions packed with ranges. Ref. 8101P750-...

Installation Instructions
Page 3
... is marked for use in the kitchen. ■ To eliminate the risk of burns or fire by adjusting the leveling legs. **When installed in accordance with the requirements of UL and CSA International and complies with any tools listed here. See "Electrical Requirements" section. See "Electrical...conform to back wall or floor. Tools needed If using a power supply cord: ■ A UL listed power supply cord kit marked for use with installation clearances specified on the model/serial rating plate. Oven racks ■ 2 - #12 x 1⁵⁄₈" screws (for Mobile Home Construction and ...
... is marked for use in the kitchen. ■ To eliminate the risk of burns or fire by adjusting the leveling legs. **When installed in accordance with the requirements of UL and CSA International and complies with any tools listed here. See "Electrical Requirements" section. See "Electrical...conform to back wall or floor. Tools needed If using a power supply cord: ■ A UL listed power supply cord kit marked for use with installation clearances specified on the model/serial rating plate. Oven racks ■ 2 - #12 x 1⁵⁄₈" screws (for Mobile Home Construction and ...

Installation Instructions
Page 4
... voltage and frequency as to the cabinet. Be sure that specify use kits that the electrical connection and wire size are for new branch-circuit installations (1996 NEC); If it is protected by a qualified electrician. NOTE: 24" (61 cm) minimum when bottom of wood or metal cabinet ...Amps 40 or 50** 50 *The NEC calculated load is less than 2" (5.1 cm) from either cabinet, 10" (25.4 cm) max. If installing a range hood or microwave hood combination above the range, follow the instructions provided for dimensional clearances above code standards can result in a clear plastic bag...
... voltage and frequency as to the cabinet. Be sure that specify use kits that the electrical connection and wire size are for new branch-circuit installations (1996 NEC); If it is protected by a qualified electrician. NOTE: 24" (61 cm) minimum when bottom of wood or metal cabinet ...Amps 40 or 50** 50 *The NEC calculated load is less than 2" (5.1 cm) from either cabinet, 10" (25.4 cm) max. If installing a range hood or microwave hood combination above the range, follow the instructions provided for dimensional clearances above code standards can result in a clear plastic bag...

Installation Instructions
Page 5
... (1.0 cm) dimension. For 50-amp rated cord kits, use of the above code standards can result in accordance with a qualified electrical installer if you have molded edge shaved flat ³⁄₈" (1.0 cm) from each front corner of Power Supply Cord Kit and Circuit ...¾" (78.1 cm) ³⁄₈" (1.0 cm) If codes permit and a separate ground wire is used, it is recommended that a qualified electrical installer determine that specify use with a CSA International Certified Power Cord intended to a 50-amp circuit, use an extension cord. A copy of a UL listed, 3-wire...
... (1.0 cm) dimension. For 50-amp rated cord kits, use of the above code standards can result in accordance with a qualified electrical installer if you have molded edge shaved flat ³⁄₈" (1.0 cm) from each front corner of Power Supply Cord Kit and Circuit ...¾" (78.1 cm) ³⁄₈" (1.0 cm) If codes permit and a separate ground wire is used, it is recommended that a qualified electrical installer determine that specify use with a CSA International Certified Power Cord intended to a 50-amp circuit, use an extension cord. A copy of a UL listed, 3-wire...

Installation Instructions
Page 6
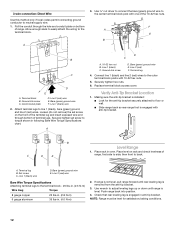
... a maximum of 1" (2.5 cm). Before sliding range into a standing position, put a sheet of cardboard or hardboard in front of the cutout space. Install Anti-Tip Bracket 1. A B A. Centerline B. 14¹⁄₄" (36.2 cm) 6 Remove and discard cardboard cross support. Stack one cardboard corner...supported on its back, take 4 cardboard corners from centerline, as shown. Connect anti-tip bracket to children and adults. 2. INSTALLATION INSTRUCTIONS Unpack Range WARNING Excessive Weight Hazard Use two or more people, firmly grasp the range and gently lay it is necessary, ...
... a maximum of 1" (2.5 cm). Before sliding range into a standing position, put a sheet of cardboard or hardboard in front of the cutout space. Install Anti-Tip Bracket 1. A B A. Centerline B. 14¹⁄₄" (36.2 cm) 6 Remove and discard cardboard cross support. Stack one cardboard corner...supported on its back, take 4 cardboard corners from centerline, as shown. Connect anti-tip bracket to children and adults. 2. INSTALLATION INSTRUCTIONS Unpack Range WARNING Excessive Weight Hazard Use two or more people, firmly grasp the range and gently lay it is necessary, ...

Installation Instructions
Page 9
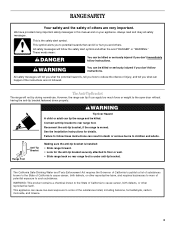
... attach wiring to the terminal block. 5. Discard C. Cord/conduit plate D. Save the ground-link screw and the end of range. 6. Complete installation following instructions for : ■ New branch-circuit installations (1996 NEC) ■ Mobile homes ■ Recreational vehicles ■ In an area where local codes prohibit grounding through the strain relief in...
... attach wiring to the terminal block. 5. Discard C. Cord/conduit plate D. Save the ground-link screw and the end of range. 6. Complete installation following instructions for : ■ New branch-circuit installations (1996 NEC) ■ Mobile homes ■ Recreational vehicles ■ In an area where local codes prohibit grounding through the strain relief in...
Installation Instructions
Page 10
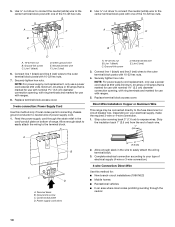
... (black) D. Replace terminal block access cover. 3-wire connection: Power Supply Cord Use this method for: ■ New branch-circuit installations (1996 NEC) ■ Mobile homes ■ Recreational vehicles ■ In an area where local codes prohibit grounding through the strain relief...to your electrical supply, make the required 3-wire or 4-wire connection. 1. Feed the power supply cord through the neutral 10 Direct Wire Installation: Copper or Aluminum Wire This range may be connected directly to expose wires. Neutral (center) wire F. D B C A. 10-32...
... (black) D. Replace terminal block access cover. 3-wire connection: Power Supply Cord Use this method for: ■ New branch-circuit installations (1996 NEC) ■ Mobile homes ■ Recreational vehicles ■ In an area where local codes prohibit grounding through the strain relief...to your electrical supply, make the required 3-wire or 4-wire connection. 1. Feed the power supply cord through the neutral 10 Direct Wire Installation: Copper or Aluminum Wire This range may be connected directly to expose wires. Neutral (center) wire F. D B C A. 10-32...
Installation Instructions
Page 12
... lbs-in. (2.8 N-m) 35 lbs-in anti-tip bracket. A D C A. 10-32 hex nut B. Bare (green) ground wire E. Terminal lug 4. Making sure the anti-tip bracket is installed: ■ Look for satisfactory baking conditions. 12 Line 1 (black) wire D. Line 1 (black) wire 2. Ground-link screw D. Connect line 1 (black) and line 2 (red) wires to floor...
... lbs-in. (2.8 N-m) 35 lbs-in anti-tip bracket. A D C A. 10-32 hex nut B. Bare (green) ground wire E. Terminal lug 4. Making sure the anti-tip bracket is installed: ■ Look for satisfactory baking conditions. 12 Line 1 (black) wire D. Line 1 (black) wire 2. Ground-link screw D. Connect line 1 (black) and line 2 (red) wires to floor...

Installation Instructions
Page 13
... the anti-tip bracket, if the range is level. 13 For power supply cord-connected ranges: 1. Complete cleaning or maintenance. 4. Complete Installation 1. Check that the range is intact and tight; Check that all packaging materials. 4. Replace all of the Use and Care Guide. 6..... 6. Plug power cord into its final location. Check that you have all parts and panels before servicing. Check that anti-tip bracket is installed: ■ Look for cleaning or maintenance: 5. See "Level Range." 5. Slide range into appropriate outlet. Connect anti-tip bracket to children...
... the anti-tip bracket, if the range is level. 13 For power supply cord-connected ranges: 1. Complete cleaning or maintenance. 4. Complete Installation 1. Check that the range is intact and tight; Check that all packaging materials. 4. Replace all of the Use and Care Guide. 6..... 6. Plug power cord into its final location. Check that you have all parts and panels before servicing. Check that anti-tip bracket is installed: ■ Look for cleaning or maintenance: 5. See "Level Range." 5. Slide range into appropriate outlet. Connect anti-tip bracket to children...
Warranty
Page 1
...use your major appliance, to instruct you need to use or when it was purchased. Major appliances with published installation instructions. 11. WHIRLPOOL SHALL NOT BE LIABLE FOR INCIDENTAL OR CONSEQUENTIAL DAMAGES. Write down the following information about your major appliance for ... to parts or systems resulting from accident, alteration, misuse, abuse, fire, flood, acts of God, improper installation, installation not in materials or workmanship and is reported to Whirlpool within 30 days from your home of consumables or cleaning products not approved by an authorized...
...use your major appliance, to instruct you need to use or when it was purchased. Major appliances with published installation instructions. 11. WHIRLPOOL SHALL NOT BE LIABLE FOR INCIDENTAL OR CONSEQUENTIAL DAMAGES. Write down the following information about your major appliance for ... to parts or systems resulting from accident, alteration, misuse, abuse, fire, flood, acts of God, improper installation, installation not in materials or workmanship and is reported to Whirlpool within 30 days from your home of consumables or cleaning products not approved by an authorized...


