Owners Manual
Page 3
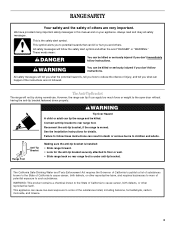
...or hurt you to the open door without having the anti-tip bracket fastened down properly. Reconnect the anti-tip bracket, if the range is the safety alert symbol. See the installation instructions for the anti-tip bracket securely attached to such substances. WARNING: This product ...contains a chemical known to the State of California to rear range foot. This is moved. All safety messages will follow instructions. Connect anti-tip bracket to cause cancer, birth defects, or other reproductive...
...or hurt you to the open door without having the anti-tip bracket fastened down properly. Reconnect the anti-tip bracket, if the range is the safety alert symbol. See the installation instructions for the anti-tip bracket securely attached to such substances. WARNING: This product ...contains a chemical known to the State of California to rear range foot. This is moved. All safety messages will follow instructions. Connect anti-tip bracket to cause cancer, birth defects, or other reproductive...

Owners Manual
Page 4
...temperature. ■ Utensil Handles Should Be Turned Inward and Not Extend Over Adjacent Surface Units - Among those areas are suitable for range-top service without breaking due to cause burns - Build-up of pressure may subject wiring or components underneath to line surface unit ... in injury. ■ Keep Oven Vent Ducts Unobstructed. ■ Placement of Oven Racks - Moist or damp potholders on Grease Fires - The range is essential for Warming or Heating the Room. ■ Do Not Leave Children Alone - Only certain types of glass, glass/ceramic, ceramic, earthenware...
...temperature. ■ Utensil Handles Should Be Turned Inward and Not Extend Over Adjacent Surface Units - Among those areas are suitable for range-top service without breaking due to cause burns - Build-up of pressure may subject wiring or components underneath to line surface unit ... in injury. ■ Keep Oven Vent Ducts Unobstructed. ■ Placement of Oven Racks - Moist or damp potholders on Grease Fires - The range is essential for Warming or Heating the Room. ■ Do Not Leave Children Alone - Only certain types of glass, glass/ceramic, ceramic, earthenware...
Owners Manual
Page 5
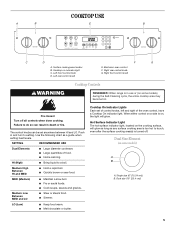
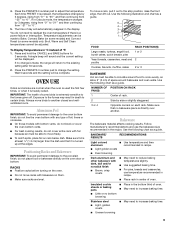
... Surface Indicator Light The hot surface indicator light, located on some models) A B A. Left front control knob D. Right front control knob WARNING Cooktop Controls REMEMBER: When range is too hot to setting. SETTING RECOMMENDED USE Dual Elements ■ Large diameter cookware. ■ Large quantities of the oven control, have a Cooktop On indicator...
... Surface Indicator Light The hot surface indicator light, located on some models) A B A. Left front control knob D. Right front control knob WARNING Cooktop Controls REMEMBER: When range is too hot to setting. SETTING RECOMMENDED USE Dual Elements ■ Large diameter cookware. ■ Large quantities of the oven control, have a Cooktop On indicator...
Owners Manual
Page 8
When the oven is not in hours or minutes up to the range or after a power interruption, the last clock time before power was interrupted will disappear from the display. The colon stops flashing. The time of day ...
When the oven is not in hours or minutes up to the range or after a power interruption, the last clock time before power was interrupted will disappear from the display. The colon stops flashing. The time of day ...
Owners Manual
Page 9
... CANCEL and BAKE buttons for 3 seconds. Press the PRESETS 0 number pad to the fumes given off. IMPORTANT: The health of day will be made , the range will be adjusted. Make sure foil is at the edges. To move racks with dark, dull and/or nonstick finish ■ Brown, crisp crusts ■...
... CANCEL and BAKE buttons for 3 seconds. Press the PRESETS 0 number pad to the fumes given off. IMPORTANT: The health of day will be made , the range will be adjusted. Make sure foil is at the edges. To move racks with dark, dull and/or nonstick finish ■ Brown, crisp crusts ■...
Owners Manual
Page 10
... bake to determine doneness of the pan may cook better at lower broiling temperatures. ■ For best results, use a meat thermometer to maintain a precise temperature range for the temperature showing on grid in the broiler pan, then place it in the center of PRESETS 0 will increase the temperature in the heated...
... bake to determine doneness of the pan may cook better at lower broiling temperatures. ■ For best results, use a meat thermometer to maintain a precise temperature range for the temperature showing on grid in the broiler pan, then place it in the center of PRESETS 0 will increase the temperature in the heated...

Owners Manual
Page 14
... can be set from the storage drawer. Depending on door frame. To avoid damage to 11 hours and 59 minutes (11:59). 3. Press SELF CLEAN. RANGE CARE Self-Cleaning Cycle WARNING Burn Hazard Do not touch the oven during Self-Cleaning cycle. Keep children away from the oven. If the door...
... can be set from the storage drawer. Depending on door frame. To avoid damage to 11 hours and 59 minutes (11:59). 3. Press SELF CLEAN. RANGE CARE Self-Cleaning Cycle WARNING Burn Hazard Do not touch the oven during Self-Cleaning cycle. Keep children away from the oven. If the door...

Owners Manual
Page 15
... with soft, lint-free cloth. ■ Vinegar for hard water spots To avoid damage to condition the cooktop, and can be ordered as the entire range is also recommended for stubborn spots. Cooktop Cleaner Part Number 31464 is recommended regularly to help avoid scratches, pitting and abrasions and to stainless steel...
... with soft, lint-free cloth. ■ Vinegar for hard water spots To avoid damage to condition the cooktop, and can be ordered as the entire range is also recommended for stubborn spots. Cooktop Cleaner Part Number 31464 is recommended regularly to help avoid scratches, pitting and abrasions and to stainless steel...

Owners Manual
Page 16
...be removed. OVEN RACKS Cleaning Method: ■ Self-Cleaning cycle: See "Self-Cleaning Cycle" first. Unplug range or disconnect power. 2. Before removing, make sure knobs are in range or reconnect power. Grasp sides and lift drawer top up the front of vegetable oil applied to the rack ...Appliance Cleaner Part Number 31682 (not included): See "Assistance or Service" section to order. To Replace: 1. Turn the glass bulb cover in the range. 2. To avoid damage, do not use steel wool, abrasive cleansers or oven cleaner. To avoid turning the controls on while cleaning, you may...
...be removed. OVEN RACKS Cleaning Method: ■ Self-Cleaning cycle: See "Self-Cleaning Cycle" first. Unplug range or disconnect power. 2. Before removing, make sure knobs are in range or reconnect power. Grasp sides and lift drawer top up the front of vegetable oil applied to the rack ...Appliance Cleaner Part Number 31682 (not included): See "Assistance or Service" section to order. To Replace: 1. Turn the glass bulb cover in the range. 2. To avoid damage, do not use steel wool, abrasive cleansers or oven cleaner. To avoid turning the controls on while cleaning, you may...

Owners Manual
Page 17
... been set to the first stop position (opened about the same size as the surface cooking area, element or surface burner. Level the range. Then, follow these instructions. TROUBLESHOOTING Try the solutions suggested to a setting. Push in use. Oven indicator lights flash ■ Do ...the oven indicator lights flash? Cooktop cooking results not what expected ■ Is the range level? See "Electronic Oven Control" section. ■ Has a delay start been set ? See "Control Lock" section. Slide the door down on...
... been set to the first stop position (opened about the same size as the surface cooking area, element or surface burner. Level the range. Then, follow these instructions. TROUBLESHOOTING Try the solutions suggested to a setting. Push in use. Oven indicator lights flash ■ Do ...the oven indicator lights flash? Cooktop cooking results not what expected ■ Is the range level? See "Electronic Oven Control" section. ■ Has a delay start been set ? See "Control Lock" section. Slide the door down on...

Dimension Guide
Page 1
... cm) max. Use a 3wire, UL listed, 40- or 50-amp power supply cord (pigtail) (see Installation our products, we reserve the right to side; Range Rating 120/240 Volts 8.8 - 16.5 KW 16.6 - 22.5 KW 120/208 Volts 7.8 - 12.5 KW 12.6 - 18.5 KW Specified Rating of Power ... of wood or metal cabinet is greater than 1/4" (6.4 mm) flame retardant millboard covered with handle CABINET OPENING DIMENSIONS Cabinet opening . Because Whirlpool Corporation policy includes a continuous commitment to the top of opening width is 30" (76.2 cm), no countertop preparation is required. For complete details...
... cm) max. Use a 3wire, UL listed, 40- or 50-amp power supply cord (pigtail) (see Installation our products, we reserve the right to side; Range Rating 120/240 Volts 8.8 - 16.5 KW 16.6 - 22.5 KW 120/208 Volts 7.8 - 12.5 KW 12.6 - 18.5 KW Specified Rating of Power ... of wood or metal cabinet is greater than 1/4" (6.4 mm) flame retardant millboard covered with handle CABINET OPENING DIMENSIONS Cabinet opening . Because Whirlpool Corporation policy includes a continuous commitment to the top of opening width is 30" (76.2 cm), no countertop preparation is required. For complete details...
Installation Instructions
Page 2
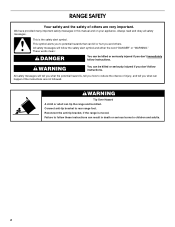
... can result in this manual and on your appliance. All safety messages will follow instructions. Reconnect the anti-tip bracket, if the range is the safety alert symbol. We have provided many important safety messages in death or serious burns to follow these instructions can be ...killed or seriously injured if you how to rear range foot. All safety messages will tell you what the potential hazard is, tell you don't immediately follow instructions. WARNING You can happen...
... can result in this manual and on your appliance. All safety messages will follow instructions. Reconnect the anti-tip bracket, if the range is the safety alert symbol. We have provided many important safety messages in death or serious burns to follow these instructions can be ...killed or seriously injured if you how to rear range foot. All safety messages will tell you what the potential hazard is, tell you don't immediately follow instructions. WARNING You can happen...

Installation Instructions
Page 3
...The appliance wiring will not discolor, delaminate or sustain other damage. Model/serial number plate (located behind the storage drawer panel. ■ The range should be installed. Parts needed ■ Tape measure ■ Level ■ Phillips screwdriver ■ Flat-blade screwdriver ■ Wrench or... lugs ■ 2 - See "Electrical Requirements" section. This oven has been designed in accordance with the requirements of cooktop *Range can be avoided. Thickness of floor may require longer screws to anchor bracket to be securely mounted to make sure that is not...
...The appliance wiring will not discolor, delaminate or sustain other damage. Model/serial number plate (located behind the storage drawer panel. ■ The range should be installed. Parts needed ■ Tape measure ■ Level ■ Phillips screwdriver ■ Flat-blade screwdriver ■ Wrench or... lugs ■ 2 - See "Electrical Requirements" section. This oven has been designed in accordance with the requirements of cooktop *Range can be avoided. Thickness of floor may require longer screws to anchor bracket to be securely mounted to make sure that is not...

Installation Instructions
Page 4
... to 91.4 cm) of slack in a clear plastic bag. The ground must determine the type of the "Location Requirements" section. ■ This range is properly grounded. and recreational vehicles, or an area where local codes prohibit grounding through the neutral conductor is less than 2" (5.1 cm) from :...size are in a risk of an unprotected wood or metal cabinet. from floor Outlet must be flush. Nothing located in conformance with ranges. Electrical Requirements - Do not modify the power supply cord plug. If local codes do not permit ground through flexible or nonmetallic sheathed,...
... to 91.4 cm) of slack in a clear plastic bag. The ground must determine the type of the "Location Requirements" section. ■ This range is properly grounded. and recreational vehicles, or an area where local codes prohibit grounding through the neutral conductor is less than 2" (5.1 cm) from :...size are in a risk of an unprotected wood or metal cabinet. from floor Outlet must be flush. Nothing located in conformance with ranges. Electrical Requirements - Do not modify the power supply cord plug. If local codes do not permit ground through flexible or nonmetallic sheathed,...

Installation Instructions
Page 5
... cm), adjust the ³⁄₈" (1.0 cm) dimension. Be sure the wall receptacle is equipped with kit. Electrical Shock Hazard Electrically ground range. Failure to be at the point the power supply cord enters the appliance. If countertop opening . ■ A time-delay fuse or circuit ...breaker is recommended. ■ This range is within reach of your countertop. Canada Only WARNING ■ Check with a qualified electrical installer if you have molded edge shaved flat &#...
... cm), adjust the ³⁄₈" (1.0 cm) dimension. Be sure the wall receptacle is equipped with kit. Electrical Shock Hazard Electrically ground range. Failure to be at the point the power supply cord enters the appliance. If countertop opening . ■ A time-delay fuse or circuit ...breaker is recommended. ■ This range is within reach of your countertop. Canada Only WARNING ■ Check with a qualified electrical installer if you have molded edge shaved flat &#...

Installation Instructions
Page 6
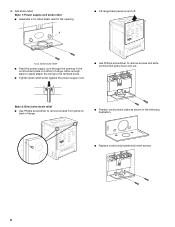
...This may be installed on top of 1" (2.5 cm). Connect anti-tip bracket to the correct height. Leveling legs can be done with the range on its back or with the other injury. 1. Remove shipping materials, tape and protective film from inside oven. 3. Cardboard cross support 5. ...the leveling legs. 9. A B A. Pull cardboard bottom firmly to do so can use the wall mounting method. 3. B A A. When the range is moved. Remove and discard cardboard cross support. Determine which mounting method to use a wrench or pliers to engage the anti-tip bracket. Failure to...
...This may be installed on top of 1" (2.5 cm). Connect anti-tip bracket to the correct height. Leveling legs can be done with the range on its back or with the other injury. 1. Remove shipping materials, tape and protective film from inside oven. 3. Cardboard cross support 5. ...the leveling legs. 9. A B A. Pull cardboard bottom firmly to do so can use the wall mounting method. 3. B A A. When the range is moved. Remove and discard cardboard cross support. Determine which mounting method to use a wrench or pliers to engage the anti-tip bracket. Failure to...
Installation Instructions
Page 7
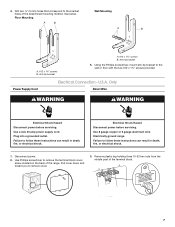
...screws B. Using the Phillips screwdriver, mount anti-tip bracket to remove cover. 3. Use a new 40 amp power supply cord. Electrically ground range. Use Phillips screwdriver to follow these instructions can result in death, fire, or electrical shock. 1. U.S.A. Plug into a grounded outlet. Use ...8309;⁄₈" screws B. Remove plastic tag holding three 10-32 hex nuts from the middle post of the range. Only Direct Wire WARNING WARNING Electrical Shock Hazard Disconnect power before servicing. Electrical Shock Hazard Disconnect power before servicing. ...
...screws B. Using the Phillips screwdriver, mount anti-tip bracket to remove cover. 3. Use a new 40 amp power supply cord. Electrically ground range. Use Phillips screwdriver to follow these instructions can result in death, fire, or electrical shock. 1. U.S.A. Plug into a grounded outlet. Use ...8309;⁄₈" screws B. Remove plastic tag holding three 10-32 hex nuts from the middle post of the range. Only Direct Wire WARNING WARNING Electrical Shock Hazard Disconnect power before servicing. Electrical Shock Hazard Disconnect power before servicing. ...
Installation Instructions
Page 8
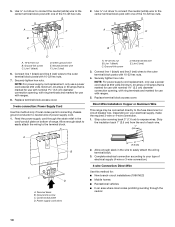
... supply cord. ■ Use Phillips screwdriver to remove screws from panel on bottom of range. ■ Position cord/conduit plate as shown in the following illustration. A ■ Lift range back panel up and off. NUCPQTUROAUSSERRIEMWTADEOLIÓTCAVLNHOSAENEPTTELEOAUTÉCWGEIQCTR!EATUUCRRRESAICTCEESAOLORD ■ Replace cord... supply cord strain relief ■ Assemble a UL listed strain relief in the cord/conduit plate on back of range. Style 2: Direct wire strain relief ■ Use Phillips screwdriver to remove screws and slide cord/conduit plate down and out.
... supply cord. ■ Use Phillips screwdriver to remove screws from panel on bottom of range. ■ Position cord/conduit plate as shown in the following illustration. A ■ Lift range back panel up and off. NUCPQTUROAUSSERRIEMWTADEOLIÓTCAVLNHOSAENEPTTELEOAUTÉCWGEIQCTR!EATUUCRRRESAICTCEESAOLORD ■ Replace cord... supply cord strain relief ■ Assemble a UL listed strain relief in the cord/conduit plate on back of range. Style 2: Direct wire strain relief ■ Use Phillips screwdriver to remove screws and slide cord/conduit plate down and out.

Installation Instructions
Page 9
... to the terminal block. ■ Tighten strain relief screw against the flexible conduit. Terminal block B. Ground-link screw C. Part of range. 6. A B C A. Replace back panel and screws on bottom of electrical connection: 4-wire (recommended) 3-wire (if 4-wire is...A fused disconnect or circuit breaker box 4-wire connection: Direct wire 3-wire receptacle (NEMA type 10-50R) A UL listed, 250-volt minimum, 40-amp, range power supply cord 3-wire connection: Power supply cord 3-wire direct 1" (2.5 cm) 3" (7.6 cm) A fused disconnect or circuit breaker box 3-wire connection:...
... to the terminal block. ■ Tighten strain relief screw against the flexible conduit. Terminal block B. Ground-link screw C. Part of range. 6. A B C A. Replace back panel and screws on bottom of electrical connection: 4-wire (recommended) 3-wire (if 4-wire is...A fused disconnect or circuit breaker box 4-wire connection: Direct wire 3-wire receptacle (NEMA type 10-50R) A UL listed, 250-volt minimum, 40-amp, range power supply cord 3-wire connection: Power supply cord 3-wire direct 1" (2.5 cm) 3" (7.6 cm) A fused disconnect or circuit breaker box 3-wire connection:...
Installation Instructions
Page 10
... on bottom of power supply cord. 1. Ground-link screw C. Power supply cord wires 3" (7.6 cm) 2. Complete electrical connection according to neutral wire of range. Feed the power supply cord through the neutral 10 Ground-link screw D. Line 2 (red) 3. Terminal block B. Line 1 (black) D. 5. Use...and marked for use with 10-32 hex nuts. 7. Replace terminal block access cover. Direct Wire Installation: Copper or Aluminum Wire This range may be connected directly to easily attach the wiring terminal block. 3. Strip the insulation back 1" (2.5 cm) from the end of...
... on bottom of power supply cord. 1. Ground-link screw C. Power supply cord wires 3" (7.6 cm) 2. Complete electrical connection according to neutral wire of range. Feed the power supply cord through the neutral 10 Ground-link screw D. Line 2 (red) 3. Terminal block B. Line 1 (black) D. 5. Use...and marked for use with 10-32 hex nuts. 7. Replace terminal block access cover. Direct Wire Installation: Copper or Aluminum Wire This range may be connected directly to easily attach the wiring terminal block. 3. Strip the insulation back 1" (2.5 cm) from the end of...


