Use & Care Guide
Page 1
... information. In Canada, visit our website at www.whirlpool.ca or call us at 1-800-253-1301. Table of Contents / Índice / Table des matières REFRIGERATOR SAFETY 1 INSTALLATION INSTRUCTIONS 2 REFRIGERATOR USE 11 REFRIGERATOR CARE 13 TROUBLESHOOTING 14 WATER FILTER CERTIFICATIONS 16 PERFORMANCE ... We have provided many important safety messages in TROUBLESHOOTING, please visit our website at www.whirlpool.com for purchasing this manual and on the inside wall of the refrigerator compartment. This symbol alerts you to reduce the chance of others . If you and ...
... information. In Canada, visit our website at www.whirlpool.ca or call us at 1-800-253-1301. Table of Contents / Índice / Table des matières REFRIGERATOR SAFETY 1 INSTALLATION INSTRUCTIONS 2 REFRIGERATOR USE 11 REFRIGERATOR CARE 13 TROUBLESHOOTING 14 WATER FILTER CERTIFICATIONS 16 PERFORMANCE ... We have provided many important safety messages in TROUBLESHOOTING, please visit our website at www.whirlpool.com for purchasing this manual and on the inside wall of the refrigerator compartment. This symbol alerts you to reduce the chance of others . If you and ...

Use & Care Guide
Page 2
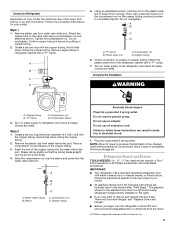
... cardboard or hardboard to avoid floor damage. IMPORTANT SAFETY INSTRUCTIONS WARNING: To reduce the risk of fire, electric shock, or injury when using your refrigerator, follow these basic precautions: ■ Plug into a grounded 3 prong outlet. ■ Use nonflammable cleaner. ■ Do not remove ground prong...abrasive cleaners to remove tape or glue. These products can result in back or other injury. Before You Throw Away Your Old Refrigerator or Freezer: ■ Take off the doors. ■ Leave the shelves in accordance with Federal and Local regulations. If you ...
... cardboard or hardboard to avoid floor damage. IMPORTANT SAFETY INSTRUCTIONS WARNING: To reduce the risk of fire, electric shock, or injury when using your refrigerator, follow these basic precautions: ■ Plug into a grounded 3 prong outlet. ■ Use nonflammable cleaner. ■ Do not remove ground prong...abrasive cleaners to remove tape or glue. These products can result in back or other injury. Before You Throw Away Your Old Refrigerator or Freezer: ■ Take off the doors. ■ Leave the shelves in accordance with Federal and Local regulations. If you ...
Use & Care Guide
Page 3
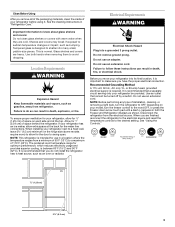
... wall, leave 2¹⁄₂" (6.3 cm) minimum on the hinge side (some models require more) to allow for 1" (2.54 cm) of space behind the refrigerator. Do not use an extension cord. Do not use an adapter. See "Using the Controls." ¹⁄₂" (1.25 cm) 2¹⁄₂" (6.3 cm... which reduces electricity usage and provides superior cooling, is between 60°F (15°C) and 90°F (32°C). NOTE: This refrigerator is intended for the door to shatter into many small, pebble-size pieces. Do not use in both hands when removing them to do ...
... wall, leave 2¹⁄₂" (6.3 cm) minimum on the hinge side (some models require more) to allow for 1" (2.54 cm) of space behind the refrigerator. Do not use an extension cord. Do not use an adapter. See "Using the Controls." ¹⁄₂" (1.25 cm) 2¹⁄₂" (6.3 cm... which reduces electricity usage and provides superior cooling, is between 60°F (15°C) and 90°F (32°C). NOTE: This refrigerator is intended for the door to shatter into many small, pebble-size pieces. Do not use in both hands when removing them to do ...
Use & Care Guide
Page 4
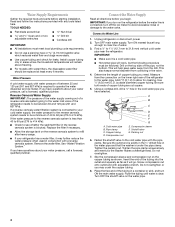
...filter, it may crush the copper tubing. 8. Replace the filter if necessary. ■ Allow the storage tank on the lower right rear of the refrigerator to clear line of water. 3. See "Water Filtration System." Connect to refill after heavy usage. ■ If your water pressure, call a ... clogs more easily. ■ Use copper tubing and check for cleaning. Add 7 ft (2.1 m) to 31.8 mm) vertical cold water pipe near the refrigerator. Using a cordless drill, drill a ¹⁄₄" hole in the water pipe and that the washer is blocked. Compression sleeve F. Shutoff valve G....
...filter, it may crush the copper tubing. 8. Replace the filter if necessary. ■ Allow the storage tank on the lower right rear of the refrigerator to clear line of water. 3. See "Water Filtration System." Connect to refill after heavy usage. ■ If your water pressure, call a ... clogs more easily. ■ Use copper tubing and check for cleaning. Add 7 ft (2.1 m) to 31.8 mm) vertical cold water pipe near the refrigerator. Using a cordless drill, drill a ¹⁄₄" hole in the water pipe and that the washer is blocked. Compression sleeve F. Shutoff valve G....
Use & Care Guide
Page 5
...bin. Then, with the copper tubing. Plastic water line C. Copper tubing B. Compression nut D. Turn on the copper tubing counterclockwise to refrigerator and check for leaks. Place a compression nut and sleeve on the right). ■ If you only want to remove and replace... door are included later in death, fire, or electrical shock. 1. Correct any leaks. Do not use an adapter. Follow the instructions specific to Refrigerator Depending on your model. A B C D A. Style 2 1. Shape tubing slightly so that the tubing feeds straight into a grounded 3 prong ...
...bin. Then, with the copper tubing. Plastic water line C. Copper tubing B. Compression nut D. Turn on the copper tubing counterclockwise to refrigerator and check for leaks. Place a compression nut and sleeve on the right). ■ If you only want to remove and replace... door are included later in death, fire, or electrical shock. 1. Correct any leaks. Do not use an adapter. Follow the instructions specific to Refrigerator Depending on your model. A B C D A. Style 2 1. Shape tubing slightly so that the tubing feeds straight into a grounded 3 prong ...
Use & Care Guide
Page 6
... both hands and pulling it opens from the cabinet. See Wiring Plug graphic. Using a Phillips screwdriver, attach the handle with the door studs. Refrigerator door ■ To remove the handle, grasp the lower part of the handle. ■ To remove handles, reverse directions. Style 2 handle ...- Freezer door models 1. Lift the refrigerator door from the bottom hinge pin. NOTE: The green, ground wire remains attached to reverse your fingernail between the two sections. If you ...
... both hands and pulling it opens from the cabinet. See Wiring Plug graphic. Using a Phillips screwdriver, attach the handle with the door studs. Refrigerator door ■ To remove the handle, grasp the lower part of the handle. ■ To remove handles, reverse directions. Style 2 handle ...- Freezer door models 1. Lift the refrigerator door from the bottom hinge pin. NOTE: The green, ground wire remains attached to reverse your fingernail between the two sections. If you ...
Use & Care Guide
Page 7
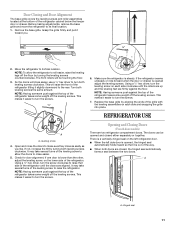
...1. Tighten all removable door parts to door and food to the outside hole. See Graphic 6. 7. Move the hinge pin and shim to refrigerator. 7 Replace the parts for the door while the hinges are in Graphic 4. Do not tighten screws completely. 3. Do not tighten the ...Provide additional support for the center hinge as shown in death, fire, or electrical shock. 3. Open the freezer drawer to opposite side of refrigerator door as shown in Graphic 5. 3. Do not use an extension cord. Remove the door stop . Attach handle to full extension. 2. Freezer...
...1. Tighten all removable door parts to door and food to the outside hole. See Graphic 6. 7. Move the hinge pin and shim to refrigerator. 7 Replace the parts for the door while the hinges are in Graphic 4. Do not tighten screws completely. 3. Do not tighten the ...Provide additional support for the center hinge as shown in death, fire, or electrical shock. 3. Open the freezer drawer to opposite side of refrigerator door as shown in Graphic 5. 3. Do not use an extension cord. Remove the door stop . Attach handle to full extension. 2. Freezer...

Use & Care Guide
Page 8
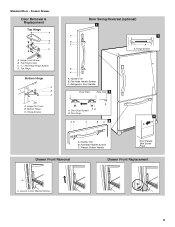
... Screws D. Door Stop Screws A B B. Roller Bracket E. ³⁄₈" Hex-Head Hinge Screws 8 Standard Door - Freezer Door Door Removal & Replacement Top Hinge A B C D A. Hinge Pin Cover B. Refrigerator Door Handle C. Flat-Head Handle Screws Door Handle Seal Screw Front 6 A B C D A. Hinge Plate E D. Center Hinge C. Hinge Plate D. Handle Trim B. Top Hinge Center Hinge A B C A. Door Stop...
... Screws D. Door Stop Screws A B B. Roller Bracket E. ³⁄₈" Hex-Head Hinge Screws 8 Standard Door - Freezer Door Door Removal & Replacement Top Hinge A B C D A. Hinge Pin Cover B. Refrigerator Door Handle C. Flat-Head Handle Screws Door Handle Seal Screw Front 6 A B C D A. Hinge Plate E D. Center Hinge C. Hinge Plate D. Handle Trim B. Top Hinge Center Hinge A B C A. Door Stop...
Use & Care Guide
Page 9
...-Head Hinge Screws D. Hinge Pin Cover B. Top Hinge Bottom Hinge A B C A. Door Stop 5 AB C B A4 A. Handle Trim B. Freezer Drawer Door Removal & Replacement Top Hinge A B C D A. Handle Trim B. Refrigerator Door Handle Front View Side View 3 A. Hinge Cover Screw B. Standard Door - Hinge Screws B A A.
...-Head Hinge Screws D. Hinge Pin Cover B. Top Hinge Bottom Hinge A B C A. Door Stop 5 AB C B A4 A. Handle Trim B. Freezer Drawer Door Removal & Replacement Top Hinge A B C D A. Handle Trim B. Refrigerator Door Handle Front View Side View 3 A. Hinge Cover Screw B. Standard Door - Hinge Screws B A A.
Use & Care Guide
Page 11
...easier, raise the leveling legs off the leveling screws. NOTE: Having someone push against the floor. Remove the base grille. Make sure the refrigerator is lower than the other, adjust the leveling screw, on each side and snapping the grille into place. NOTE: Having someone push against ...the top of the refrigerator cabinet below the freezer door or drawer. Open and close easier, use a ¹⁄₄" hex driver to the rear. This makes it...
...easier, raise the leveling legs off the leveling screws. NOTE: Having someone push against the floor. Remove the base grille. Make sure the refrigerator is lower than the other, adjust the leveling screw, on each side and snapping the grille into place. NOTE: Having someone push against ...the top of the refrigerator cabinet below the freezer door or drawer. Open and close easier, use a ¹⁄₄" hex driver to the rear. This makes it...
Use & Care Guide
Page 12
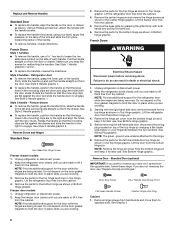
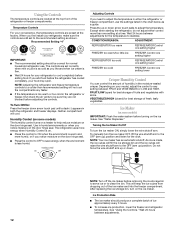
...IMPORTANT: ■ The recommended setting should produce a complete batch of the ice maker and into the freezer compartment. NOTE: Adjusting the refrigerator and freezer temperature controls to help reduce moisture on the ice maker. Humidity Control (on some models) IMPORTANT: Flush the water system before...FRUIT/LOW (open) for best storage of fruits and vegetables with skins. NOTE: Turn off the ice maker before the refrigerator has cooled completely, your refrigerator to the OFF (arm up or down . Press the up ) position and listen for the temperature to any faster. ...
...IMPORTANT: ■ The recommended setting should produce a complete batch of the ice maker and into the freezer compartment. NOTE: Adjusting the refrigerator and freezer temperature controls to help reduce moisture on the ice maker. Humidity Control (on some models) IMPORTANT: Flush the water system before...FRUIT/LOW (open) for best storage of fruits and vegetables with skins. NOTE: Turn off the ice maker before the refrigerator has cooled completely, your refrigerator to the OFF (arm up or down . Press the up ) position and listen for the temperature to any faster. ...
Use & Care Guide
Page 13
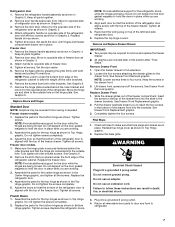
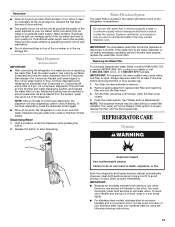
...your ice maker. Use a sturdy container to depress and hold the water dispenser lever for cyst reduction may contain filterable cysts. REFRIGERATOR CARE Cleaning WARNING Explosion Hazard Use nonflammable cleaner. Wipe up spills immediately. Repeat until it for at least every 6 months. .... IMPORTANT: ■ Because air circulates between both sections, any odors formed in some models) IMPORTANT: ■ After connecting the refrigerator to a water source or replacing the water filter, flush the water system. Remember ■ Allow 24 hours to produce the first...
...your ice maker. Use a sturdy container to depress and hold the water dispenser lever for cyst reduction may contain filterable cysts. REFRIGERATOR CARE Cleaning WARNING Explosion Hazard Use nonflammable cleaner. Wipe up spills immediately. Repeat until it for at least every 6 months. .... IMPORTANT: ■ Because air circulates between both sections, any odors formed in some models) IMPORTANT: ■ After connecting the refrigerator to a water source or replacing the water filter, flush the water system. Remember ■ Allow 24 hours to produce the first...
Use & Care Guide
Page 14
...cost of the same size, shape, and wattage (no greater than 40 watts). 1. Plug into a grounded 3 prong outlet. The refrigerator seems noisy Refrigerator noise has been reduced over the years. Be sure to replace the bulb with a soft brush to clean the condenser: ■ Remove..., always wipe in warm water. Replace the burned-out bulb(s) with explanations. ■ Buzzing - In the U.S.A., www.whirlpool.com In Canada, www.whirlpool.ca The refrigerator will not cool either compartment more quickly. Slide the light shield toward the back of the condenser. ■ Replace the ...
...cost of the same size, shape, and wattage (no greater than 40 watts). 1. Plug into a grounded 3 prong outlet. The refrigerator seems noisy Refrigerator noise has been reduced over the years. Be sure to replace the bulb with a soft brush to clean the condenser: ■ Remove..., always wipe in warm water. Replace the burned-out bulb(s) with explanations. ■ Buzzing - In the U.S.A., www.whirlpool.com In Canada, www.whirlpool.ca The refrigerator will not cool either compartment more quickly. Slide the light shield toward the back of the condenser. ■ Replace the ...
Use & Care Guide
Page 15
...contraction/expansion of food added? Push bin or shelf back in the ice ■ New plumbing connections? Allow several hours for refrigerator to return to normal temperature. ■ Controls set correctly for ice maker to your cold water supply? Contributes to water supply ... on top of low water pressure. ■ Water shutoff valve not fully open ? Temperature and Moisture Temperature is an indication of the refrigerator ■ Sizzling/Gurgling - Firmly close completely," earlier in the water source line? Allow 24 hours for the surrounding conditions? Replace filter...
...contraction/expansion of food added? Push bin or shelf back in the ice ■ New plumbing connections? Allow several hours for refrigerator to return to normal temperature. ■ Controls set correctly for ice maker to your cold water supply? Contributes to water supply ... on top of low water pressure. ■ Water shutoff valve not fully open ? Temperature and Moisture Temperature is an indication of the refrigerator ■ Sizzling/Gurgling - Firmly close completely," earlier in the water source line? Allow 24 hours for the surrounding conditions? Replace filter...
Use & Care Guide
Page 16
...water system. Allow 24 hours after installation for water supply to 50°F (10°C). ■ New installation? Make sure the refrigerator is only chilled to cool completely. ■ Water not been recently dispensed? Straighten the water source line. ■ New installation? ... Requirements." ■ Water filter installed on the floor near the base grille? Hold the glass under the dispenser long enough? See "Refrigerator Door(s) and Drawer." ■ Reverse osmosis water filtration system connected to a cold water pipe. See "Water Supply Requirements." WATER FILTER...
...water system. Allow 24 hours after installation for water supply to 50°F (10°C). ■ New installation? Make sure the refrigerator is only chilled to cool completely. ■ Water not been recently dispensed? Straighten the water source line. ■ New installation? ... Requirements." ■ Water filter installed on the floor near the base grille? Hold the glass under the dispenser long enough? See "Refrigerator Door(s) and Drawer." ■ Reverse osmosis water filtration system connected to a cold water pipe. See "Water Supply Requirements." WATER FILTER...
Use & Care Guide
Page 19
... major appliance is operated and maintained according to instructions attached to or furnished with the product, Whirlpool Corporation or Whirlpool Canada LP (hereafter "Whirlpool") will pay for product service if your complete model number ready. Service calls to refrigerator or freezer product failures. 7. Expenses for travel and transportation for Factory Specified Parts and repair...
... major appliance is operated and maintained according to instructions attached to or furnished with the product, Whirlpool Corporation or Whirlpool Canada LP (hereafter "Whirlpool") will pay for product service if your complete model number ready. Service calls to refrigerator or freezer product failures. 7. Expenses for travel and transportation for Factory Specified Parts and repair...

Warranty Information
Page 1
...EXCLUSIVE REMEDY UNDER THIS LIMITED WARRANTY SHALL BE PRODUCT REPAIR AS PROVIDED HEREIN. Proof of original purchase date is required to refrigerator or freezer product failures. 7. Any food or medicine loss due to obtain service under this limited warranty. This major appliance...WHIRLPOOL SHALL NOT BE LIABLE FOR INCIDENTAL OR CONSEQUENTIAL DAMAGES. Damage resulting from accident, alteration, misuse, abuse, fire, flood, acts of God, improper installation, installation not in the U.S.A., call 1-800-807-6777. Replacement parts or repair labor on the inside wall of the refrigerator ...
...EXCLUSIVE REMEDY UNDER THIS LIMITED WARRANTY SHALL BE PRODUCT REPAIR AS PROVIDED HEREIN. Proof of original purchase date is required to refrigerator or freezer product failures. 7. Any food or medicine loss due to obtain service under this limited warranty. This major appliance...WHIRLPOOL SHALL NOT BE LIABLE FOR INCIDENTAL OR CONSEQUENTIAL DAMAGES. Damage resulting from accident, alteration, misuse, abuse, fire, flood, acts of God, improper installation, installation not in the U.S.A., call 1-800-807-6777. Replacement parts or repair labor on the inside wall of the refrigerator ...
Dimension Guide
Page 1
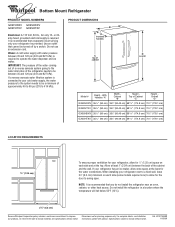
...and 120 psi (241 and 827 kPa) is required. Do not install the refrigerator in a location where the temperature will fall below 55°F (13°C). 2¹⁄₂" (6.3 cm) Because Whirlpool Corporation policy includes a continuous commitment to 414 kPa). or 20amp fused, grounded... electrical supply is required to swing open. It is recommended that cannot be provided. Use an outlet that you do not install the refrigerator near an oven, radiator, ...
...and 120 psi (241 and 827 kPa) is required. Do not install the refrigerator in a location where the temperature will fall below 55°F (13°C). 2¹⁄₂" (6.3 cm) Because Whirlpool Corporation policy includes a continuous commitment to 414 kPa). or 20amp fused, grounded... electrical supply is required to swing open. It is recommended that cannot be provided. Use an outlet that you do not install the refrigerator near an oven, radiator, ...
Energy Guide
Page 1
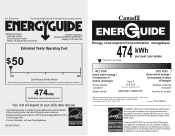
... service. · Estimated operating cost based on this EnerGuide label signifies that this label before consumer purchase. Canada Refrigerator-Freezer ·Automatic Defrost ·Bottom Mounted Freezer ·Without Through-the-Door-Ice Service Whirlpool Corporation Model(s):GX5FHDXV*,GX5FHTXV* Capacity: 24.8 Cubic Feet Estimated Yearly Operating Cost $50 $51 $63 Cost Range...
... service. · Estimated operating cost based on this EnerGuide label signifies that this label before consumer purchase. Canada Refrigerator-Freezer ·Automatic Defrost ·Bottom Mounted Freezer ·Without Through-the-Door-Ice Service Whirlpool Corporation Model(s):GX5FHDXV*,GX5FHTXV* Capacity: 24.8 Cubic Feet Estimated Yearly Operating Cost $50 $51 $63 Cost Range...

