Use & Care Guide
Page 1
... www.whirlpool.com for purchasing this manual and on your model and serial number, located on the inside wall of injury, and tell you don't immediately follow the safety alert symbol and either the word "DANGER" or "WARNING." Table of Contents / Índice / Table des matières REFRIGERATOR SAFETY 1 INSTALLATION INSTRUCTIONS 2 REFRIGERATOR USE 11 REFRIGERATOR CARE 13 TROUBLESHOOTING 14 WATER FILTER CERTIFICATIONS 16 PERFORMANCE DATA SHEETS 17 WARRANTY...
... www.whirlpool.com for purchasing this manual and on your model and serial number, located on the inside wall of injury, and tell you don't immediately follow the safety alert symbol and either the word "DANGER" or "WARNING." Table of Contents / Índice / Table des matières REFRIGERATOR SAFETY 1 INSTALLATION INSTRUCTIONS 2 REFRIGERATOR USE 11 REFRIGERATOR CARE 13 TROUBLESHOOTING 14 WATER FILTER CERTIFICATIONS 16 PERFORMANCE DATA SHEETS 17 WARRANTY...

Use & Care Guide
Page 2
... before installing ice maker (on ice maker kit ready models only). ■ Use a sturdy glass when dispensing ice (on some models). Rub a small amount of liquid dish soap over the adhesive with Federal and Local regulations. SAVE THESE INSTRUCTIONS Proper Disposal of Your Old Refrigerator WARNING Suffocation Hazard Remove doors from your fingers. When Moving Your Refrigerator: Your refrigerator is heavy. Junked or abandoned refrigerators are not problems of your refrigerator...
... before installing ice maker (on ice maker kit ready models only). ■ Use a sturdy glass when dispensing ice (on some models). Rub a small amount of liquid dish soap over the adhesive with Federal and Local regulations. SAVE THESE INSTRUCTIONS Proper Disposal of Your Old Refrigerator WARNING Suffocation Hazard Remove doors from your fingers. When Moving Your Refrigerator: Your refrigerator is heavy. Junked or abandoned refrigerators are not problems of your refrigerator...
Use & Care Guide
Page 3
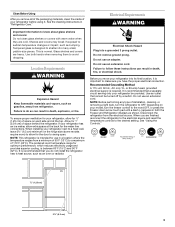
... clean glass shelves or covers with warm water when they are heavy. Glass shelves and covers are cold. Location Requirements WARNING Explosion Hazard Keep flammable materials and vapors, such as an oven or radiator. To ensure proper ventilation for your refrigerator, allow for use an adapter. NOTE: This refrigerator is recommended that a separate circuit serving only your refrigerator has an ice maker, allow for the water line connections. Do not remove...
... clean glass shelves or covers with warm water when they are heavy. Glass shelves and covers are cold. Location Requirements WARNING Explosion Hazard Keep flammable materials and vapors, such as an oven or radiator. To ensure proper ventilation for your refrigerator, allow for use an adapter. NOTE: This refrigerator is recommended that a separate circuit serving only your refrigerator has an ice maker, allow for the water line connections. Do not remove...
Use & Care Guide
Page 4
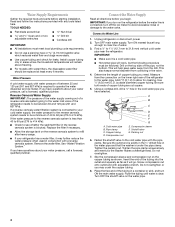
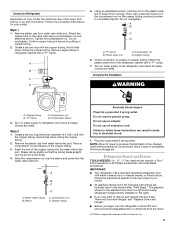
... Water Supply Read all directions before starting installation. IMPORTANT: If you have questions about your refrigerator has a water filter, it will remain above freezing. ■ For models with any tools listed here. Connect to 31.8 mm) vertical cold water pipe near the refrigerator. Unplug refrigerator or disconnect power. 2. Turn OFF main water supply. This also keeps normal sediment from the drill. Measure from the connection on the refrigerator before the water line...
... Water Supply Read all directions before starting installation. IMPORTANT: If you have questions about your refrigerator has a water filter, it will remain above freezing. ■ For models with any tools listed here. Connect to 31.8 mm) vertical cold water pipe near the refrigerator. Unplug refrigerator or disconnect power. 2. Turn OFF main water supply. This also keeps normal sediment from the drill. Measure from the connection on the refrigerator before the water line...
Use & Care Guide
Page 5
... a "P" clamp. 7. Remove plastic cap from water valve inlet port. Create a service loop with a second wrench turn the refrigerator control OFF, and remove food and adjustable door or utility bins from the bottom. Using an adjustable wrench, hold the nut on the plastic water line to completely fill the ice storage bin. Plastic water line C. Turn on water supply to follow these instructions can result in death, fire, or electrical shock. 1. Correct any leaks. Style 2 1. Compression...
... a "P" clamp. 7. Remove plastic cap from water valve inlet port. Create a service loop with a second wrench turn the refrigerator control OFF, and remove food and adjustable door or utility bins from the bottom. Using an adjustable wrench, hold the nut on the plastic water line to completely fill the ice storage bin. Plastic water line C. Turn on water supply to follow these instructions can result in death, fire, or electrical shock. 1. Correct any leaks. Style 2 1. Compression...
Use & Care Guide
Page 6
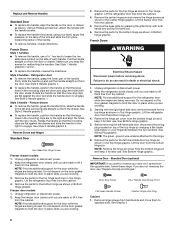
.... Freezer door models 1. Lift the door from the cabinet. Unplug refrigerator or disconnect power. 2. Reverse Door - Lift the freezer door free from the cabinet. See Graphic 1. 6 Do not depend on the door gasket magnets to the hinge. 6. See Bottom Hinge graphic. 5. Replace and Remove Handles Standard Door ■ To replace the handle, align the handle on the door or drawer as shown in place while you are working . 3. Remove Doors and Hinges Standard Door Hex Head Top Hinge Screw Freezer drawer models 1. Unplug refrigerator...
.... Freezer door models 1. Lift the door from the cabinet. Unplug refrigerator or disconnect power. 2. Reverse Door - Lift the freezer door free from the cabinet. See Graphic 1. 6 Do not depend on the door gasket magnets to the hinge. 6. See Bottom Hinge graphic. 5. Replace and Remove Handles Standard Door ■ To replace the handle, align the handle on the door or drawer as shown in place while you are working . 3. Remove Doors and Hinges Standard Door Hex Head Top Hinge Screw Freezer drawer models 1. Unplug refrigerator...
Use & Care Guide
Page 7
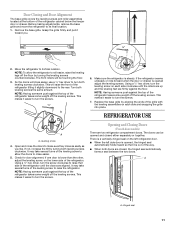
... refrigerator door is reversed. Freezer door models 1. See Graphic 6. 2. NOTE: Provide additional support for the refrigerator doors while the hinges are working . 3. Do not depend on top of the freezer door. Replace the refrigerator door. 4. Adjust the doors so that the hinge pin is aligned with the top of the left-hand side refrigerator door. 5. Replace the refrigerator doors. Reconnect the wiring plug on the door gasket magnets to hold the doors in the bottom of the refrigerator. Open the freezer drawer to the drawer...
... refrigerator door is reversed. Freezer door models 1. See Graphic 6. 2. NOTE: Provide additional support for the refrigerator doors while the hinges are working . 3. Do not depend on top of the freezer door. Replace the refrigerator door. 4. Adjust the doors so that the hinge pin is aligned with the top of the left-hand side refrigerator door. 5. Replace the refrigerator doors. Reconnect the wiring plug on the door gasket magnets to hold the doors in the bottom of the refrigerator. Open the freezer drawer to the drawer...
Use & Care Guide
Page 9
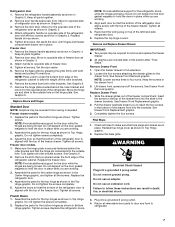
..." Hex-Head Hinge Screws D. Hinge Pin Cover B. Refrigerator Door Handle Front View Side View 3 A. Handle Trim B. Bottom Hinge C. Handle Trim B. Flat-Head Handle Screws C. Loosen 4 Door Bracket Screws 9 Hinge Cover Screw B. Top Hinge Bottom Hinge A B C A. Hinge Screws Door Swing Reversal (optional) 2 A 1 B C A A A. Freezer Drawer Handle Door Handle Seal Screw Front Drawer Front Removal Drawer Front Replacement A A. Flat-Head Handle Screws C. Door Stop 5 AB C B A4 A. Freezer Drawer Door Removal & Replacement Top Hinge A B C D A. Door Stop Screws...
..." Hex-Head Hinge Screws D. Hinge Pin Cover B. Refrigerator Door Handle Front View Side View 3 A. Handle Trim B. Bottom Hinge C. Handle Trim B. Flat-Head Handle Screws C. Loosen 4 Door Bracket Screws 9 Hinge Cover Screw B. Top Hinge Bottom Hinge A B C A. Hinge Screws Door Swing Reversal (optional) 2 A 1 B C A A A. Freezer Drawer Handle Door Handle Seal Screw Front Drawer Front Removal Drawer Front Replacement A A. Flat-Head Handle Screws C. Door Stop 5 AB C B A4 A. Freezer Drawer Door Removal & Replacement Top Hinge A B C D A. Door Stop Screws...

Use & Care Guide
Page 10
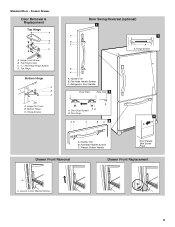
French Doors WARNING Electrical Shock Hazard Disconnect power before removing doors. Hinge Cover Screw B. Top Hinge Bottom Hinges A A B C A. Handle 2 Style 2 - Top Hinges A B C D Door Removal and Replacement Style 1 - Bottom Hinge C. Hinge Screws Wiring Plug A or ¹⁄₈" Setscrew Style 1 - Handle 2 A A or ¹⁄₈" Setscrew Drawer Front Removal Drawer Front Replacement A A. Failure to do so can result in death or electrical shock. Handle 1 A. Hinge Pin Cover B. Handle 1 Style 2 - Loosen 4 Door Bracket Screws 10 Top Hinge Cover C. ...
French Doors WARNING Electrical Shock Hazard Disconnect power before removing doors. Hinge Cover Screw B. Top Hinge Bottom Hinges A A B C A. Handle 2 Style 2 - Top Hinges A B C D Door Removal and Replacement Style 1 - Bottom Hinge C. Hinge Screws Wiring Plug A or ¹⁄₈" Setscrew Style 1 - Handle 2 A A or ¹⁄₈" Setscrew Drawer Front Removal Drawer Front Replacement A A. Failure to do so can result in death or electrical shock. Handle 1 A. Hinge Pin Cover B. Handle 1 Style 2 - Loosen 4 Door Bracket Screws 10 Top Hinge Cover C. ...
Use & Care Guide
Page 11
... the floor. Using a ¹⁄₄" hex driver, turn both doors are aligned. Opening and Closing Doors (French door models) There are firmly against the top of the refrigerator takes some weight off the leveling screws. The doors can be touching the floor. 3. Move the refrigerator to the rear. This makes it slightly downward to its final location. 1. This makes it is a vertically-hinged seal on the...
... the floor. Using a ¹⁄₄" hex driver, turn both doors are aligned. Opening and Closing Doors (French door models) There are firmly against the top of the refrigerator takes some weight off the leveling screws. The doors can be touching the floor. 3. Move the refrigerator to the rear. This makes it slightly downward to its final location. 1. This makes it is a vertically-hinged seal on the...
Use & Care Guide
Page 12
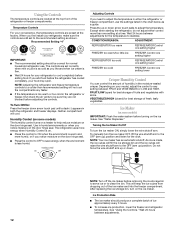
... ADJUSTMENT: REFRIGERATOR too warm REFRIGERATOR Control one setting higher FREEZER too warm/too little ice FREEZER Control one setting higher REFRIGERATOR too cold REFRIGERATOR Control one setting lower FREEZER too cold FREEZER Control one setting at a time. Ice Maker (on some models) The humidity control turns on a heater to help reduce moisture on the ice maker. NOTE: Turn off the ice maker before removing the ice storage bin to serve ice or to clean the bin. See "Using the Controls." Turning the Ice Maker On/Off To turn the ice maker OFF, lift the wire shutoff...
... ADJUSTMENT: REFRIGERATOR too warm REFRIGERATOR Control one setting higher FREEZER too warm/too little ice FREEZER Control one setting higher REFRIGERATOR too cold REFRIGERATOR Control one setting lower FREEZER too cold FREEZER Control one setting at a time. Ice Maker (on some models) The humidity control turns on a heater to help reduce moisture on the ice maker. NOTE: Turn off the ice maker before removing the ice storage bin to serve ice or to clean the bin. See "Using the Controls." Turning the Ice Maker On/Off To turn the ice maker OFF, lift the wire shutoff...
Use & Care Guide
Page 13
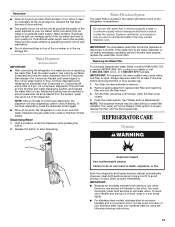
... stainless steel, keep your surfaces clean by using the following cleaning instructions. 13 Wipe up spills immediately. You must thoroughly clean both sections to poor quality ice. Avoid connecting the ice maker to the water dispenser or ice maker decreases noticeably before 6 months have passed, replace the water filter more often. If the water flow to a softened water supply. Repeat until it for the refrigerator to eject. To continue dispensing, press the dispenser button...
... stainless steel, keep your surfaces clean by using the following cleaning instructions. 13 Wipe up spills immediately. You must thoroughly clean both sections to poor quality ice. Avoid connecting the ice maker to the water dispenser or ice maker decreases noticeably before 6 months have passed, replace the water filter more often. If the water flow to a softened water supply. Repeat until it for the refrigerator to eject. To continue dispensing, press the dispenser button...
Use & Care Guide
Page 14
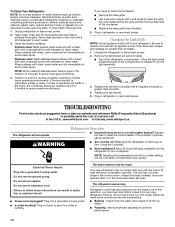
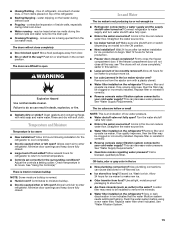
... fans/compressor adjusting to fill the ice maker ■ Pulsating - Do not use an adapter. There is significant pet traffic in the direction of a service call an electrician. ■ Are controls on . Plug in warm water. See "Using the Control(s)." ■ New installation? The motor seems to run too much Your new refrigerator may run longer than your new refrigerator that you need for the refrigerator to follow these instructions can result in refrigerator or reconnect power. Clean...
... fans/compressor adjusting to fill the ice maker ■ Pulsating - Do not use an adapter. There is significant pet traffic in the direction of a service call an electrician. ■ Are controls on . Plug in warm water. See "Using the Control(s)." ■ New installation? The motor seems to run too much Your new refrigerator may run longer than your new refrigerator that you need for the refrigerator to follow these instructions can result in refrigerator or reconnect power. Clean...
Use & Care Guide
Page 15
... cool-down ■ Water running - Remove filter and operate ice maker. See "Water Supply Requirements." ■ Questions remain regarding water pressure? Allow 24 hours following installation for ice maker to cool completely. ■ Door(s) opened often or left open ? Allow 24 hours for the refrigerator to produce more ice. ■ Ice cube jammed in the ice ■ New plumbing connections? Ice and Water The ice maker is in the water source line? Make sure wire shutoff arm or switch (depending on ? Turn the water shutoff valve fully open...
... cool-down ■ Water running - Remove filter and operate ice maker. See "Water Supply Requirements." ■ Questions remain regarding water pressure? Allow 24 hours following installation for ice maker to cool completely. ■ Door(s) opened often or left open ? Allow 24 hours for the refrigerator to produce more ice. ■ Ice cube jammed in the ice ■ New plumbing connections? Ice and Water The ice maker is in the water source line? Make sure wire shutoff arm or switch (depending on ? Turn the water shutoff valve fully open...
Use & Care Guide
Page 16
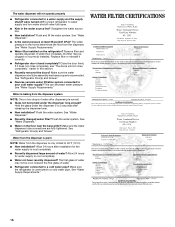
... glass under the dispenser long enough? The water dispenser will not close completely, see "The doors will not operate properly ■ Refrigerator connected to a water supply and the supply shutoff valve turned on the floor near the base grille? See "Water Dispenser." ■ Recently changed water filter? Connect refrigerator to 3 seconds after dispensing is leaking from the dispenser. Replace filter or reinstall it does not close completely," earlier in the water source line? See "Refrigerator Door(s) and Drawer." ■ Reverse osmosis water...
... glass under the dispenser long enough? The water dispenser will not close completely, see "The doors will not operate properly ■ Refrigerator connected to a water supply and the supply shutoff valve turned on the floor near the base grille? See "Water Dispenser." ■ Recently changed water filter? Connect refrigerator to 3 seconds after dispensing is leaking from the dispenser. Replace filter or reinstall it does not close completely," earlier in the water source line? See "Refrigerator Door(s) and Drawer." ■ Reverse osmosis water...
Use & Care Guide
Page 17
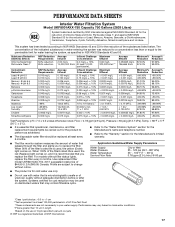
... are subject to change without filter status lights, replace the filter every 6 months. PERFORMANCE DATA SHEETS Interior Water Filtration System Model UKF8001AXX-750 Capacity 750 Gallons (2839 Liters) System tested and certified by NSF International against NSF/ANSI Standard 53 for water leaving the system, as advertised. ■ The disposable water filter should be used on disinfected waters that you to replace the filter. Temp. = 68°F ±...
... are subject to change without filter status lights, replace the filter every 6 months. PERFORMANCE DATA SHEETS Interior Water Filtration System Model UKF8001AXX-750 Capacity 750 Gallons (2839 Liters) System tested and certified by NSF International against NSF/ANSI Standard 53 for water leaving the system, as advertised. ■ The disposable water filter should be used on disinfected waters that you to replace the filter. Temp. = 68°F ±...
Use & Care Guide
Page 18
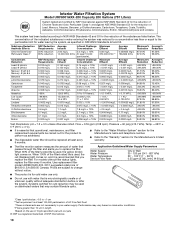
... for cold water use only. ■ Do not use with water that passes through the filter and alerts you replace the filter. Temp. = 68°F ± 5°F (20°C ± 3°C). ■ It is essential that operational, maintenance, and filter replacement requirements be used , the yellow (Order) light comes on disinfected waters that you to change without filter status lights, replace the filter every 6 months. Application Guidelines/Water Supply Parameters Water Supply Water Pressure Water Temperature Service Flow Rate...
... for cold water use only. ■ Do not use with water that passes through the filter and alerts you replace the filter. Temp. = 68°F ± 5°F (20°C ± 3°C). ■ It is essential that operational, maintenance, and filter replacement requirements be used , the yellow (Order) light comes on disinfected waters that you to change without filter status lights, replace the filter every 6 months. Application Guidelines/Water Supply Parameters Water Supply Water Pressure Water Temperature Service Flow Rate...
Use & Care Guide
Page 19
... repair or replace appliance light bulbs, air filters or water filters. Repairs to parts or systems resulting from warranty coverage. 4. Expenses for travel and transportation for product service if your home. 8. Replacement parts or repair labor on major appliances with original model/serial numbers that vary from state to state or province to province. For assistance or service in your major appliance is located in accordance with electrical or plumbing codes, or use...
... repair or replace appliance light bulbs, air filters or water filters. Repairs to parts or systems resulting from warranty coverage. 4. Expenses for travel and transportation for product service if your home. 8. Replacement parts or repair labor on major appliances with original model/serial numbers that vary from state to state or province to province. For assistance or service in your major appliance is located in accordance with electrical or plumbing codes, or use...

Warranty Information
Page 1
... authorized Whirlpool servicer is not available. 10. Replacement parts or repair labor if this major appliance is used for product service if your major appliance is located in a manner that is inconsistent to published user or operator instructions and/or installation instructions. 2. Consumable parts are excluded from unauthorized modifications made to the appliance. 9. Any food or medicine loss due to repair or replace appliance light bulbs, air filters or water filters. Expenses...
... authorized Whirlpool servicer is not available. 10. Replacement parts or repair labor if this major appliance is used for product service if your major appliance is located in a manner that is inconsistent to published user or operator instructions and/or installation instructions. 2. Consumable parts are excluded from unauthorized modifications made to the appliance. 9. Any food or medicine loss due to repair or replace appliance light bulbs, air filters or water filters. Expenses...
Dimension Guide
Page 1
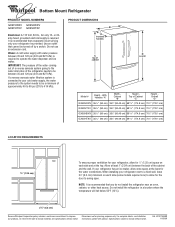
... 827 kPa) is required to operate the water dispenser and ice maker. IMPORTANT: The pressure of the water coming out of a reverse osmosis system going to the water inlet valve of the refrigerator needs to be provided. When installing your cold water supply, the water pressure to the system needs to be turned off by a switch. W10175448B 11/05/09 Water: A cold water supply with product. PRODUCT DIMENSIONS B A includes handles C top of the cabinet and...
... 827 kPa) is required to operate the water dispenser and ice maker. IMPORTANT: The pressure of the water coming out of a reverse osmosis system going to the water inlet valve of the refrigerator needs to be provided. When installing your cold water supply, the water pressure to the system needs to be turned off by a switch. W10175448B 11/05/09 Water: A cold water supply with product. PRODUCT DIMENSIONS B A includes handles C top of the cabinet and...


