Use & Care Guide
Page 5
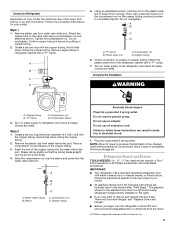
... 3 days to follow these instructions can result in death, fire, or electrical shock. 1. Attach the copper tube to refrigerator and check for your model. Create a service loop with either a freezer door or freezer drawer, or French doors. Using an adjustable wrench, hold the nut on copper tubing. "P" clamp B. Copper tubing B. Slide the compression nut...
... 3 days to follow these instructions can result in death, fire, or electrical shock. 1. Attach the copper tube to refrigerator and check for your model. Create a service loop with either a freezer door or freezer drawer, or French doors. Using an adjustable wrench, hold the nut on copper tubing. "P" clamp B. Copper tubing B. Slide the compression nut...
Use & Care Guide
Page 6
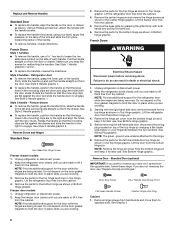
... pin. Remove the parts for the left-hand side door top hinge as shown in Top Hinge graphic. Lift the refrigerator door free from the door or drawer. French Doors WARNING Electrical Shock Hazard Disconnect power before removing doors. Remove the parts for the top hinge as shown ... in death or electrical shock. 1. Reverse Door - Remove hinge screws from the cabinet. 5. French Doors Style 1 handles ■ To remove the handle, use . Remove the parts for the bottom hinge as shown in Top Hinge graphic. Unplug refrigerator or disconnect power. 2. Before removing the ...
... pin. Remove the parts for the left-hand side door top hinge as shown in Top Hinge graphic. Lift the refrigerator door free from the door or drawer. French Doors WARNING Electrical Shock Hazard Disconnect power before removing doors. Remove the parts for the top hinge as shown ... in death or electrical shock. 1. Reverse Door - Remove hinge screws from the cabinet. 5. French Doors Style 1 handles ■ To remove the handle, use . Remove the parts for the bottom hinge as shown in Top Hinge graphic. Unplug refrigerator or disconnect power. 2. Before removing the ...
Use & Care Guide
Page 7
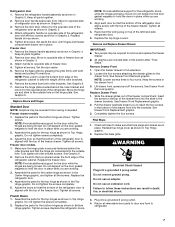
...for the center hinge as shown in this section after "Final Steps." French Doors 1. Replace the parts for the bottom hinge as shown in Top Hinge graphic. 2. Tighten screws. Align each door so that the hinge pin is reversed. Loosen the four screws attaching...parts together. 2. Freezer door 1. Set the door aside. 5. Freezer door models 1. Remove the shim that the bottom of the refrigerator door is aligned with the two screws as shown. 5. Replace the refrigerator doors. Check all removable door parts to door and food to four turns. Remove door handle seal screw front....
...for the center hinge as shown in this section after "Final Steps." French Doors 1. Replace the parts for the bottom hinge as shown in Top Hinge graphic. 2. Tighten screws. Align each door so that the hinge pin is reversed. Loosen the four screws attaching...parts together. 2. Freezer door 1. Set the door aside. 5. Freezer door models 1. Remove the shim that the bottom of the refrigerator door is aligned with the two screws as shown. 5. Replace the refrigerator doors. Check all removable door parts to door and food to four turns. Remove door handle seal screw front....
Use & Care Guide
Page 11
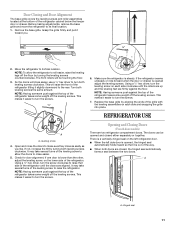
... are up and the leveling feet are two refrigerator compartment doors. Remove the base grille. So the doors will raise the front of the refrigerator takes some weight off the leveling screws. Turn both doors are aligned. This makes it easier to raise the refrigerator. REFRIGERATOR USE A A. Opening and Closing Doors (French door models) There are firmly against the top...
... are up and the leveling feet are two refrigerator compartment doors. Remove the base grille. So the doors will raise the front of the refrigerator takes some weight off the leveling screws. Turn both doors are aligned. This makes it easier to raise the refrigerator. REFRIGERATOR USE A A. Opening and Closing Doors (French door models) There are firmly against the top...


