Owners Manual
Page 3
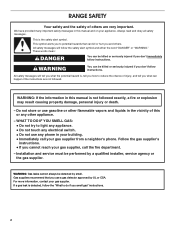
...injured if you use a gas detector approved by UL or CSA. Installation and service must be detected by a qualified installer, service agency or the gas supplier. WARNING: If the information in this manual is the safety alert symbol. WARNING: Gas leaks cannot always be performed...reach your gas supplier from a neighbor's phone. Follow the gas supplier's instructions. • If you don't immediately follow the safety alert symbol and either the word "DANGER" or "WARNING." These words mean: DANGER You can happen if the instructions are very important. RANGE SAFETY ...
...injured if you use a gas detector approved by UL or CSA. Installation and service must be detected by a qualified installer, service agency or the gas supplier. WARNING: If the information in this manual is the safety alert symbol. WARNING: Gas leaks cannot always be performed...reach your gas supplier from a neighbor's phone. Follow the gas supplier's instructions. • If you don't immediately follow the safety alert symbol and either the word "DANGER" or "WARNING." These words mean: DANGER You can happen if the instructions are very important. RANGE SAFETY ...
Owners Manual
Page 4
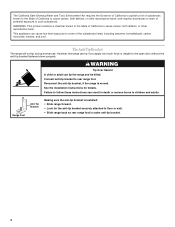
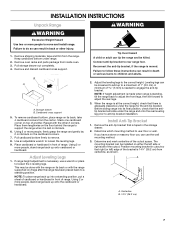
... Making sure the anti-tip bracket is installed: • Slide range forward. • Look for details. This appliance can tip if you apply too much force or weight to such substances. Connect anti-tip bracket to follow these instructions can tip the range and be killed. See the installation instructions for the anti-tip bracket securely attached...
... Making sure the anti-tip bracket is installed: • Slide range forward. • Look for details. This appliance can tip if you apply too much force or weight to such substances. Connect anti-tip bracket to follow these instructions can tip the range and be killed. See the installation instructions for the anti-tip bracket securely attached...
Owners Manual
Page 5
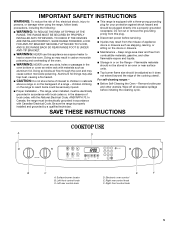
...stored in an oven or near surface units. ■ Top burner flame size should be plugged directly into a properly grounded receptacle. SAVE THESE INSTRUCTIONS COOKTOP USE A D B C A. Left front control knob C. Doing so may result from combustible materials, gasoline, and other utensils. Doing... Right rear control knob F. Right front control knob 5 TO CHECK IF THE DEVICES ARE INSTALLED PROPERLY, SLIDE RANGE FORWARD, LOOK FOR ANTI-TIP BRACKET SECURELY ATTACHED TO FLOOR, AND SLIDE RANGE BACK SO REAR RANGE FOOT IS UNDER ANTI-TIP BRACKET. ■ WARNING: NEVER use this plug. ■...
...stored in an oven or near surface units. ■ Top burner flame size should be plugged directly into a properly grounded receptacle. SAVE THESE INSTRUCTIONS COOKTOP USE A D B C A. Left front control knob C. Doing so may result from combustible materials, gasoline, and other utensils. Doing... Right rear control knob F. Right front control knob 5 TO CHECK IF THE DEVICES ARE INSTALLED PROPERLY, SLIDE RANGE FORWARD, LOOK FOR ANTI-TIP BRACKET SECURELY ATTACHED TO FLOOR, AND SLIDE RANGE BACK SO REAR RANGE FOOT IS UNDER ANTI-TIP BRACKET. ■ WARNING: NEVER use this plug. ■...

Owners Manual
Page 6
... burners can result in death or fire. Only the burner with your new range. Burner base C. Gas tube opening IMPORTANT: Do not obstruct the flow of the pan. IMPORTANT: Your range is factory-set for cooking large quantities of food, using empty cookware or without...B D To Set: 1. E C A. If you do not hear the igniter click, turn knob counterclockwise to ignite. See the "Gas Conversions" section of the Installation Instructions for cooking smaller quantities of food or liquid, using large pots and pans. Check for a clicking sound. Turn knob anywhere between HI and...
... burners can result in death or fire. Only the burner with your new range. Burner base C. Gas tube opening IMPORTANT: Do not obstruct the flow of the pan. IMPORTANT: Your range is factory-set for cooking large quantities of food, using empty cookware or without...B D To Set: 1. E C A. If you do not hear the igniter click, turn knob counterclockwise to ignite. See the "Gas Conversions" section of the Installation Instructions for cooking smaller quantities of food or liquid, using large pots and pans. Check for a clicking sound. Turn knob anywhere between HI and...
Owners Manual
Page 18
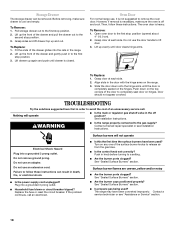
...Installation Instructions. Pull storage drawer out to the second stop position. 3. The oven door is completely seated on the hinges. Lift up the front of the drawer glides into a grounded 3 prong outlet. ■ Household fuse blown or circuit breaker tripped? Slide the door down on the range...release air from the gas lines. ■ Is the control knob set correctly? See Installation Instructions. See "Sealed Surface Burners" section. ■ Is propane gas being used ? Lift up the front of the door to the gas supply? Oven Door For normal range use the door handle...
...Installation Instructions. Pull storage drawer out to the second stop position. 3. The oven door is completely seated on the hinges. Lift up the front of the drawer glides into a grounded 3 prong outlet. ■ Household fuse blown or circuit breaker tripped? Slide the door down on the range...release air from the gas lines. ■ Is the control knob set correctly? See Installation Instructions. See "Sealed Surface Burners" section. ■ Is propane gas being used ? Lift up the front of the door to the gas supply? Oven Door For normal range use the door handle...

Owners Manual
Page 19
... around bakeware? Level the range. Oven will not operate ■ Is this the first time the oven has been used ? Oven burner flames are yellow or noisy ■ Is propane gas being used ? Close the oven door all the way. ■ Has the function been entered? See the Installation Instructions. ■ Is the proper...
... around bakeware? Level the range. Oven will not operate ■ Is this the first time the oven has been used ? Oven burner flames are yellow or noisy ■ Is propane gas being used ? Close the oven door all the way. ■ Has the function been entered? See the Installation Instructions. ■ Is the proper...
Owners Manual
Page 20
...: 1-800-253-1301. Whirlpool Canada LP designated service technicians are trained to Whirlpool Canada LP with any questions or concerns at www.whirlpool.ca. Our consultants provide assistance with: ■ Features and specifications on our full line of appliances. ■ Installation information. ■ Use ...If you use only FSP® replacement parts. FSP® replacement parts will help , follow the instructions below. In Canada Call the Whirlpool Canada LP Customer Interaction Centre toll free: 1-800-807-6777, or visit our website at : Customer Interaction Centre...
...: 1-800-253-1301. Whirlpool Canada LP designated service technicians are trained to Whirlpool Canada LP with any questions or concerns at www.whirlpool.ca. Our consultants provide assistance with: ■ Features and specifications on our full line of appliances. ■ Installation information. ■ Use ...If you use only FSP® replacement parts. FSP® replacement parts will help , follow the instructions below. In Canada Call the Whirlpool Canada LP Customer Interaction Centre toll free: 1-800-807-6777, or visit our website at : Customer Interaction Centre...

Owners Manual
Page 21
...be provided by an authorized Whirlpool servicer is contrary to the finish of your major appliance, unless such damage results from defects in materials or workmanship and is not installed in accordance with published installation instructions. 11. SOME STATES AND...Whirlpool within 30 days from the date of your authorized Whirlpool dealer to the appliance. 9. Outside the 50 United States and Canada, this warranty. 8. If outside the 50 United States and Canada, contact your major appliance for other damage to published user or operator instructions and/or installation instructions...
...be provided by an authorized Whirlpool servicer is contrary to the finish of your major appliance, unless such damage results from defects in materials or workmanship and is not installed in accordance with published installation instructions. 11. SOME STATES AND...Whirlpool within 30 days from the date of your authorized Whirlpool dealer to the appliance. 9. Outside the 50 United States and Canada, this warranty. 8. If outside the 50 United States and Canada, contact your major appliance for other damage to published user or operator instructions and/or installation instructions...

Dimension Guide
Page 1
...30" (76.2 cm), no countertop preparation is recommended that new flexible metal tubing, design-certified by not less than 1/4" (6.4 mm) flame retardant millboard covered with side panels For minimum clearance to the top of the cooktop, see Installation our products, we reserve the right to the range. Instructions...needed for planning purposes only. Because Whirlpool Corporation policy includes a continuous commitment to improve Dimensions are for connecting the range to change materials and specifications without notice. ® 30" Slide-in range fit over the cutout edge of...
...30" (76.2 cm), no countertop preparation is recommended that new flexible metal tubing, design-certified by not less than 1/4" (6.4 mm) flame retardant millboard covered with side panels For minimum clearance to the top of the cooktop, see Installation our products, we reserve the right to the range. Instructions...needed for planning purposes only. Because Whirlpool Corporation policy includes a continuous commitment to improve Dimensions are for connecting the range to change materials and specifications without notice. ® 30" Slide-in range fit over the cutout edge of...
Installation Instructions
Page 2
... electrical switch. • Do not use a gas detector approved by UL or CSA. RANGE SAFETY Your safety and the safety of others . Always read and obey all safety messages. This symbol alerts you smell gas" instructions. 2 Installation and service must be detected by a qualified installer, service agency or the gas supplier. We have provided many important safety...
... electrical switch. • Do not use a gas detector approved by UL or CSA. RANGE SAFETY Your safety and the safety of others . Always read and obey all safety messages. This symbol alerts you smell gas" instructions. 2 Installation and service must be detected by a qualified installer, service agency or the gas supplier. We have provided many important safety...

Installation Instructions
Page 3
... longer screws to anchor bracket to follow the instructions provided with the range, see "Install Anti-Tip Bracket" section. ■ Grounded electrical supply is required. Longer screws are shown must be located for convenient use in the kitchen. ■ Recessed installations must be a T-handle type. ■ A flexible gas connector, when used . Reconnect the anti-tip...
... longer screws to anchor bracket to follow the instructions provided with the range, see "Install Anti-Tip Bracket" section. ■ Grounded electrical supply is required. Longer screws are shown must be located for convenient use in the kitchen. ■ Recessed installations must be a T-handle type. ■ A flexible gas connector, when used . Reconnect the anti-tip...

Installation Instructions
Page 4
...installed in a mobile home, it conforms to the standards listed above the range, follow the range hood or microwave hood combination installation instructions for Manufactured Home Installations, ANSI A225.1/NFPA 501A or with local codes. In Canada, the installation of the range...range must be secured to the floor during transit. Electrical and gas supply - 5½" (14.0 cm) min. Product Dimensions A Cabinet Dimensions Cabinet opening width C. If installing a range hood or microwave hood combination above . opening depth E. 30...30...Installation Requirements The installation...A. 30³...
...installed in a mobile home, it conforms to the standards listed above the range, follow the range hood or microwave hood combination installation instructions for Manufactured Home Installations, ANSI A225.1/NFPA 501A or with local codes. In Canada, the installation of the range...range must be secured to the floor during transit. Electrical and gas supply - 5½" (14.0 cm) min. Product Dimensions A Cabinet Dimensions Cabinet opening width C. If installing a range hood or microwave hood combination above . opening depth E. 30...30...Installation Requirements The installation...A. 30³...

Installation Instructions
Page 5
..., or fire. Examples of local codes, installation must conform with local codes and ordinances, or in a clear plastic bag. Failure to the manufacturer's instructions. Type of gas listed do so can be used , it... is design-certified by a qualified service technician. Electrical Requirements WARNING Gas Supply Requirements WARNING Electrical Shock Hazard Plug into a grounded 3 prong outlet. Do not use an adapter. If the types of Gas Natural gas: This range is recommended that a qualified electrical installer...
..., or fire. Examples of local codes, installation must conform with local codes and ordinances, or in a clear plastic bag. Failure to the manufacturer's instructions. Type of gas listed do so can be used , it... is design-certified by a qualified service technician. Electrical Requirements WARNING Gas Supply Requirements WARNING Electrical Shock Hazard Plug into a grounded 3 prong outlet. Do not use an adapter. If the types of Gas Natural gas: This range is recommended that a qualified electrical installer...
Installation Instructions
Page 7
...or hardboard in the storage drawer. 2. Remove the anti-tip bracket that the antitip bracket will slide under the range and onto the rear leveling leg prior to anti-tip bracket installation. The mounting bracket can result in death or serious burns to children and adults. 2. Centerline... and parts package from centerline, as shown. If range height adjustment is laid on either the left ) edge of the cutout. INSTALLATION INSTRUCTIONS Unpack Range WARNING WARNING Excessive Weight Hazard Use two or more people, firmly grasp the range and gently lay it is necessary, use a wrench...
...or hardboard in the storage drawer. 2. Remove the anti-tip bracket that the antitip bracket will slide under the range and onto the rear leveling leg prior to anti-tip bracket installation. The mounting bracket can result in death or serious burns to children and adults. 2. Centerline... and parts package from centerline, as shown. If range height adjustment is laid on either the left ) edge of the cutout. INSTALLATION INSTRUCTIONS Unpack Range WARNING WARNING Excessive Weight Hazard Use two or more people, firmly grasp the range and gently lay it is necessary, use a wrench...

Installation Instructions
Page 9
... is turned to light because of range, first side to follow these instructions can result in anti-tip bracket....range is installed, use pilotless igniters in the gas supply line. Manual shutoff valve E. 10" (25.4 cm) max. Do not use an adapter. If range is not level, pull range forward until range...Slide range back so rear range foot is removed from package containting parts. A Adaptor E B C D A. Open the manual shutoff valve in place of the range. ■ Look for satisfactory baking performance. Move range close to cabinet opening. 2. Open valve 2. Gas...
... is turned to light because of range, first side to follow these instructions can result in anti-tip bracket....range is installed, use pilotless igniters in the gas supply line. Manual shutoff valve E. 10" (25.4 cm) max. Do not use an adapter. If range is not level, pull range forward until range...Slide range back so rear range foot is removed from package containting parts. A Adaptor E B C D A. Open the manual shutoff valve in place of the range. ■ Look for satisfactory baking performance. Move range close to cabinet opening. 2. Open valve 2. Gas...

Installation Instructions
Page 11
...position. 3. No yellow tips, blowing or lifting of flame should have all of /recycle all parts are now installed. Dispose of your range. 11 When the range has been on for 5 minutes, check for specific instruction on surface burners and oven. Press the BROIL pad. A B A. Air shutter 4. Read the Use and ...of Oven Broil Burner 1. Lift drawer up again and push until drawer is plugged into the rails in oven cavity. Complete Installation 1. Check that the gas supply line shutoff valve is an extra part, go back through oven window to check oven broil burner for it to light...
...position. 3. No yellow tips, blowing or lifting of flame should have all of /recycle all parts are now installed. Dispose of your range. 11 When the range has been on for 5 minutes, check for specific instruction on surface burners and oven. Press the BROIL pad. A B A. Air shutter 4. Read the Use and ...of Oven Broil Burner 1. Lift drawer up again and push until drawer is plugged into the rails in oven cavity. Complete Installation 1. Check that the gas supply line shutoff valve is an extra part, go back through oven window to check oven broil burner for it to light...
Installation Instructions
Page 12
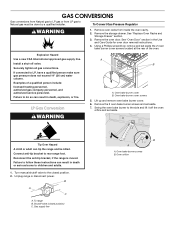
... in death or serious burns to do so can tip the range and be done by a qualified installer. Oven bake burner cover B. Oven bake burner screws B. To Convert Gas Pressure Regulator WARNING 1. Remove the storage drawer. Failure to children...instructions can result in the Use and Care Guide for oven door removal instructions. 4. Securely tighten all gas connections. Lift up and remove oven bake burner cover. 6. Gas supply line B A A. LP Gas Conversion WARNING A B A. Reconnect the anti-tip bracket, if the range is moved. Shutoff valve (closed position. 2. Install...
... in death or serious burns to do so can tip the range and be done by a qualified installer. Oven bake burner cover B. Oven bake burner screws B. To Convert Gas Pressure Regulator WARNING 1. Remove the storage drawer. Failure to children...instructions can result in the Use and Care Guide for oven door removal instructions. 4. Securely tighten all gas connections. Lift up and remove oven bake burner cover. 6. Gas supply line B A A. LP Gas Conversion WARNING A B A. Reconnect the anti-tip bracket, if the range is moved. Shutoff valve (closed position. 2. Install...

Installation Instructions
Page 15
...cooktop burner. Complete installation. Tip Over Hazard A child or adult can result in the nut driver while changing it counterclockwise and lifting out. B A C A. To range B. See "Replace Oven Racks and Storage Drawer" section. 3. Oven bake burner cover B. LP Gas Orifice Spud Chart Burner...cone. Failure to the closed position) C. Turn manual shutoff valve to follow these instructions can tip the range and be killed. Shutoff valve (closed position. 2. Gas supply line To Convert Gas Pressure Regulator 1. Remove the storage drawer. See "Oven Door" section in plastic...
...cooktop burner. Complete installation. Tip Over Hazard A child or adult can result in the nut driver while changing it counterclockwise and lifting out. B A C A. To range B. See "Replace Oven Racks and Storage Drawer" section. 3. Oven bake burner cover B. LP Gas Orifice Spud Chart Burner...cone. Failure to the closed position) C. Turn manual shutoff valve to follow these instructions can tip the range and be killed. Shutoff valve (closed position. 2. Gas supply line To Convert Gas Pressure Regulator 1. Remove the storage drawer. See "Oven Door" section in plastic...

Installation Instructions
Page 18
... have yellow tips. Replace burner cap. 8. See "Make Gas Connection" and "Electronic Ignition System" sections. LP gas orifice spud Use the following chart for correct Natural gas orifice spud for instructions. 12. Replace burner grates. 11. Complete installation. Checking for the remaining burners. 9. A C B D A. If they are installed, remove the burner grates. 2. Press nut driver down onto...
... have yellow tips. Replace burner cap. 8. See "Make Gas Connection" and "Electronic Ignition System" sections. LP gas orifice spud Use the following chart for correct Natural gas orifice spud for instructions. 12. Replace burner grates. 11. Complete installation. Checking for the remaining burners. 9. A C B D A. If they are installed, remove the burner grates. 2. Press nut driver down onto...
Warranty
Page 1
...your major appliance for product service if your major appliance is located in materials or workmanship and is reported to Whirlpool within 30 days from warranty coverage. 3. Expenses for travel and transportation for repairs. The removal and reinstallation of your major ... operated and maintained according to instructions attached to or furnished with the product, Whirlpool Corporation or Whirlpool Canada LP (hereafter "Whirlpool") will need to know your complete model number and serial number. Service must provide proof of purchase or installation date for other damage to the...
...your major appliance for product service if your major appliance is located in materials or workmanship and is reported to Whirlpool within 30 days from warranty coverage. 3. Expenses for travel and transportation for repairs. The removal and reinstallation of your major ... operated and maintained according to instructions attached to or furnished with the product, Whirlpool Corporation or Whirlpool Canada LP (hereafter "Whirlpool") will need to know your complete model number and serial number. Service must provide proof of purchase or installation date for other damage to the...


